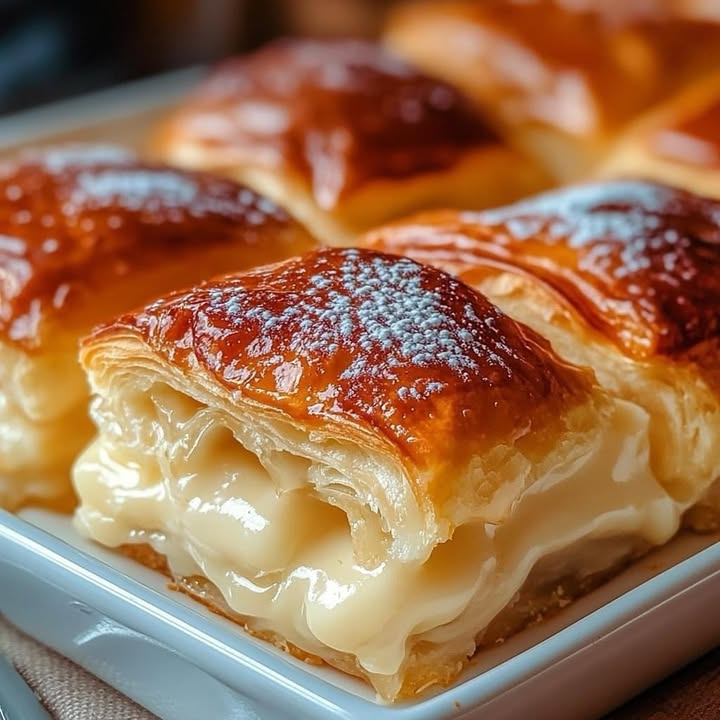
Cheesecake Roll Casserole: Your New Favorite Breakfast Trick
Okay, let me tell you about the morning I accidentally created a family legend. I had a brunch to host and two sad cans of crescent dough staring me down. I also had a serious craving for something cinnamon-y and creamy. What happened next was pure magic in a 9×13 dish. This Cheesecake Roll Casserole is my secret weapon—it looks fancy, tastes like a dream, and is so easy you’ll laugh. It’s the love child of a cinnamon roll and a cheese danish, and it’s about to become your most-requested recipe.
The Story Behind This Easy Casserole
Now, I can’t claim this is a centuries-old family recipe. It’s more of a delicious product of modern kitchen convenience meeting old-fashioned flavor. It takes the classic idea of a sweet, layered pastry—think of those beloved European strudels or American breakfast bakes—and makes it accessible on a busy Tuesday. By using refrigerated crescent dough, we skip the fuss of homemade pastry but keep all the soul-satisfying goodness of butter, cinnamon, and rich cream cheese. It’s a perfect example of how simple ingredients can be transformed into something truly spectacular with just a little creativity and a hot oven.
Why You’ll Adore This Cheesecake Breakfast Bake
You will love this for three big reasons. First, the texture is phenomenal: crispy, buttery layers on top and bottom with that luscious, soft cheesecake center. Second, it’s incredibly simple. If you can unroll dough and use a mixer, you’ve got this. Finally, it’s a versatile crowd-pleaser. Serve it warm for a decadent weekend breakfast, at room temperature for a potluck dessert, or even cold (straight from the fridge, I don’t judge!) for a sweet little treat.
When to Whip Up This Sweet Sensation
This casserole is your answer for almost any gathering. It’s a star at holiday brunches (Easter morning, I’m looking at you!), a guaranteed hit at baby or bridal showers, and the perfect cozy treat for a family breakfast on a slow Saturday. I’ve even brought it to “breakfast for dinner” parties—it always disappears first. It’s that magical dish that feels special but doesn’t keep you chained to the kitchen all day.
What You’ll Need: The Ingredients List
- 2 cans of refrigerated crescent dough (the regular kind, not the sheets)
- 2 blocks of cream cheese (8 oz each), at room temperature
- 1 cup granulated sugar
- 1 teaspoon pure vanilla extract
- 1/4 cup melted butter
- 1 tablespoon ground cinnamon
- 2 tablespoons granulated sugar (for the cinnamon-sugar topping)
Handy Substitutions for Your Pantry
No problem! Here’s how you can adapt:
Crescent Dough: You can use seamless crescent dough sheets for even easier pressing. Puff pastry is a great swap for a flakier result.
Cream Cheese: Use full-fat for the best texture, but reduced-fat will work in a pinch. Avoid fat-free.
Sugar: You can use light brown sugar in the filling for a deeper, caramel-like flavor.
Butter: Salted or unsalted works fine. If using salted, that’s okay—the sweet filling balances it.
Creating Your Cheesecake Roll Masterpiece
Step 1: Preheat and Prepare Your Pan
Start by firing up your oven to 350°F (175°C). This ensures it’s perfectly hot when your casserole is ready to go. Grab your trusty 9×13-inch baking dish. Now, give it a good coat of non-stick spray, butter, or a light brush of oil. This little step is your insurance policy for those beautiful, golden squares sliding out without a fight later. Pro tip: I like to use the butter wrapper from my stick of butter to grease the pan—no waste!
Step 2: Lay the First Buttery Foundation
Open that first can of crescent dough. You’ll hear that satisfying pop and get a whiff of that bakery-fresh scent. Unroll it right into the bottom of your prepared pan. Now, use your fingers to gently press and seal all the seams together. You’re creating one solid, even layer of dough. Don’t stress perfection here, just make sure there aren’t any giant gaps. This layer will soak up the creamy filling and become wonderfully tender.
Step 3: Whip Up the Dreamy Cheesecake Filling
This is the heart of the dish! In a mixing bowl, plop in your softened cream cheese blocks. They should be so soft that your mixer beaters glide through them. Add the full cup of sugar and that teaspoon of fragrant vanilla. Beat it on medium speed until the mixture is completely smooth, creamy, and lump-free. You’ll see it turn a lovely pale ivory color. Spread this heavenly filling evenly over your dough layer, going all the way to the edges.
Step 4: Seal in the Goodness with the Top Layer
Time for the second can of dough! Unroll it directly over the cream cheese layer. Again, press and pinch the seams together to form a solid top crust. Gently press down the edges all around the pan to seal in that creamy filling. This top layer will puff up and become beautifully golden and crispy, creating a fantastic contrast with the soft middle.
Step 5: The Buttery, Cinnamon-Sugar Finish
Take your melted butter and, using a pastry brush or the back of a spoon, brush it generously all over the top dough layer. In a small bowl, mix together the cinnamon and the 2 tablespoons of sugar. Now, sprinkle this mixture evenly over the buttered dough. The butter helps the cinnamon-sugar stick and creates that irresistible, sparkly, crackly top. Your kitchen already smells incredible.
Step 6: Bake to Golden Perfection
Carefully place your creation in the preheated oven. Bake for about 25-30 minutes. You’re looking for a deep, golden-brown top and the edges to be pulling away slightly from the pan. The center should be set, not jiggly. Chef’s tip: Ovens vary, so start checking at 25 minutes. If the top is browning too fast, you can loosely tent it with foil for the last few minutes.
Step 7: The (Hardest Part) Rest and Serve
I know it’s tempting, but you must let it cool! Allow the casserole to rest in the pan for at least 20 minutes. This lets the creamy filling set so you can cut clean squares. Then, slice it up and serve. For an extra touch of sweetness, I love a light drizzle of honey or a dusting of powdered sugar. Enjoy it warm, when the filling is still a little soft and dreamy.
Timing is Everything
Prep Time: 15 minutes
Cook Time: 30 minutes
Cooling Time: 20 minutes
Total Time: About 1 hour 5 minutes
My Chef’s Secret for the Best Casserole
For an extra flavor boost, add just a tiny pinch of salt (about 1/8 teaspoon) to your cream cheese filling. It sounds odd, but it makes the vanilla and sweetness pop in the most amazing way. It’s my little secret for a more rounded and professional taste.
A Fun Fact About Cream Cheese
Did you know cream cheese was first made in New York in 1872 by a dairyman named William Lawrence? He was actually trying to make a French cheese called Neufchâtel and accidentally created the richer, creamier spread we know and love today. So every time you use it, you’re baking with a happy accident!
Tools You’ll Need for the Job
- 9×13 inch baking dish
- Mixing bowl and electric hand mixer or stand mixer
- Measuring cups and spoons
- Pastry brush or small spoon
- Spatula
- Small bowl for cinnamon-sugar mix
Storing Your Leftover Casserole
Once fully cooled, cover the baking dish tightly with plastic wrap or aluminum foil. You can store it right in the pan in the refrigerator. It will stay fresh and delicious for up to 3-4 days.
For longer storage, this casserole freezes beautifully! Cut it into individual squares and wrap each one tightly in plastic wrap, then place them in a freezer bag. They can be frozen for up to 2 months. This is perfect for having a ready-to-go breakfast or dessert on hand.
To reheat, simply thaw a square overnight in the fridge (if frozen) and warm it in the microwave for 20-30 seconds, or in a 300°F oven for about 10 minutes until warmed through. The oven method will help crisp up the top again.
My Best Tips and Advice for You
Room temperature cream cheese is non-negotiable. It’s the key to a smooth, lump-free filling. If you forget, you can soften the blocks (in their foil) in a bowl of warm water for 10-15 minutes.
Don’t overbeat the filling. Just mix until smooth. Overbeating can incorporate too much air and change the texture.
Let it cool before cutting. I promise it’s worth the wait. Cutting too soon leads to a messy, runny slice.
Presentation Tips to Impress Your Guests
- Serve on a platter with fresh berries like strawberries or raspberries on the side.
- Drizzle plates with a simple vanilla glaze (powdered sugar + milk + vanilla) or a caramel sauce before placing the square.
- Add a dollop of freshly whipped cream or a scoop of vanilla ice cream for a dessert presentation.
- Sprinkle with a little extra cinnamon or chopped nuts like pecans right before serving.
Healthier Twist Ideas for This Casserole
Want to lighten it up? Here are six simple variations:
- Whole Grain Swap: Use whole-wheat crescent roll dough if you can find it. The nutty flavor pairs wonderfully with the cinnamon.
- Reduced Sugar: Try cutting the sugar in the filling to 3/4 cup. The cream cheese and vanilla still shine through beautifully.
- Fruit-Filled Delight: After spreading the cream cheese, add a thin layer of your favorite fruit preserves (like raspberry or blueberry) or a sprinkle of fresh blueberries.
- Nutty Crunch: Mix chopped walnuts or pecans into the cinnamon-sugar topping before sprinkling for added texture and healthy fats.
- Dairy Alternatives: Use a plant-based cream cheese and butter alternative for a dairy-free version. Check that your crescent dough is also dairy-free.
- Portion Control: Bake the casserole in a muffin tin for individual, perfectly portioned “cheesecake roll cups.” Just reduce the baking time.
Common Mistakes to Avoid
Mistake 1: Using Cold Cream Cheese
This is the #1 reason for a lumpy, uneven filling. Cold cream cheese will not blend smoothly with the sugar, no matter how long you mix. You’ll end up with chunks of plain cream cheese in your sweet filling. To avoid this, take the cream cheese out of the fridge at least an hour before you start baking. When you press your finger into it, it should leave a deep indent.
Mistake 2: Skipping the Sealing Step on the Dough
If you just lay the crescent triangles down without pressing the seams, the cream cheese filling will leak through the gaps during baking. This can cause the bottom layer to become soggy and make the casserole hard to slice. Take that extra 60 seconds to pinch and press the dough together firmly. You’re creating a solid barrier for that yummy filling.
Mistake 3: Cutting the Casserole While It’s Hot
I know the aroma is irresistible, but cutting in too soon is a recipe for a gooey mess. The filling hasn’t set yet, so it will ooze out everywhere, and the layers won’t hold their shape. Be patient. Letting it cool for 20 minutes allows everything to firm up, giving you those perfect, clean squares that look as good as they taste.
Mistake 4: Overbaking Until It’s Dry
We’re going for golden brown, not dark brown and crispy all the way through. Overbaking will dry out the dough layers and can make the cream cheese filling rubbery. Set a timer for 25 minutes and check. The top should be golden, and the center should look set but may still have a slight, gentle wobble. It will continue to cook a bit as it cools.
Frequently Asked Questions
Can I make this Cheesecake Roll Casserole the night before?
Yes, you can prepare it ahead! Assemble the entire casserole right up to the point of baking (through the cinnamon-sugar sprinkle). Then, cover it tightly with plastic wrap and refrigerate overnight. In the morning, just take it out while the oven preheats (let it sit for about 20-30 minutes to take the chill off) and then bake as directed. You might need to add 3-5 extra minutes to the baking time since it’s starting from cold.
Can I use a different size pan?
You can, but the results will change. A 9×13 is ideal. A smaller pan will make the casserole thicker, requiring a longer bake time, and you risk the center not setting before the top burns. A larger, shallower pan will make the layers too thin, leading to overbaking quickly. I really recommend sticking with the standard 9×13-inch baking dish for the best texture and baking time.
My filling is runny after baking. What went wrong?
A runny filling usually points to two things. First, the cream cheese might not have been at true room temperature, leading to an uneven mix that didn’t set properly. Second, the casserole might not have baked long enough. The center should look set and not jiggle like liquid when you gently shake the pan. Make sure your oven temperature is accurate with an oven thermometer for best results.
Can I add fruit like apples or blueberries to this recipe?
Absolutely! Adding fruit is a wonderful variation. For apples, I suggest thinly slicing or dicing them and sautéing with a little butter and cinnamon until slightly softened before cooling and scattering over the cream cheese layer. For fresh berries like blueberries, just rinse, dry well, and sprinkle a cup over the filling before adding the top dough layer. The berries will burst and create a jammy layer—it’s delicious!
Is there a way to make this less sweet?
You can easily reduce the sugar to suit your taste. Try using 3/4 cup of sugar in the filling instead of a full cup. The cream cheese and vanilla will still provide plenty of flavor. You can also reduce the cinnamon-sugar topping to just 1 tablespoon of sugar mixed with the cinnamon, or even omit it entirely and just brush with butter for a less sweet, more buttery top.
Can I use homemade dough instead of canned?
You certainly can if you’re feeling ambitious! A simple homemade sweet dough or even a portion of your favorite cinnamon roll dough would work beautifully. Roll it out to fit the pan size. Just keep in mind that using a yeast-based dough will require a rise time, making the recipe much longer from start to finish. The canned dough is all about speed and ease.
How do I know when it’s done baking?
Look for three key signs: First, the top should be a beautiful, even golden brown. Second, the edges of the casserole will be pulling away slightly from the sides of the pan. Third, and most important, the center should appear set. If you give the pan a gentle nudge, there should be no liquid-like jiggle in the middle, just a slight, firm wobble. A toothpick inserted in the center should come out mostly clean, perhaps with a few moist crumbs.
What’s the best way to reheat leftovers?
The microwave is fastest (20-30 seconds per square) but can soften the crisp top. For the best texture, reheat in a toaster oven or regular oven at 300°F for about 8-10 minutes. This will warm it through and re-crisp the top layer beautifully. If reheating from frozen, thaw in the fridge first, then use the oven method.
Can I double this recipe?
Doubling is tricky because of the pan size. Instead of trying to fit it all in one giant pan, I recommend making two separate casseroles. Simply double all the ingredients and prepare two 9×13 pans side-by-side. This ensures even baking and perfect texture. It’s a fantastic plan for feeding a big crowd at a holiday gathering or party.
Why did my top layer puff up into a giant dome?
This happens sometimes with crescent dough because it’s designed to separate and puff. To minimize doming, make sure you’ve pressed the top layer of dough firmly and evenly over the filling, sealing it to the edges. You can also use the tines of a fork to prick the top layer lightly all over before adding the butter and cinnamon-sugar. This creates tiny steam vents and helps it bake more flatly.
The Final Slice
There you have it—my go-to recipe for a breakfast or dessert that feels like a hug. This Cheesecake Roll Casserole is more than just a recipe; it’s a guaranteed way to make people smile. It’s forgiving, flexible, and full of comfort. Trust me, once you make it and see those faces light up after the first bite, you’ll understand why it’s always on my menu. Now go preheat that oven and get ready for the compliments to roll in. Happy baking!
Chocolate Milk Buns
Ingredients
Equipment
Method
- Preheat your oven to 350°F (175°C) and prepare a 9x13-inch baking dish with non-stick spray or butter.
- Open the first can of crescent dough, unroll it into the bottom of the pan, pressing and sealing the seams together.
- In a mixing bowl, combine softened cream cheese, sugar, and vanilla. Beat until smooth and creamy, then spread evenly over the dough layer.
- Unroll the second can of dough over the cream cheese filling, pressing seams together to seal it in.
- Brush the top dough layer with melted butter, then sprinkle the cinnamon-sugar mixture evenly on top.
- Bake for 25-30 minutes until the top is golden-brown and the edges have pulled away from the pan.
- Allow it to cool for at least 20 minutes before slicing and serving.