Introduction to Jo’s Rosemary Bread
There’s nothing better than the smell of fresh bread in the kitchen. Jo’s Rosemary Bread is simple yet full of flavor. It’s become a staple in my house because it’s easy to make and wows guests. Whether you’re new to baking or a pro, this bread will quickly become your favorite.
The Story Behind Jo’s Rosemary Bread
I found this recipe during a trip to a small Italian village. Locals served herb-infused bread with every meal. Back home, I adjusted it to highlight rosemary’s earthy scent. Now, it’s a family go-to. My kids love kneading the dough—it’s a fun way to bond.
Why You’ll Love This Recipe
This bread balances flavors perfectly. The rosemary adds a fragrant touch, while the crust stays crisp and golden. Best part? It’s easy. With a few ingredients and some patience, you’ll have bakery-quality bread on your table.
Perfect Occasions for Jo’s Rosemary Bread
Serve this bread at dinner parties, holiday meals, or cozy family dinners. It pairs well with soups, salads, or as a snack with olive oil. Toast slices for breakfast and top them with butter or avocado.
Ingredients for Jo’s Rosemary Bread
- 4 cups all-purpose flour
- 2 teaspoons salt
- 1 packet (2 ¼ teaspoons) active dry yeast
- 1 ½ cups warm water (about 110°F)
- 3 tablespoons olive oil
- 2 tablespoons chopped fresh rosemary
Substitution Options
No fresh rosemary? Use dried—just halve the amount. Swap all-purpose flour for whole wheat if you want a healthier twist. Coconut oil works too, but stick to mild oils to let the rosemary shine.
Step 1: Mixing Dry Ingredients
In a large bowl, mix the flour, salt, and yeast. Stir well to avoid clumps. Pro tip: Use a whisk to blend everything before adding liquids.
Step 2: Adding Liquids
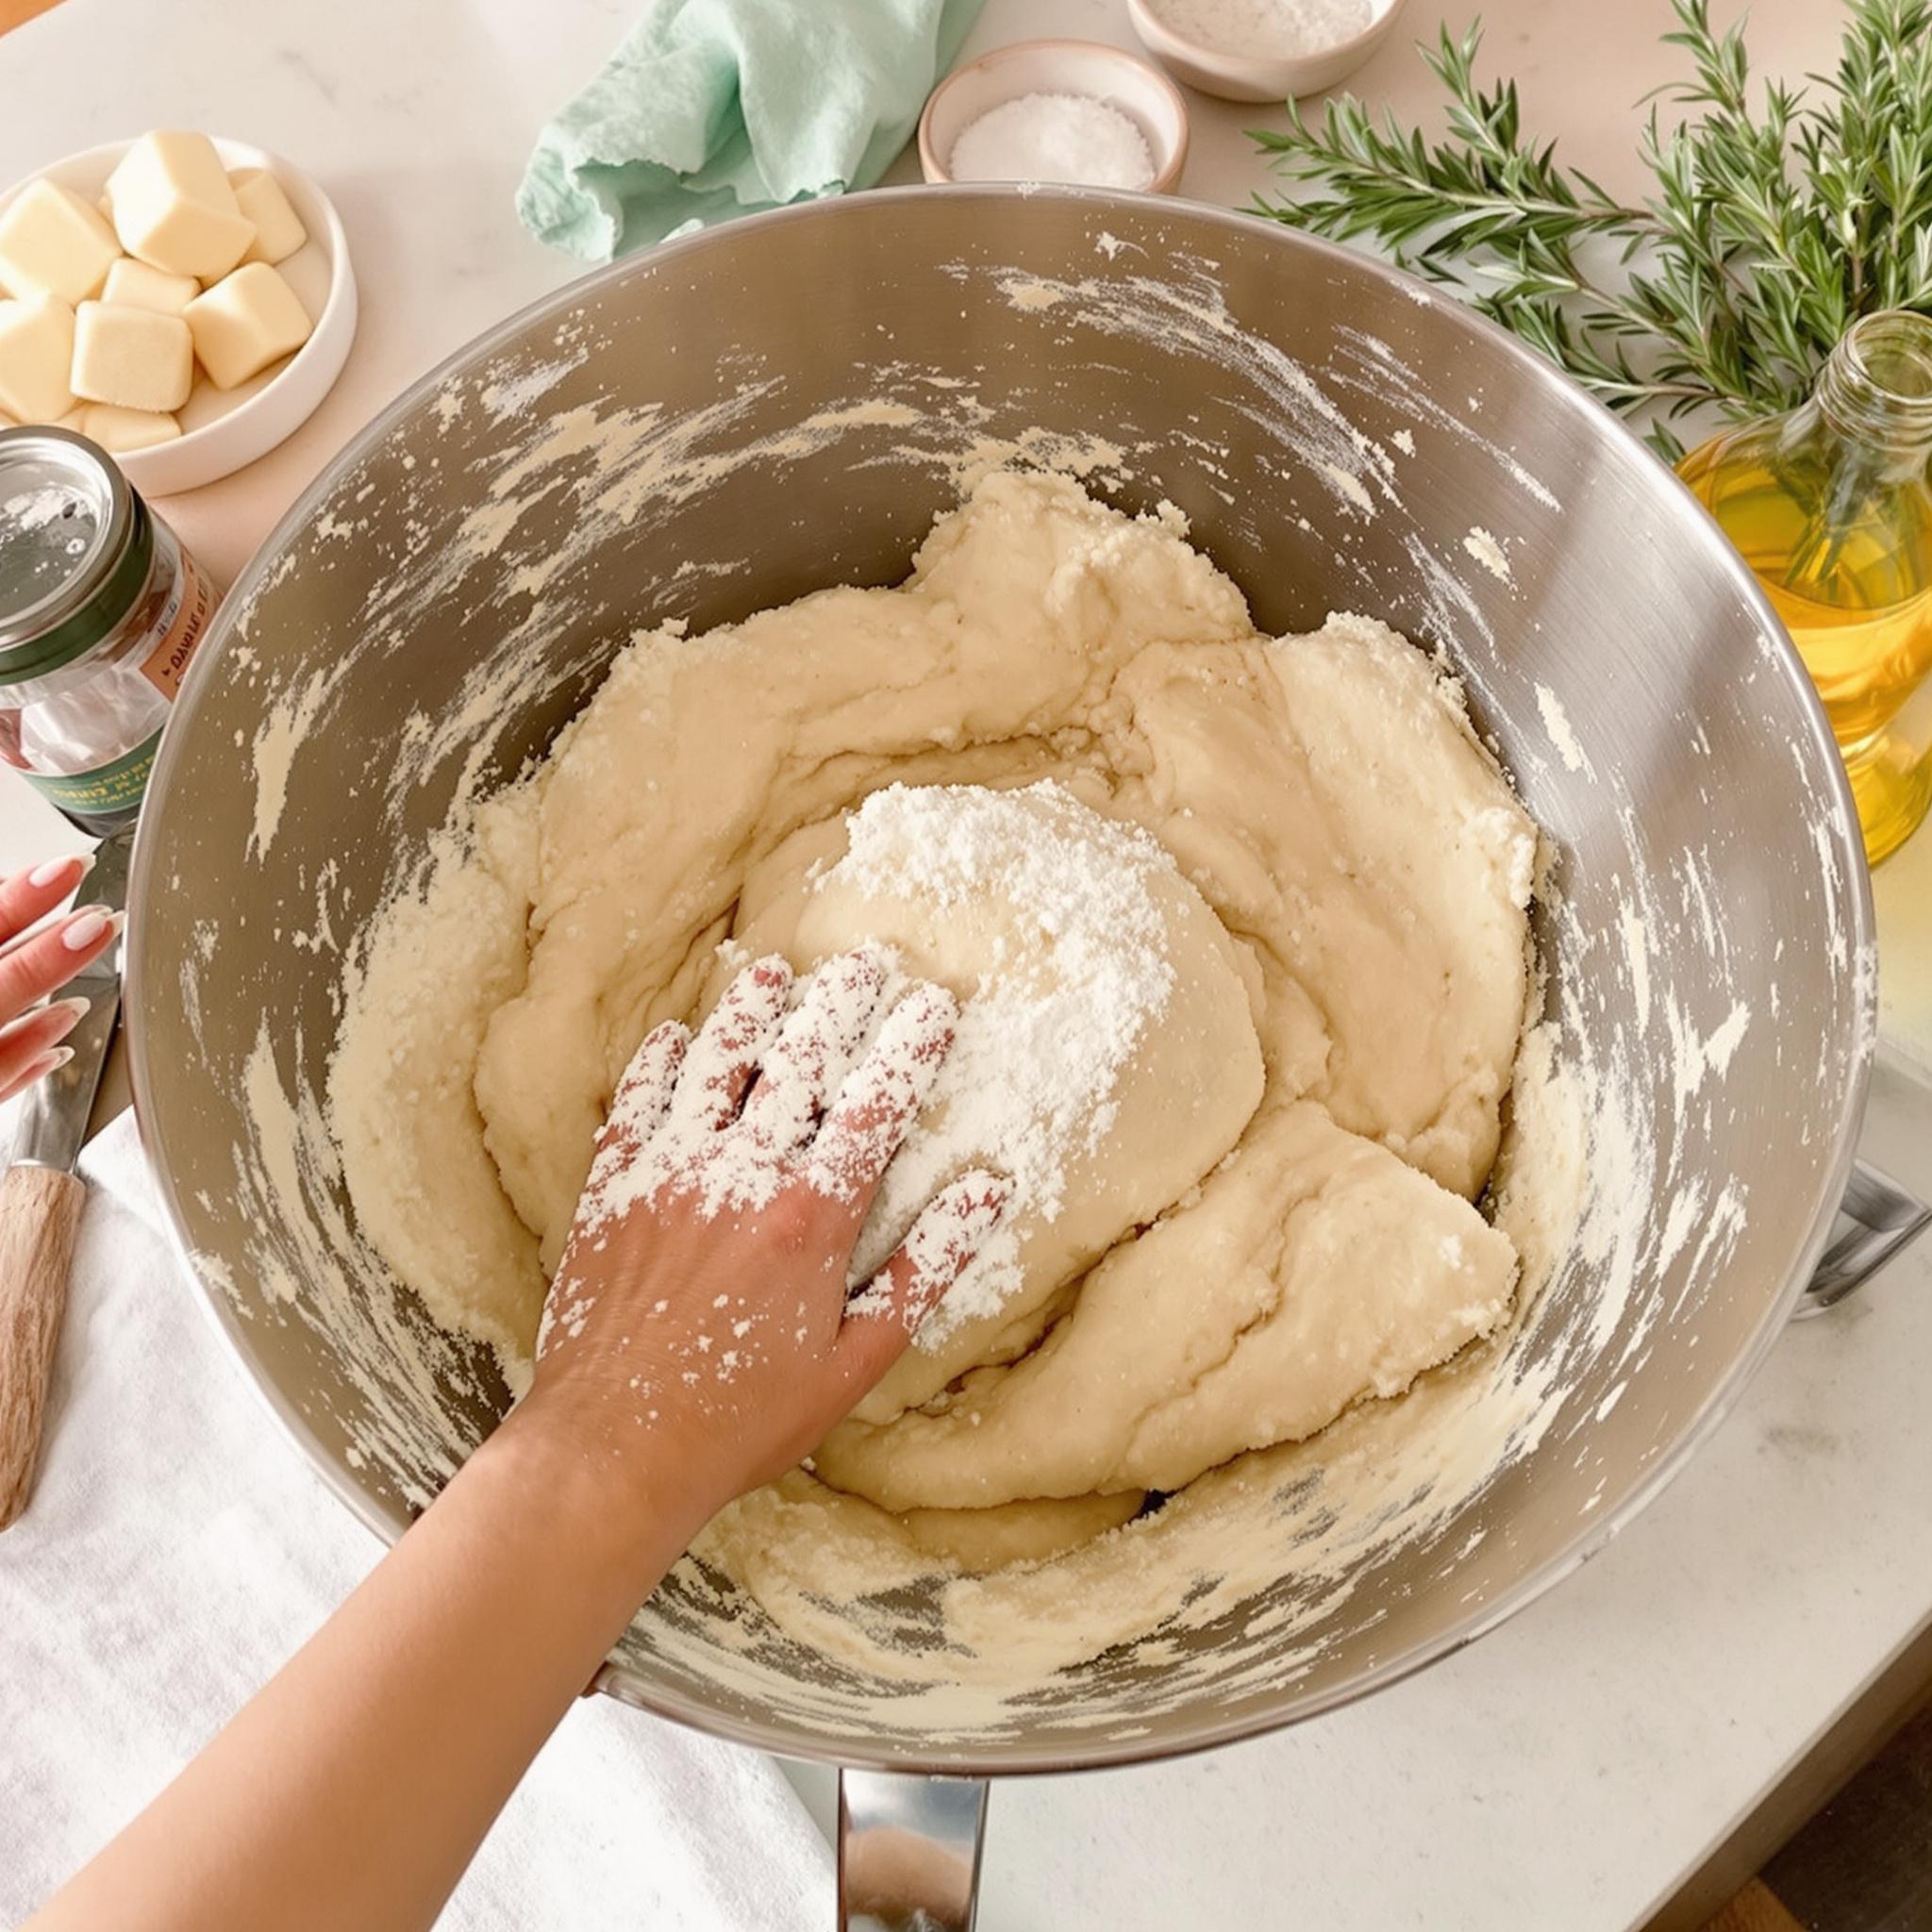
Pour in the warm water and olive oil. Mix until the dough comes together. It should feel slightly sticky but not too wet. Adjust water or flour as needed.
Step 3: Kneading with Rosemary
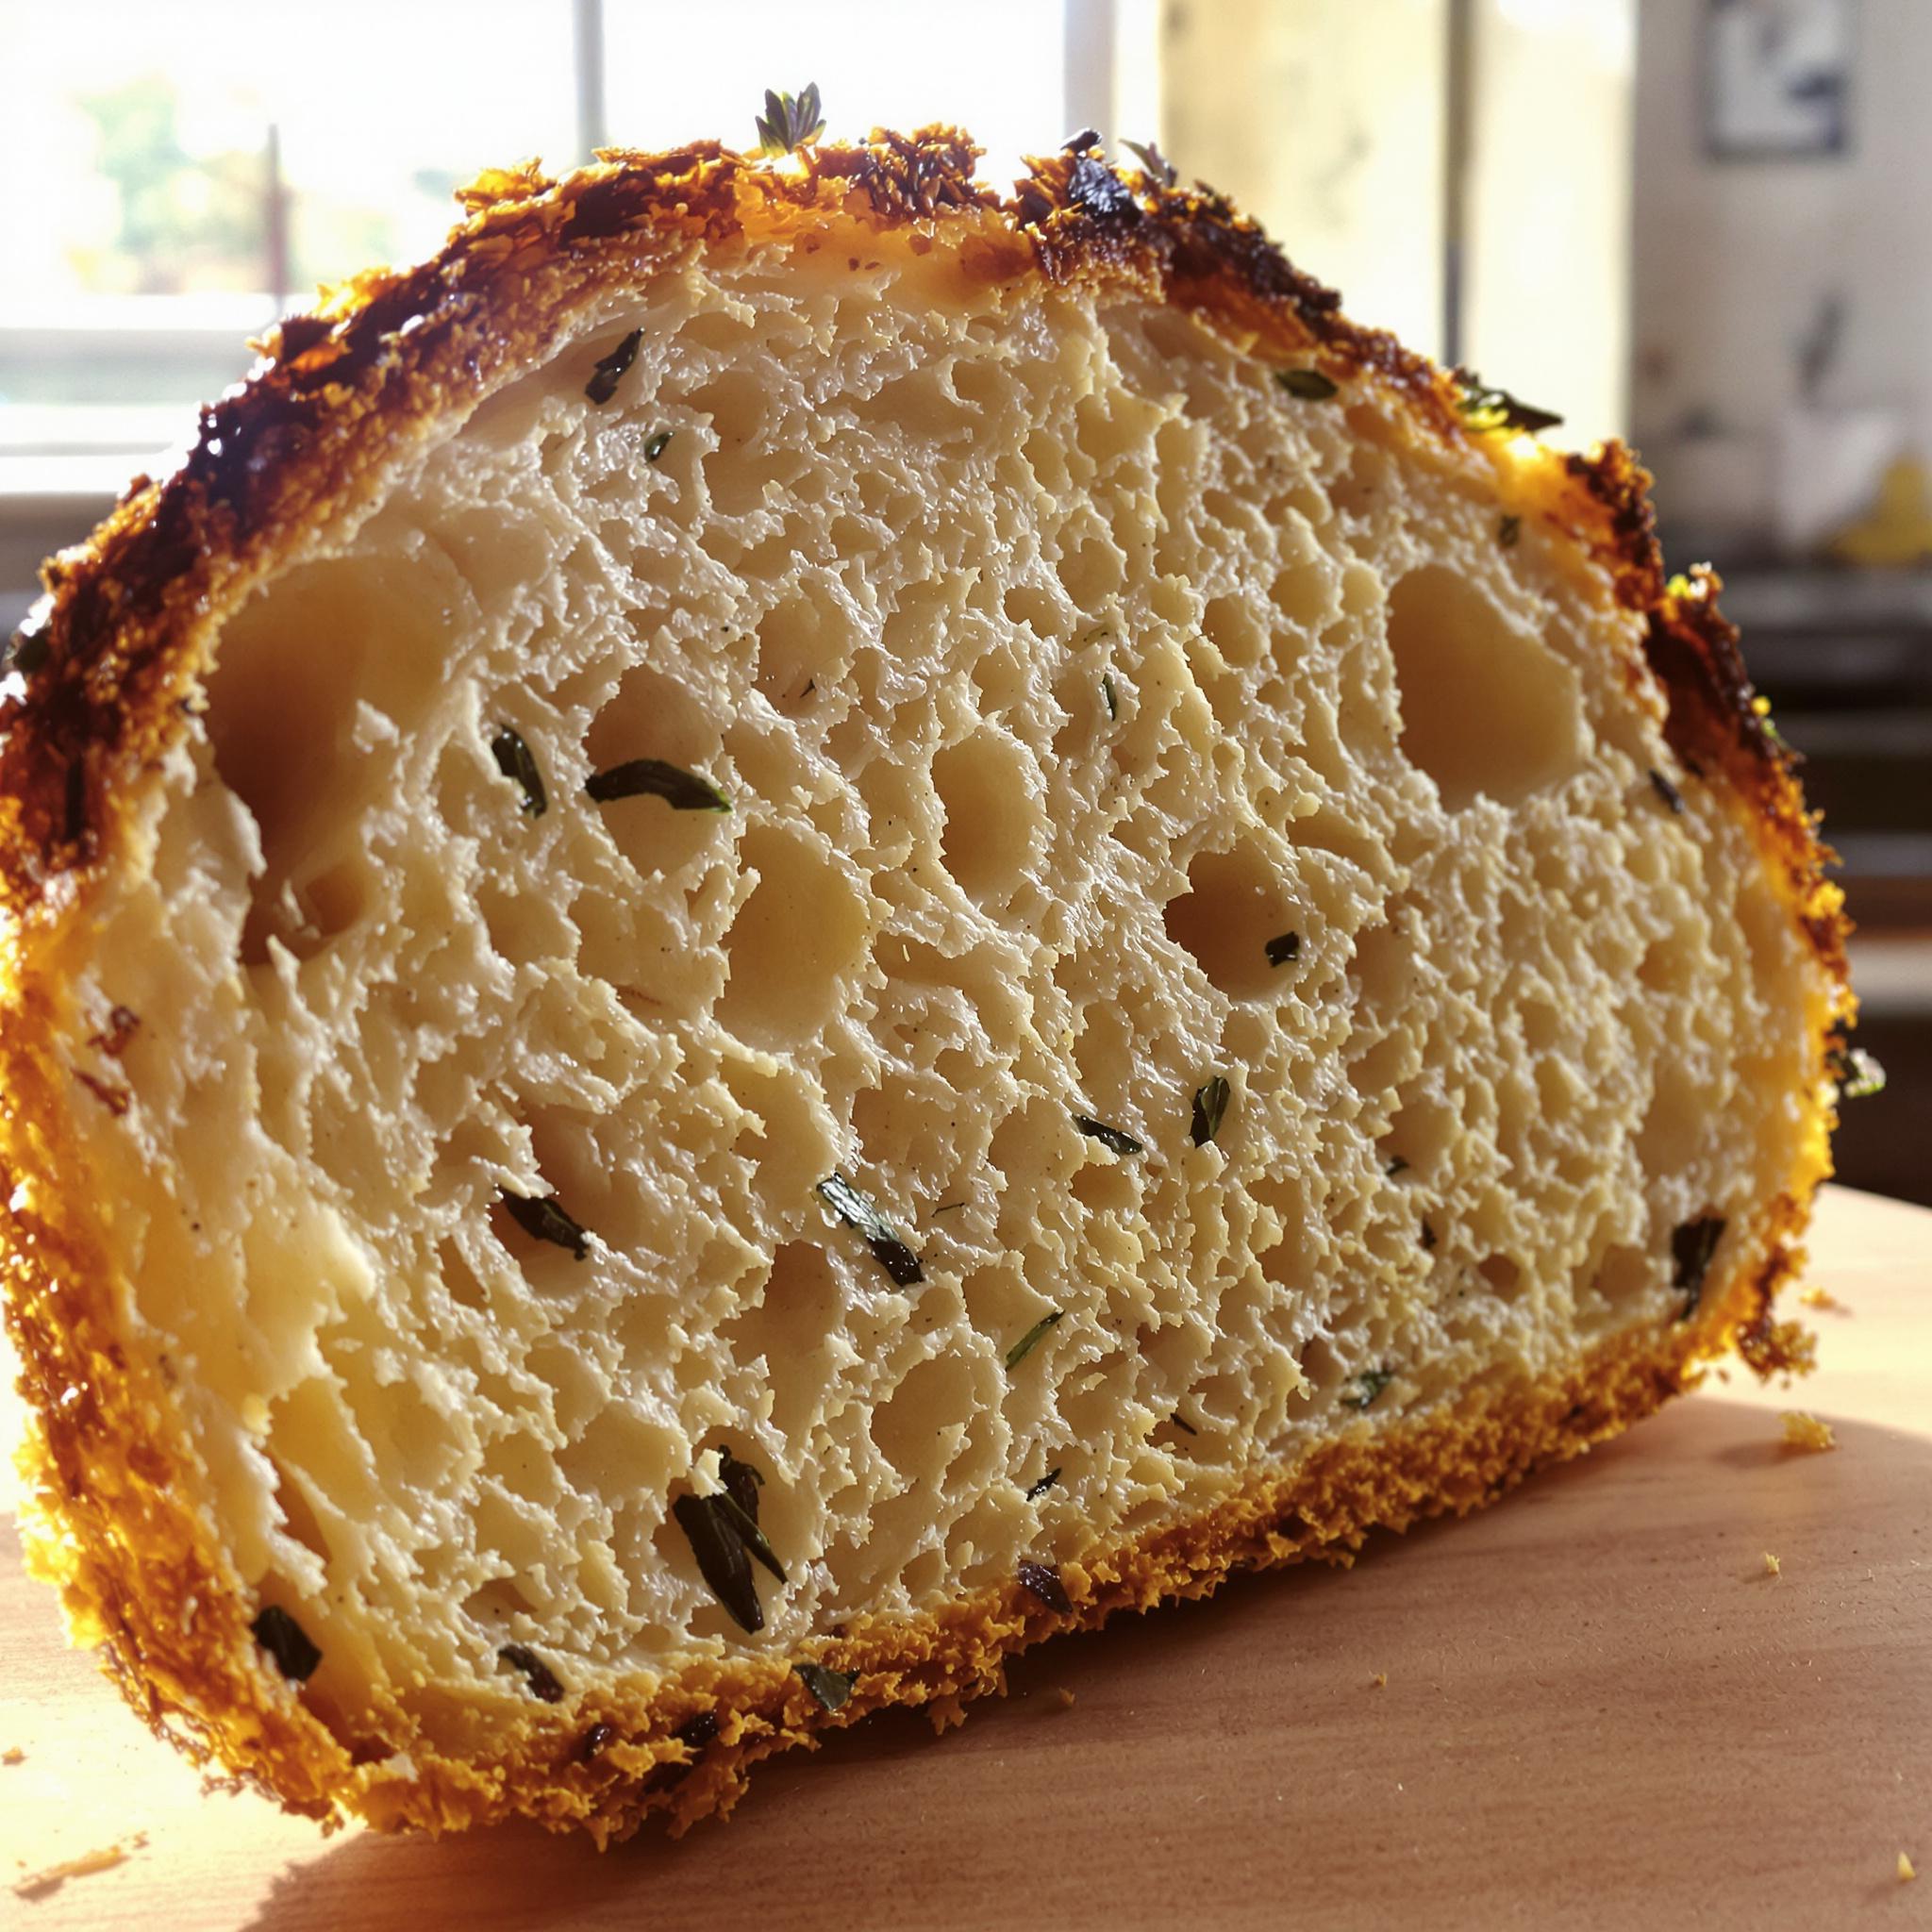
Add chopped rosemary to the dough. Knead for about 10 minutes until smooth and elastic. As you work, the dough gets springy, and the rosemary fills your kitchen with a lovely scent.
Step 4: Letting Dough Rise
Place the dough in a greased bowl, cover it with a damp cloth, and let it rest in a warm spot. Wait 1-2 hours until it doubles in size. Patience pays off—the rise makes the bread light and airy.
Step 5: Shaping and Baking
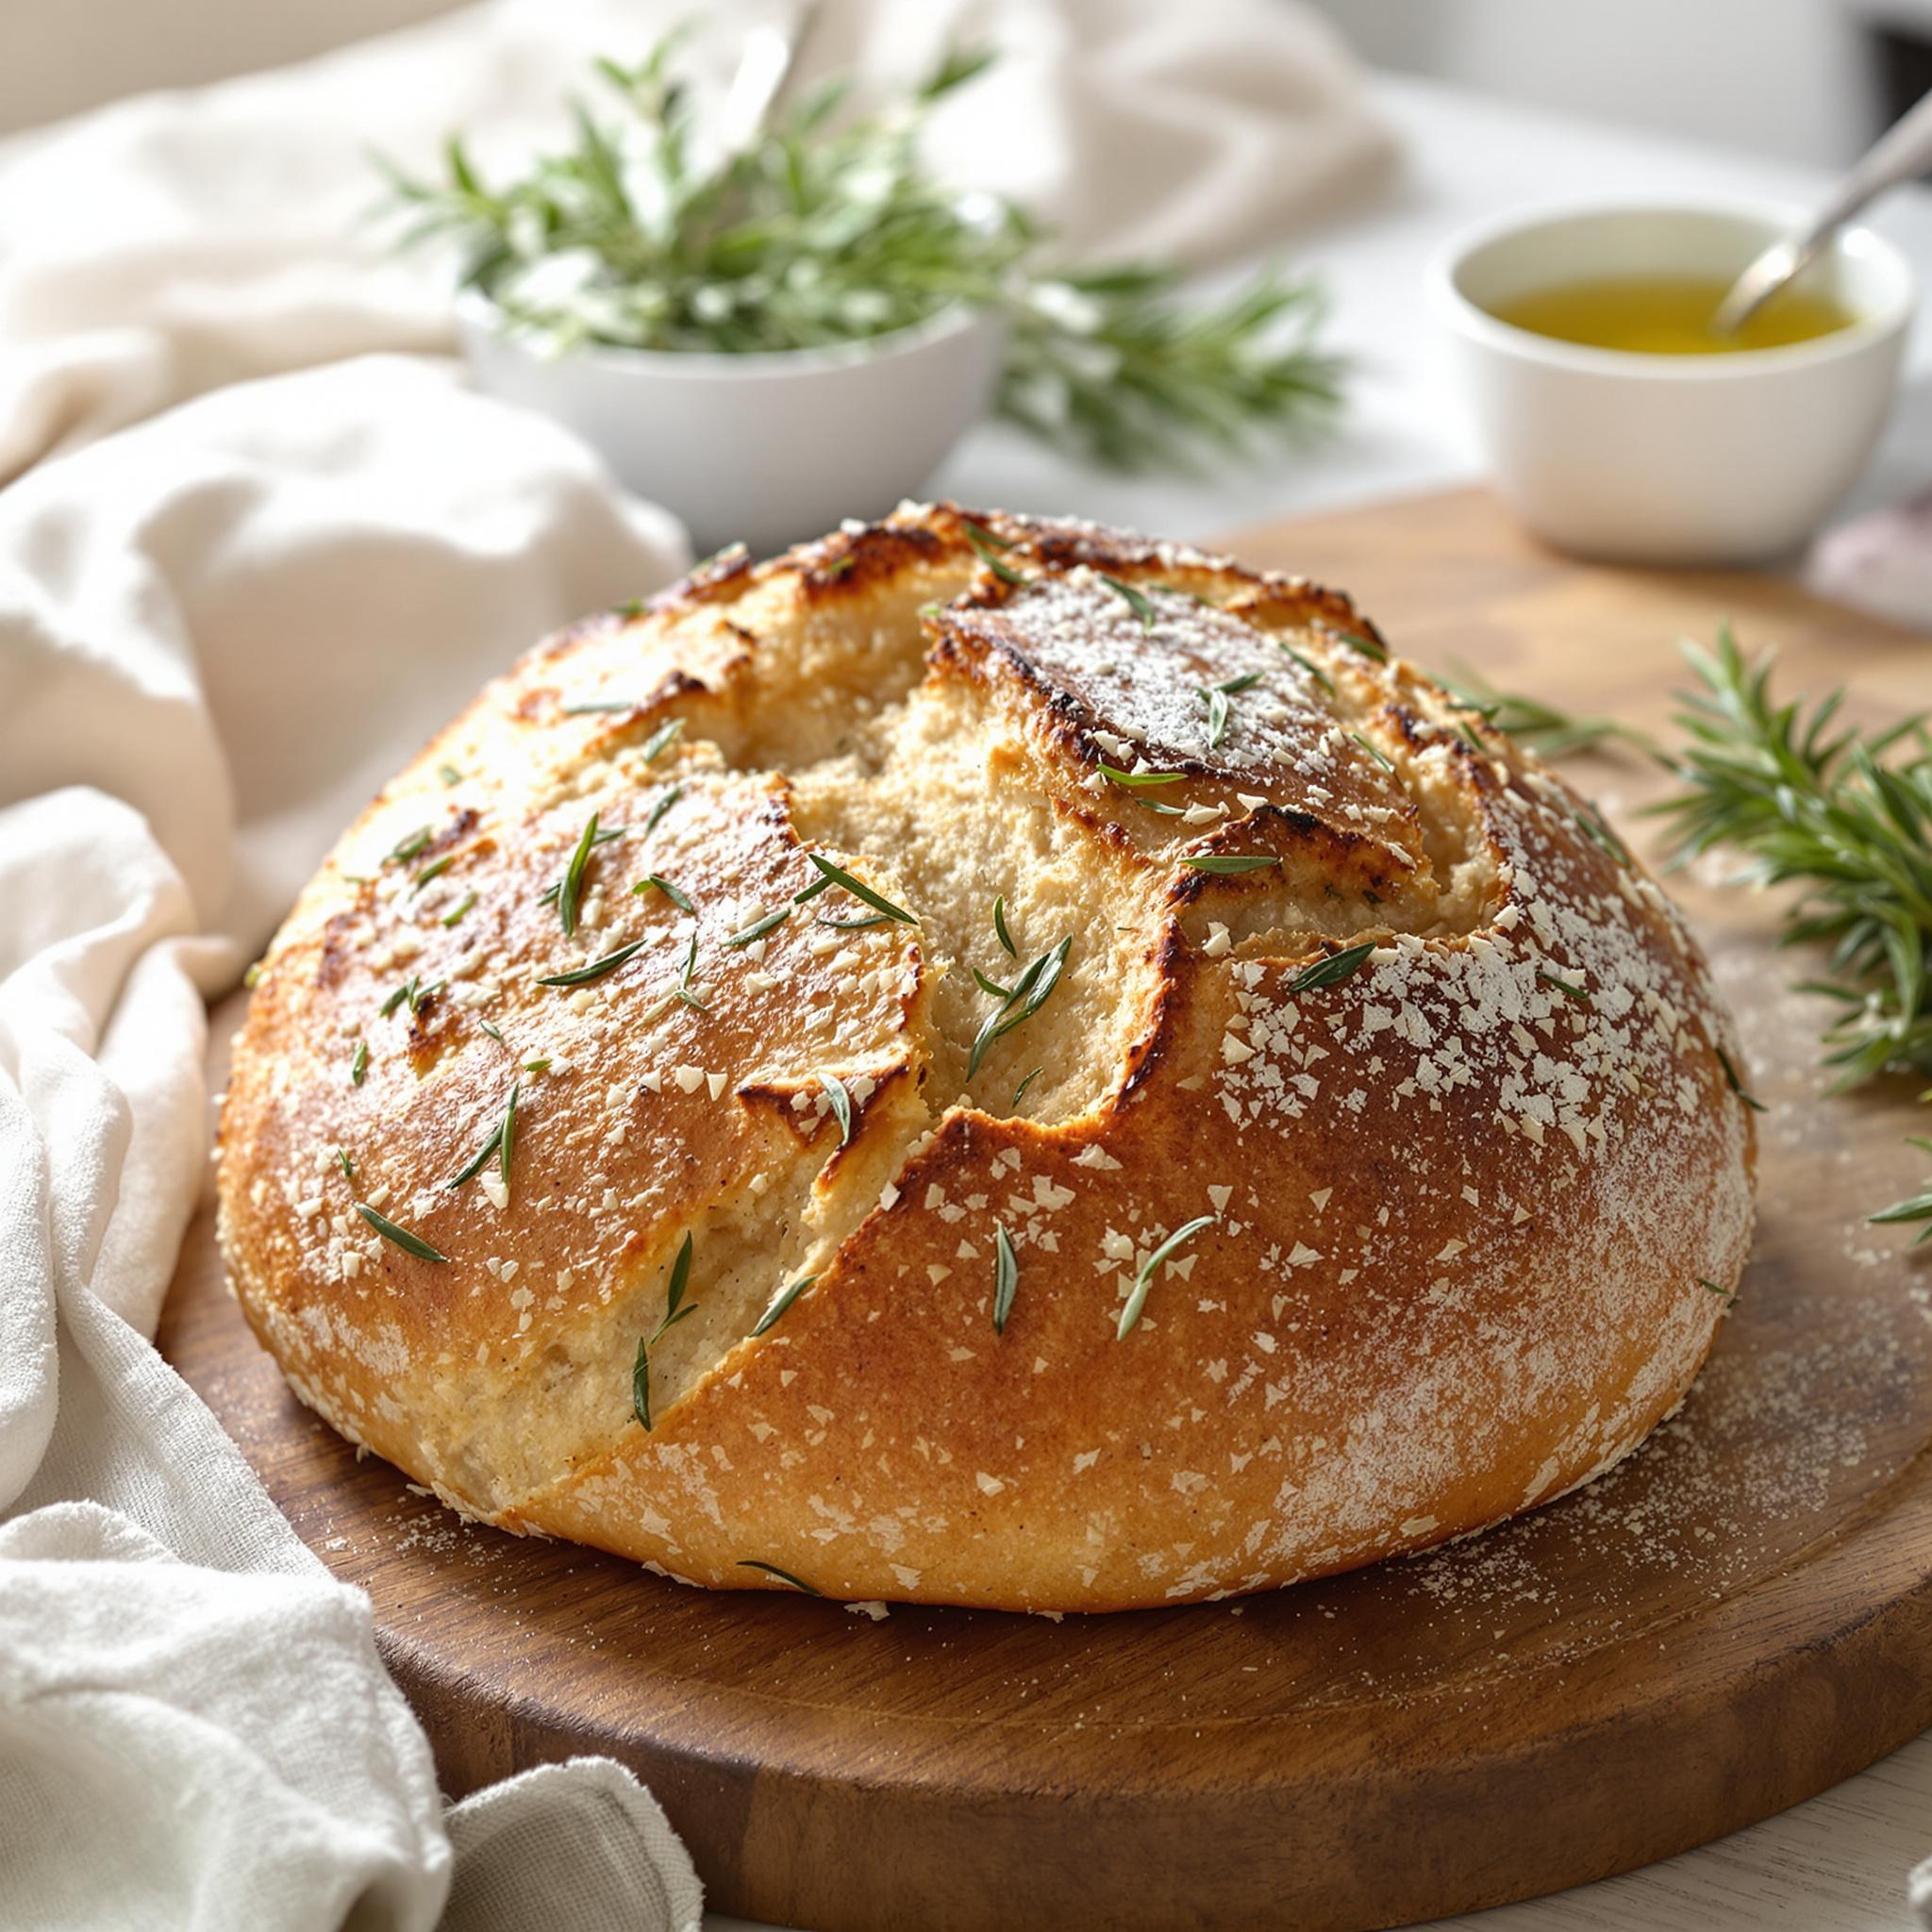
Shape the risen dough into a loaf and place it on a baking sheet. Bake at 400°F for 25-30 minutes until golden brown. Tap the bottom—it should sound hollow when done. The smell will make you hungry!
Chef’s Tip for Jo’s Rosemary Bread
Brush the baked loaf with melted butter mixed with minced garlic. It adds richness and gives the crust a glossy finish.
Time Required for Jo’s Rosemary Bread
- Prep Time: 20 minutes
- Rising Time: 1-2 hours
- Baking Time: 25-30 minutes
- Total Time: About 2.5-3 hours
Nutritional Information
Per slice (assuming 12 slices per loaf): Calories: 180, Protein: 4g, Fat: 3g, Carbs: 32g, Fiber: 1g.
Extra Information
Rosemary isn’t just tasty—it’s packed with antioxidants. Ancient Greeks thought it boosted memory. Maybe baking this bread will sharpen your skills!
Necessary Tools
- Large mixing bowl
- Measuring cups and spoons
- Baking sheet
- Oven
- Kitchen towel
Storage Instructions
To keep your bread fresh, store it in a paper bag or bread box. Avoid plastic bags—they trap moisture and make the crust soggy. For long-term storage, wrap it in foil and freeze for up to 3 months. Thaw and reheat in the oven for a crispy finish.
If you live in a humid area, store leftovers in the fridge. Just reheat slices to restore texture. Never leave bread uncovered—it dries out fast. Slice only what you need to keep it fresher longer.
Tips and Tricks
Use filtered water for better yeast activation. Don’t rush the rise—cooler temps take longer but improve flavor. Score the top before baking for a pro look.
Serving Suggestions
- Serve warm with olive oil and balsamic vinegar for dipping.
- Pair with soups like tomato basil or creamy mushroom.
Healthier Alternatives for Jo’s Rosemary Bread
Here are six ways to tweak this recipe:
- Whole Wheat Version: Replace half the flour with whole wheat for added fiber.
- Gluten-Free Option: Use a gluten-free flour blend designed for yeast breads.
- Low-Sodium Twist: Cut the salt in half without losing flavor.
- Olive Oil Boost: Add an extra tablespoon of olive oil for healthy fats.
- Herb Medley: Try thyme or oregano alongside rosemary.
- Sweet Touch: Add honey to the dough for a hint of sweetness.
Common Mistakes to Avoid
Mistake 1: Using Cold Water
Yeast needs warmth to activate. Cold water slows things down, leading to dense bread. Aim for lukewarm water around 110°F.
Mistake 2: Overmixing the Dough
Overmixing makes bread tough. Stop once the dough feels smooth and elastic. Trust your gut and don’t overwork it.
Mistake 3: Skipping the Rise
Don’t rush the rising step. Proper fermentation builds flavor and texture. Find a draft-free spot and give it time to double.
Frequently Asked Questions
Can I use instant yeast instead of active dry?
Yes, swap them 1:1. Instant yeast doesn’t need proofing, so mix it directly with the dry ingredients.
How do I know if the dough has risen enough?
Poke it gently. If the dent stays, it’s ready. If it springs back, let it rest longer.
What if my bread tastes bland?
Check your salt measurement. Salt boosts flavor, so skipping it makes bread flat.
Can I freeze the dough?
Absolutely. After the first rise, shape the dough, wrap it tightly, and freeze. Thaw overnight in the fridge before baking.
Why is my crust too hard?
Bake at the right temperature and avoid overcooking. A lower temp yields softer results.
Is there a dairy-free version?
This recipe is naturally dairy-free. Just ensure substitutes like butter alternatives are plant-based.
How long does the bread stay fresh?
Stored properly, it lasts 2-3 days. Beyond that, freezing is best.
Can I add cheese?
Yes! Fold shredded Parmesan into the dough for a cheesy twist.
What if I don’t have a stand mixer?
No problem. Hand-kneading works fine—it’s good exercise too!
Why did my bread collapse?
It likely rose too long or in a hot spot. Keep an eye on it and avoid drafts.
Conclusion
Jo’s Rosemary Bread is versatile and sure to please. Its simplicity and rich aroma make it fun to bake and share. Stick to the classic or try a healthier twist—either way, it’s a winner. Happy baking!
Jo's Rosemary Bread
Ingredients
Equipment
Method
- In a large bowl, combine the flour, salt, and yeast. Stir well to distribute everything evenly.
- Gradually pour in the warm water and olive oil. Mix until the dough starts coming together. Adjust water or flour as needed for the right consistency.
- Sprinkle chopped rosemary into the dough. Knead for about 10 minutes until smooth and elastic.
- Place the dough in a greased bowl, cover it with a damp cloth, and set aside in a warm spot for 1-2 hours.
- Shape the risen dough into a loaf and place it on a baking sheet. Bake in a preheated oven at 400°F for 25-30 minutes until golden brown.