My New Favorite Frozen Treat: Pecan Brownie Ice Cream Bars
Can I tell you a secret? I have a major sweet tooth, but I don’t always have hours to spend in the kitchen. These Pecan Brownie Ice Cream Bars are my magical solution. Imagine a rich, chewy, no-bake brownie base made with pecans and dates. Top that with two dreamy layers of creamy ice cream. It’s like a gourmet ice cream sandwich decided to put on its fancy pants. Best part? You’ll only need a food processor and a little freezer time. I made these for a playdate, and the kids (and the moms!) went absolutely wild. It’s my new go-to showstopper.
A Sweet Treat That’s Rooted in Simple Joy
We all love a classic brownie and a scoop of ice cream, right? This recipe is a fun, frozen twist on that beloved combo. It pulls inspiration from no-bake energy bites and the timeless Neapolitan ice cream idea – layers of different flavors. My modern spin uses simple, whole ingredients for the base, letting the quality of the ice cream shine. There’s no baking, no fussy tempering of chocolate. It’s about assembly and anticipation. I love that it feels both decadent and a little bit clever. It’s the kind of recipe that makes people ask, “You made this?!” every single time.
Why You’ll Go Nuts for These Ice Cream Bars
This recipe is a winner for so many reasons. First, that brownie base is naturally sweetened and has an amazing fudgy texture from the dates and pecans. Then, you get to play with your favorite ice cream flavors! Vanilla and salted caramel is my favorite duo, but the possibilities are endless. It’s also incredibly forgiving. If your base is a little crumbly, add another date. If the ice cream softens a tad too much, just pop it back in the freezer. They’re perfect for making ahead, which is a lifesaver for busy weekends and surprise guests. It’s a dessert that looks and tastes like you tried much harder than you actually did!
The Perfect Occasion for These Dreamy Bars
These bars are unbelievably versatile. I love them for summer BBQs because they’re cold and refreshing. They’re also fantastic for birthday parties instead of a traditional cake – just pop a candle on top! I’ve brought them to potlucks where they always disappear first. They make a wonderful Friday night family treat to celebrate the weekend. Want to impress your book club or a new neighbor? This is your secret weapon. Honestly, any day that ends with ‘y’ is a good day for a pecan brownie ice cream bar.
What You’ll Need: The Shopping List
Gathering your ingredients is the first step to success. Here’s your simple list:
- For the Brownie Base:
- 1/2 cup (50g) pecans
- 1 Tbsp (7g) coconut flour
- 1/4 cup (25g) raw cacao powder
- A pinch of good-quality salt
- 6-7 (120-140g) soft Medjool dates, pitted
- 1/2 tub (about 1-1.5 cups) of your favorite vanilla ice cream
- 1 full tub (about 2-3 cups) of salted caramel & chocolate chip ice cream
No Stress Swaps: Ingredient Substitutions
Don’t worry if you’re missing something! This recipe is very flexible.
- Pecans: Walnuts or almonds work beautifully.
- Coconut Flour: Almond flour is a great substitute. You could also use an extra tablespoon of cacao powder.
- Raw Cacao: Regular unsweetened cocoa powder works just fine.
- Medjool Dates: If your dates are dry, soak them in warm water for 10 minutes, then drain well before using.
- Ice Cream Flavors: This is where you can get creative! Try mint chocolate chip with fudge ripple, or strawberry with vanilla bean.
Crafting Your Frozen Masterpiece: The Steps
Let’s get our hands dirty (figuratively, of course)!
Step 1: Create the Fudgy Base
First, line a 10-15cm square tin with baking paper. Let the paper overhang the sides a bit. This creates little handles to lift the whole block out later. Now, grab your food processor. Add the pecans, coconut flour, cacao powder, and that pinch of salt. Pulse it several times. You’ll hear a wonderful, crumbly sound. Watch as the nuts break down into a dark, aromatic sand with little pecan flecks. You want everything to look like very fine crumbs. This is your foundation, and that nutty-cocoa smell is already promising something amazing.
Step 2: Bind It with Dates
Here comes the magic! Make sure your Medjool dates have their pits removed. Add them to the food processor. Now, pulse again. At first, it will just look like coarse crumbs. But keep pulsing. You’ll see the mix start to clump together on the sides. It should hold together when you pinch it between your fingers. If it’s too dry and won’t clump, add one more soft date. Once it’s ready, dump the mixture into your lined tin. Use your fingers or the bottom of a glass to press it down firmly and evenly. This compact layer is what gives you a perfect, sliceable bar.
Step 3: Layer on the Creamy Goodness
Take both tubs of ice cream out of the freezer. Scoop them into separate bowls. Let them sit on the counter for 10-15 minutes. You want them soft enough to spread, but not melted. Now, working relatively quickly, spread the softened vanilla ice cream over your brownie base. Use a spoon or a small spatula to create a smooth, even layer. Next, gently scoop the salted caramel ice cream on top. Smooth this into a second beautiful, even layer. Admire your work! You’ve just created a stunning frozen dessert. Now, the hardest part: patience. Place the tin in the freezer for at least 2 hours, or until rock solid.
Step 4: The Grand Reveal and Serve
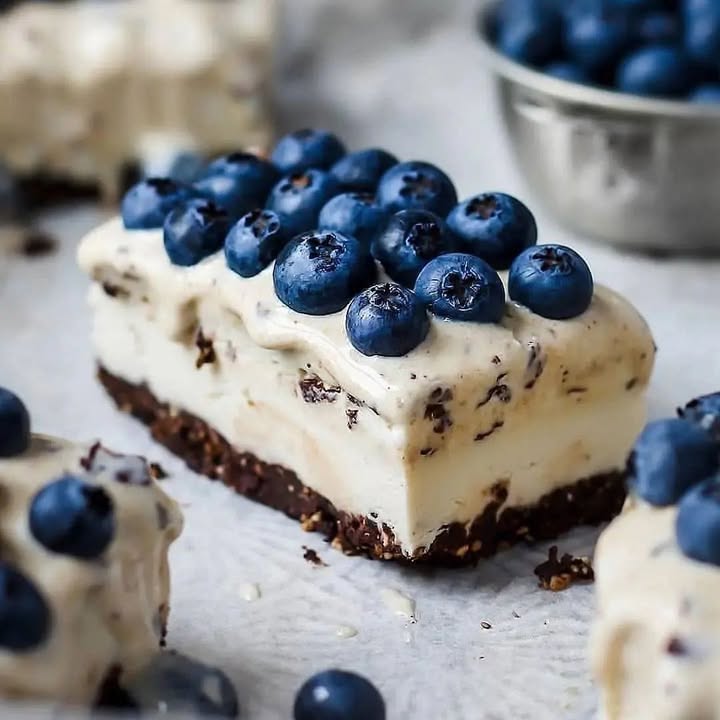
When you’re ready to serve, get excited! Take the tin from the freezer. Be bold here. Carefully run just the *bottom and sides* of the tin under hot water for 10-20 seconds. Do not let any water get inside the tin! This loosens the dessert. Use the paper handles to lift the whole block out onto a cutting board. Grab a sharp knife. For clean cuts, you can run the knife under hot water and dry it quickly. Cut the block into bars or squares. Serve immediately, maybe with a few fresh berries on top. Any extras go straight back into an airtight container in the freezer.
How Long Does This Take?
Let’s break down the timing so you can plan.
- Prep Time: 20 minutes (mostly pulsating and pressing!)
- Freezing Time: 2 hours minimum
- Total Time: About 2 hours and 20 minutes
- Servings: Makes 4-6 generous bars, depending on how you slice them.
My Chef’s Secret for Perfect Bars
My absolute best trick is to use a warm knife. Just before you’re ready to slice the frozen block, fill a tall glass with very hot water. Dip your sharp knife in, wipe it dry with a towel, and make your cut. Repeat for each slice. This glides right through the hard ice cream and gives you those gorgeous, clean-edged bars you see in bakeries. It makes all the difference in presentation!
A Little Nibble of Knowledge
Did you know Medjool dates are often called “nature’s candy”? They’re incredibly sweet all on their own because of their high natural sugar content. This is why they work so perfectly to bind our no-bake brownie base without any added sugar. They provide that wonderful, fudgy chew we love in a brownie. I always keep a stash in my pantry for recipes like this and for a quick, healthy snack straight from the fridge.
Gear You’ll Need to Get Started
You don’t need any fancy equipment for this recipe.
- A food processor (a small one is perfect)
- A 10-15cm square baking tin (or a small loaf pan in a pinch)
- Baking paper (parchment paper)
- A spatula or spoon for spreading
- A sharp knife for slicing
Keeping Your Treats Perfect: Storage Guide
These bars are meant to be stored in the freezer. Once you’ve sliced them, place the bars in a single layer in an airtight container. You can separate layers with baking paper if you need to stack them. Store them in the coldest part of your freezer, usually at the back. They will keep their best texture and flavor for up to 2 weeks.
For the best eating experience, let a bar sit at room temperature for just 2-3 minutes before you bite in. This slight softening makes the brownie base chewy and the ice cream creamy, instead of rock-hard. It’s the ideal texture balance.
If you have leftover base mixture or just want to prep ahead, you can press the base into the tin and freeze it, covered, for up to a week. Then, just add your softened ice cream layers when you’re ready to complete the dessert. This makes last-minute assembly a total breeze.
My Best Tips for Ice Cream Bar Success
- Soft Dates are Key: If your dates are old and hard, they won’t bind. Soak them in warm water for 10 minutes first, then pat them very dry.
- Don’t Over-Soften Ice Cream: You want it spreadable, not soupy. Check it after 10 minutes by pressing with your spoon.
- Press That Base Firmly: A well-packed base won’t crumble when you slice through it. Really put some muscle into it!
- Label Your Container: In a busy freezer, these can look mysterious. A simple “Pecan Brownie Bars” note prevents exploratory bites from family members!
Making Them Look as Good as They Taste
Presentation is the final, fun flourish!
- Drizzle melted dark chocolate over the top before serving.
- Add a tiny sprinkle of flaky sea salt on each bar to make the caramel pop.
- Serve on a chilled plate with a few fresh raspberries or a sprig of mint.
- For a party, cut them into small, bite-sized squares and serve with toothpicks.
Want to Mix It Up? Try These 6 Variations!
Love the idea but want a different twist? Here are some delicious spins.
- Mocha Madness: Add a teaspoon of instant espresso powder to the brownie base. Use coffee ice cream and chocolate fudge ice cream for the layers.
- Tropical Escape: Use macadamia nuts in the base. Layer coconut ice cream and mango sorbet on top. Sprinkle with toasted coconut flakes.
- Cookies & Cream: Add 3-4 crushed Oreo cookies to the brownie base. Use classic vanilla and cookies & cream ice cream for the layers.
- Peanut Butter Paradise: Swap pecans for roasted peanuts. Add a big spoonful of peanut butter to the base. Layer chocolate and vanilla peanut butter cup ice cream.
- Berry Cheesecake: Press the base into a springform pan. Layer a softened cheesecake-flavored ice cream, then top with a ripple of strawberry ice cream or sauce.
- Mint Chocolate Chip: Use peppermint extract (just a drop!) in the base. Layer mint chocolate chip ice cream and a rich dark chocolate ice cream.
Common Mistakes to Avoid
Avoid these simple pitfalls for perfect bars every time.
Mistake 1: Using Rock-Hard Dates
Old, dry dates won’t provide the sticky moisture needed to bind your base. You’ll end up with a crumbly mess that falls apart. Always check your dates. If they aren’t soft and sticky, revive them! Soak in warm water for 10 minutes, then drain and pat thoroughly dry before using. This brings them back to life and makes them perfect for pulsing.
Mistake 2: Letting the Ice Cream Melt
If you let the ice cream get too soft, it will melt into the base and create a sloppy, soggy layer. It can also form nasty ice crystals when it re-freezes. Set a timer for 10-15 minutes. The ice cream is ready when you can easily press a spoon into it and spread it, but it’s not dripping or liquid. It should hold its shape.
Mistake 3: Skipping the Hot Water Knife Trick
Trying to slice a frozen dessert with a regular knife leads to smashed, messy bars. The ice cream squishes, and the base shatters. You lose those beautiful clean layers. The simple fix is using a warm knife. Dip your sharp knife in hot water, wipe, and cut. It glides through like butter, giving you professional-looking slices.
Mistake 4: Not Lining the Tin Properly
If you just spray the tin, you’ll never get the bars out in one piece. You’ll be chiseling ice cream and brownie from the corners. Always use baking paper or parchment. Cut a piece large enough so it overhangs on two opposite sides. These “handles” are your best friend for a clean, easy lift-out.
Your Pecan Brownie Ice Cream Bar Questions, Answered!
Can I make this recipe vegan?
Absolutely! This recipe is very easy to make vegan. Just ensure your ice cream flavors are dairy-free and vegan-friendly. Most grocery stores carry amazing vegan vanilla and salted caramel options. All the other base ingredients (pecans, dates, cacao) are naturally plant-based. Check your coconut flour to be sure, but it almost always is. It’s a fantastic inclusive dessert for guests with dietary preferences.
My food processor is huge. Will a blender work?
A high-powered blender can work, but you need to be careful. Blenders are designed to puree, not pulse into crumbs. You risk turning the nuts into butter too quickly. If you must use a blender, work in very short bursts and shake the jar often. A small food processor is truly the ideal tool for getting the perfect crumb texture without over-processing.
How do I prevent ice crystals from forming on the bars?
Ice crystals form from temperature fluctuation and air exposure. To prevent them, store the bars in an airtight container. Press a piece of baking paper directly onto the surface of the bars before sealing the lid. This creates a barrier. Also, avoid constantly opening the freezer door. The more stable the temperature, the creamier your bars will stay.
Can I use a different size or shape of pan?
You can, but it will change the thickness of your layers. A larger pan will give you thinner, wider bars. A smaller pan (like a loaf pan) will give you thicker, smaller bars. Just adjust your freezing time—thicker bars may need more than 2 hours to set completely. The key is to press your base to an even thickness regardless of the pan shape.
The base is too crumbly. What did I do wrong?
This almost always means you needed more dates or your dates were too dry. The dates are your glue. The mixture should hold together firmly when pinched. Don’t be afraid to add an extra date or two while pulsing. Also, make sure you are pressing the base into the pan VERY firmly. Use the bottom of a glass to really compact it down.
Can I use regular cocoa powder instead of raw cacao?
Yes, you can! Raw cacao has a slightly more intense, fruity flavor, but regular unsweetened cocoa powder works perfectly well in this recipe. Use it as a direct 1:1 substitute. Your brownie base will still be deliciously chocolatey and dark. This is a great way to use what you already have in your pantry.
How long can I store these in the freezer?
For the best flavor and texture, enjoy your bars within 2 weeks. After that, they are still safe to eat, but they might develop more ice crystals or the nuts in the base could start to lose their fresh taste. They are so delicious, though, I doubt they’ll last that long! Labeling the container with the date is a good practice.
What’s the best way to transport these to a party?
Keep them frozen solid! Place the fully-frozen bars in a single layer in your airtight container. Put this container inside a cooler bag or insulated lunch bag with a couple of ice packs. Take them out right before serving. Don’t leave the container out on the dessert table; keep it in the freezer or cooler until it’s time to eat.
Can I use honey or syrup instead of dates to bind the base?
I don’t recommend it. The dates provide a specific sticky, fudgy, dry sweetness. Liquid sweeteners like honey will make the base wet and won’t provide the same structural hold. It could make the base soggy, especially under the ice cream. Dates are truly the best binder for this no-bake application.
My ice cream layers swirled together. Is that okay?
That’s more than okay—that’s delicious! If you softened the ice cream a bit too much and the layers swirled as you spread them, you’ve just created a beautiful marbled effect. It will still taste incredible. For distinct layers next time, just make sure the first layer is very smooth and slightly firmed up in the freezer for 10 minutes before adding the second.
Go Forth and Freeze!
I truly hope you love making and eating these Pecan Brownie Ice Cream Bars as much as my family does. They are a constant reminder that the most joyful desserts don’t have to be complicated. They’re about good ingredients, a little layering, and the shared happiness of a cold, creamy, chocolaty bite. So grab your food processor, pick your favorite ice cream flavors, and get ready for the compliments to roll in. Happy freezing!
Tiramisu Kinder Bueno : Recette Délicieuse et Facile
Ingredients
Equipment
Method
- Line a 10-15cm square tin with baking paper.
- In a food processor, add pecans, coconut flour, raw cacao powder, and salt. Pulse until fine crumbs form.
- Add the pitted Medjool dates to the processor and pulse until the mixture holds together.
- Transfer the mixture into the lined tin and press down firmly to create an even base.
- Scoop softened vanilla ice cream over the brownie base and spread evenly.
- Scoop softened salted caramel ice cream on top and smooth into an even layer.
- Freeze for at least 2 hours or until solid.
- To serve, run the tin under hot water for a few seconds and lift out using the baking paper.
- Slice into bars with a warm knife for clean cuts.