Welcome to Your New Favorite Fish Recipe
I’ll never forget the first time I tried to cook fish at home. I was terrified of messing it up, worried it would turn out dry and rubbery like some restaurant disasters I’d experienced. But then I discovered baked cod, and everything changed. This forgiving, mild-flavored fish became my gateway to confident seafood cooking. Now I make it at least twice a month, and my kids actually ask for it by name.
If you’ve been hesitant about cooking fish, you’re not alone. Most people I talk to say the same thing. They love eating fish but avoid making it at home. The good news is that baked cod is one of the easiest proteins you can prepare. It cooks quickly, tastes amazing, and works with almost any flavor profile you can imagine.
Why Choose Baked Cod for Your Next Dinner
Let me share why cod has earned a permanent spot in my weekly meal rotation. This white fish brings so much to the table, both literally and nutritionally.
First, let’s talk health benefits. Cod is loaded with lean protein that keeps you full without weighing you down. A typical serving gives you about 20 grams of protein with barely any fat. It’s also rich in omega-3 fatty acids, which support heart health and brain function. My doctor actually recommended I eat more fish, and cod became my go-to option.
The vitamin and mineral content surprised me when I first looked into it. Cod provides vitamin B12, which helps with energy levels and nerve function. It also contains selenium, an antioxidant that supports your immune system. Plus, you get phosphorus for strong bones and teeth.
Beyond the nutrition, cod is incredibly versatile. It has a mild, slightly sweet flavor that pairs well with almost anything. You can dress it up with bold Mediterranean spices or keep it simple with butter and lemon. I’ve made Asian-inspired versions, Italian-style preparations, and classic American comfort food dishes. They all work beautifully.
The texture is another reason I love working with this fish. When baked properly, cod becomes tender and flaky. It practically melts in your mouth. Unlike some fish that can taste overly fishy or have an off-putting texture, cod appeals to even picky eaters. My seven-year-old, who claims to hate seafood, happily eats my crispy baked cod without complaint.
Sustainability matters to me too. Many cod fisheries now use responsible practices that protect fish populations and ocean ecosystems. When you choose cod from certified sustainable sources, you’re making an environmentally conscious choice. I always check for labels from the Marine Stewardship Council when shopping.
Getting Started with Simple Baked Cod
The beauty of simple baked cod is that you don’t need fancy ingredients or complicated techniques. This is where I always start when teaching friends how to cook fish.
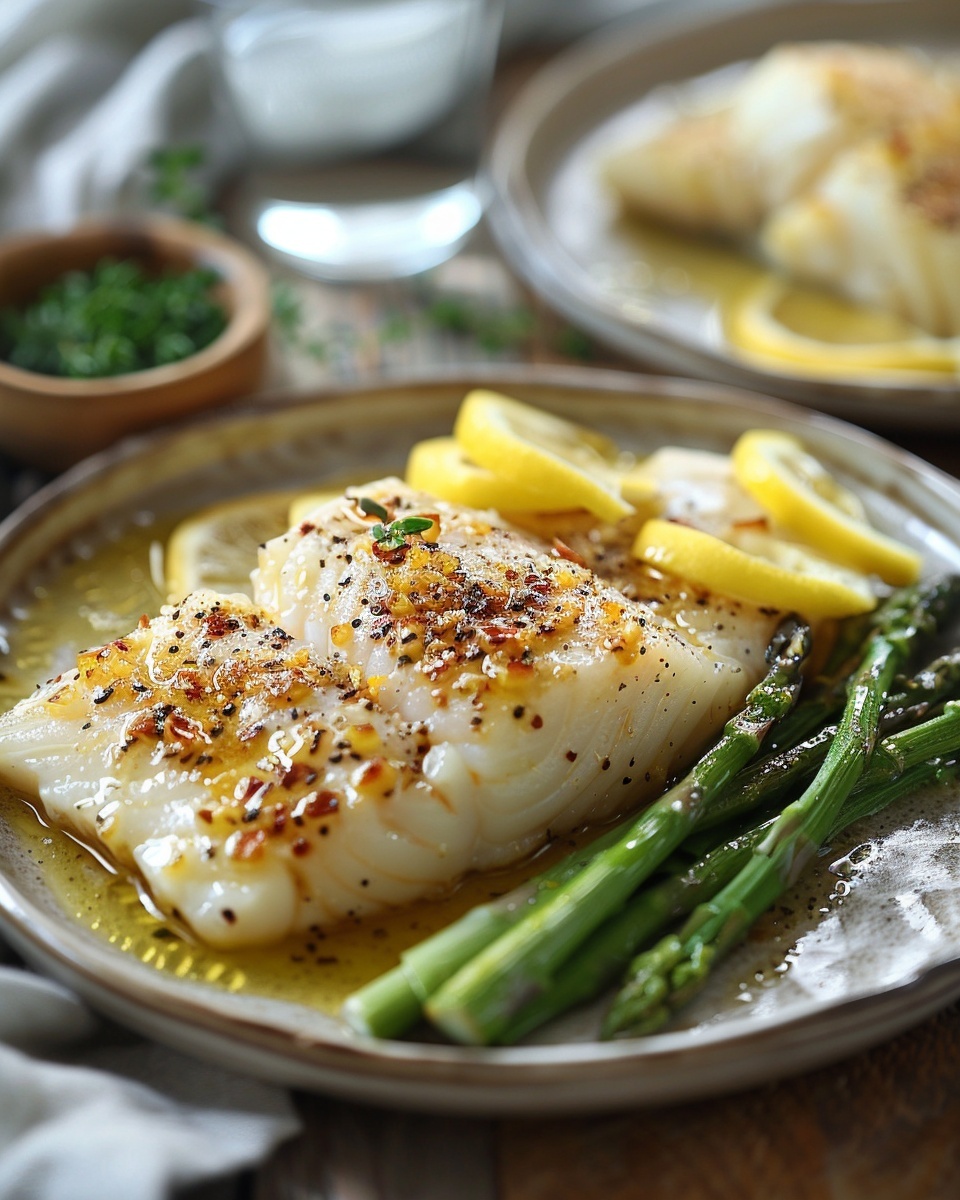
Here’s what makes this recipe so approachable. You need just four or five basic ingredients that you probably have in your kitchen right now. A good quality cod fillet, some olive oil, fresh lemon, salt, and pepper. That’s it. Maybe add some garlic or fresh herbs if you have them, but they’re not required.
The cooking method couldn’t be simpler. You preheat your oven, place the seasoned fish on a baking sheet, and let the heat do its magic. No flipping required. No constant monitoring. You can prep a side dish or set the table while the fish bakes.
One question I hear constantly is this: How long does cod take in the oven at 400 degrees? The answer depends on thickness, but typically 12 to 15 minutes does the trick. I use a general rule of 10 minutes per inch of thickness. A standard fillet that’s about one inch thick will be perfectly done in 12 minutes.
Another common question: Is it better to bake fish at 350 or 400? I prefer 400 degrees for cod. The higher temperature creates a slightly firmer exterior while keeping the inside moist and tender. At 350 degrees, the fish cooks more gently but can sometimes dry out if you’re not careful with timing.
Essential Tips for Perfect Baked Cod Every Time
Let me share the tricks I’ve learned through trial and error. These simple tips make the difference between okay fish and restaurant-quality results.
Pat your fish dry before seasoning. This step is critical. Moisture on the surface prevents proper browning and can make your fish steam instead of bake. I use paper towels to thoroughly dry both sides of each fillet.
Room temperature fish cooks more evenly than cold fish. I take my cod out of the fridge about 15 minutes before cooking. This small step prevents the outside from overcooking while the center catches up.
People often ask: Should you bake cod covered or uncovered? I almost always bake it uncovered. This allows the top to develop a lovely texture and lets excess moisture evaporate. The exception is baked cod in foil, which I’ll use when adding lots of vegetables or making a packet meal. The foil traps steam and creates a different but equally delicious result.
Don’t skip the fat. A light coating of olive oil or baked cod with butter keeps the fish moist and adds flavor. I brush it on generously, especially if I’m making a simple preparation.
Use a meat thermometer if you’re unsure about doneness. Fish is perfectly cooked at 145 degrees Fahrenheit. At this temperature, it should flake easily with a fork but still look slightly translucent in the very center. It will finish cooking with residual heat.
Building Flavor in Your Baked Cod Recipes
Once you master the basic technique, the fun really begins. You can transform simple cod into dozens of different dishes.
Baked cod with panko is one of my favorite variations. The Japanese breadcrumbs create an incredibly crispy coating without deep frying. I mix the panko with melted butter, press it onto the fish, and bake as usual. The result tastes indulgent but stays relatively healthy.
For Italian night, I make parmesan baked cod recipes that my family devours. Grated parmesan mixed with herbs and a touch of mayo creates a golden crust that’s absolutely addictive. The cheese adds umami depth that elevates the mild fish.
Baked cod with tomatoes brings Mediterranean flair to dinner. I arrange cherry tomatoes, olives, and capers around the fish and let everything roast together. The tomatoes burst and create a light sauce that’s perfect over rice or pasta.
When cooking thicker cuts, like baked cod loin, I adjust my timing and sometimes use a lower temperature. These premium cuts deserve gentle treatment to maintain their delicate texture.
I’m also inspired by baked cod recipes Jamie Oliver style, which often feature bold, fresh flavors. His approach of using quality ingredients simply prepared aligns perfectly with how I like to cook.
The possibilities truly are endless. Each week brings a new combination to try, keeping dinner interesting without requiring culinary school skills.


My Go-To Crispy Baked Cod with Panko
Now that you’ve got the fundamentals down, let me walk you through my absolute favorite way to prepare cod—the one that gets requested for birthdays and special dinners.
I stumbled onto this crispy baked cod method completely by accident. My husband brought home panko breadcrumbs instead of regular ones, and I figured I’d give them a shot. That first bite changed everything. The crust was so incredibly crunchy, almost like fried fish but without all the oil and mess. The inside stayed perfectly moist and tender. I haven’t looked back since.
Here’s how I make it work every single time. Start with your dried, room-temperature cod fillets. Set up a simple breading station with three shallow dishes. In the first one, I put about half a cup of flour seasoned with salt, pepper, and a pinch of paprika. The second dish gets two beaten eggs with a tablespoon of water whisked in. The third holds about a cup and a half of panko breadcrumbs.
The secret to getting that coating to actually stick is the order and technique. Dredge each fillet in the flour, shaking off the excess. Then dip it into the egg mixture, making sure every surface gets covered. Finally, press it into the panko, really pushing those breadcrumbs onto the fish. I use my hands to pat them down firmly on both sides.
I like to add flavor directly to the panko. Sometimes I mix in grated lemon zest and chopped fresh parsley. Other times I go with garlic powder and dried Italian herbs. My kids prefer it plain with just salt and pepper, which honestly tastes amazing too.
One trick that makes a huge difference: I drizzle or spray the breaded fillets with olive oil before baking. This helps the baked cod with panko turn that gorgeous golden brown color. Without the oil, the breadcrumbs stay pale and don’t crisp up as nicely.
Bake these at 425 degrees for about 15 minutes. The slightly higher temperature really activates the panko and creates that satisfying crunch. You’ll know they’re done when the coating looks golden and the fish flakes easily.
By the way, this technique works beautifully with other white fish too. I’ve made it with haddock and tilapia with excellent results. But cod’s firm texture really holds up best to the breading process.
I usually serve this crispy version with something fresh and light to balance the richness. An orzo feta salad on the side cuts through the coating beautifully and adds Mediterranean flair to the plate.
Parmesan Baked Cod That Feels Fancy But Isn’t
Let me tell you about the dish that impresses dinner guests without stressing me out. Parmesan baked cod recipes always look like they took way more effort than they actually did.
I make a simple topping by combining half a cup of grated parmesan cheese with three tablespoons of mayonnaise. I know mayo sounds weird, but trust me on this one. It helps bind everything together and keeps the fish incredibly moist while adding richness without being heavy.
To that mixture, I add a tablespoon of melted butter, a teaspoon of minced garlic, and whatever fresh herbs I have around. Basil works wonderfully. So does dill or thyme. Even dried Italian seasoning gets the job done when my herb garden isn’t cooperating.
The process couldn’t be simpler. Place your seasoned cod fillets on a baking sheet lined with parchment paper. Spread the parmesan mixture evenly over the top of each fillet, creating a thick coating that covers the entire surface. Don’t be shy with it.
Here’s the thing—this dish bakes at 400 degrees for just 12 to 14 minutes. The parmesan melts and bubbles, creating this golden crust that looks absolutely restaurant-worthy. Sometimes I finish it under the broiler for 30 seconds to get extra color, but that’s completely optional.
The flavor combination is incredible. The salty, umami-rich parmesan complements cod’s mild sweetness perfectly. The garlic adds depth without overwhelming the fish. And that golden crust? It’s slightly crispy on top while staying creamy underneath.
Funny enough, my mother-in-law asked for this recipe after I served it at a family dinner. She’s been cooking for fifty years and thought I’d spent hours on it. I felt a little guilty admitting it took me about twenty minutes total.
This version pairs wonderfully with roasted vegetables or a simple green salad. I often serve it alongside a garden fresh salad that adds color and crunch to the plate without competing with the rich cheese topping.
If you’re watching calories, you can lighten this up by using Greek yogurt instead of mayo. The results aren’t quite as creamy, but they’re still delicious and considerably healthier.
Baked Cod with Tomatoes for Summer Nights
When the weather gets warm and I want something lighter, I turn to my baked cod with tomatoes recipe. This one tastes like vacation in Italy, even though I’m just standing in my suburban kitchen.
The beauty of this preparation is that everything cooks together in one pan. I use a baking dish just large enough to hold my fillets with a little space around them. First, I scatter halved cherry tomatoes across the bottom—about two cups worth. Then I add sliced garlic, maybe four or five cloves depending on how much I love garlic that day.
I nestle the cod fillets right into the tomatoes, season everything generously with salt and pepper, and drizzle the whole thing with good olive oil. A splash of white wine goes in too, about a quarter cup. If you don’t cook with wine, chicken broth works fine.
Fresh basil leaves get torn and scattered over everything. I use a whole handful because basil and tomatoes are one of those combinations that just makes sense together. Some people add capers or olives here, which I love when I have them.
This bakes at 375 degrees for about 18 minutes. The lower temperature lets the tomatoes break down and release their juices, creating this light, flavorful sauce that pools around the fish. The cod absorbs all those bright, acidic, summery flavors while staying tender.
What I love most about this dish is how the tomatoes do all the work. They basically make their own sauce without any effort from me. By the time the fish is cooked, you’ve got this gorgeous mixture of burst tomatoes, garlic, and herbs that tastes like you simmered it for hours.
I serve this over something that can soak up the tomato juices. Rice works great. So does crusty bread. Sometimes I make orzo or couscous. Actually, if I’m really thinking ahead, I’ll make extra to turn into a cold pasta salad the next day.
The acidity from the tomatoes really does cut through the richness of the fish, creating this balanced bite that doesn’t feel heavy. It’s become my go-to recipe for weeknight dinners when I want something healthy but flavorful.
For a finishing touch, I drizzle everything with balsamic glaze right before serving. That sweet-tart flavor ties everything together beautifully. You can buy it ready-made or simmer balsamic vinegar until it reduces and thickens.
This recipe reminds me that fish doesn’t need to be complicated to be impressive. The freshness of the ingredients does most of the talking. I’ve served this to seafood skeptics who ended up asking for seconds.
If you’re planning a seafood-focused dinner, this pairs nicely with other light preparations. I sometimes start with garlic butter shrimp as an appetizer, then serve the cod as the main course. Or if I’m grilling, grilled salmon fillets alongside the cod gives guests options.
The versatility of these baked cod recipes healthy options means you’ll never get bored. Each one brings something different to the table while keeping things simple and approachable. That’s exactly how I like to cook—good food without the fuss.


Baked Cod Loin: When You Want Something Special
Let me tell you about the cut of fish that makes me feel like I’m splurging even when I’m not. Baked cod loin is what I reach for when I want dinner to feel a little more elevated without actually doing anything complicated.
The loin comes from the thickest part of the fish, right along the back. It’s meatier and more substantial than regular fillets, almost steak-like in how it holds its shape. The first time I bought cod loin, I was honestly intimidated by the price tag. But then I realized that one thick piece serves more people than two thin fillets, and it cooks up so beautifully that it feels like restaurant food.
Here’s what makes cod loin different from regular fillets. The thickness means you get this wonderful contrast in textures when it’s properly baked. The exterior develops a slight firmness while the center stays incredibly moist and almost buttery. Regular thin fillets don’t give you that same experience because they’re cooked through before any real texture develops on the outside.
I keep the seasoning simple for cod loin because the fish itself is the star. A generous coating of salt and freshly cracked black pepper forms the base. Then I add thinly sliced garlic—maybe six or seven cloves that I press right onto the surface of the fish. The garlic roasts alongside the cod and becomes sweet and mellow.
Sometimes I add fresh thyme sprigs on top. Other times I use rosemary if that’s what’s growing in my garden. The woody herbs stand up well to the longer cooking time that cod loin requires. Delicate herbs like basil or cilantro would burn, so I save those for quicker-cooking preparations.
Temperature and timing matter more with this thicker cut. I bake cod loin at 375 degrees rather than the higher heat I use for thin fillets. The gentler temperature lets the heat penetrate to the center without overcooking the outside. Depending on thickness, it usually takes 20 to 25 minutes. I always use my thermometer to check for that perfect 145-degree internal temperature.
One technique I learned from watching too many cooking shows: I sear the cod loin in a hot skillet for about two minutes per side before transferring it to the oven. This creates a gorgeous golden crust that adds visual appeal and a slightly different texture. It’s not necessary, but when I have an extra five minutes, I do it.
The presentation makes a difference with cod loin. Because it’s such a substantial piece of fish, I serve it almost like a small roast. I’ll place the whole loin on a platter, slice it into thick portions right at the table, and let everyone serve themselves. It feels celebratory, which is exactly what I want for special dinners.
Pairing sides with cod loin gives me a chance to round out the meal nutritionally. Roasted vegetables work perfectly because they can cook alongside the fish. I use the same oven temperature and just put a sheet pan of vegetables on the lower rack. Brussels sprouts, carrots, and fennel all roast beautifully at 375 degrees.
By the way, if you’re curious about the nutritional value you’re getting, cod loin provides impressive protein content along with minimal calories and fat. That meaty texture isn’t just satisfying—it’s also delivering the nutrients your body needs without any guilt.
I’ve found that cod loin works wonderfully with compound butters. I make a simple one by mixing softened butter with lemon zest, minced parsley, and a touch of Dijon mustard. A pat of this melting over the hot fish right before serving adds richness and a pop of bright flavor. You could also do an herb butter with tarragon and shallots, or even a spicy version with chili flakes and lime zest.
The leftovers, if you’re lucky enough to have any, are actually fantastic. I flake the cold cod loin into salads the next day, or fold it into pasta with some cream and peas. It holds up better to reheating than thin fillets because the thickness protects it from drying out.
What surprised me most about working with cod loin was how forgiving it is. I thought such a premium cut would be finicky, but it’s actually more tolerant of slight timing variations than thin fillets. Those few extra minutes won’t ruin it the way they might with a delicate piece.
For anyone planning a dinner party or just wanting to make a weeknight feel special, cod loin delivers. It looks impressive on the plate, tastes luxurious, and requires minimal skill to execute well. That’s my kind of cooking—maximum impact with reasonable effort.
Wrapping Up Your Baked Cod Journey
After years of making baked cod in every possible variation, I keep coming back to the same realization. This fish has quietly become the foundation of so many good meals in my house. It’s gotten my kids to eat seafood without complaints. It’s impressed guests who thought I spent hours in the kitchen. And it’s given me confidence that cooking fish at home doesn’t have to be stressful or complicated.
The versatility still amazes me. Some weeks I keep it stupidly simple with just lemon and herbs. Other times I get creative with crusts and toppings. Both approaches work, and that flexibility means I never get tired of eating it. Whether you go for crispy baked cod with panko or stick with a basic preparation, you’re making a smart choice for your health and your taste buds.
I think what I love most is how approachable these recipes are for beginners while still being interesting enough for experienced cooks. You don’t need special equipment or hard-to-find ingredients. Just good fish, some basic seasonings, and a working oven. That’s honestly all it takes to make dinner that feels like something you’d order at a nice restaurant.
If you’re looking to expand your seafood repertoire even further, I’d encourage you to explore more options in the seafood category where you’ll find everything from quick weeknight meals to showstopper dishes that’ll make you look like a pro.
The next time you’re standing in front of the fish counter feeling uncertain, grab some cod. Start with the simplest recipe that appeals to you. Follow the basic guidelines about temperature and timing. And trust that it’s going to turn out well because this fish really does want to cooperate with you. Before you know it, you’ll be improvising your own variations and wondering why you ever found seafood intimidating in the first place.
Frequently Asked Questions About Baked Cod
How long does cod take in the oven at 400 degrees?
At 400 degrees, most cod fillets need about 12 to 15 minutes of baking time. The exact duration depends on thickness—a thin fillet might be done in 10 minutes while a thicker piece could need closer to 18. I always use the rule of 10 minutes per inch of thickness as my starting point. The fish is ready when it flakes easily with a fork and reaches an internal temperature of 145 degrees. Don’t forget that it continues cooking slightly after you remove it from the oven.
Is it better to bake fish at 350 or 400?
I prefer 400 degrees for most cod preparations because the higher heat creates a firmer exterior while keeping the inside moist. It also cooks faster, which means less chance of drying out. However, 350 degrees works better for thicker cuts like cod loin or when you’re baking fish with lots of toppings that might burn at higher temperatures. For delicate preparations or when cooking fish in sauce, the gentler 350-degree heat prevents overcooking. Honestly, both temperatures work—it just depends on the result you’re after.
How do you cook cod in the oven?
Start by preheating your oven to 400 degrees and patting your cod fillets completely dry with paper towels. Place them on a lined baking sheet and brush both sides with olive oil or melted butter. Season generously with salt, pepper, and any other flavors you like. Bake for 12 to 15 minutes until the fish flakes easily and looks opaque throughout. Let it rest for a couple minutes before serving. The simplicity is what makes oven-baked cod so perfect for busy weeknights.
Should you bake cod covered or uncovered?
I almost always bake cod uncovered because it allows moisture to evaporate and creates a better texture on top. The exception is when I’m making baked cod in foil packets with vegetables and liquid, where the steam helps everything cook together. If your fish seems to be browning too quickly on top, you can tent it loosely with foil for the last few minutes. But generally, uncovered gives you the best results with a slight firmness on the exterior and tender flakes inside.
Can you bake frozen cod without thawing it first?
Yes, you absolutely can bake frozen cod, though I prefer thawing it when I have time because it cooks more evenly. If cooking from frozen, add about 5 to 8 minutes to your normal baking time and make sure it reaches 145 degrees internally. Pat off any ice crystals before seasoning, and use a bit more oil or butter since frozen fish tends to release more moisture. The texture won’t be quite as perfect as thawed fish, but it’s a lifesaver when you forget to plan ahead.
What’s the best way to tell when baked cod is done?
The most reliable method is using an instant-read thermometer to check for 145 degrees. Visually, the fish should be opaque throughout with no translucent center, and it should flake easily when you press a fork into it. The flesh will have changed from a slightly glossy appearance to a matte finish. If you’re still unsure, slightly underdone is better than overdone since the residual heat will finish cooking it. With practice, you’ll develop an eye for it.
How do you prevent baked cod from drying out?
Don’t overcook it—that’s the number one mistake people make. Use a thermometer and pull it out right at 145 degrees. Brush the fish generously with fat like olive oil or butter before baking, which helps seal in moisture. Avoid baking at temperatures higher than 425 degrees for extended periods. If you’re worried, you can bake it on top of lemon slices or a bed of vegetables, which adds moisture to the cooking environment. And remember, a little underdone is always better than dry and rubbery.
Can I use the same recipes for other white fish?
Absolutely! These baked cod recipes healthy options work beautifully with haddock, halibut, sea bass, or even tilapia. The cooking times might vary slightly depending on thickness and the fish’s density. Halibut is meatier and might need an extra minute or two, while tilapia is thinner and cooks faster. The seasonings and techniques transfer perfectly, so feel free to substitute whatever fresh white fish looks good at your market.
What are the best side dishes to serve with baked cod?
I love pairing cod with roasted vegetables like asparagus, Brussels sprouts, or green beans because they can cook at the same temperature. Rice pilaf or quinoa soaks up any juices beautifully. Fresh salads with citrus vinaigrette complement the mild fish without overwhelming it. Roasted potatoes—either regular or sweet—add heartiness to the meal. For lighter options, steamed broccoli or sautéed spinach work perfectly. The mild flavor of cod pairs well with almost anything, so you really can’t go wrong.
How should I store and reheat leftover baked cod?
Store leftover cod in an airtight container in the refrigerator for up to three days. To reheat without drying it out, I prefer using a low oven—about 275 degrees—for 10 minutes or so, covered loosely with foil. The microwave works in a pinch, but use 50% power and heat in short bursts to prevent it from getting rubbery. Honestly though, I think leftover cod is best served cold, flaked into salads or mixed into pasta. The texture actually holds up better that way than when reheated.
I hope these recipes and tips give you the confidence to make baked cod a regular part of your cooking routine. It’s become one of those reliable dishes I know I can count on, and I think you’ll find the same thing once you get comfortable with it. Happy cooking, and enjoy every flaky, delicious bite!
Ingredients
Equipment
Method
- Préchauffez votre four à 200°C (400°F).
- Essuyez les filets de cabillaud avec des serviettes en papier pour assurer un bon brunissement.
- Disposez le poisson assaisonné sur une plaque de cuisson recouverte de papier sulfurisé.
- Arrosez d'huile d'olive et pressez du jus de citron sur les filets.
- Saisissez généreusement de sel et de poivre.
- Faites cuire au four préchauffé pendant 12 à 15 minutes, selon l'épaisseur.
- Assurez-vous que le poisson atteint une température interne de 63°C (145°F) avant de servir.