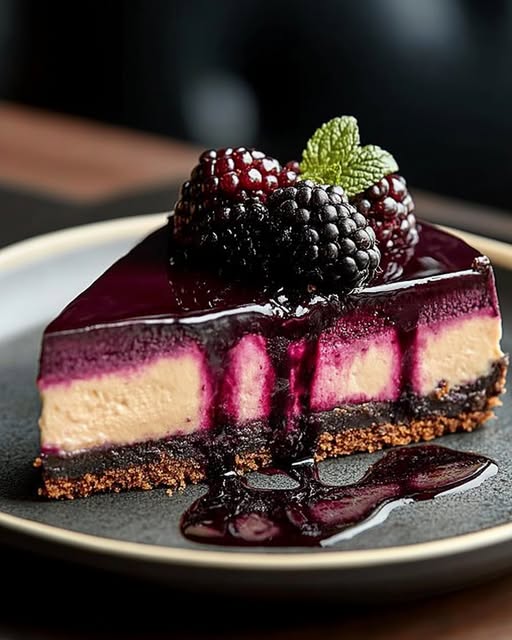
Creamy and Dreamy: The Ultimate Berry Bliss Cheesecake
You know that one dessert you bring to a party and everyone falls silent? Then comes the chorus of “Oh my, you made this?” This is that dessert. My Berry Bliss Cheesecake is the star of every potluck and the secret hero of our family birthdays. It has a velvety, slightly tangy filling that melts on your tongue, a buttery graham cracker hug, and this glorious, jewel-toned blackberry sauce that makes it look like it came from a fancy bakery. But trust me, the magic is all homemade.
A Slice of History: From Ancient Greeks to My Kitchen
Cheesecake’s story goes way back! The ancient Greeks made a simple version for athletes. Over centuries, it traveled and changed. The creamy New York-style cheesecake we love today really became famous in the 1900s. My version is a nod to that classic, but with a lush berry twist. I first tried a blackberry cheesecake at a farmer’s market years ago and became obsessed with recreating it at home. After many, *many* tasty trials (my friends were happy testers), I landed on this perfect balance of sweet, tart, and creamy. It’s a modern classic with a very personal touch.
Why You’ll Fall in Love With This Berry Cheesecake
Let me count the ways! First, the taste is pure heaven. The rich cream cheese filling is cut perfectly by the bright, tart blackberry sauce. Second, it’s a make-ahead dream. You do the work the day before, so on party day, you’re cool and collected. Finally, it’s just so impressive. That shiny, deep purple sauce dripping down the sides makes everyone feel special. It’s a dessert that says “I care,” without you having to say a word.
When to Whip Up Your Blackberry Cheesecake
This cheesecake isn’t just for holidays! It’s perfect for:
- Summer BBQs: A cool, fruity finish to a grilled feast.
- Elegant Dinner Parties: It looks fancy but is secretly straightforward.
- Birthdays: Skip the store-bought cake! This feels so much more personal.
- Just Because: A Tuesday sunset deserves a beautiful slice too.
Your Berry Cheesecake Ingredients List
For the Crust:
- 225g (about 1 ½ cups) graham cracker crumbs
- 6 tablespoons unsalted butter, melted
- 2 tablespoons granulated sugar
For the Cheesecake Filling:
- 675g (24 oz) cream cheese, VERY soft
- 200g (1 cup) granulated sugar
- 60ml (¼ cup) heavy cream
- 120ml (½ cup) sour cream or crème fraîche
- 1 tablespoon vanilla bean paste (or extract)
- 3 large eggs + 2 egg yolks, at room temperature
For the Blackberry Sauce:
- 2 cups frozen or fresh blackberries, divided
- Zest of 1 lemon
- 3 tablespoons granulated sugar
- 1 teaspoon cornstarch
- Juice of 1 lemon
No Stress Substitutions
Don’t have everything? No problem! Here are easy swaps:
- Graham Crackers: Use digestive biscuits or vanilla wafers.
- Sour Cream: Full-fat plain Greek yogurt works beautifully.
- Fresh Blackberries: Frozen are excellent and often more affordable. Do not thaw before cooking.
- Vanilla Bean Paste: Use 2 teaspoons of pure vanilla extract.
- Springform Pan: If you don’t have one, use a deep 9-inch pie dish. You’ll just serve it from the dish.
Creating Your Masterpiece: Step-by-Step
Step 1: The Buttery Base
Start by preheating your oven to 325°F (163°C). Grab your food processor and pulse the graham crackers into fine, sandy crumbs. Pour in the melted butter and sugar. It should look like wet sand and hold together when you pinch it. Press this mixture firmly into the bottom and up the sides of a 9-inch springform pan. I use the bottom of a measuring cup to get it nice and even. Bake this for 10 minutes until it smells toasty and looks set. Let it cool on a rack. This step gives your cheesecake its essential, crunchy foundation.
Pro tip: For extra flavor, a pinch of cinnamon in the crust is delicious!
Step 2: The Luxurious Filling
This is where the magic happens! Your cream cheese MUST be super soft. I leave mine on the counter for a few hours. Beat it in your stand mixer (or with a hand mixer) until it’s completely smooth and lump-free. Add the sugar and beat for another 2 minutes, scraping the bowl. Now, mix in the heavy cream, sour cream, and that fragrant vanilla. The mixture will become gloriously silky. With the mixer on low, add the eggs and yolks one at a time. Mix ONLY until each egg is just incorporated. Overmixing here adds too much air and can cause cracks. The filling will be pale, thick, and dreamy.
Step 3: The Gentle Bake (Bain-Marie)
Wrap the outside of your springform pan tightly with aluminum foil. This prevents water from the water bath seeping in. Place the pan inside a larger roasting pan. Pour the filling into the crust. Now, carefully place the whole setup in the oven. THEN, pour hot water into the roasting pan until it comes halfway up the side of the springform pan. This water bath creates a steamy environment for a gentle, even bake. Bake for 60-70 minutes. The edges will be set, but the center will still have a slight, gentle jiggle. Turn off the oven, crack the door open, and let it cool inside for 1 hour. This slow cooling is the second key to a crack-free top.
Chef’s tip: The jiggle should be like set Jell-O, not liquid. If it looks too wet, give it 5 more minutes.
Step 4: The Vibrant Blackberry Topping
While the cheesecake chills, make the sauce! In a saucepan, cook 1 cup of the blackberries with the sugar and lemon zest over medium heat. They’ll start to burst and release their gorgeous purple juice. In a small bowl, make a “slurry” by mixing the cornstarch with the lemon juice until smooth. Stir this into the bubbling berries – the sauce will thicken almost immediately. Cook for about 5 minutes. Gently stir in the remaining 1 cup of blackberries and cook for just 1 more minute to warm them through. You want some whole berries for texture! Let this cool completely. The color is just breathtaking.
Step 5: The Grand Finale Assembly
Once your cheesecake has chilled overnight (be patient, it’s worth it!), run a thin knife around the edge of the pan and release the springform collar. Carefully transfer the cake to a serving plate. Give your cooled sauce a stir, then pour it generously over the top, letting it cascade down the sides. I love to pipe or dollop whipped cream around the edge and scatter a few fresh berries on top. Let it sit at room temperature for 15 minutes before slicing for the perfect, creamy texture. Get ready for the compliments!
Your Berry Cheesecake Timeline
- Prep Time: 30 minutes
- Cook Time: 70 minutes
- Cooling/Chilling Time: 9 hours (1 hour in oven, 1 hour on counter, 8+ in fridge)
- Total Time: About 10 hours 40 minutes (mostly hands-off)
- Servings: 12 elegant slices
The #1 Chef’s Secret for Perfection
Room temperature is NOT a suggestion. It’s the law for cheesecake. Cold cream cheese will never blend smoothly, leading to a lumpy filling. You’ll be tempted to overmix to fix it, which incorporates too much air. This causes the cheesecake to puff and then fall, often creating cracks. Plan ahead! Leave your cream cheese, eggs, and sour cream out for at least 2-3 hours before you start.
A Berry Fun Fact
Did you know blackberries aren’t actually berries? Botanically, they’re an “aggregate fruit,” meaning each little juicy bead is its own tiny fruit with a seed! Raspberries are the same. This is why they have that beautiful clustered structure. Strawberries aren’t berries either, but bananas and avocados are! Mind-blowing, right?
Kitchen Tools You’ll Need
- 9-inch springform pan
- Stand mixer or hand mixer
- Food processor (for crumbs)
- Large roasting pan (for water bath)
- Aluminum foil
- Medium saucepan
- Fine mesh sieve (optional, for seedless sauce)
Storing Your Blackberry Cheesecake
Once assembled, your cheesecake is best stored covered in the refrigerator. I place a large bowl or a cake carrier over the top. It will stay fresh and delicious for up to 5 days. The sauce may soften the crust slightly after a day or two, but it will still taste amazing.
For longer storage, you can freeze the un-topped cheesecake. Wrap the completely chilled cheesecake (without sauce) tightly in plastic wrap, then in foil. Freeze for up to 2 months. Thaw overnight in the refrigerator before adding your fresh blackberry sauce and serving.
The blackberry sauce itself can be made ahead and stored separately in an airtight container in the fridge for up to 1 week. Give it a good stir before using. You can also freeze the sauce for up to 3 months.
Tips For Cheesecake Success
- Prevent Sticking: For an extra layer of protection, line the bottom of your springform pan with a round of parchment paper before adding the crust.
- Smooth Slices: Dip your knife in hot water and wipe it clean between each cut. This gives you gorgeous, clean slices.
- No Cracks: Besides the water bath and slow cooling, avoid opening the oven door during baking. Sudden temperature changes are a crack’s best friend.
- Tailor the Sweetness: Taste your blackberries! If they are very tart, you can add an extra tablespoon of sugar to the sauce.
Show-Stopping Presentation Ideas
- Serve each slice on a pool of extra blackberry sauce.
- Garnish with a mint sprig and a light dusting of powdered sugar.
- For a dinner party, place a single perfect blackberry and a twist of lemon zest on each plate.
- Drizzle individual slices with a little white chocolate or dark chocolate ganache along with the berry sauce.
Lighten It Up: Healthier Berry Cheesecake Twists
Love the idea but want a lighter option? Try one of these delicious variations:
- Greek Yogurt Swirl: Replace half the cream cheese with full-fat Greek yogurt for a protein boost and tangier flavor.
- Nutty Crust: Use a mix of ground almonds and oat flour instead of graham crackers for a gluten-free, wholesome base.
- No-Bake Berry Bliss: Use whipped cream and gelatin to set a filling with blended cottage cheese or light cream cheese. Pour over the crust and chill.
- Mini Cheesecakes: Bake in a muffin tin with liners for perfect portion control. Reduce baking time to about 20 minutes.
- Sugar Adjustment: You can reduce the sugar in the filling by ¼ cup without major texture changes. The tart sauce will balance it.
- Berry Medley: Use a mix of raspberries, blackberries, and blueberries for the sauce. It’s a beautiful color and flavor explosion.
Common Mistakes to Avoid
Mistake 1: Using Cold Ingredients
This is the biggest culprit for lumpy, cracked cheesecakes. Cold cream cheese doesn’t blend smoothly. You end up overbeating to try to fix the lumps, which whips too much air into the batter. This air expands in the oven and then collapses, causing cracks and a dense texture. Always plan ahead to let your dairy and eggs sit on the counter until they are truly room temperature, about 2-3 hours.
Mistake 2: Skipping the Water Bath
It might seem like an annoying extra step, but the water bath (or bain-marie) is non-negotiable for a classic baked cheesecake. It creates a gentle, humid heat in the oven. This cooks the eggs slowly and evenly, preventing the proteins from tightening up too fast and squeezing out moisture. Skipping it often leads to a dry, rubbery texture, a domed top, and major cracks. Just wrap your pan well in foil and take the extra minute to set it up.
Mistake 3: Overmixing the Eggs
Once you add the eggs, your mixing style needs to change. Eggs contain proteins that form structure. If you beat them vigorously, you incorporate too many air bubbles. This makes the cheesecake rise like a soufflé and then fall dramatically as it cools. Always mix the eggs in on the lowest speed, and only until the yellow streaks disappear. A few tiny streaks are better than overmixing.
Mistake 4: Not Letting it Chill Long Enough
I know it’s hard to wait! But a cheesecake needs time to fully set its structure. Cutting into it after only 4 hours in the fridge will give you a slice that’s too soft and may even seem undercooked in the center. The long, slow chill (at least 8 hours, overnight is best) allows the fats to firm up perfectly. This gives you that iconic creamy-yet-firm texture that slices cleanly.
Mistake 5: Cooking the Berry Sauce Too Long
You want a sauce that’s glossy and thick, but still vibrant and fresh-tasting. If you cook all the berries for too long, or at too high a heat, the sauce can become jammy, dull in color, and overly sweet. The key is cooking half the berries down to create the base, then stirring in the rest at the very end. This preserves their shape, bright flavor, and that beautiful fresh berry pop in every bite.
Your Berry Cheesecake Questions Answered
Can I make this cheesecake without a springform pan?
Absolutely! You can use a 9-inch deep-dish pie plate. You’ll build the crust and bake the cheesecake right in it. The only difference is you’ll serve it directly from the dish instead of removing the sides. Make sure to still use the water bath technique by placing the pie plate inside a larger baking dish. The slices might be a little messier to get out, but the taste will be exactly the same delicious Berry Bliss Cheesecake.
My sauce is too thin/too thick. How can I fix it?
Sauce consistency is easy to adjust. If it’s too thin after cooling, pour it back into the saucepan. Mix another ½ teaspoon of cornstarch with a teaspoon of cold water to make a new slurry. Bring the sauce to a simmer, whisk in the new slurry, and cook for another minute. If it’s too thick (almost like jam), simply whisk in a tablespoon of warm water or lemon juice at a time until it reaches a pourable, glaze-like consistency. Remember, it will also thicken a bit more as it cools on the cold cheesecake.
Why did my cheesecake crack on top?
Cracks usually happen for a few common reasons: overmixing the batter (adding too much air), baking at too high a temperature, not using a water bath, or cooling it too quickly (like taking it right from the oven to a cold counter). Don’t worry, it’s still delicious! The glorious blackberry sauce will cover any cracks completely, turning a “mistake” into a beautiful design feature. Focus on the water bath and slow cooling for your next one.
Can I use frozen blackberries for the whole recipe?
Yes, frozen blackberries work wonderfully, and I often use them. There’s no need to thaw them for the sauce; just add them frozen to the pot. Using frozen berries can actually give you a more consistent result year-round, and they’re usually more budget-friendly. For a garnish on top, fresh berries look prettier, but frozen are perfect for the cooking part of the sauce.
How far in advance can I make this dessert?
This is a fantastic make-ahead dessert! You can bake and chill the plain cheesecake (without the topping) up to 2 days in advance. Make the blackberry sauce up to 3 days ahead and store it separately in the fridge. On the day you plan to serve, let the cheesecake sit out for 15-20 minutes, add the sauce and final garnishes, and you’re ready to go. This timeline makes it stress-free for entertaining.
Is there a way to make a seedless blackberry sauce?
For a super smooth, seedless sauce, the process is simple. After you cook down the first cup of berries with the sugar and lemon, press the mixture through a fine-mesh sieve into a clean saucepan. Use a spatula to push all the pulp and juice through, leaving the seeds behind. Discard the seeds. Whisk the cornstarch-lemon slurry into this strained juice and cook to thicken. Then stir in the remaining whole berries. You get a velvety base with the texture of the whole berries, but no seeds.
Can I use a different kind of berry?
Please do! This recipe is very versatile. Raspberries make a stunning and slightly tarter sauce. A mix of blueberries and blackberries is beautiful. Even strawberries work—just chop them small. The cooking method is the same. Adjust the sugar in the sauce based on the natural sweetness of the berry you choose. You could call it a “Mixed Berry Bliss Cheesecake” and it would be just as fabulous.
What’s the difference between using vanilla extract and vanilla bean paste?
Vanilla bean paste is a wonderful middle ground between extract and whole beans. It has the tiny, flavorful seeds right in the paste, so you get those beautiful black specks and a richer, more complex vanilla flavor than extract. It’s also thicker, so it doesn’t add extra liquid. If you use extract, the flavor is still great, but you won’t see the specks. Use 2 teaspoons of pure vanilla extract if you don’t have the paste.
My crust is soggy. What happened?
A soggy bottom usually means moisture got to it. The main causes are: not baking the crust first (blind baking), not letting it cool before adding the filling, or a leak in your foil during the water bath letting steam in. Make sure your springform pan is wrapped securely in heavy-duty foil. Also, ensure the crust is fully cooled—it should be just warm to the touch—before you pour in the filling. This creates a barrier.
How do I get perfectly clean slices?
The secret to picture-perfect slices is a hot, clean knife. Fill a tall glass with very hot water. Dip a sharp, thin-bladed knife into the water and wipe it dry with a clean towel. Make one slow, smooth cut through the cheesecake. Repeat: dip, wipe, cut for every single slice. The heat helps the knife glide through the creamy filling and sticky sauce without dragging or smearing. It makes a huge difference in presentation.
A Dessert to Remember
So there you have it, my friend. My heart and soul poured into this Berry Bliss Cheesecake recipe. It’s more than just mixing ingredients. It’s about creating a moment of pure, shared joy. That first bite of cool, creamy filling with the tangy berry burst is always a small celebration. It’s the dessert my family requests most, and I have a feeling it might become one of yours too. Don’t be intimidated by the steps. Take your time, enjoy the process, and get ready for the best compliments of your life. Now, go preheat that oven and make some magic! Happy baking!
Berry Bliss Cheesecake
Ingredients
Equipment
Method
- Preheat your oven to 325°F (163°C).
- Pulse graham crackers into fine crumbs in a food processor; mix with melted butter and sugar until it resembles wet sand.
- Press the mixture into the bottom and up the sides of a 9-inch springform pan; bake for 10 minutes.
- Cool the crust on a rack.
- Beat softened cream cheese until smooth; add sugar and beat for 2 more minutes.
- Mix in heavy cream, sour cream, and vanilla until silky.
- Add eggs and yolks one at a time on low speed, mixing until just incorporated.
- Wrap the springform pan with aluminum foil to prevent seepage.
- Pour the filling into the crust; place in a larger roasting pan and fill with hot water halfway up the sides.
- Bake for 60-70 minutes until edges are set with a gentle jiggle in the center.
- Turn off the oven, crack the door open, and let cheesecake cool inside for 1 hour.
- In a saucepan, cook 1 cup of blackberries with sugar and lemon zest until they burst and release juice.
- Mix cornstarch with lemon juice; stir into bubbling berries, cooking until thickened.
- Gently stir in remaining blackberries and heat for 1 more minute; let sauce cool completely.
- Chill cheesecake overnight; carefully release from springform pan.
- Pour blackberry sauce over the cheesecake; let sit at room temperature for 15 minutes before slicing.