Why I’m Obsessed with Blueberry Cheesecake Baked Oats
Last Tuesday morning, I woke up craving dessert for breakfast. Not just any dessert, but rich, creamy cheesecake with juicy blueberries. Instead of feeling guilty about it, I made myself a batch of blueberry cheesecake baked oats. Ten minutes of prep and thirty minutes later, I was eating what tasted like cake but was actually good for me.
This recipe changed my entire morning routine. I used to skip breakfast or grab something boring on my way out the door. Now I actually look forward to waking up because I know I have this waiting for me. The best part? My kids think they’re getting dessert too, so everyone wins.
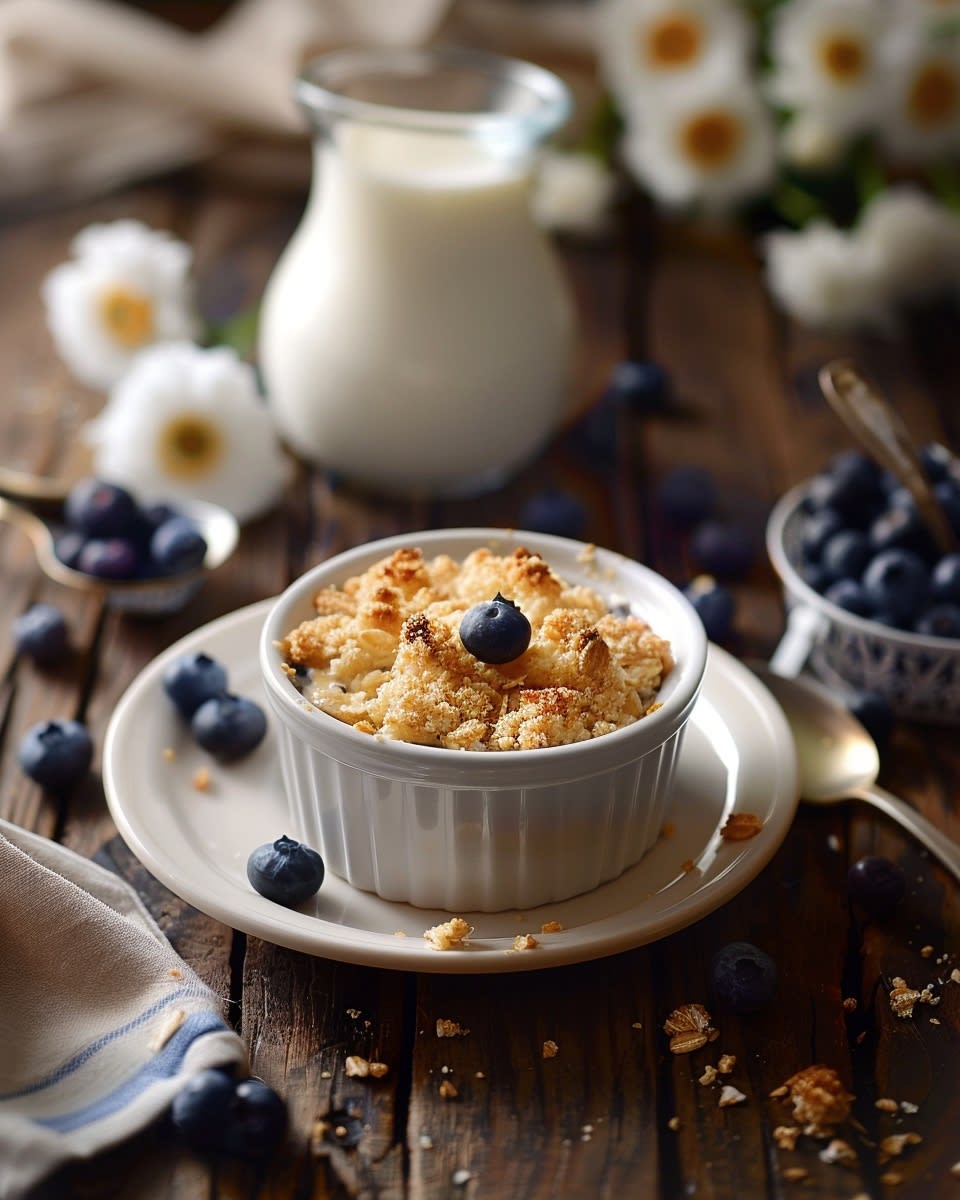
Blueberry cheesecake baked oats are exactly what they sound like. You take regular oats, blend them with eggs and milk, add cream cheese and blueberries, then bake everything until it puffs up like a cake. The texture sits somewhere between a muffin and a slice of baked cheesecake. The top gets slightly golden and crispy while the inside stays soft and creamy.
What makes this breakfast special is how it solves the eternal morning problem. We all want something quick, tasty, and healthy. Usually you only get to pick two of those things. But this recipe delivers on all three. You can make it in advance for the whole week. Each serving packs a serious protein punch. And it honestly tastes like you’re treating yourself to something indulgent.
I started making easy blueberry cheesecake baked oats about six months ago after trying one of thefitlondoner baked oats recipes. Her version inspired me to create my own twist. Since then, I’ve made this recipe at least twenty times. I’ve tested different variations, tried various mix-ins, and figured out exactly what works best.
The protein content in this breakfast keeps me full until lunch. No mid-morning crashes or desperate snack attacks. Just steady energy that lasts. When you use the right ingredients, a single serving can give you over 20 grams of protein. That’s more than most protein bars and way more satisfying.
Another reason I love this recipe is how flexible it is. You can batch cook baked oats on Sunday and have breakfast ready for the entire week. Just reheat a portion each morning and you’re set. This has saved me countless times when I’m rushing to get everyone out the door.
The cheesecake flavor comes through strong without being overwhelming. You get that tangy, creamy taste in every bite. The blueberries add bursts of sweetness and keep things interesting. Some bites are more berry-forward while others highlight the cream cheese. It’s like your taste buds get to go on a little adventure.
What You Need for Blueberry Cheesecake Baked Oats
Let me walk you through everything you’ll need to make this recipe. I’ve tested this with different brands and ingredients, so I can tell you exactly what works best.
The star ingredient is Philadelphia cream cheese. I’ve tried other brands, but Philadelphia gives you that authentic cheesecake flavor we’re after. You don’t need much, just a few tablespoons per serving. The cream cheese melts into the oats and creates pockets of creamy goodness throughout. Don’t even think about using reduced-fat versions here. The full-fat cream cheese is what makes this recipe taste like actual cheesecake.
For the blueberry cottage cheese baked oats variation, you’ll add cottage cheese to the mix. This might sound weird at first, but trust me on this one. Cottage cheese completely transforms the texture and protein content. I use full-fat cottage cheese because it blends smoother and tastes better. The cottage cheese adds an extra layer of creaminess while bumping up the protein significantly.
When it comes to blueberries, fresh beats frozen every single time. Fresh blueberries hold their shape better during baking and don’t release as much liquid. They burst in your mouth with that perfect sweet-tart flavor. I buy mine from the farmer’s market when they’re in season. During winter, I’ll use frozen berries if I have to, but I always thaw and drain them first.
Here’s your complete ingredient list:
- Rolled oats – The base of your recipe. Use old-fashioned rolled oats, not instant or steel-cut. You’ll need about 1/2 cup per serving.
- Philadelphia cream cheese – About 2 tablespoons per serving for that authentic cheesecake taste.
- Cottage cheese – 1/4 cup per serving if you want the blueberry cheesecake baked oats high protein version.
- Fresh blueberries – A generous handful, roughly 1/3 cup per serving.
- Eggs – One whole egg per serving to bind everything together.
- Milk – Any type works. I use regular whole milk, but almond or oat milk are fine too.
- Vanilla extract – Just a splash for extra flavor depth.
- Baking powder – A small amount helps everything rise and get fluffy.
- Sweetener – Honey, maple syrup, or your preferred option. I use about 1 tablespoon per serving.
- Salt – A tiny pinch balances all the flavors.
You can find all these ingredients at any regular grocery store. I shop at my local supermarket and never have trouble finding what I need. The cream cheese lives in the dairy section near the butter. Cottage cheese is usually nearby. Grab the oats from the cereal aisle.
If you can’t find fresh blueberries, frozen ones work in a pinch. Just remember to thaw them completely and pat them dry with paper towels. Otherwise you’ll end up with purple oats and too much liquid in your mixture. I learned this the hard way during my first attempt.
For the cottage cheese, look for brands with simple ingredient lists. Some cottage cheeses have weird additives that affect the taste. I prefer Good Culture or Daisy brand. The curd size doesn’t matter much since you’ll be blending it anyway.
Can you make substitutions? Absolutely. Greek yogurt can replace cottage cheese if that’s what you have on hand. The protein content will be similar. You could also use ricotta cheese for an even richer texture, though it has less protein than cottage cheese.
For a dairy-free version, you’ll need to get creative. Dairy-free cream cheese exists but often doesn’t melt the same way. I’ve had decent results using cashew cream cheese. The baked cheesecake oats cottage cheese element is harder to replace, but silken tofu blended smooth could work.
If you’re serious about making blueberry baked oats high protein, add a scoop of vanilla protein powder to the mix. This bumps the protein content even higher. Just reduce the sweetener since most protein powders already contain sweetness.
One ingredient I never substitute is the vanilla extract. Real vanilla extract makes a noticeable difference in the final taste. The artificial stuff just doesn’t compare. Spend a few extra dollars on the good vanilla. Your taste buds will thank you.
Store your oats in an airtight container. Keep cream cheese and cottage cheese in the coldest part of your fridge. Fresh blueberries should be stored unwashed in their original container. Only rinse them right before you’re ready to use them. This prevents mold and keeps them fresh longer.
Having all these ingredients on hand means you can whip up easy blueberry cheesecake baked oats whenever the craving hits. I keep my pantry stocked so I’m always ready. This recipe has become such a regular part of my routine that I automatically add these items to my shopping list each week.


How to Make Easy Blueberry Cheesecake Baked Oats
Now that you’ve got everything lined up on your counter, let’s actually make this thing. I promise this is easier than you think, even if you’ve never baked anything more complicated than toast.
Start by preheating your oven to 350°F. This is crucial because you want the temperature just right when your mixture goes in. While that’s heating up, grab your blender. If you don’t have a blender, a food processor works fine too. I used my old NutriBullet for months before upgrading to a proper blender.
Throw your rolled oats into the blender first. Pulse them until they turn into a flour-like consistency. This takes maybe fifteen seconds. You want it fine but not completely powdered. Some texture is good. This step is what transforms regular oats into something that actually bakes like cake instead of feeling like chunky porridge.
Next comes the wet ingredients. Crack your egg right into the blender with the oat flour. Add your milk, vanilla extract, sweetener, and a pinch of salt. Now here’s where it gets interesting. Drop in your cream cheese in small chunks. If it’s too cold and hard, microwave it for about ten seconds to soften it up. Nobody wants to blend rock-hard cream cheese.
If you’re making the blueberry cottage cheese baked oats version, add the cottage cheese now too. I know some people get squeamish about cottage cheese, but once it’s blended, you can’t even tell it’s there. It just makes everything incredibly creamy and protein-packed. My husband had no idea I was using cottage cheese until I told him after his third serving.
Blend everything until completely smooth. This usually takes about thirty seconds. Stop halfway through and scrape down the sides with a spatula to make sure everything gets incorporated. The mixture should look like thick pancake batter. If it seems too thick, add a splash more milk. Too thin? Toss in another tablespoon of oats.
Here’s the thing about texture. You want it pourable but not watery. When you lift your spatula out of the mixture, it should slowly drip off rather than running like water or sticking like glue. I’ve made this recipe enough times to know that getting this consistency right makes all the difference in how it bakes.
Grab your baking dish. I use individual ramekins because they’re perfect for portion control and they look fancy. You can also use a small casserole dish if you prefer. Either way, spray it generously with cooking spray or brush it with butter. Don’t skip this step unless you enjoy scrubbing baked-on oats from dishes for twenty minutes.
Pour your blended mixture into your prepared dish, filling it about three-quarters full. The easy blueberry cheesecake baked oats will puff up while baking, so you need that extra room. I learned this lesson when my first batch overflowed all over the oven and set off the smoke alarm at 6 AM.
Now for the best part. Take small pieces of that Philadelphia cream cheese you saved and dot them across the top. Press fresh blueberries into the batter, spacing them out evenly. I like to push some berries halfway down so they’re throughout the dish, not just on top. This creates those amazing pockets of jammy blueberry goodness in every bite.
If you want to get creative with variations, this is your moment. Chopped walnuts sprinkled on top add a nice crunch and extra protein. Pecans work great too. Sometimes I’ll add a handful of sliced almonds. The nuts toast while everything bakes and add this wonderful nutty flavor that complements the berries perfectly.
Want to try other fruits? Raspberries are fantastic instead of blueberries. Blackberries work well too. I’ve even done a mixed berry version that was incredible. Strawberries are trickier because they release more liquid, but if you dice them small, they’re fine. Actually, if you love experimenting with fruit-based desserts, you might enjoy my lemon blueberry yogurt cake which has a similar vibe but different texture.
Pop your dish into the preheated oven. Set your timer for 25 minutes if you’re using individual ramekins, or 35-40 minutes for a larger dish. You’ll know it’s done when the top is golden brown and the center doesn’t jiggle when you gently shake the dish. A toothpick inserted in the middle should come out mostly clean, maybe with a few moist crumbs.
The smell while this bakes is absolutely unreal. Your whole kitchen will smell like a bakery. My neighbor once knocked on my door asking what I was making because the scent drifted into the hallway. That’s how good this smells.
Let it cool for about five minutes before eating. I know waiting is hard when it smells this good, but trust me. Right out of the oven, it’s molten hot and needs a minute to set up properly. During this time, the texture firms up slightly and becomes more cake-like.
By the way, if you’re into single-serving desserts that come together quickly, check out this quick mug cake recipe for those nights when you need something sweet immediately.
Nutritional Benefits of Blueberry Cheesecake Baked Oats
Let’s talk about why this breakfast is actually good for you, not just delicious. Because honestly, that combination is rare.
The protein content in these blueberry cheesecake baked oats high protein is legitimately impressive. A single serving gives you anywhere from 20-25 grams of protein depending on whether you use cottage cheese or not. That’s the same amount you’d get from a chicken breast or a big scoop of protein powder, except this tastes like dessert.
I eat this after my morning workouts all the time. The combination of protein and complex carbs from the oats is perfect for muscle recovery. Your body needs both after exercise, and this delivers them in the ideal ratio. Plus, eating something this satisfying means I’m not raiding the fridge an hour later looking for snacks.
The eggs and dairy products provide complete proteins with all the essential amino acids your body needs. Cottage cheese specifically is packed with casein protein, which digests slowly and keeps you full for hours. I’ve noticed that on mornings when I eat this, I can easily make it to lunch without even thinking about food. Compare that to when I used to eat cereal and was starving by 10 AM.
Blueberries are basically tiny nutritional powerhouses. They’re loaded with antioxidants, particularly anthocyanins, which give them that deep blue color. These antioxidants fight inflammation and may help protect your brain as you age. I read somewhere that blueberries are one of the most antioxidant-rich foods you can eat. So basically, you’re doing your future self a favor.
Fresh blueberries also contain vitamin C, vitamin K, and manganese. They’re good for your heart, your skin, and your immune system. And because we’re using fresh berries instead of syrup or jam, you’re getting all those benefits without added sugar and preservatives.
The oats themselves deserve recognition. Rolled oats contain both soluble and insoluble fiber. The soluble fiber, particularly beta-glucan, helps lower cholesterol and stabilize blood sugar. This is why you don’t get that crazy energy spike and crash like you would from sugary breakfast cereals or pastries. The energy release is slow and steady.
Funny enough, people always assume anything with “cheesecake” in the name must be terrible for you. But let’s compare blueberry cheesecake baked oats to actual cheesecake. A slice of restaurant cheesecake typically has 400-500 calories, 30+ grams of sugar, and maybe 7 grams of protein if you’re lucky. My baked oats have about 300 calories, 10-12 grams of natural sugars (mostly from fruit), and triple the protein.
Traditional cheesecake is mostly cream cheese, sugar, and graham cracker crust. It’s delicious but nutritionally empty. This recipe gives you whole grains, fruit, quality protein, and healthy fats. You’re actually nourishing your body instead of just satisfying a craving. Though honestly, it satisfies the craving pretty damn well too.
The fats in this recipe come from good sources. Eggs provide omega-3 fatty acids. Full-fat dairy contains conjugated linoleic acid, which some studies suggest might help with weight management. These aren’t the processed trans fats you find in commercial baked goods. They’re natural fats that your body actually needs for hormone production and nutrient absorption.
If you’re someone who tracks macros, this breakfast is a dream. It hits all three macronutrients in balanced proportions. You’ve got your protein from eggs and dairy, carbs from oats and fruit, and healthy fats from dairy and any nuts you add. It’s basically the definition of a complete meal.
For anyone following a higher-protein diet, whether for fitness goals or just to stay full longer, these blueberry baked oats high protein make life so much easier. Getting enough protein at breakfast is challenging without eating eggs every single day or choking down protein shakes. This gives you variety while still hitting your protein targets.
I’ve also found that starting my day with this much protein changes my eating patterns for the entire day. I make better food choices at lunch and dinner because I’m not desperately hungry. There’s actual science behind this. Protein increases satiety hormones and reduces the hunger hormone ghrelin. Your body literally feels more satisfied.
Speaking of protein-packed treats, if you’re looking for other high-protein options that taste indulgent, you should try this chocolate mousse made with cottage cheese. Same concept of sneaking protein into something delicious. Or for a lighter option, Greek yogurt bark is another protein-rich treat that feels like dessert.
The vitamin and mineral content is nothing to ignore either. Between the eggs, dairy, oats, and berries, you’re getting B vitamins, calcium, iron, magnesium, phosphorus, and zinc. That’s a pretty comprehensive nutritional profile for something that takes ten minutes to throw together.
This is the kind of breakfast that actually fuels your day instead of weighing you down. You’re giving your body quality ingredients it can use for energy, not just empty calories it has to process and store. That’s the real difference between this and traditional breakfast pastries or desserts.


TheFitLondoner’s Tips for Perfect Baked Oats
After making thefitlondoner baked oats recipes more times than I can count, I’ve picked up some tricks that completely changed my game. These aren’t just random tips I read somewhere. They’re things I learned through actual trial and error, including some pretty spectacular failures along the way.
Temperature matters way more than you’d think. I always bake mine at exactly 350°F, never higher. My friend insisted that cranking it up to 375°F would save time, and she ended up with a burnt top and raw middle. Not worth it. The moderate temperature lets everything cook evenly from edge to center. If your oven runs hot like mine does, drop it to 340°F and add five extra minutes to the baking time.
Here’s something I wish someone had told me earlier: the toothpick test doesn’t work quite the same way as regular cake. When you insert a toothpick into blueberry cheesecake baked oats, you want it to come out with a few moist crumbs clinging to it. If it comes out completely clean, you’ve actually overbaked it. The residual heat continues cooking it even after you pull it from the oven, so slightly underdone is your target.
For timing, individual ramekins take 23-27 minutes in my oven. I check at 23 minutes and give it a gentle shake. If the center jiggles like Jell-O, it needs more time. If it barely moves, it’s ready. For a larger 8×8 baking dish, plan for 38-42 minutes. Write these times down somewhere because ovens vary wildly, and once you figure out your sweet spot, you’ll want to remember it.
Now let’s talk about something that genuinely changed my mornings: batch cooking. Every Sunday afternoon, I make four servings of philadelphia blueberry cheesecake baked oats at once. I use four individual ramekins or a muffin tin, bake them all together, then store them in the fridge. This might be the single best meal prep decision I’ve ever made.
The method for batch cooking is simple. Multiply your recipe by however many servings you want. Mix everything in one big batch, then divide it among your containers before baking. I line my muffin tins with parchment paper circles cut to fit the bottom. This makes removal ridiculously easy and cleanup takes about thirty seconds.
Storage is straightforward but important. Let your baked oats cool completely before covering them. If you cover them while they’re still warm, condensation builds up and makes them soggy. Nobody wants soggy oats. Once cooled, wrap each portion individually in plastic wrap or store in airtight containers. They’ll stay fresh in the fridge for five solid days.
Reheating is where many people mess up. Don’t use the microwave on full power. That’s a rookie mistake. Microwave on 50% power for about 90 seconds, checking halfway through. This gentle reheating maintains that soft, cake-like texture without turning it rubbery. You can also reheat in a 300°F oven for ten minutes if you have time. The oven method actually makes the top crispy again, which I personally love.
For freezing, wrap cooled portions twice. First in plastic wrap, then in aluminum foil. Label them with the date because frozen food all looks the same after a while. They’ll keep for three months in the freezer. To eat, thaw overnight in the fridge, then reheat as usual. I always keep a few in the freezer as backup for chaotic mornings.
Serving suggestions can take your easy blueberry cheesecake baked oats from good to absolutely incredible. My go-to topping is a generous dollop of cold Greek yogurt. The tangy coolness contrasts perfectly with the warm, sweet oats. Sometimes I’ll mix a little vanilla extract and honey into the yogurt first. Game changer.
A drizzle of real maple syrup over the top adds that restaurant-quality finish. Don’t drown it, just a light drizzle in a zigzag pattern. If you’re feeling fancy, warm the maple syrup for fifteen seconds in the microwave first. Warm syrup soaks into the oats slightly and tastes more luxurious.
Fresh berries on top aren’t just pretty, they add textural contrast. The baked berries inside become soft and jammy, but fresh ones on top stay firm and bright. I’ll often add a small handful of fresh blueberries, raspberries, or sliced strawberries right before serving. The color contrast makes it Instagram-worthy, which apparently matters to some people.
Chopped nuts sprinkled on top add crunch and healthy fats. Pecans, walnuts, or sliced almonds all work beautifully. I’ll toast them quickly in a dry pan first to bring out their flavor. Takes two minutes and makes a noticeable difference. The toasted nuts add this warm, almost caramelized taste that complements the berries.
By the way, if you want to go completely over the top, add a small scoop of vanilla ice cream. I know this defeats the healthy breakfast purpose, but for a weekend brunch or dessert situation, it’s unreal. The cold ice cream melting into the warm baked cheesecake oats cottage cheese creates this incredible temperature and texture combination.
A light dusting of powdered sugar makes it look bakery-quality. Use a small mesh strainer to dust it evenly over the top. This is purely aesthetic but sometimes presentation matters, especially if you’re serving guests. People are way more impressed by food that looks as good as it tastes.
Here’s a weird tip that actually works: let it sit for two minutes after you think it’s done cooling. I used to dive in immediately and burn my tongue every time. Those two extra minutes let the temperature drop to the perfect eating range while the flavors meld together. Patience pays off.
Temperature consistency in your oven is crucial. Invest in an oven thermometer if you haven’t already. I discovered my oven was running 15 degrees cooler than the dial indicated, which explained why my first few batches took forever to bake. A five-dollar thermometer solved months of frustration.
The blueberries you choose genuinely impact the final result. Small wild blueberries work better than giant cultivated ones because they distribute more evenly throughout the batter. When you bite into it, you get berry flavor in almost every mouthful instead of the occasional huge berry that dominates everything.
Don’t skip the resting time after baking. I know I mentioned this before, but it’s worth repeating because it’s that important. The structure continues to set during those five minutes of rest. Cut into it too early and it falls apart. Wait those few minutes and you get clean slices that hold together beautifully.
For the absolute creamiest texture in your blueberry cottage cheese baked oats, blend the cottage cheese separately first until it’s completely smooth, then add it to the rest of your ingredients. This extra step eliminates any graininess and creates this silky texture that’s absolutely worth the extra thirty seconds of effort.
Mix your wet and dry ingredients just until combined. Overmixing develops gluten in the oat flour and makes the final product tough and chewy instead of tender and cake-like. I mix by hand with a spatula for better control. Once you can’t see any dry oat flour, stop mixing.
Room temperature ingredients blend better than cold ones. Take your cream cheese, cottage cheese, and eggs out of the fridge fifteen minutes before you start. Everything incorporates more smoothly, and you’ll get fewer lumps in your batter. Cold eggs especially don’t emulsify as well.
Here’s something most people don’t consider: the role of blueberries in supporting overall wellness. Beyond their delicious taste, these berries contain compounds that contribute to immune system support through their high antioxidant content, making your breakfast not just filling but genuinely beneficial for your body’s defense mechanisms.
If you’re looking for more delicious ways to start your day beyond just baked oats, definitely explore other breakfast and brunch recipes that can add variety to your morning routine while keeping things nutritious and satisfying.
One last thing about batch cook baked oats that makes life infinitely easier: prep your dry ingredients in advance. Measure out the oats, baking powder, and any sweetener into individual containers or zip-top bags. Store these on your counter. When you’re ready to make breakfast, you just dump the pre-measured dry mix into your blender with the wet ingredients. Cuts your morning prep time in half.
Try this recipe this weekend. Start with a single serving just to get the feel for it. Once you nail the technique, scale up to batch cooking. Your future self will thank you when you’re rushing out the door on Tuesday morning but still have a delicious, protein-packed breakfast waiting in the fridge.
Frequently Asked Questions About Blueberry Cheesecake Baked Oats
Can I use frozen blueberries instead of fresh ones?
Absolutely, frozen blueberries work fine in this recipe. The main thing to remember is they release more liquid than fresh berries as they thaw and bake. To compensate, thaw them completely first, then pat them dry with paper towels to remove excess moisture. You might also want to reduce your milk by about two tablespoons to account for the extra liquid. I toss frozen berries in a tiny bit of oat flour before adding them, which helps absorb some of that juice and prevents purple streaks throughout your oats.
Is there a dairy-free version of this recipe?
Yes, you can make a dairy-free version, though the taste and texture will be slightly different. Replace the cream cheese with cashew-based cream cheese or a coconut cream cheese alternative. For the cottage cheese, try using blended silken tofu or coconut yogurt for similar protein content. Use almond milk, oat milk, or any plant-based milk instead of regular milk. The protein content will drop a bit unless you use a high-protein plant milk or add vegan protein powder to compensate.
How long can I store the baked oats?
In the refrigerator, properly stored baked oats last up to five days. Make sure they’re completely cooled before storing in airtight containers to prevent condensation and sogginess. For longer storage, freeze them for up to three months. Wrap individual portions in plastic wrap, then again in aluminum foil to prevent freezer burn. Label them with the date because you’ll forget when you made them. Thaw overnight in the fridge before reheating, or microwave from frozen on 50% power for about two minutes.
Can I make this recipe without eggs?
You can make an egg-free version, but eggs provide important binding and help the oats rise properly. For each egg, substitute one flax egg (one tablespoon ground flaxseed mixed with three tablespoons water, let sit five minutes) or a quarter cup of unsweetened applesauce. The texture will be slightly denser and less fluffy without real eggs. You might also try a commercial egg replacer like Bob’s Red Mill egg replacer. I’d also add an extra quarter teaspoon of baking powder to help with the rise.
Why are my baked oats coming out too dry?
Dry baked oats usually mean you’ve either overbaked them or didn’t use enough liquid in your mixture. Check your oven temperature with a thermometer to make sure it’s accurate. Your batter should be pourable, similar to thick pancake batter, not stiff like cookie dough. If your mixture seems too thick before baking, add milk one tablespoon at a time until it reaches the right consistency. Also, remember that different brands of oats absorb liquid differently, so you might need to adjust based on what you’re using.
Can I prep the batter the night before?
While you technically can prepare the batter the night before, I don’t recommend it. The oats continue absorbing liquid as they sit, and the baking powder starts losing its effectiveness once it gets wet. This results in dense, flat oats instead of fluffy, cake-like ones. If you want to save time in the morning, measure out your dry ingredients separately and have your wet ingredients ready to blend. The actual mixing and blending only takes three minutes anyway, so you’re not saving much time by doing it ahead.
What’s the best way to reheat leftover baked oats?
The microwave works best for convenience, but use reduced power for better results. Microwave your portion at 50% power for 60-90 seconds, checking at the one-minute mark. This prevents the edges from getting rubbery while the center stays cold. For a crispier top, reheat in a 300°F oven for about ten minutes. You can also add a tiny drizzle of milk over the top before reheating to add back some moisture. I actually prefer the texture of properly reheated baked oats over fresh ones sometimes because they get even more tender.
Can I use steel-cut oats or instant oats instead of rolled oats?
Stick with old-fashioned rolled oats for this recipe. Steel-cut oats won’t blend into flour properly and will leave your baked oats with a weird, chewy texture. Instant oats will work in a pinch, but they create a mushier, less structured final product because they’re already partially cooked and more broken down. Quick oats fall somewhere in between and can work if that’s all you have, but rolled oats are really the sweet spot. They blend into the right consistency and maintain enough structure to give you that cake-like texture we’re after.
How do I prevent the cream cheese from clumping?
Make sure your cream cheese is softened to room temperature before blending. Cold, hard cream cheese won’t incorporate smoothly and creates chunks throughout your batter. If you forgot to take it out ahead of time, microwave it for 10-15 seconds to soften it slightly. Cut it into small cubes before adding to your blender so it distributes more evenly. Blend on high speed for at least 30 seconds to ensure it’s completely smooth. Scrape down the sides of your blender halfway through to catch any pieces that got stuck.
Can I add protein powder to boost the protein content even more?
Definitely! Adding a scoop of vanilla or unflavored protein powder bumps the protein content significantly. Use about one scoop (roughly 25-30 grams) per serving and reduce your sweetener since most protein powders already contain sweetness. You might need to add an extra tablespoon or two of milk because protein powder absorbs liquid. Whey protein works best for texture, but plant-based proteins like pea or brown rice protein work fine too. Just be aware that some protein powders can make the texture slightly denser or give a chalky aftertaste if you use too much.
Ingredients
Equipment
Method
- Préchauffez votre four à 175°C.
- Mixez les flocons d'avoine dans un mixeur jusqu'à obtenir une consistance proche de la farine.
- Ajoutez l'œuf, le lait, l'extrait de vanille, l'édulcorant et le sel aux flocons d'avoine et mixez jusqu'à consistance lisse.
- Si vous utilisez du fromage cottage, ajoutez-le à la préparation et mixez jusqu'à ce qu'il soit entièrement incorporé.
- Graissez votre plat de cuisson avec un spray de cuisson ou du beurre.
- Versez le mélange dans le plat préparé, en le remplissant aux trois quarts.
- Parsemez le dessus de petits morceaux de fromage à la crème et enfoncez les myrtilles fraîches dans la pâte.
- Enfournez pendant 25-30 minutes (23-27 minutes pour des ramequins, ou 35-40 pour un plat plus grand) jusqu'à ce que le dessus soit doré et le centre soit bien cuit.
- Laissez refroidir pendant environ 5 minutes avant de servir.