The Magic of Dining Out, Made at Home: Parm-Crusted Chicken
Okay, I’ll admit it. I’ve been known to sneak the little bread basket into my purse. Not the bread, mind you, but the basket itself—the one holding those irresistible, fluffy garlic knots at Longhorn Steakhouse. It’s a problem! But the one dish I could never quite recreate was that perfectly juicy chicken with its golden, cheesy, crunchy top. Until now. After a few… let’s call them “delicious experiments”… I cracked the code. This Parmesan-Crusted Chicken brings the steakhouse right to your kitchen table, no fancy pants required.
A Little Backstory on This Cheesy Marvel
While the exact origins of the dish at the restaurant are a chef’s secret, the concept of Parmesan-crusted protein is pure Italian-American comfort food genius. It takes the simple idea of a breaded cutlet—think chicken Parmesan—and flips it. Instead of frying and saucing, it uses a rich, cheesy crust that bakes into a glorious, savory helmet. My version is a homage, not a copycat. It mixes the salty bite of Parmesan with melty mozzarella and a hint of mayo for unbelievable richness. It’s tradition, with a side of my own kitchen-tested tweaks.
Why You’ll Absolutely Adore This Recipe
First, it’s shockingly simple for something that tastes so fancy. The ingredient list is mostly pantry staples. Second, that crust! It bakes up into this incredible texture—crispy, cheesy, and packed with flavor in every bite. And third, it’s a guaranteed crowd-pleaser. My picky nephew, my foodie friend, and my husband who “isn’t hungry” all magically appear in the kitchen when this is in the oven. It solves the “what’s for dinner” dilemma with style.
Perfect Occasions for This Parmesan Chicken
This is your new go-to recipe. It’s fancy enough for a date night in with candlelight and a glass of wine. It’s easy enough for a hectic Wednesday when you need a win. It’s impressive for when the in-laws come over, and it’s comforting for a quiet Sunday family supper. Basically, any time you want a meal that feels special without the special effort, this is your chicken.
Gathering Your Ingredients
Here’s everything you’ll need to create this masterpiece. I promise, it’s all straightforward!
For the Chicken:
- 4 boneless, skinless chicken breasts (about 6 ounces each)
- 2 tablespoons olive oil
- 1 teaspoon garlic powder
- 1 teaspoon onion powder
- 1/2 teaspoon smoked paprika
- 1/2 teaspoon salt
- 1/4 teaspoon black pepper
For the Parmesan Crust:
- 1/2 cup panko breadcrumbs
- 1/3 cup grated Parmesan cheese
- 1/3 cup shredded mozzarella cheese
- 2 tablespoons unsalted butter, melted
- 1 tablespoon mayonnaise
- 1 teaspoon dried parsley
- 1/2 teaspoon garlic powder
Optional Garnish:
- Fresh parsley, chopped
- Lemon wedges
No Stress Substitutions
Don’t have something? No worries! Cooking is flexible.
- Panko Breadcrumbs: Regular breadcrumbs work, but they won’t be as crispy. For a gluten-free option, use gluten-free panko.
- Cheeses: All Parmesan is fine. Try Asiago for a sharper kick. For the mozzarella, any mild melty cheese like provolone or Monterey Jack will do.
- Mayonnaise: This is the magic binder! If you’re out, sour cream or Greek yogurt can work in a pinch.
- Smoked Paprika: Sweet paprika works, but you’ll miss that subtle smoky depth.
Let’s Get Cooking: Step-by-Step Instructions
Follow these steps and you’ll be a hero at dinnertime.
Step 1: Preheat and Prep
Get that oven roaring hot to 400°F (200°C). This high heat is key for a crispy crust and juicy interior. While it warms up, line a baking sheet with parchment paper. This little trick is my best friend—it means virtually no scrubbing later. Trust me, future-you will be grateful.
Step 2: Season the Chicken
Take your chicken breasts and pat them completely dry with paper towels. This is a non-negotiable step! Wet chicken steams instead of sears. Now, give them a light brush with olive oil. In a small bowl, mix your garlic powder, onion powder, smoked paprika, salt, and pepper. Sprinkle this fragrant seasoning mix over both sides of each breast, rubbing it in gently. You’ll already smell the promise of good things.
Step 3: Sear to Perfection
Heat a good skillet (non-stick or cast iron is perfect) over medium-high heat. Add a tiny drizzle of olive oil. Carefully lay the chicken in the hot pan. You should hear a nice sizzle! Let them cook without moving for about 2-3 minutes per side. We’re not cooking them through, just getting a beautiful golden-brown color. That sear locks in juices and adds tons of flavor. Once gorgeous, transfer them to your waiting baking sheet.
Pro tip: Don’t crowd the pan. Cook in batches if needed to avoid steaming.
Step 4: Create the Cheesy Crust
Time for the star of the show! In a medium bowl, combine the panko, grated Parmesan, shredded mozzarella, melted butter, mayonnaise, dried parsley, and garlic powder. Get in there with a fork and mix until it looks like a delicious, crumbly, cheesy mess. The mayo and butter will make it clump together slightly—that’s exactly what you want. It should smell like the best grilled cheese sandwich of your life.
Step 5: Add the Crust and Bake
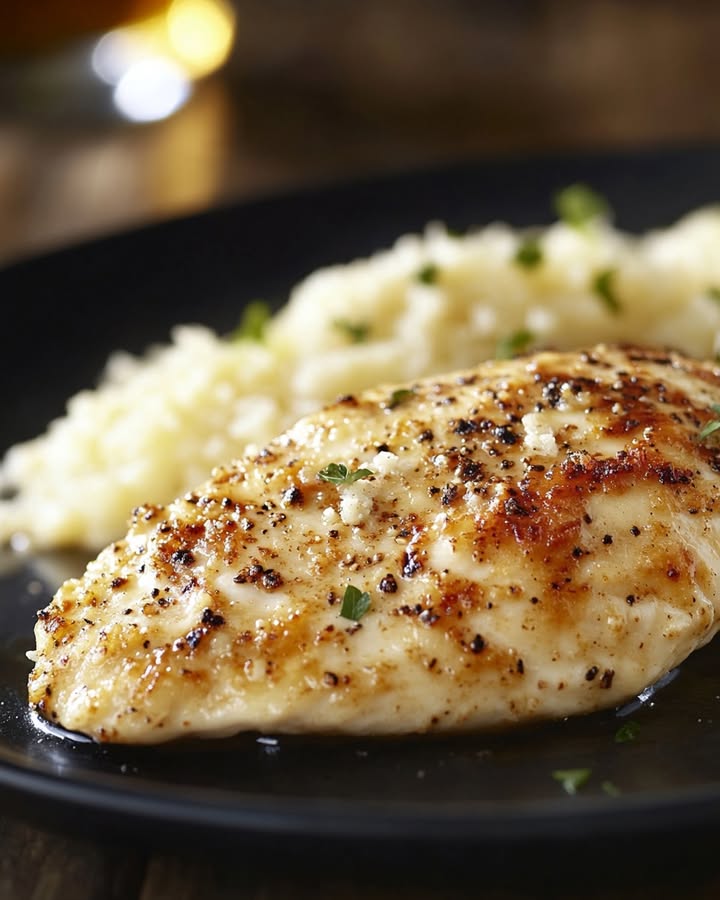
Divide your Parmesan crust mixture evenly among the four chicken breasts. Pile it high on top and use your fingers to gently press it down so it adheres. Don’t worry about the sides. Slide the baking sheet into your hot oven. Bake for 20-25 minutes. The chicken is done when it reaches an internal temperature of 165°F (74C) on a meat thermometer, and the crust is a deep, golden brown.
Step 6: Rest, Garnish, and Serve
This is the hardest part—waiting! Let the chicken rest on the pan for 5 minutes after it comes out of the oven. This lets the juices redistribute, ensuring every bite is moist. Then, sprinkle with a little fresh chopped parsley for a pop of color and serve with lemon wedges. A squeeze of lemon brightens up all that rich, cheesy goodness beautifully.
Chef’s tip: For an extra-juicy result, consider pounding the thicker ends of the chicken breasts to an even thickness before seasoning. They’ll cook more evenly!
Timing is Everything
Here’s the breakdown so you can plan your dinner perfectly:
- Prep Time: 15 minutes
- Cooking Time: 25 minutes
- Resting Time: 5 minutes
- Total Time: 45 minutes
- Servings: 4 happy people
My Secret Weapon for the Best Crust
Alright, lean in. The real trick is in the combination of cheeses and binder. Using both grated Parmesan and shredded mozzarella gives you flavor and melt. But the secret glue? A tablespoon of mayonnaise mixed with melted butter. It creates an irresistibly rich, crispy, and cohesive crust that won’t slide off. It’s my little “aha!” moment from all my testing.
A Fun Fact About Parmesan
Did you know real Parmigiano-Reggiano is often called the “King of Cheeses”? It’s aged for a minimum of 12 months, sometimes over 36! Those tiny, crunchy crystals you sometimes find in aged Parmesan are tyrosine, an amino acid that forms during aging. They’re a sign of quality and pack an incredible burst of savory flavor, which is why it’s worth using the good stuff for this crust.
Kitchen Tools You’ll Need
Nothing crazy here! You likely have it all already.
- A good baking sheet
- Parchment paper (a lifesaver!)
- A medium skillet (for searing)
- Mixing bowls (one small, one medium)
- Pastry brush or your clean hands for oil
- Paper towels
- A meat thermometer (the best way to guarantee perfect doneness)
Storing Your Leftovers (If You Have Any!)
Let the chicken cool completely to room temperature. Do not leave it out for more than two hours. Once cool, place it in an airtight container. You can store it in the refrigerator for up to 3-4 days.
To reheat, the oven or toaster oven is your best bet to keep the crust crispy. Preheat to 350°F and warm for 10-15 minutes, until heated through. The microwave will work in a pinch but will make the crust soft.
I do not recommend freezing this dish after it’s baked. The mayonnaise-based crust can separate and become greasy when thawed and reheated. For meal prep, you can season the chicken and make the crust mix ahead of time, storing them separately in the fridge for a day, then assembling and baking when ready.
Tips and Advice for Success
- Always use a meat thermometer. 165°F in the thickest part is the goal.
- If your chicken breasts are huge, you can butterfly them (cut them horizontally almost in half) to create two thinner cutlets. This reduces cooking time and increases crust-to-chicken ratio—a win!
- For extra flavor, add 1/4 teaspoon of Italian seasoning or dried oregano to the crust mixture.
- Don’t skip the sear! It builds a flavor foundation you can’t get from baking alone.
Presentation Ideas to Wow Your Table
- Serve on a bed of creamy mashed potatoes with a side of garlicky green beans.
- Slice the chicken on a diagonal and fan it over a pile of roasted asparagus drizzled with balsamic glaze.
- Keep it light with a big, vibrant arugula salad topped with shaved Parmesan and a lemon vinaigrette.
- For a true steakhouse vibe, add a baked potato with all the fixings and a warm bread roll on the side.
Healthier Twists on the Parmesan Crust
Love the idea but want a lighter version? Try these easy swaps.
- Air Fryer Method: Skip the sear and cook the prepared chicken in a preheated air fryer at 375°F for 12-16 minutes. The crust gets incredibly crispy with less oil.
- Greek Yogurt Swap: Replace the mayonnaise and melted butter with an equal amount (3 tablespoons) of plain, thick Greek yogurt. It adds tang and protein with less fat.
- Whole Wheat Panko: Use whole wheat panko breadcrumbs for added fiber and a nuttier flavor.
- Leaner Protein: Try this same crust on thick cutlets of turkey breast or even firm white fish like cod or halibut.
- Veggie Power: Create a “vegetable steakhouse” by using large portobello mushroom caps as the base. Season and bake, then top with the crust for the last 10 minutes.
- Cut the Cheese (A Little): Reduce the mozzarella by half and add 2 tablespoons of nutritional yeast for a cheesy flavor with less saturated fat.
Common Mistakes to Avoid
Avoid these simple pitfalls for the best chicken every time.
Mistake 1: Starting with Wet Chicken
This is the most common error. If you don’t pat the chicken dry with paper towels, the seasoning won’t stick well. More importantly, moisture creates steam in the pan. This prevents that beautiful golden sear we’re after. You’ll end up boiling the chicken instead of browning it. Always take 30 seconds to thoroughly dry each breast. It makes a world of difference.
Mistake 2: Skipping the Sear
You might be tempted to just put the raw, seasoned chicken in the oven with the crust. Don’t do it! The quick sear in a hot skillet does two crucial things. First, it creates a flavorful browned layer through the Maillard reaction. Second, it starts the cooking process, so the chicken finishes evenly in the oven without drying out. It’s the step that makes it taste restaurant-quality.
Mistake 3: Using Pre-Shredded Bagged Cheese for the Crust
Pre-shredded cheeses contain anti-caking agents like cellulose. These prevent the cheese from clumping in the bag, but they also prevent it from melting smoothly and cohesively into your crust. For the best texture and melt, take a minute to grate a block of Parmesan and shred your own mozzarella. The fresh cheese will blend beautifully with the other ingredients for a superior, non-gritty crust.
Mistake 4: Overcooking the Chicken
Dry, tough chicken is a sad dinner. Because the crust is so flavorful, it’s easy to forget about the chicken underneath. Baking at 400°F cooks things quickly. Relying solely on time can lead to overcooking, as breast sizes vary. The foolproof solution is a simple meat thermometer. Insert it into the thickest part, and pull the chicken out the moment it hits 165°F. It will be perfectly juicy.
Frequently Asked Questions (FAQ)
Can I use chicken thighs instead of breasts?
Absolutely! Boneless, skinless chicken thighs are a fantastic choice for this recipe. They are more forgiving and stay incredibly moist due to their higher fat content. You may need to adjust the baking time slightly, as thighs can be thicker. Still, use your meat thermometer and cook to 165°F. The rich, cheesy crust pairs wonderfully with the deeper flavor of thigh meat. Just be sure to trim any excess fat before seasoning and searing.
I don’t have panko. Can I use regular breadcrumbs?
Yes, you can, but know that the texture will be different. Regular breadcrumbs are much finer and denser than panko. Panko is made from bread without crusts, resulting in larger, airier flakes that stay crispier after baking. If you use regular breadcrumbs, your crust will be more like a traditional coating—still tasty, but less crunchy and light. For a closer result, try crushing up plain cracker crumbs or even crushed cornflakes for a bit more texture.
Why do I need to sear the chicken before baking? Can’t I just bake it?
You could just bake it, but you’d be missing out on a huge layer of flavor. Searing the chicken in a hot pan creates a caramelized, browned crust on the outside of the meat itself. This process, called the Maillard reaction, develops complex, savory flavors that you simply can’t get from baking alone. It also gives the chicken a head start on cooking, which helps it stay juicy inside while the cheese crust browns. Think of the sear as building a flavor foundation for your dish.
How can I make this recipe gluten-free?
It’s very easy to make a gluten-free version! The only ingredient containing gluten is the panko breadcrumbs. Simply swap them out for an equal amount of gluten-free panko breadcrumbs, which are widely available in most grocery stores. Be sure to also check that your other ingredients, like the spices and mayonnaise, are certified gluten-free if you have a severe sensitivity. All other steps in the recipe remain exactly the same, and you’ll get the same delicious, crispy result.
What’s the purpose of the mayonnaise in the crust?
The mayonnaise serves as a brilliant binder and flavor enhancer. It helps the breadcrumb and cheese mixture stick together so it forms a cohesive crust that won’t fall off the chicken. But it does more than that! The eggs and oil in mayo contribute to a rich, golden-brown color and an incredibly tender-crisp texture as it bakes. It adds a subtle tang and moisture that butter alone doesn’t provide. Don’t worry, you won’t taste “mayo”—you’ll just taste an amazing, crispy topping.
Can I prepare this dish ahead of time?
You can do some prep ahead to make dinner time easier. You can season the chicken breasts and store them covered in the fridge for up to a day. You can also mix the dry ingredients for the crust (panko, cheeses, parsley, garlic powder) ahead of time. Store that mix in a separate bag or container. When you’re ready to cook, melt the butter, mix it with the mayo, and combine with your pre-made dry mix. Then sear, top, and bake. I don’t recommend assembling the whole dish hours ahead, as the crust can get soggy.
What are the best side dishes to serve with this chicken?
This chicken is wonderfully versatile! For a classic comfort food plate, pair it with creamy mashed potatoes and steamed broccoli. To keep it lighter, a big kale Caesar salad or roasted Brussels sprouts are perfect. Pasta sides work great too—think angel hair with marinara or a simple lemon butter orzo. For a low-carb option, serve it over cauliflower mash or with a medley of roasted zucchini, bell peppers, and onions. The lemon wedge garnish is key; a squeeze brightens up all these pairings.
My crust isn’t sticking to the chicken. What did I do wrong?
If your crust is falling off, there are two likely culprits. First, the chicken might have been too wet when you applied the topping. Make sure it’s well-seared and dry on the surface. Second, you might not have pressed the crust mixture on firmly enough. After spreading it over each breast, use the palm of your hand to gently but firmly press it down. This helps it adhere. The combination of the sticky seared surface and the binding power of the mayo-butter mix should hold it on beautifully if you give it a good press.
Is smoked paprika really necessary? What does it add?
It’s not strictly necessary, but it’s highly recommended. Smoked paprika adds a deep, subtle smoky flavor that elevates the dish beyond ordinary seasoned chicken. It gives a hint of complexity that mimics the char-grilled flavor you might get at a steakhouse. If you only have sweet paprika, you can use it, but the flavor profile will be simpler. For a different twist, you could use a tiny pinch of cayenne for heat or some dried thyme for an herbal note. But try to find smoked paprika—it’s a kitchen powerhouse!
Can I cook this in an air fryer instead of the oven?
Yes, the air fryer is a fantastic tool for this recipe! It makes the crust extra crispy. Follow the recipe through searing the chicken. Then, instead of using a baking sheet, place the seared, crust-topped chicken in your air fryer basket. Make sure they aren’t touching. Air fry at 375°F for about 10-14 minutes. Always check with a meat thermometer to ensure the chicken reaches 165°F, as air fryer models vary in power. The result is incredibly juicy chicken with an unbelievably crunchy, golden crust.
Your New Family Favorite Awaits
So there you have it—my tried-and-true path to making a spectacular Parmesan-Crusted Chicken that feels like a fancy night out. It’s become a regular on our weekly menu because it’s reliably delicious and always brings smiles. I hope this recipe finds its way into your kitchen and becomes one of those cherished, “Mom, can you make that chicken?” meals. Now, go preheat that oven and get ready for some serious compliments. Happy cooking!