The Joy of Homemade Chicken Tenders Crispy
Last Tuesday night, my eight-year-old refused to eat anything until I promised her chicken tenders. I watched her crunch into that first bite, eyes lighting up at the sound of that perfect crispy coating. That moment reminded me why homemade chicken tenders matter so much.
There’s something magical about chicken tenders crispy enough to make that satisfying crunch with every bite. While frozen options line grocery store shelves, nothing beats tenders you make in your own kitchen. You control the ingredients, the seasoning, and most importantly, that golden crust everyone loves.
I’ve spent years testing different methods to create the best chicken tenders recipe. Some nights I’ve pulled out my deep fryer for a classic fried chicken tenders recipe. Other times I’ve used my oven to make healthier oven baked chicken tenders that still deliver on taste and texture. Both methods work beautifully when you know the right techniques.
Homemade tenders win over restaurant versions for several reasons. You can adjust the spice level for your family. You know exactly what goes into your coating. Plus, making them yourself costs less than takeout or frozen packages. Kids love helping with the breading process too.
In this guide, I’ll share everything I’ve learned about making restaurant-quality tenders at home. You’ll discover tips for both oven fried chicken tenders and traditional fried versions. I’ll cover different breading options and explain what really makes tenders turn out crispy instead of soggy. Whether you want a quick weeknight dinner or party food that impresses, these methods will work for you.
The Secret to Crispy Tenders
People always ask me the same question: what is the secret to crispy tenders? The answer isn’t just one thing. It’s a combination of smart techniques that work together to create that perfect crunch.
The coating makes or breaks your tenders. I learned this the hard way after serving my family soggy, disappointing chicken more times than I want to admit. A proper coating needs three layers. First comes a dry flour coating that helps everything else stick. Then a wet mixture that adds moisture and flavor. Finally, a second dry coating creates the actual crust.
How to get a good crust on chicken tenders? Start by patting your chicken completely dry with paper towels. Wet chicken won’t hold coating properly. Any surface moisture prevents the flour from sticking and creates steam during cooking. Steam is the enemy of crispiness.
I set up three shallow dishes for my breading station:
- Dish one: All-purpose flour mixed with salt, pepper, and garlic powder
- Dish two: Beaten eggs or buttermilk
- Dish three: Breadcrumbs, panko, or seasoned flour
The type of breadcrumb you choose matters tremendously. Regular breadcrumbs work fine, but panko breadcrumbs create superior crispiness. Those Japanese-style breadcrumbs have a lighter, flakier texture. They don’t absorb as much oil and they stay crunchier longer. When I’m making a kfc crispy chicken strips recipe at home, panko gets me closest to that signature texture.
Some cooks add cornstarch to their flour mixture. This trick works because cornstarch creates an extra crispy coating. I use about one part cornstarch to three parts flour. The cornstarch absorbs moisture better than flour alone and forms a harder shell when cooked.
Buttermilk appears in many traditional fried chicken tenders recipe variations for good reason. The acid in buttermilk tenderizes the chicken while adding tangy flavor. It also creates a thicker coating than regular milk or eggs. The chicken soaks up some of that buttermilk, which keeps the meat juicy inside while the outside gets crispy.
But what if you don’t have buttermilk? I’ve made plenty of fried chicken strips recipe without buttermilk that turned out great. You can make a quick substitute by adding one tablespoon of lemon juice or white vinegar to one cup of regular milk. Let it sit for five minutes until it curdles slightly. This creates the same acidic environment that tenderizes chicken.
Plain beaten eggs work too. They help breading stick just fine, though you miss out on that buttermilk tang. For extra flavor without buttermilk, I sometimes use seasoned eggs. I whisk in hot sauce, Worcestershire sauce, or dried herbs right into the beaten eggs.
Temperature control plays a huge role in achieving crispy results. For fried tenders, oil temperature should stay between 350 and 375 degrees Fahrenheit. Too cool and your coating absorbs excess oil, making greasy tenders. Too hot and the outside burns before the inside cooks through.
I use a thermometer every single time I fry chicken. Those few dollars for a basic kitchen thermometer have saved countless batches of tenders. Drop your chicken into properly heated oil and you’ll hear an immediate sizzle. That sound tells you the coating is forming a seal that locks in moisture.
For oven baked chicken tenders, a different approach helps. How to crisp up chicken tenders in the oven? The key is high heat and a wire rack. I preheat my oven to 425 degrees Fahrenheit. I place breaded tenders on a wire rack set inside a baking sheet. This lets hot air circulate all around each tender instead of trapping steam underneath.
Spray your breaded tenders lightly with cooking oil before baking. This helps browning and adds that fried texture without actually frying. I use an oil spray bottle and coat all sides evenly. The oil helps conduct heat to the breading and encourages those breadcrumbs to turn golden and crispy.
Another crispy chicken recipe secret involves letting breaded chicken rest before cooking. After coating your tenders, place them on a rack for 10 to 15 minutes. This rest time lets the breading set and adhere better to the chicken. The coating dries out slightly, which makes it crispier when it hits the heat.
Double breading creates extra crunch for people who love really thick coating. After your standard three-step breading process, dip the tender back into the wet mixture, then into the breadcrumbs again. This second layer builds up more crust. It takes extra time but delivers impressive results for special occasions.
Seasoning your breading layers separately gives better flavor throughout. Don’t just season the chicken itself. Add salt, pepper, paprika, and other spices to both the flour and the breadcrumb mixture. Every layer should taste good on its own. When they combine, you get complex flavor instead of bland coating surrounding seasoned chicken.
The final secret? Don’t crowd your cooking surface. Whether you’re frying or baking, leave space between each tender. Crowding causes temperature drops in oil or trapped steam in the oven. Both problems lead to soggy coating instead of that crispy texture we’re after. Cook in batches if needed. Your patience will pay off with better results.


Fried Chicken Tenders Recipe
Once you understand those fundamental techniques, you’re ready to put them all together into an actual recipe.
I’ve tested this fried chicken tenders recipe probably fifty times over the years. My notebook has notes scribbled in the margins from batches that turned out too salty or not crispy enough. But I finally landed on a version that works every single time. My family asks for these at least twice a month.
Start with about two pounds of chicken tenderloins. You can buy them already separated, or cut chicken breasts into strips yourself. I actually prefer cutting my own because I can make them whatever size works best. Thicker strips take longer to cook but stay juicier inside. Thinner ones cook faster and get extra crispy, though they can dry out if you’re not careful.
Here’s what you’ll need for the coating: one and a half cups of all-purpose flour, two cups of panko breadcrumbs, three eggs, one cup of buttermilk, and your seasonings. For the spice mix, I use two teaspoons of paprika, one teaspoon of garlic powder, one teaspoon of onion powder, half a teaspoon of cayenne pepper, and salt and black pepper to taste. The cayenne adds a gentle kick without making things too spicy for kids.
Before you start breading, pour about two inches of vegetable oil into a heavy-bottomed pot or Dutch oven. Start heating it over medium heat. It’ll take maybe ten minutes to reach the right temperature, so getting it going early saves time later. You want that oil at 350 degrees Fahrenheit when you’re ready to fry.
Set up your breading station while the oil heats. Mix your flour with half of the seasoning blend in a shallow dish. In another dish, whisk together the eggs and buttermilk until they’re completely combined. The buttermilk makes such a difference here—it creates this tangy flavor that reminds me of the kfc crispy chicken strips recipe I’ve been trying to recreate forever. In your third dish, combine the panko with the remaining seasonings.
Pat those chicken strips completely dry. This step matters more than people think. Even a little moisture messes up how the flour sticks. Take each strip and dredge it thoroughly in the seasoned flour. Shake off any excess—you want a light, even coating. Then dunk it in the egg mixture, letting the extra drip back into the bowl. Finally, press it into the panko breadcrumbs, making sure every surface gets covered. I use one hand for wet ingredients and one for dry to keep my fingers from getting completely coated in breading.
By the way, if you want even more flavor, try marinating the chicken in buttermilk for a few hours before you start. I’ve done overnight marinades that resulted in incredibly tender chicken. Just drain the strips well and pat them dry before beginning the breading process.
Once your oil reaches temperature, carefully lower three or four strips into the hot oil. Don’t drop them from a height—slide them in gently to avoid splashing. The oil temperature will drop when you add cold chicken, which is normal. It should recover quickly if you don’t overcrowd the pot. I learned this lesson after making a batch where I crammed in too many pieces at once. The temperature plummeted, the coating absorbed tons of oil, and everything came out greasy instead of crispy.
Fry each batch for about four to five minutes per side. You’ll see the coating turn this gorgeous golden brown color. The chicken should float when it’s done cooking. I always check the first piece with a meat thermometer to make sure the internal temperature hits 165 degrees Fahrenheit. Better safe than sorry when it comes to chicken.
Transfer the cooked tenders to a wire rack set over a baking sheet. Never put fried food directly on paper towels—that traps steam underneath and makes the bottom soggy. The wire rack lets air circulate all around, keeping everything crispy. If you’re cooking multiple batches, you can keep finished tenders warm in a 200-degree oven while you finish the rest.
The variations on this best chicken tenders recipe are endless. Sometimes I add a tablespoon of cornmeal to my breadcrumb mixture for extra crunch and texture. Other times I spike the flour with different spice blends. Italian seasoning creates a different flavor profile that goes great with marinara sauce for dipping. A little curry powder in the breading makes something unexpected and delicious.
My kids love when I make “everything bagel” chicken tenders. I just add everything bagel seasoning to the panko mixture. Sounds weird, but trust me on this one. The sesame seeds, poppy seeds, and dried garlic create this addictive coating that even adults go crazy for at parties.
For a Nashville hot chicken version, I mix cayenne pepper and brown sugar into melted butter and brush it on right after frying. The combination of spicy, sweet, and crispy is absolutely incredible. Just have plenty of milk ready because it brings some serious heat. This technique actually shares some similarities with how I prepare flavorful baked chicken, where coating chicken right after cooking helps seasonings stick better.
Oven Baked Chicken Tenders
Here’s the thing about frying—it tastes amazing, but it’s not something I want to do on a random Tuesday night. The oil, the cleanup, the smell that lingers in my kitchen for hours. Sometimes I just want crispy chicken without all that hassle.
That’s where oven baked chicken tenders save the day. They’re healthier since you’re not submerging chicken in oil. They’re easier because you can cook a whole batch at once instead of working in small groups. And honestly, when you use the right techniques, the texture rivals fried versions.
The benefits go beyond convenience. Baked tenders have fewer calories and less fat, which matters when you’re trying to eat a bit healthier without giving up foods you love. You can walk away from the oven instead of standing over hot oil. There’s almost no splatter to clean up afterward. And you don’t have to figure out what to do with a pot of used cooking oil.
To make the best oven fried chicken tenders, preheat your oven to 425 degrees Fahrenheit. This high heat is crucial for creating that crispy exterior. Use the same three-step breading process I described earlier—flour, egg mixture, breadcrumbs. The preparation stays identical to the fried version.
The key difference comes in your baking setup. Place a wire cooling rack inside a rimmed baking sheet. Spray the rack generously with cooking spray so the chicken doesn’t stick. Arrange your breaded tenders on the rack with space between each piece. That elevation allows hot air to circulate completely around every tender, much like how traditional slow-cooked dishes benefit from even heat distribution, similar to preparing tender braised meats.
Before the tenders go into the oven, spray them lightly with cooking oil spray. I use olive oil or avocado oil spray, making sure to coat the top and sides. This step replaces the oil bath from frying, helping the breadcrumbs brown and crisp up beautifully. Don’t skip this—it makes a massive difference in the final texture.
Bake for about 20 to 25 minutes, flipping the tenders halfway through cooking time. You’ll know they’re done when the coating turns golden brown and the internal temperature reaches 165 degrees Fahrenheit. The flip ensures both sides get equally crispy. I set a timer for 12 minutes, flip everything, then check them every few minutes after that.
Funny enough, I discovered another trick by accident one night when I was running late. I added a tablespoon of oil directly into my breadcrumb mixture before coating the chicken. The oil-enriched breadcrumbs created extra crispiness in the oven without needing to spray as much afterward. Now I do this regularly for baked chicken tenders recipe variations.
Some people ask me about broiling at the end for extra browning. It can work, but you have to watch carefully. I turn on the broiler for the last two minutes of cooking if my tenders need more color. Keep the oven door cracked and don’t walk away—things go from golden to burned incredibly fast under a broiler.
The spice combinations that work for fried tenders work just as well for baked versions. I’ve made lemon pepper tenders, barbecue-seasoned ones, and even Parmesan-crusted versions that remind me of the elegant coatings you might find on upscale meat dishes. Mix a half cup of grated Parmesan cheese into your breadcrumbs along with some Italian herbs. The cheese adds incredible flavor and helps with browning.
For people who really miss that deep-fried taste, I’ve got one more technique. After your tenders come out of the oven, brush them very lightly with melted butter. It adds richness that makes them taste more indulgent. Just a little goes a long way—you don’t want to make them greasy.
The cooking time varies based on thickness. Thinner strips might be done in 15 minutes while thicker ones need the full 25. I always check with a thermometer rather than guessing. You can also cut into the thickest tender to make sure the meat is white all the way through with no pink remaining.
One advantage of baking is that you can prep tenders ahead of time. Bread them in the morning, arrange them on your prepared baking sheet, cover with plastic wrap, and refrigerate until dinner time. They go straight from fridge to oven, though you might need to add a couple extra minutes to the cooking time. This approach to advance preparation works well for busy weeknights, much like preparing components of honey-glazed chicken ahead of time.
Whether you choose to fry or bake, homemade chicken tenders beat store-bought options every time. You control everything that goes into them. You can adjust seasonings to match your family’s preferences. And the satisfaction of pulling off restaurant-quality results in your own kitchen never gets old.


Special Recipes and Variations
I remember the first time I tried to recreate KFC’s chicken at home. My husband looked at me like I was crazy when I told him I’d cracked the code. But after one bite, he stopped talking and just kept eating. That’s when I knew I was onto something.
The kfc crispy chicken strips recipe people search for constantly isn’t some impossible mystery. Sure, the Colonel had his blend of eleven herbs and spices locked in a vault somewhere, but you can get remarkably close with ingredients already in your pantry. I’ve experimented with dozens of spice combinations, and I finally landed on a mix that makes my kids choose my version over the drive-through.
Here’s what makes KFC-style coating different from regular fried chicken. They use a pressure fryer, which we can’t replicate at home safely. But the seasoning blend and double-breading technique? Totally doable. The secret lies in using MSG if you’re comfortable with it. I know MSG gets a bad reputation, but a tiny amount creates that savory, almost addictive quality that makes KFC taste like KFC. If you prefer to skip it, just increase the salt slightly and add a bit of soy sauce to your marinade.
My copycat seasoning blend uses two tablespoons of paprika, one tablespoon of garlic salt, one tablespoon of dried oregano, one tablespoon of dried basil, one tablespoon of dried marjoram, two teaspoons of black pepper, two teaspoons of white pepper, two teaspoons of celery salt, one teaspoon of dried thyme, one teaspoon of ground ginger, and half a teaspoon of MSG (optional). Mix this thoroughly and store it in an airtight container. It keeps for months and works on all kinds of chicken dishes.
The marination process matters just as much as the coating. KFC brines their chicken, which keeps it incredibly juicy despite the high-heat cooking. I make a simple brine with four cups of water, a quarter cup of salt, two tablespoons of sugar, and a tablespoon of my spice blend. Submerge your chicken strips in this mixture for at least two hours, though overnight works even better. The salt breaks down proteins, allowing moisture to penetrate deep into the meat.
After brining, drain the chicken completely and pat it dry. Here comes the KFC trick—you’re going to bread these strips twice, but differently than the double-breading I mentioned earlier. First, mix two cups of flour with three tablespoons of your seasoning blend. Dredge the brined chicken in this seasoned flour, then dip in beaten eggs mixed with a splash of milk. Instead of panko, coat them in the same seasoned flour again. Press firmly so the flour really adheres.
Let those breaded strips rest on a rack for twenty minutes before frying. This rest period is crucial—it lets the coating set up and dry out slightly, which prevents it from falling off in the oil. When you fry them at 350 degrees for about six to eight minutes, you’ll see that characteristic KFC golden-brown color develop. The coating puffs up slightly and gets these gorgeous crispy ridges that crunch perfectly.
By the way, temperature consistency matters even more with this style of coating. Keep that oil steady at 350 degrees, adjusting your burner as needed between batches. I’ve noticed that the coating burns easily if the oil creeps above 365 degrees, so I’m pretty vigilant about checking my thermometer.
Beyond the KFC style, I’ve developed several other variations that my family requests regularly. My honey mustard chicken tenders involve adding two tablespoons of dry mustard powder to the flour mixture and brushing the cooked tenders with a honey-mustard glaze right out of the fryer. The combination of spicy, sweet, and crispy makes these disappear faster than I can make them.
For Asian-inspired tenders, I marinate the chicken in a mixture of soy sauce, rice wine, grated ginger, and minced garlic for a few hours. Then I add sesame seeds to my panko breadcrumbs and proceed with normal breading. After frying, I toss them in a quick sauce made from honey, soy sauce, and sriracha. These work beautifully as an appetizer when you’re entertaining.
Here’s a variation nobody expects but everyone loves—pickle-brined chicken tenders. Use the juice from a jar of dill pickles as your marinade. I’m serious. Soak the chicken strips in pickle juice for four hours. The vinegar tenderizes the meat while adding this subtle tangy flavor. Bread them normally with your favorite seasonings. The pickle flavor stays mild and interesting rather than overwhelming. My neighbor tried these at a cookout and called me the next day demanding the recipe.
Buffalo-style tenders deserve a mention too. I make these exactly like regular fried chicken tenders recipe versions, but the moment they come out of the oil, I toss them in melted butter mixed with Frank’s RedHot sauce. The ratio I use is one stick of butter to a half cup of hot sauce, though you can adjust based on your heat preference. Serve these with blue cheese dressing and celery sticks for the complete experience. The hot sauce soaks into those crispy nooks and crannies of the breading, creating this amazing contrast between the crunchy coating and the spicy, buttery sauce.
Sometimes I go in a completely different direction with Mediterranean flavors. I add dried oregano, lemon zest, and crumbled feta cheese to my breadcrumb mixture. After baking or frying, I serve these with tzatziki sauce for dipping. The bright, fresh flavors work surprisingly well with chicken tenders, and they make a nice change from the usual barbecue or honey mustard options. When considering dietary information about processed versus homemade foods, making these tenders from scratch lets you control sodium levels and avoid the preservatives found in frozen products.
Ranch seasoning creates another fantastic variation. Mix a packet of ranch seasoning mix into your flour coating, or make your own blend with dried dill, dried parsley, garlic powder, onion powder, and buttermilk powder. The herbs give the coating this distinctive flavor that kids especially seem to love. I’ve brought these to potlucks where people assumed I’d bought them from some fancy restaurant.
For holiday gatherings, I sometimes make a cranberry-glazed version. I coat and cook the tenders normally, then brush them with a glaze made from cranberry sauce, orange juice, and a touch of cinnamon. It sounds like a strange combination for chicken tenders crispy enough to stand on their own, but the sweet-tart glaze complements the savory coating beautifully. These feel festive and special without requiring much extra effort.
Coconut chicken tenders offer a tropical twist that works great for summer parties. Replace half of your panko breadcrumbs with sweetened shredded coconut. The coconut toasts beautifully and adds a subtle sweetness that pairs wonderfully with sweet chili sauce or mango salsa for dipping. Just watch them carefully during cooking since the coconut can burn faster than regular breadcrumbs.
My teenage daughter invented what she calls “taco tenders” last month. She added taco seasoning to the flour mixture and crushed up some tortilla chips to mix with the breadcrumbs. I was skeptical until I tasted them. The tortilla chips create this incredible texture, and the taco spices make them perfect for topping a salad or stuffing into a wrap with lettuce, tomatoes, and sour cream.
One more variation worth trying involves pretzel coating. Crush up salted pretzels in a food processor until they’re coarse crumbs, then use them instead of breadcrumbs. The salt content means you need to reduce other salt in the recipe, but the pretzel coating creates such a unique, crunchy texture. I serve these with beer cheese dip for game day, and they’re always the first thing to disappear.
The beauty of a solid best chicken tenders recipe is that it becomes a canvas for creativity. Once you master the basic techniques—the proper breading, the right temperatures, the tricks for staying crispy—you can experiment endlessly with flavors. I keep notes in my phone about combinations I want to try. Some work better than others, but the testing process is half the fun.
If you enjoy experimenting with different preparations of chicken and other proteins, you’ll find plenty of inspiration exploring more meat and poultry recipes that showcase various cooking techniques and flavor combinations.
Don’t be afraid to mess around with these ideas. Add your favorite spices. Try different dipping sauces. Mix cheese into your breadcrumbs. The worst that happens is you learn what doesn’t work, and even “failed” chicken tenders usually taste pretty good. My family jokes that I’ve never met a chicken tender variation I didn’t want to attempt. They’re probably right.
Making chicken tenders at home transforms a simple weeknight dinner into something your family gets excited about. Whether you’re craving that classic KFC taste, want to try something new and unexpected, or just need to get dinner on the table quickly, these recipes and techniques give you the tools to succeed. The confidence that comes from pulling a batch of perfectly golden, crispy tenders from your oven or fryer never gets old. Neither does watching your kids reach for seconds and thirds, or hearing your spouse admit that homemade really does beat takeout.
Frequently Asked Questions
What is the secret to crispy chicken?
The secret isn’t just one thing but a combination of techniques working together. Start with completely dry chicken since moisture prevents proper coating adhesion. Use a three-step breading process with seasoned flour, egg wash, and breadcrumbs or panko. Let the breaded chicken rest for 10 to 15 minutes before cooking so the coating sets properly. Control your cooking temperature carefully, whether frying at 350 to 375 degrees or baking at 425 degrees. Finally, avoid crowding your cooking surface so each piece crisps properly without creating steam.
Can I make chicken tenders ahead of time?
Absolutely, and this actually works great for meal planning. You can bread the tenders completely, arrange them on a baking sheet, cover with plastic wrap, and refrigerate for up to 24 hours before cooking. They go straight from the fridge to the oven or fryer, though you might need a couple extra minutes of cooking time. You can also freeze breaded uncooked tenders for up to three months. Don’t thaw them before cooking—just add five to seven extra minutes to your cooking time. Cooked tenders can be refrigerated for three to four days and reheated in a 375-degree oven for about ten minutes.
How do I reheat chicken tenders and keep them crispy?
Never use a microwave if you want to maintain that crispy coating—it’ll turn everything soggy. Instead, preheat your oven to 375 degrees Fahrenheit and place the tenders on a wire rack set over a baking sheet. Heat them for about ten minutes, flipping halfway through. The wire rack allows air circulation that keeps the coating crisp on all sides. An air fryer also works wonderfully for reheating—just five minutes at 375 degrees usually does the trick. You can also reheat them in a skillet with a tiny bit of oil over medium heat, turning them every couple of minutes until they’re heated through.
What’s the best oil for frying chicken tenders?
I prefer vegetable oil or canola oil because they have high smoke points and neutral flavors. Peanut oil is excellent too if nobody in your household has allergies—it adds a subtle flavor and handles high heat beautifully. Avoid olive oil for deep frying since it has a lower smoke point and can taste bitter when heated to frying temperatures. You want an oil that can maintain 350 to 375 degrees without breaking down or smoking. Whatever oil you choose, make sure you have enough depth—at least two inches—so the tenders can cook evenly and the temperature stays consistent when you add the chicken.
Why does my breading fall off during cooking?
This frustrating problem usually comes down to a few common mistakes. First, you might not be drying your chicken thoroughly before breading—any moisture prevents the flour from sticking properly. Second, make sure you’re pressing the breading firmly onto the chicken at each step rather than just lightly dusting it. Third, let the breaded chicken rest for 10 to 15 minutes before cooking so the coating can set and adhere better. Also check your oil temperature—if it’s not hot enough when the chicken goes in, the coating can slip off before it sets. Finally, avoid moving or flipping the chicken too much during cooking.
Can I use chicken breasts instead of tenderloins?
Yes, chicken breasts work perfectly fine. Just slice them into strips about half an inch to three-quarters of an inch thick, cutting against the grain. Try to make them uniform in size so they cook evenly. Some people prefer cutting breasts into strips because you can control the exact size and thickness. Tenderloins are convenient because they’re already the right shape, but they can be pricier per pound. Either way, the breading and cooking techniques stay exactly the same. Just remember that thicker pieces need longer cooking time, so adjust accordingly and always check with a thermometer to ensure they reach 165 degrees internally.
What dipping sauces go best with chicken tenders?
The classics exist for good reason—honey mustard, barbecue sauce, ranch dressing, and buffalo sauce all work wonderfully. I love making a quick honey mustard by mixing equal parts Dijon mustard and honey with a splash of mayo. For something different, try sweet chili sauce, garlic aioli, or comeback sauce (a Southern specialty made with mayo, ketchup, hot sauce, and Worcestershire). Homemade ranch tastes way better than bottled versions—just mix buttermilk, mayo, sour cream, and ranch seasoning. Kids often love plain ketchup or cheese sauce too. I usually put out three or four different options and let everyone choose their favorite.
How do I know when chicken tenders are fully cooked?
The only truly reliable method is using an instant-read meat thermometer inserted into the thickest part of the tender. It should read 165 degrees Fahrenheit for safe consumption. Visual cues help too—the coating should be golden brown, the juices should run clear when you cut into it, and the meat should be white throughout with no pink remaining. For fried tenders, they usually float to the surface when they’re done cooking. But seriously, get a cheap kitchen thermometer if you don’t have one. It takes the guesswork out of cooking chicken and prevents both undercooking and overcooking.
Can I make gluten-free chicken tenders?
Definitely, and they turn out surprisingly well. Replace regular flour with a gluten-free flour blend or rice flour for the initial coating. For the outer coating, use gluten-free panko breadcrumbs (several brands make them now) or crushed gluten-free cornflakes or rice cereal. The texture won’t be identical to wheat-based breading, but it’s still crispy and delicious. Make sure your seasonings don’t contain hidden gluten too. Some people even use crushed pork rinds as a coating, which creates an incredibly crispy, zero-carb option that happens to be gluten-free. The cooking methods stay exactly the same as regular tenders.
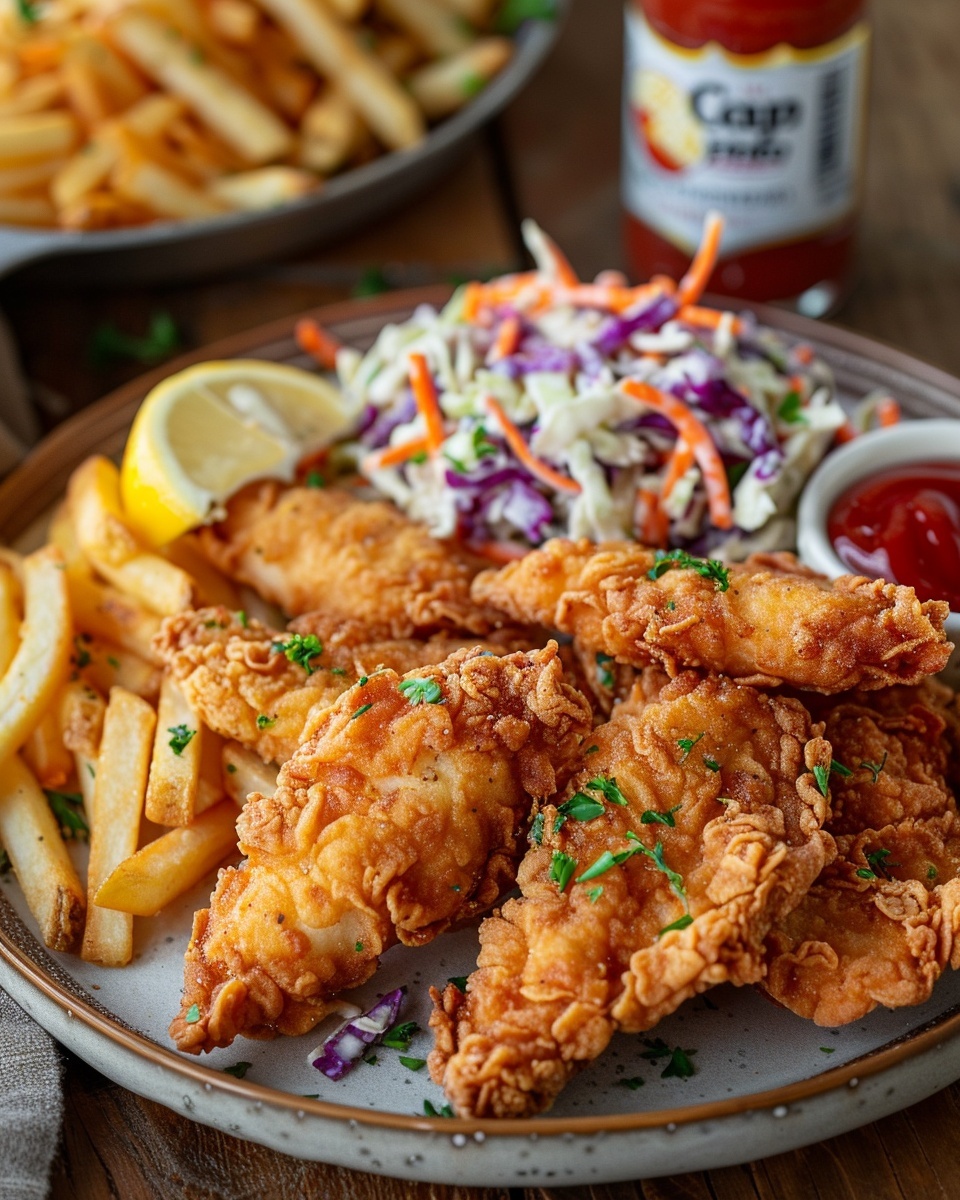
What side dishes pair well with chicken tenders?
Classic pairings include french fries, coleslaw, mac and cheese, and mashed potatoes for a comfort food feast. For lighter options, try a green salad, roasted vegetables, or corn on the cob. Biscuits or cornbread make excellent sides that soak up any dipping sauces. Sweet potato fries offer a healthier alternative to regular fries while adding a nice flavor contrast. I often serve tenders with a simple cucumber and tomato salad dressed with vinegar to cut through the richness of fried food. For kids’ meals, fruit cups, carrot sticks with ranch, or applesauce work great. Really, chicken tenders are versatile enough to go with almost anything.
The next time dinner feels like a chore instead of a joy, remember that a batch of homemade chicken tenders can turn the whole evening around. There’s something about that golden, crispy coating and juicy interior that makes everyone at the table happy, and knowing you created it yourself makes it taste even better.
Chicken Tenders Crispy
Ingredients
Equipment
Method
- Pour about two inches of vegetable oil into a heavy-bottomed pot or Dutch oven and heat over medium heat.
- In a shallow dish, mix flour with half of the seasoning blend.
- In another dish, whisk together eggs and buttermilk until combined.
- In a third dish, combine panko with the remaining seasonings.
- Pat chicken strips completely dry to remove any moisture.
- Dredge each chicken strip in the seasoned flour, shaking off any excess.
- Dip the floured chicken into the egg mixture, allowing excess to drip back.
- Press the chicken into the panko breadcrumbs, ensuring even coating.
- Carefully lower three or four strips into the hot oil, taking care to avoid splashing.
- Fry each batch for about 4-5 minutes per side until golden brown.
- Check the internal temperature with a meat thermometer to ensure it reaches 165°F.
- Transfer cooked tenders to a wire rack set over a baking sheet to keep them crispy.