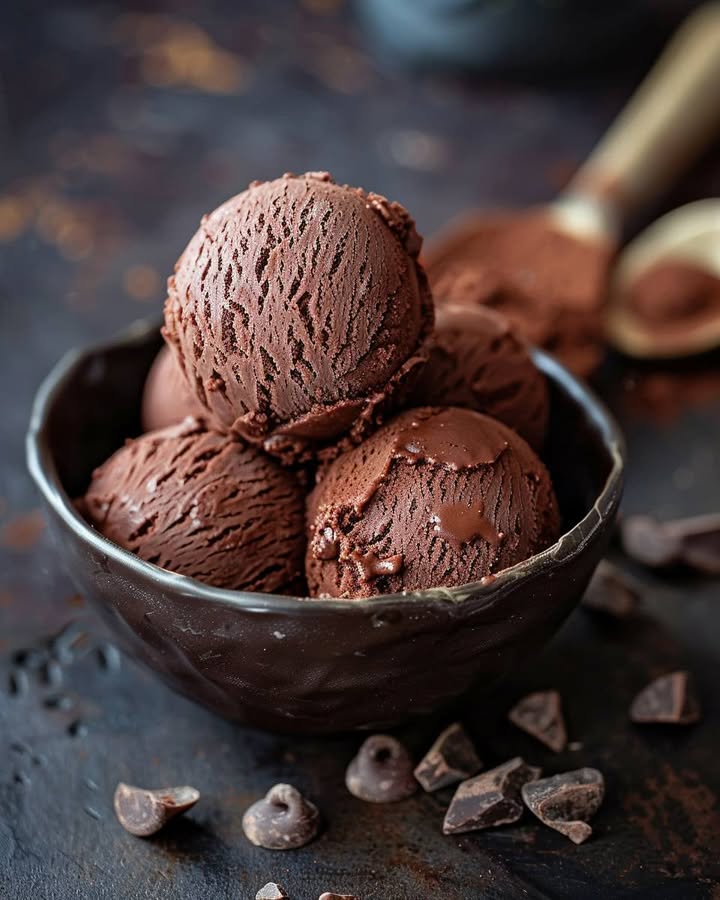
The Ultimate No-Churn Chocolate Ice Cream Balls
Do you ever just have one of those days where only the richest, most chocolatey treat will do? You know the ones. I was staring into my freezer, my family was begging for dessert, and that half-eaten tub of ordinary chocolate ice cream was looking a little sad. So, I decided to give it a makeover. What I created were these incredible Chocolate Ice Cream Balls—a crunchy, creamy, super-chocolatey bite of pure joy that takes minutes to make. They disappeared so fast, I had to make a second batch before I could even take a photo!
From Simple Scoop to Stellar Dessert
We all love a classic scoop of ice cream. But rolling that ice cream into fun, shareable balls? That’s a game-changer for any gathering. This recipe takes inspiration from classic ice cream sundaes and cookie-crunch toppings, blending them into a perfect frozen pop you can eat with your hands. It’s the modern, easier twist on labor-intensive desserts, perfect for today’s busy families who still want a touch of homemade magic. Think of it as upgrading your weeknight dessert into a party-ready superstar without any fancy equipment.
Why These Chocolate Ice Cream Balls Will Be Your New Favorite
You’re going to adore this recipe for three big reasons. First, it’s unbelievably easy. If you can mix and roll, you can make these. Second, the customization is endless. Roll them in nuts, sprinkles, or even more cookie crumbs! Finally, they are the ultimate make-ahead dessert. Having a container of these in your freezer means you’re always ready for surprise guests or a sudden sweet tooth. They’re a fun project to do with kids, too—just be prepared for sticky, happy fingers everywhere.
When to Whip Up a Batch of Chocolate Ice Cream Balls
This isn’t just a random dessert; it’s your secret weapon for so many occasions! I love making them for birthday parties as a fun alternative to cake. They’re perfect for summer barbecues, movie nights, or a fancy dinner party when served in little paper liners. I even pack a few in a small cooler for picnics. Honestly, any event gets a little more special with a platter of these decadent, bite-sized treats on the table.
What You’ll Need: The Chocolate Dream Team
Gather these simple ingredients. The magic is in how you combine them!
- 2 cups chocolate ice cream, softened
- 1 cup crushed chocolate sandwich cookies (like Oreos)
- 1/2 cup chocolate chips
- 1/4 cup unsweetened cocoa powder
- 1/4 cup powdered sugar
- Sprinkles or crushed nuts (optional, for coating)
No Oreos? No Problem! Handy Substitutions
Don’t stress if you’re missing an ingredient. Cooking is about creativity!
- Ice Cream: Use vanilla or coffee ice cream for a different flavor base! Just keep the chocolate mix-ins.
- Cookies: Any crunchy cookie works. Try graham crackers, wafer cookies, or even pretzels for a sweet-salty twist.
- Chocolate Chips: Swap for white chocolate chips, butterscotch chips, or chopped-up candy bars.
- Cocoa Powder: If you’re out, you can omit it. The ice cream and cookies provide plenty of chocolate flavor.
- Coating: Get creative! Use toasted coconut, colored sugar, or even a drizzle of melted chocolate after freezing.
Let’s Make Some Magic: Your Step-by-Step Guide
Ready? Put on an apron, clear some freezer space, and let’s get rolling!
Step 1: Set the Stage
First, grab a large baking sheet and line it with a piece of parchment paper. This little step is a lifesaver. It prevents the chocolate ice cream balls from sticking and makes clean-up a breeze. Trust me, scrubbing frozen ice cream off a pan is no fun. Place the lined sheet in the freezer for a few minutes to get it cold. A cold pan helps the balls keep their shape faster when you place them on it.
Step 2: The Big Mix
Take your softened chocolate ice cream and scoop it into a big, roomy mixing bowl. Now, the fun part: dump in the crushed cookies, chocolate chips, cocoa powder, and powdered sugar. The rich, dark cocoa powder will mix with the sweet sugar, creating a dusty, intense chocolate aroma. Use a sturdy spoon or spatula to fold it all together. You’ll see the creamy ice cream turn into a thick, chunky, irresistible chocolate dough. Pro tip: Don’t over-mix! Just combine until everything is evenly distributed.
Step 3: Roll, Roll, Roll Your Balls
Scoop up about two tablespoons of the mixture. I love using a small cookie scoop for even sizes. The mixture will be cold and sticky. Quickly roll it between your palms to form a smooth-ish ball. Don’t worry about perfection. The uneven bits and cookie chunks add charm! Place each ball onto your cold, prepared baking sheet. Work relatively fast so the ice cream doesn’t melt too much in your hands. If it gets too soft, pop the bowl back in the freezer for 5 minutes.
Step 4: Dress Them Up (Optional but Fun!)
This is where you can let your personality shine. Pour some rainbow sprinkles or finely crushed nuts into a shallow bowl. Take one of your formed balls and gently roll it in the coating. Press lightly so the goodies stick to the surface. You’ll create a fantastic contrast of textures—crunchy outside, creamy inside. This step is especially great if you’re serving these at a party with a color theme.
Step 5: The Big Chill
Once all your beautiful balls are formed and coated, it’s time for the final step: freezing. Carefully slide the entire baking sheet into the freezer. Let them chill undisturbed for at least 1 to 2 hours. This allows them to firm up completely and set their shape. The wait is the hardest part! The smell of chocolate will be tempting you, but patience makes for the perfect, neat-to-eat treat.
Step 6: Serve and Savor!
When they’re frozen solid, your chocolate ice cream balls are ready to shine. You can pile them high in a bowl, arrange them on a fancy platter, or serve them in individual cupcake liners. They are deliciously rich and satisfying all on their own. Chef’s tip: For an extra-decadent touch, serve them with a side of warm chocolate sauce for dipping. Watch them disappear with happy smiles all around!
Your Simple Timeline
This recipe fits into even the busiest schedules.
- Prep Time: 15 minutes (fun, hands-on time!)
- Freezing Time: 1-2 hours (perfect for doing other things)
- Total Time: About 1 hour 15 minutes to 2 hours 15 minutes
- Servings: Makes about 12-15 delightful chocolate ice cream balls
A Little Chef’s Secret
My secret for the easiest rolling? Lightly dampen your hands with cold water before you start shaping each ball. This creates a thin barrier that prevents the ice cream mixture from sticking to your palms like glue. It makes the process so much smoother and faster, and your balls will look much neater!
Did you know the concept of adding mix-ins to ice cream became hugely popular in America in the late 20th century? That’s when brands started making “chunky” flavors with cookies and candies mixed right in. Our recipe is a homemade, super-sized version of that idea. By crushing the cookies ourselves and adding extra chips, we get ultimate control over every delicious, crunchy bite!
Your Simple Toolkit
You likely have everything you need already:
- Large mixing bowl
- Mixing spoon or spatula
- Baking sheet
- Parchment paper
- Small cookie scoop or tablespoon
- Shallow bowls for coatings (optional)
Keeping Your Chocolate Ice Cream Balls Perfect
Once your balls are fully frozen, you’ll want to store them properly. The best method is to transfer them from the baking sheet into a single layer in an airtight, freezer-safe container. Place a piece of parchment paper between layers if you need to stack them. This prevents them from freezing together into one big lump.
Stored this way, your chocolate ice cream balls will keep their best texture and flavor for up to 2 weeks. Any longer, and they might start to develop freezer burn or lose their creamy consistency. They are best enjoyed within the first week for peak deliciousness.
When you’re ready to serve, just take out as many as you need and let them sit at room temperature for just a minute or two. This little rest softens them slightly, making them perfect for biting into without being too hard. No need to thaw completely!
My Best Tips for Success
- Soften, Don’t Melt: Let the ice cream sit on the counter for 10-15 minutes. You want it soft enough to mix, but not soupy.
- Crush Cookies Well: Put your cookies in a sealed bag and use a rolling pin. You want fine crumbs with a few small chunks for texture.
- Freeze Fast: Make sure your freezer is at the proper temperature (0°F or below) so the balls freeze quickly and don’t form ice crystals.
- Double the Batch: Seriously, consider it. These go fast, and having a backup stash in the freezer is always a good idea.
Presentation Ideas to Impress Your Guests
Make your dessert table pop with these simple ideas:
- Serve them in mini paper cupcake liners for a cute, individual touch.
- Skewer two balls on a lollipop stick for an ice cream pop effect.
- Create a sundae bar with bowls of these balls, plus sauces, whipped cream, and cherries.
- For a party, use different coatings (sprinkles, nuts, coconut) to create a colorful variety platter.
6 Tasty Variations to Try
Once you master the basic recipe, the flavor world is your oyster! Here are six fun twists.
- Rocky Road Balls: Add mini marshmallows and chopped almonds to the mix, then roll in crushed graham crackers.
- Peanut Butter Cup Balls: Use chocolate-peanut butter ice cream, mix in chopped peanut butter cups, and roll in crushed peanut butter cereal.
- Mint Chocolate Chip Balls: Start with mint chocolate chip ice cream, add extra chocolate chips, and roll in dark chocolate sprinkles.
- Cookies & Cream Extreme: Use vanilla ice cream, double the amount of crushed Oreos, and roll in… you guessed it, more Oreo crumbs!
- S’mores Balls: Use chocolate ice cream, mix in graham cracker crumbs and mini marshmallows, then roll the finished ball in melted chocolate and more crumbs.
- Decadent Truffle Balls: Roll the basic chocolate balls in pure cocoa powder or dipped in melted dark chocolate for a super-rich, adult-friendly treat.
Common Mistakes to Avoid
Avoid these simple pitfalls for perfect results every time.
Mistake 1: Using Rock-Hard Ice Cream
Trying to mix solid, straight-from-the-freezer ice cream is a workout for your arms and a disaster for your spoon. You’ll end up with uneven chunks and a half-frozen mess. Always let the ice cream soften on the counter for about 10-15 minutes. It should be easily scoopable and malleable, like thick frosting, but not liquid.
Mistake 2: Over-Mixing the Dough
It’s easy to get carried away and stir the mixture into a smooth, homogenous paste. But we want texture! Over-mixing warms up the ice cream too much, making it soupy and hard to roll. Gently fold the ingredients together just until combined. It’s okay to see streaks of cookie dust and pockets of chocolate chips.
Mistake 3: Skipping the Parchment Paper
Placing sticky ice cream balls directly on a bare metal baking sheet seems fine until it’s time to remove them. You’ll be chiseling! The parchment paper creates a non-stick surface that lets you pop the balls off effortlessly once frozen. It’s a tiny step that saves huge frustration.
Mistake 4: Not Freezing Long Enough
Impatience is the enemy here. If you try to serve or store the balls after just 30 minutes, they’ll be too soft and will squish and melt quickly. The full 1-2 hour freeze is crucial. It allows the fats and water in the ice cream to re-solidify completely, giving you that perfect, firm, bite-sized treat.
Your Chocolate Ice Cream Ball Questions, Answered
Can I use a different flavor of ice cream?
Absolutely! This recipe is a fantastic template. Vanilla, coffee, mint chip, or even strawberry ice cream would work beautifully. Just pair your mix-ins and coatings to match. For example, use vanilla ice cream with crushed strawberry cookies and white chocolate chips for a “strawberries and cream” version. The key is to use a good-quality ice cream you love, as it’s the base of all the flavor.
How do I prevent the balls from melting while I roll them?
Speed and cold are your best friends. Work in a cool kitchen, not a hot one. Keep the mixing bowl in the freezer for a few minutes before you start if needed. Having damp, cold hands helps. Most importantly, don’t try to do all the rolling at once. Scoop several portions onto the pan first, then quickly roll them one after another. If the mixture in the bowl gets too soft, just stop and freeze it for 5-10 minutes before continuing.
What’s the best way to crush the cookies?
There are two easy ways. You can place them in a sturdy zip-top bag, seal it well, and crush them with a rolling pin or the bottom of a heavy pan. This gives you nice, uneven crumbs with some texture. For finer, sand-like crumbs, you can pulse them a few times in a food processor. I prefer the bag method because it’s quick, creates less mess, and leaves some satisfying little cookie chunks in the final balls.
Can I make these dairy-free or vegan?
Yes, you can easily adapt this recipe! Simply use your favorite dairy-free chocolate ice cream. Many brands made from coconut, almond, or oat milk are excellent. Also, check that your chocolate chips and sandwich cookies are vegan-friendly (some contain dairy or honey). The method stays exactly the same. It’s a great way to make an inclusive dessert for everyone to enjoy.
How far in advance can I make these?
You can make these up to 2 weeks in advance, which makes them a fantastic party-planning lifesaver. The key is proper storage. Once they are fully frozen solid on the baking sheet, transfer them to an airtight container with parchment between layers. This prevents freezer burn and flavor transfer. They taste best within the first week, but will still be perfectly good for a fortnight.
My ice cream mixture is too soft to roll. What do I do?
Don’t panic! This happens if the ice cream was too soft to begin with or your kitchen is very warm. Simply place the entire mixing bowl back into the freezer for 15-20 minutes. Let the mixture firm up. You can also pop the already-scooped portions on the tray into the freezer for 10 minutes before trying to roll them. A firmer mixture is much easier to handle and will give you neater balls.
Can I dip these in melted chocolate?
That’s a delicious idea, creating a chocolate shell like a fancy bonbon! To do it, make sure your balls are completely frozen solid. Melt chocolate with a tiny bit of coconut oil to help it set smoothly. Using a fork or dipping tools, quickly dip each frozen ball into the melted chocolate, let the excess drip off, and return it to the parchment-lined tray. It will set almost instantly. You can then re-freeze them until ready to serve.
What can I use instead of a cookie scoop?
No special tools are required. A regular tablespoon from your drawer works just fine. You can use two spoons to scoop and shape the mixture. For more uniform balls, you can even gently press the mixture into a mini muffin pan or a small ice cube tray before freezing. The goal is just to get roughly golf-ball-sized portions.
Are these safe for people with nut allergies?
They can be, but you must be very careful with your ingredient choices. Use ice cream, cookies, and chocolate chips that are made in a nut-free facility (always read labels). Definitely skip the optional nut coating. To be extra safe, you could use coatings like sprinkles, crushed cereal (check labels), or just more cookie crumbs. Always inform guests of all ingredients.
Can I turn these into an actual ice cream cake?
What a fun idea! Yes, you can. Instead of rolling into balls, press the entire mixed ice cream “dough” into a springform pan or a pie dish lined with plastic wrap. Smooth the top, add optional toppings, and freeze until solid. When ready to serve, unmold and slice like a cake. It’s a stunning, no-bake dessert that has all the amazing texture of the balls in cake form.
A Final Scoop of Inspiration
So there you have it—your new go-to dessert for any day that needs a little celebration. These Chocolate Ice Cream Balls prove that with a little imagination, something simple can become spectacular. They’ve saved my dinner parties, delighted my kids, and satisfied my own midnight cravings more times than I can count. I hope this recipe brings as much joy and chocolatey goodness to your kitchen as it has to mine. Now, go raid that freezer and get rolling!
Coconut-Lime Fish
Ingredients
Equipment
Method
- Line a large baking sheet with parchment paper and chill it in the freezer.
- In a mixing bowl, combine softened chocolate ice cream, crushed cookies, chocolate chips, cocoa powder, and powdered sugar.
- Fold the mixture gently until evenly combined; do not overmix.
- Scoop about two tablespoons of the mixture and roll it into a ball.
- If desired, roll the balls in sprinkles or crushed nuts.
- Place the formed balls on the chilled baking sheet and freeze for at least 1 to 2 hours.