Strawberry White Chocolate Cheesecake Bliss: A Dreamy Dessert
You know that feeling when a dessert is so good it makes you pause? I had that moment with this cheesecake. My best friend, a notorious dessert skeptic, took one bite and her eyes went wide. “This is pure bliss,” she declared. That’s how this recipe got its name. It’s a magical mix of creamy, tangy, and sweet that feels like a hug in dessert form. Let’s make some bliss together!
From Classic to Contemporary: The Cheesecake Story
Cheesecake is an ancient treat, loved by Greeks and Romans! The modern cream cheese version we adore was born in America. My twist, the Strawberry White Chocolate Cheesecake, is a love letter to that tradition. It mixes the timeless creamy filling with the playful romance of strawberries and the smooth luxury of white chocolate. It’s a modern classic perfect for today’s celebrations, big or small.
Why You’ll Fall in Love With This Cheesecake
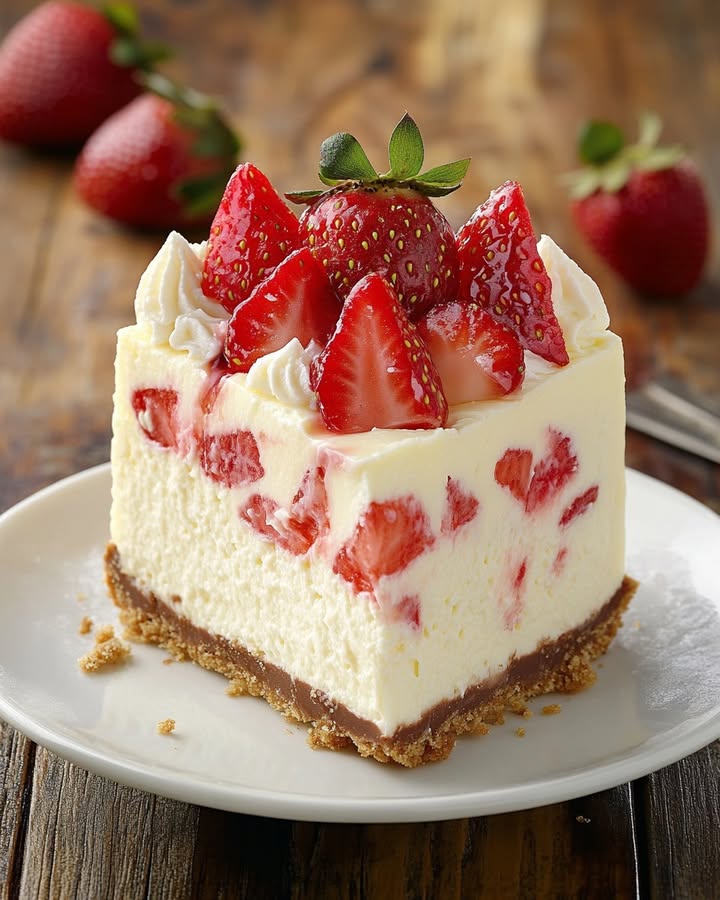
This isn’t just another cheesecake recipe. It’s a foolproof path to a stunning dessert. The flavors are a perfect trio. Sweet white chocolate melts into rich cream cheese. Juicy strawberries pop with freshness in every bite. The texture is smooth as silk, with a crunchy, buttery crust. It’s surprisingly simple to make, but it looks and tastes like you spent all day in a fancy bakery!
Perfect Occasions for Cheesecake Bliss
This cheesecake turns any moment into a celebration. It’s the star of Mother’s Day brunch or a romantic Valentine’s dinner. Bring it to a summer potluck and watch it disappear. It’s my go-to for birthday parties when cake feels too ordinary. A quiet slice with a cup of coffee on a Tuesday afternoon is also a perfectly valid reason to make it. Treat yourself!
What You’ll Need: The Ingredients List
Gathering your ingredients is the first fun step. Here’s your shopping list for this strawberry white chocolate cheesecake bliss:
- 1 ½ cups graham cracker crumbs
- ⅓ cup melted butter
- 3 tablespoons granulated sugar (for the crust)
- 16 oz (450g) full-fat cream cheese, softened
- 1 cup white chocolate chips, melted & cooled
- ¾ cup granulated sugar (for the filling)
- 2 teaspoons pure vanilla extract
- 3 large eggs, at room temperature
- 1 cup fresh strawberries, finely diced
- ½ cup fresh strawberries, sliced (for topping)
- ¼ cup white chocolate chips, melted (for drizzling)
No Stress Substitutions
Don’t have something? No problem! Here are some easy swaps:
- Graham Crackers: Use digestive biscuits or vanilla wafers.
- Fresh Strawberries: Thawed frozen strawberries work well for the diced mix-in. Pat them dry very well.
- White Chocolate: High-quality white baking bars chopped up are fantastic. In a pinch, you can use vanilla or white chocolate pudding mix for a different flavor twist.
- Crust Sugar: Brown sugar adds a nice caramel note.
Creating Your Strawberry White Chocolate Cheesecake Bliss
Ready? Put on some happy music, clear your counter, and let’s create magic. Follow these steps for a flawless cheesecake.
Step 1: Building the Buttery Foundation
First, let’s make the crust. In a medium bowl, mix the graham cracker crumbs with the melted butter and sugar. It should look like wet sand and hold together when you squeeze it. Pour this mixture into your 9-inch springform pan. Use the bottom of a glass or a measuring cup to press it firmly and evenly into the bottom and about an inch up the sides. This compact layer is your dessert’s delicious base. Pro tip: Do this right away before the butter cools and the crumbs won’t stick as well.
Step 2: Whipping Up the Dreamy Filling
Now for the creamy heart of the bliss. In a large bowl, beat the softened cream cheese with an electric mixer until it’s completely smooth and fluffy. This takes about 2 minutes. Slowly pour in the cooled, melted white chocolate while mixing. The vanilla and sugar go in next. Mix until it’s silky. Add the eggs one at a time, mixing just until the yellow disappears after each. Don’t overmix! Finally, gently fold in your pile of juicy, diced strawberries. The pink flecks will swirl into the white filling beautifully.
Step 3: The Bake and The Graceful Cool
Pour your gorgeous pink-speckled filling over the waiting crust. Gently tap the pan on the counter to remove air bubbles. Place it in your preheated 325°F (165°C) oven. Bake for 45-50 minutes. The edges will be set, but the center should still have a slight jiggle, like Jell-O. This is key! Turn off the oven, crack the door open, and let the cheesecake cool inside for one hour. This slow cooling prevents cracks and keeps it creamy.
Step 4: The Chill and The Final Thrill
Patience is your final ingredient. After its oven nap, move the cheesecake to the refrigerator. Let it chill for at least 4 hours, but overnight is even better. This sets the texture perfectly. When you’re ready to serve, run a thin knife around the edge and unlock the springform pan. Arrange your fresh strawberry slices on top. Drizzle everything with luxurious melted white chocolate. Get ready for the “oohs” and “aahs.”
Chef’s Secret Tip
For the ultimate smooth filling, make sure every single ingredient is at room temperature before you start. Cold cream cheese or eggs will make your filling lumpy no matter how long you mix. I take my cream cheese and eggs out about 2 hours before I plan to bake.
Timing Your Dessert Masterpiece
Good desserts take a little time, but most of it is hands-off. Here’s your schedule:
- Prep Time: 20 minutes of active kitchen fun.
- Cook Time: 50 minutes in the oven.
- Cooling Time: 1 hour in the turned-off oven.
- Chilling Time: Minimum 4 hours (overnight is gold).
- Total Time: About 6 hours, mostly waiting.
- Servings: Makes 10 happy slices.
- Calories: Approximately 350 per indulgent slice.
A Sweet Little Fact
Did you know the strawberry is not actually a berry? Botanists call it an “aggregate accessory fruit.” The tiny seeds on the outside are the real fruits! But we don’t need science to tell us they’re delicious, especially paired with creamy white chocolate in this blissful cheesecake.
Your Kitchen Toolbox
You don’t need fancy gadgets. Here’s what gets the job done:
- 9-inch springform pan (non-negotiable for easy removal)
- Electric hand mixer or stand mixer
- Medium and large mixing bowls
- Measuring cups and spoons
- Spatula
- Knife and cutting board for strawberries
- Microwave-safe bowl for melting chocolate
Keeping Your Bliss Fresh: Storage Tips
If you have leftovers (a big if!), cover the cheesecake tightly with plastic wrap or store it in an airtight container. It will stay fresh and delicious in the refrigerator for up to 5 days. The crust may soften a tiny bit by day 4 or 5, but the flavor will still be amazing.
You can also freeze this cheesecake for longer storage. Wrap the whole cheesecake or individual slices tightly in plastic wrap, then a layer of aluminum foil. Pop it in the freezer for up to 2 months. This is perfect for planning ahead for a party or saving a treat for later.
To serve frozen cheesecake, simply transfer it from the freezer to the refrigerator and let it thaw overnight. The texture will be just as creamy as the day you made it. Don’t try to thaw it on the counter, as this can make it soggy.
My Best Tips for Success
- Room Temp is Key: I’ll say it again—soft cream cheese blends smoothly. No lumps allowed!
- Don’t Over-bake: That slight jiggle in the center means a creamy texture. It will set as it chills.
- Dry Those Berries: Pat your diced strawberries very dry with a paper towel. Extra moisture can make the filling runny.
- Use a Water Bath: For super-silky, crack-free tops, bake your springform pan in a larger pan of hot water. Wrap the bottom of your pan in foil first to prevent leaks.
Presentation Ideas to Impress
Make your dessert table shine! Try these pretty ideas:
- Serve each slice with a mint leaf and a dusting of powdered sugar.
- Create a strawberry rose for the center of the cake before drizzling chocolate.
- Use a piping bag to make elegant white chocolate swirls on each plate before placing the slice.
- Offer a side of lightly sweetened whipped cream for those who want extra decadence.
Mix It Up! Healthier & Fun Variations
Love the base recipe? Try these twists for a different kind of bliss:
- Gluten-Free Bliss: Use gluten-free graham crackers or almond flour for the crust.
- Lighter Version: Swap in low-fat cream cheese and Greek yogurt for half the cream cheese. Use a sugar substitute designed for baking.
- Mixed Berry Bonanza: Use a mix of raspberries, blueberries, and blackberries with the strawberries.
- Lemon Burst: Add 2 tablespoons of lemon zest and a tablespoon of lemon juice to the filling for a bright, citrusy kick.
- Chocolate Lover’s Dream: Use a chocolate cookie crust and swap the white chocolate for dark or milk chocolate.
- No-Bake Version: Use gelatin to set the filling and skip the oven. Perfect for hot summer days.
Common Mistakes to Avoid
Mistake 1: Using Cold Ingredients
This is the number one reason for a lumpy cheesecake filling. Cold cream cheese doesn’t blend smoothly with other ingredients. It leaves little bits that never fully incorporate. Your eggs should also be at room temperature. They blend in more easily and help create a uniform, creamy texture. Always plan ahead and set your dairy and eggs on the counter for 1-2 hours before you start baking.
Mistake 2: Overmixing After Adding Eggs
Once you add the eggs, less is more. Mixing just until the yolk disappears is enough. If you keep beating, you incorporate too much air. This extra air expands in the oven and then collapses as the cake cools. That collapse often leads to big, unsightly cracks across the top of your beautiful cheesecake. Be gentle for a smooth, dense, and crack-free surface.
Mistake 3: Skipping the Slow Cool
Pulling your cheesecake out of the hot oven and plopping it on the counter is a shock. The sudden temperature change makes the filling contract quickly. This almost always causes it to crack. Letting it cool gradually in the turned-off oven with the door cracked is not an optional step. It’s a must-do for professional-looking results. It’s the easiest way to prevent cracks.
Mistake 4: Not Drying the Strawberries
Strawberries are full of water. If you dice them and stir them right into the batter, that water will seep out during baking. This can create a soggy layer in your filling or make it separate. Always pat your diced strawberries thoroughly with paper towels. Get them as dry as you can. This small step ensures your cheesecake sets with the perfect firm, creamy texture.
Your Cheesecake Bliss Questions, Answered
Can I use frozen strawberries?
Yes, you can use frozen strawberries for the part that gets mixed into the filling. It’s very important to thaw them completely first. Then, chop them up and press them in several layers of paper towels to remove as much liquid as possible. Excess moisture is the enemy of a firm cheesecake filling. For the fresh slices on top, you should definitely use fresh, beautiful strawberries.
Why did my cheesecake crack on top?
Cracks usually happen for three main reasons. Overmixing the batter after adding the eggs puts in too much air. Overbaking the cheesecake makes it dry and pull apart. Cooling it too quickly shocks the delicate structure. To avoid this, mix gently, bake until just set with a wobbly center, and always cool it slowly in the oven. Even with a crack, it will still taste incredible—just cover it with extra berries!
How do I know when it’s done baking?
The cheesecake is done when the edges look puffed and set, but the center—about a 3-inch circle—still has a noticeable jiggle. It should move like soft Jell-O when you gently shake the pan. The internal temperature should be about 150°F. Remember, it will continue to cook and set as it cools in the turned-off oven. Taking it out at the right time is the secret to a creamy, not dry, texture.
Can I make this cheesecake ahead of time?
Absolutely! This cheesecake is actually better made ahead. The long chilling time allows the flavors to meld and the texture to become perfectly firm. I often bake it the day before I need it. Let it cool, chill it overnight, and then add the strawberry and chocolate toppings right before serving. This makes entertaining so much easier and less stressful.
My crust stuck to the pan! How do I prevent that?
To make sure your crust releases cleanly, always use a springform pan. Before adding the crumbs, you can line the bottom with a round of parchment paper for extra insurance. Also, make sure you press the crust mixture firmly into the pan. A loose crust is more likely to crumble and stick. When serving, use a thin, sharp knife to loosen the edges after chilling.
What’s the best way to melt white chocolate?
White chocolate is tricky because it burns easily. The best method is to melt it slowly. Use a microwave-safe bowl and heat it in 20-second bursts, stirring well after each burst. Stop when just a few lumps remain, then stir until smooth. You can also use a double boiler over barely simmering water. Never let water or steam get into the chocolate, as it will cause it to seize and become grainy.
Is there a way to make this recipe less sweet?
You can reduce the sugar in the filling by a couple of tablespoons. The strawberries and white chocolate are already quite sweet. Choose a white chocolate bar with a higher cocoa butter content, as it tends to be less cloyingly sweet than chips. You can also slightly increase the amount of cream cheese to balance the sweetness or add a tiny pinch of salt to the filling to enhance other flavors.
Can I use a different type of pan?
A springform pan is highly recommended. The removable sides make it simple to get the cheesecake out without ruining it. If you only have a regular 9-inch cake pan, you can use it, but serving will be harder. You’ll need to line the bottom with parchment paper that hangs over the sides. Once chilled, you can use those paper “handles” to carefully lift the whole cheesecake out.
How long can it sit out at a party?
For food safety and best texture, don’t leave your cheesecake out at room temperature for more than 2 hours. The cream cheese and eggs in the filling are perishable. On a very hot day, keep it out for just 1 hour. To keep it cool longer, you can place the serving plate on a larger tray filled with ice. Otherwise, just keep it in the fridge and bring out slices as needed.
Can I add other fruits?
Of course! This recipe is a wonderful canvas. Raspberries or chopped peaches would be lovely folded into the batter. For a topping, try a mix of berries, kiwi slices, or even a mango puree drizzle. If using juicy fruits like peaches or pineapple, remember the golden rule: pat them very, very dry before adding them to the batter to keep your filling firm and perfect.
The Final Slice
There you have it—your guide to creating the most dreamy, creamy, and absolutely blissful Strawberry White Chocolate Cheesecake. It’s a recipe built on joy and shared with love. Whether it’s for a special day or a simple Tuesday treat, this dessert promises smiles. So preheat that oven, grab your spoon, and get ready to make some sweet memories. Happy baking!
Comforting Chicken Pie
Ingredients
Equipment
Method
- Preheat your oven to 325°F (165°C).
- In a medium bowl, mix graham cracker crumbs, melted butter, and sugar until it resembles wet sand.
- Press the mixture firmly and evenly into the bottom and up the sides of a 9-inch springform pan.
- In a large bowl, beat softened cream cheese with an electric mixer until smooth and fluffy.
- Slowly add cooled, melted white chocolate while mixing.
- Incorporate vanilla and sugar, mixing until silky.
- Add eggs one at a time, mixing just until combined.
- Gently fold in diced strawberries until evenly distributed.
- Pour the mixture over the prepared crust and gently tap the pan to remove air bubbles.
- Bake for 45-50 minutes until the edges are set and the center has a slight jiggle.
- Turn off the oven, crack the door open, and let the cheesecake cool inside for one hour.
- Transfer the cheesecake to the refrigerator and chill for at least 4 hours (overnight is best).
- Run a thin knife around the edge and unlock the springform pan.
- Top with fresh strawberry slices and drizzle with melted white chocolate before serving.