Mini Pineapple Cakes: Your Bite-Sized Tropical Vacation
You know that feeling when you take a bite of something and it just whisks you away? That’s what these Mini Pineapple Cakes do for me. One minute I’m in my kitchen, the next I’m on a sun-drenched beach with the sound of waves. I created this recipe for my book club when I wanted a dessert that felt special but wasn’t a huge fuss. Let me tell you, these little cakes disappeared faster than the gossip! They are sunshine in a bite, perfectly moist, and an instant mood-lifter.
A Slice of Sunshine History
Pineapple has always been a symbol of welcome and hospitality. While big, fluffy pineapple upside-down cake is a beloved classic, these mini cakes are their fun, portable cousin. I wanted to capture that same sweet-tart magic but in a size that’s perfect for parties, picnics, or just a single-serve treat. This modern take keeps all the tropical flavor but delivers it in the most adorable, shareable package. It’s like a little taste of vacation, anytime you want it.
Why You’ll Go Crazy for These Tropical Bites
First, they are incredibly easy. Second, the smell that fills your house while they bake is pure happiness. Third, they’re versatile. Eat them plain for a simple snack, or dress them up for a party. The texture is beautifully soft and tender, thanks to the crushed pineapple, and they have just the right amount of sweetness. You get a little taste of the tropics in every single bite. Trust me, your family and friends will be asking for the recipe.
Perfect Occasions for Your Mini Tropical Delights
These little cakes are party superstars! I love making them for baby showers, summer barbecues, or as a sweet treat in lunchboxes. They’re perfect for potlucks because they’re so easy to transport and serve. I even bake a batch on gloomy days to bring some sunshine indoors. Any time you need a quick dessert that looks like you fussed, this is your go-to recipe.
Gathering Your Sunshine Ingredients
Here’s what you’ll need to make about 12 delightful little cakes. Everything is simple and likely already in your pantry!
- 1 1/2 cups all-purpose flour
- 1/2 cup granulated sugar
- 1/2 cup unsalted butter, softened
- 2 large eggs
- 1 cup crushed pineapple, drained (This is the star!)
- 1/2 cup milk
- 1 teaspoon vanilla extract
- 1 teaspoon baking powder
- 1/4 teaspoon salt
No-Stress Ingredient Swaps
Don’t have something? No worries! Cooking should be fun, not stressful.
- Butter: You can use salted butter. Just omit the extra salt in the recipe.
- Milk: Any milk you have works—whole, 2%, or even a non-dairy milk like almond or oat.
- Crushed Pineapple: Fresh pineapple is lovely, but canned is super convenient and works beautifully. Just make sure to drain it well!
Let’s Bake Some Sunshine!
Get ready to fill your kitchen with an amazing tropical aroma. Follow these simple steps for perfect Mini Pineapple Cakes every time.
Step 1
First, preheat your oven to 350°F (175°C). This gives it time to reach the perfect temperature. Now, grab your mini muffin or cupcake pan. Give it a good greasing with a little butter or non-stick spray. This simple step is your best friend. It ensures your little cakes pop right out after baking, looking beautiful and intact. Pro tip: I like to use a pastry brush to get butter into every little crevice.
Step 2
Let’s mix our dry ingredients. Take a medium bowl and add your flour, baking powder, and salt. Whisk them together really well. You’ll see the flour puff up a bit. This isn’t just busywork. Whisking spreads the baking powder and salt evenly through the flour. It guarantees every single cake rises perfectly and has balanced flavor. Set this bowl aside for now.
Step 3
Now for the fun part! In a large bowl, beat the softened butter and sugar. Use an electric mixer or a good old-fashioned wooden spoon and some elbow grease. Beat it until it turns pale, fluffy, and looks like creamy sunshine. Then, crack in one egg at a time. Mix well after each one until it’s fully blended in. This creates a smooth, rich base for our cakes. You should have a beautiful, velvety mixture now.
Step 4
Pour in that lovely vanilla extract and give it a quick mix. Now, we’ll add the dry ingredients and the milk. Here’s the trick: add about a third of the flour mixture, mix it in gently, then half the milk. Repeat, ending with the last of the flour. Mix just until you no longer see streaks of flour. Pro tip: Overmixing at this stage can make cakes tough. A few small lumps are totally fine!
Step 5
Time for the star ingredient! Fold in your well-drained crushed pineapple. Use a spatula and a gentle folding motion to distribute those golden bits throughout the batter. Watch as the batter takes on a gorgeous, speckled appearance. The sweet, tangy smell is irresistible. Be careful not to overmix here, either—just fold until it’s combined.
Step 6
Take a spoon or a small cookie scoop and fill each prepared cup about 3/4 full. This leaves just enough room for them to rise into perfect little domes. Slide the pan into your preheated oven. Bake for 15 to 20 minutes. You’ll know they’re done when they’re golden on top and a toothpick poked into the center comes out clean. Your kitchen will smell like a tropical paradise.
Step 7
Once baked, let the pan sit on the counter for about 5 minutes. This allows the cakes to firm up a little. Then, gently run a knife around the edges if needed and pop them out onto a wire rack. Let them cool completely. Chef’s tip: Patience is key! A warm cake can crumble. Letting them cool gives you the perfect, stable texture for frosting or dusting with sugar.
Timing Your Tropical Delight
From start to finish, you’re looking at about 30-35 minutes of real kitchen time. Prep is a quick 15 minutes once you’ve got everything out. Baking takes 15-20 minutes, depending on your oven. Letting them cool completely might take another 20-30 minutes. So, in just over an hour, you can have a whole batch of homemade sunshine ready to share.
My Little Secret for Extra Flavor
Here’s my secret weapon: I add just a tiny pinch of ground cardamom or a teaspoon of lemon zest to the flour mixture. It doesn’t taste like those flavors directly. Instead, it magically makes the pineapple flavor pop even more! It adds a subtle, sophisticated layer that will have people wondering what your secret is.
A Fun Pineapple Fact
Did you know it takes a pineapple plant nearly two years to produce a single fruit? That makes these sweet, spiky treasures even more special. Using pineapple in baking is a wonderful way to enjoy its flavor year-round. Each little cake packs in a bit of that long-grown sunshine.
What You’ll Need to Make Them
You don’t need fancy equipment for this recipe. Here’s the short list:
- Mini muffin or cupcake pan
- Two mixing bowls (one large, one medium)
- Whisk
- Electric mixer or wooden spoon
- Spatula
- Measuring cups and spoons
- Wire cooling rack
Keeping Your Cakes Fresh and Tasty
Once your Mini Pineapple Cakes are completely cool, store them properly to keep that wonderful texture. Place them in an airtight container at room temperature. They’ll stay soft and delicious for 2-3 days. A slice of bread in the container can help keep them moist.
Want to keep them longer? These little cakes freeze beautifully. Wrap them individually in plastic wrap, then place them all in a freezer bag. They can hang out in the freezer for up to 2 months. Simply thaw at room temperature for an hour whenever you need a tropical pick-me-up.
If you’ve added whipped cream or a glaze, it’s best to store them in the refrigerator. Use an airtight container and enjoy within 2 days. The cake itself might firm up a bit in the fridge, but it will still taste wonderful.
Tips for the Best Mini Cakes Ever
- Drain that Pineapple Well: Seriously, press it in a sieve or squeeze it in a clean kitchen towel. Too much liquid can make the batter soggy.
- Room Temperature is Key: Using room temperature eggs and butter helps everything blend smoothly for a better texture.
- Don’t Peek: Resist opening the oven door before at least 15 minutes. The cold air can make your cakes sink.
- Test for Doneness: That toothpick trick is your best friend. Clean toothpick = perfectly baked cake.
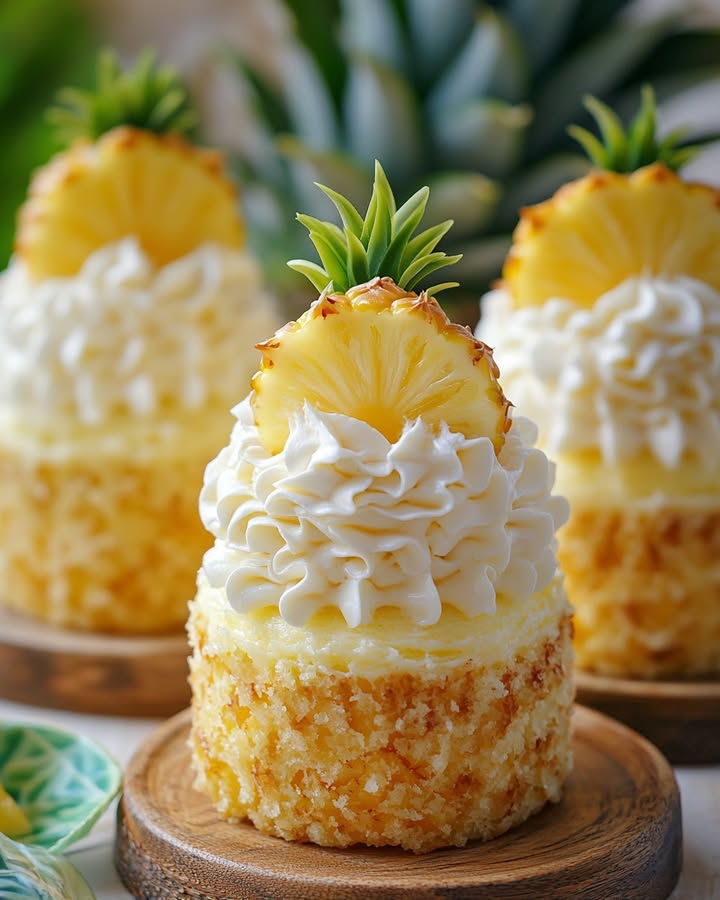
Pretty Ways to Serve Your Creations
These cakes are cute on their own, but a little dressing up makes them party-ready!
- Dust the tops with a snowy shower of powdered sugar.
- Add a tiny dollop of whipped cream and top with a maraschino cherry for a “mini tropical sundae” look.
- Drizzle with a simple glaze made from powdered sugar and a little pineapple juice.
- Serve them on a platter lined with banana leaves or green shredded paper for a real tropical vibe.
Six Delicious Variations to Try
Love this base recipe? Mix it up! Here are six fun twists:
- Pina Colada Cakes: Add 1/4 cup shredded sweetened coconut to the batter. Use coconut milk instead of regular milk.
- Pineapple Upside-Down Minis: Place a maraschino cherry and a pinch of brown sugar in the bottom of each muffin cup before adding batter. Bake as usual, then invert while warm.
- Lemon-Pineapple Sunshine: Add the zest of one lemon to the batter. The lemon brightens the pineapple flavor even more.
- Tropical Nut Cakes: Fold in 1/3 cup of chopped macadamia nuts for a lovely crunch and rich flavor.
- Spiced Pineapple Cakes: Add 1/2 teaspoon of ground ginger or cinnamon to the dry ingredients for a warm, cozy twist.
- Gluten-Free Tropical Bites: Swap the all-purpose flour for your favorite 1-to-1 gluten-free baking blend. Everything else stays the same!
Common Mistakes to Avoid
Avoid these simple pitfalls for perfect cakes every time.
Mistake 1: Not Draining the Pineapple Enough
This is the biggest culprit for dense, gummy cakes. Canned crushed pineapple holds a lot of juice. If you don’t drain it well, all that extra liquid throws off the balance of your batter. It can make the cakes soggy and prevent them from rising properly. Always drain it in a fine-mesh sieve and press down gently with a spoon. For super-dry pineapple, give it a squeeze in a clean kitchen towel.
Mistake 2: Overmixing the Batter
It’s so tempting to keep stirring until the batter is perfectly smooth. But with cakes, that’s a bad idea. Overmixing develops the gluten in the flour. This leads to tough, chewy cakes instead of light, tender ones. Mix just until the flour disappears and the ingredients are combined. A few small lumps are absolutely fine! They will bake out perfectly.
Mistake 3: Overfilling the Muffin Cups
When you see that delicious batter, you might want to fill each cup to the top. Don’t do it! If you fill them more than 3/4 full, the batter has nowhere to go but over the sides. You’ll end up with messy, fused-together cakes that are hard to get out of the pan. They might also sink in the middle from the weight. Use a spoon or scoop for consistent, mess-free filling.
Mistake 4: Skipping the Preheating Step
Putting your cake batter into a cold oven is a recipe for disappointment. The baking powder needs that immediate blast of heat to start working and create lift. If the oven is still heating up, the batter sits and the leavening power fizzles out. Your cakes will be flat and dense. Always, always preheat your oven fully and wait for it to signal it’s ready.
Your Mini Pineapple Cake Questions Answered
Can I use fresh pineapple instead of canned?
Absolutely! Fresh pineapple is a wonderful choice. You’ll need to peel, core, and finely chop or crush about half a medium pineapple to get one cup. The flavor will be beautifully bright. Just make sure to drain any excess juice very well, just like you would with canned. Sometimes fresh pineapple can be less sweet, so you might want to taste a piece first.
My cakes didn’t rise much. What went wrong?
Oh no, that’s frustrating! A few things could be the culprit. First, check your baking powder. Is it fresh? Old baking powder loses its power. Second, you might have overmixed the batter, which made the cakes tough. Third, perhaps the pineapple wasn’t drained enough—extra liquid weighs everything down. Lastly, make sure your oven was fully preheated before baking.
Can I make this as one big cake instead of minis?
You sure can! This batter works beautifully for a standard 8-inch or 9-inch round cake pan. Just grease and flour the pan well. The baking time will be longer, likely 30-35 minutes. Always use the toothpick test to check for doneness in the center. Let it cool in the pan for 10 minutes before turning it out onto a rack.
How do I know when the cakes are perfectly baked?
Your best tools are your eyes and a toothpick. Look for golden edges pulling slightly away from the sides of the cups. The tops should spring back when you gently press them. Most importantly, insert a toothpick into the center of a cake. If it comes out clean or with a few dry crumbs, they’re done. If it has wet batter on it, they need more time.
Can I freeze these Mini Pineapple Cakes?
Freezing is a great way to have a sweet treat on hand! Let the cakes cool completely first. Wrap each one tightly in plastic wrap, then place them all in a heavy-duty freezer bag. Squeeze out the air and seal. They’ll keep for up to 2 months. Thaw at room temperature for about an hour, or warm them up briefly in the microwave.
What’s the best way to get the cakes out of the pan?
Patience and a little tool help a lot. Let the cakes cool in the pan for 5 minutes first. This lets them firm up. Then, carefully run a small offset spatula or a butter knife around the edge of each cake to loosen it. Gently lift from the bottom to pop them out. If you greased the pan well, they should come out easily.
Can I add other fruits to the batter?
You can experiment, but be careful with wet fruits. Diced mango or passionfruit pulp could be delicious tropical additions. If the fruit is very juicy, like berries, toss them in a little flour first. This prevents them from sinking to the bottom and adding too much liquid. Start with small additions, like 1/4 cup, to see how it affects the batter.
Why do my ingredients need to be at room temperature?
Room temperature ingredients mix together much more smoothly. Cold butter doesn’t cream well with sugar, and cold eggs can cause the batter to curdle or separate. When everything is similarly warm, they create a smooth, emulsified batter. This leads to a finer, more even crumb in your finished cakes. Just take your eggs and butter out of the fridge about 30 minutes before you start.
Can I make these dairy-free?
Yes, it’s an easy swap! Use a plant-based butter substitute (the stick kind, not spread) for the butter. For the milk, use any unsweetened non-dairy milk you like, such as almond, oat, or soy milk. The flavor might change slightly depending on your choice, but the texture should still be lovely.
What can I use if I don’t have a mini muffin pan?
No problem! You can use a regular-sized muffin pan. Just fill the cups about halfway and expect a longer baking time—probably 20-25 minutes. You could also bake it in a small loaf pan. Keep an eye on it and use the trusty toothpick test to know when it’s done. You’ll get fewer, bigger treats, but they’ll taste just as wonderful.
Ready for Your Taste of the Tropics?
And there you have it! My go-to recipe for bringing a little sunshine into any day. These Mini Pineapple Cakes are more than just a dessert. They’re a bite of joy, a simple project, and a guaranteed crowd-pleaser. I hope you bake a batch soon and see how they brighten your kitchen and your table. Don’t forget to share your creations online and tag them with #TropicalDelight—I’d love to see your sunny results. Happy baking!
Creamy Scallop Delight
Ingredients
Equipment
Method
- Preheat your oven to 350°F (175°C) and grease your mini muffin or cupcake pan.
- In a medium bowl, whisk together the flour, baking powder, and salt.
- In a large bowl, beat the softened butter and sugar until pale and fluffy, then add eggs one at a time, mixing well after each.
- Add vanilla extract, then mix in the dry ingredients and milk in alternating additions, starting and ending with dry ingredients.
- Gently fold in the well-drained crushed pineapple.
- Fill each muffin cup about 3/4 full with batter and bake for 15 to 20 minutes until golden and a toothpick comes out clean.
- Let the pan sit for 5 minutes before loosening cakes with a knife and transferring them to a wire rack to cool completely.