Why This Crispy Chicken Salad Will Make Your Day
There’s something about a plate of perfectly crispy chicken paired with a creamy, slightly spicy coleslaw that just feels like home. I first made this dish on a busy Tuesday night when I needed something quick but satisfying for my family. The crunch of the golden escalopes combined with the cool, tangy jalapeño-infused salad was an instant hit. It’s not just a meal—it’s a mood booster. Whether you’re cooking for one or feeding a crowd, this Crispy Chicken Salad is your ticket to a delicious and wholesome dinner.
A Little History Behind the Dish
This recipe brings together two culinary classics: breaded chicken cutlets and coleslaw. Breaded chicken has roots in European cuisines, particularly Italian and Austrian schnitzels, while coleslaw hails from Dutch traditions. Over time, these dishes have evolved globally, with each culture adding its own twist. My version marries the best of both worlds—crispy, cheesy chicken with a creamy, crunchy slaw. It’s comfort food with a modern flair, perfect for today’s busy lifestyles.
Why You’ll Love This Recipe
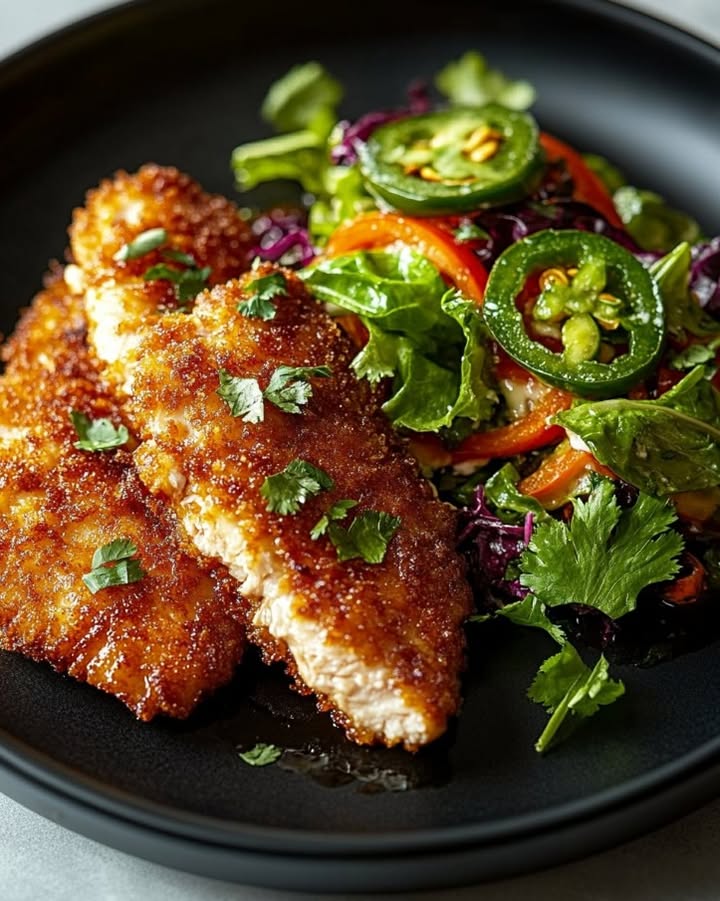
This Crispy Chicken Salad is everything you want in a meal: crunchy, creamy, savory, and slightly spicy. The chicken is coated in a cheesy Panko crust that turns golden brown and crispy, while the slaw adds a refreshing contrast. Plus, it’s ready in under 30 minutes, making it ideal for weeknight dinners. Whether you’re a seasoned cook or a beginner, this recipe is foolproof and fun to make. Trust me, once you try it, it’ll become a staple in your kitchen.
Perfect Occasions to Prepare This Recipe
This dish is incredibly versatile. Serve it for a casual weeknight dinner, pack it for lunch at work, or impress guests at a summer barbecue. It’s also a great option for potlucks or game nights. The combination of flavors and textures makes it a crowd-pleaser, no matter the occasion.
Ingredients
- For the chicken:
- 4 thin chicken escalopes
- 1 cup all-purpose flour
- 2 tsp salt
- 1 tsp smoked paprika
- 1 tsp garlic powder
- 3 eggs
- 2 cups Panko breadcrumbs
- ½ cup grated Parmesan cheese
- 1 tsp black pepper
- 1 cup vegetable oil for frying
- For the slaw:
- 4 cups shredded green cabbage
- 1 cup shredded red cabbage
- 2 grated carrots
- 1 finely chopped jalapeño (seeds removed)
- ¼ cup chopped fresh cilantro
- ½ cup plain Greek yogurt
- 1 tbsp mayonnaise
- 1 tbsp honey
- 1 tbsp lemon juice
- Salt and pepper to taste
Substitution Options
If you’re out of an ingredient or looking for alternatives, here are some swaps:
- Use almond flour instead of regular flour for a gluten-free option.
- Swap Greek yogurt for sour cream if you prefer a richer dressing.
- Replace jalapeño with bell peppers for a milder flavor.
- Use olive oil instead of vegetable oil for frying.
Step 1: Preparing the Chicken
Start by flattening the chicken escalopes between two sheets of parchment paper using a rolling pin. This ensures even cooking and maximizes crispiness. Season them generously with salt, pepper, and smoked paprika. Don’t skimp on the seasoning—it’s what gives the chicken its bold flavor. Pro tip: Let the seasoned chicken rest for 5 minutes to allow the spices to penetrate the meat.
Step 2: Setting Up the Breading Station
Create a breading station with three bowls: one for flour mixed with garlic powder, another for beaten eggs, and the third for Panko breadcrumbs combined with Parmesan and black pepper. This assembly-line setup makes the process smooth and mess-free. Dip each piece of chicken first in the flour, then in the egg wash, and finally in the breadcrumb mixture. Press gently to ensure the coating sticks well.
Step 3: Cooking the Chicken
Heat vegetable oil in a large skillet over medium-high heat. Fry the chicken for about 3 minutes per side until golden brown and crispy. The key is to maintain the right oil temperature—not too hot, or the coating will burn before the inside cooks; not too cool, or the chicken will absorb too much oil. Place the cooked chicken on paper towels to drain excess grease. Chef’s tip: For extra crispiness, bake the chicken in the oven at 400°F for 5 minutes after frying.
Step 4: Making the Creamy Slaw
In a large bowl, combine shredded green and red cabbage, grated carrots, chopped jalapeño, and cilantro. In a small bowl, whisk together Greek yogurt, mayonnaise, honey, and lemon juice. Pour the dressing over the slaw and toss until evenly coated. Taste and adjust seasoning with salt and pepper. The vibrant colors and creamy texture make this slaw irresistible.
Step 5: Plating and Serving
To serve, place a crispy chicken escalope on a plate alongside a generous portion of the creamy slaw. Garnish with fresh cilantro leaves and a wedge of lemon for a pop of color and acidity. Squeeze the lemon over the chicken just before eating—it brightens up the flavors beautifully.
Timing
Prep time: 20 minutes
Cooking time: 10 minutes
Total time: 30 minutes
Chef’s Secret
For a restaurant-quality touch, sprinkle a pinch of smoked paprika on top of the finished dish. It adds depth and enhances the visual appeal.
Extra Info
Did you know that Panko breadcrumbs originated in Japan? They’re lighter and crunchier than regular breadcrumbs, making them perfect for achieving that irresistible crispy texture.
Necessary Equipment
- Large skillet
- Rolling pin or meat mallet
- Three mixing bowls
- Tongs for flipping chicken
- Paper towels for draining grease
Storage
Short-term storage: Store leftovers in an airtight container in the refrigerator for up to 3 days. Keep the chicken and slaw separate to prevent sogginess.
Reheating tips: Reheat the chicken in the oven at 350°F for 10 minutes to retain crispiness. Avoid microwaving, as it can make the coating soggy.
Freezing: Freeze uncooked breaded chicken in a single layer on a baking sheet, then transfer to a freezer bag. Cook directly from frozen, adding a couple of extra minutes to the cooking time.
Tips and Advice
- Pat the chicken dry before breading to help the coating adhere better.
- Double-dip the chicken in the egg and breadcrumb mixture for an extra-thick crust.
- Add a splash of hot sauce to the slaw dressing for an extra kick.
Presentation Tips
- Serve on a rustic wooden board for a cozy vibe.
- Garnish with edible flowers or microgreens for elegance.
- Serve with lemon wedges and a sprinkle of fresh herbs.
Healthier Alternative Recipes
1. Air-Fried Chicken: Skip the frying and use an air fryer for a lower-fat version.
2. Cauliflower Cutlets: Replace chicken with cauliflower steaks for a vegetarian twist.
3. Gluten-Free Option: Use almond flour and gluten-free breadcrumbs.
4. Dairy-Free Dressing: Substitute Greek yogurt with coconut milk yogurt.
5. Low-Carb Slaw: Swap cabbage with zucchini ribbons.
6. Spicy Honey Glaze: Drizzle honey mixed with chili flakes over the chicken.
Mistake 1: Overcrowding the Pan
When frying, resist the urge to cook all the chicken at once. Overcrowding lowers the oil temperature, resulting in soggy chicken. Fry in batches, giving each piece enough space to crisp up properly.
Mistake 2: Skipping the Resting Time
Don’t rush the resting step after seasoning the chicken. Allowing the spices to sit helps infuse the meat with flavor. Patience pays off!
Mistake 3: Using Cold Oil
Always heat the oil before adding the chicken. Cold oil leads to uneven cooking and greasy results. Test the oil by dropping a breadcrumb—if it sizzles, it’s ready.
FAQ
Can I use chicken breast instead of escalopes?
Absolutely! Slice chicken breasts horizontally into thin cutlets to mimic escalopes. They’ll cook faster and stay tender.
Is this recipe kid-friendly?
Yes! Kids love the crispy chicken, and you can adjust the spice level in the slaw to suit their taste.
How do I keep the slaw from getting watery?
Make sure to pat the vegetables dry before mixing. Adding the dressing just before serving also helps maintain freshness.
Can I prep this ahead of time?
You can bread the chicken and mix the slaw ingredients separately a day in advance. Assemble and cook right before serving.
What sides pair well with this dish?
Serve with roasted potatoes, grilled veggies, or a simple arugula salad for a complete meal.
Is this recipe gluten-free?
With a few tweaks—like using gluten-free flour and breadcrumbs—it can easily be made gluten-free.
Can I bake instead of fry?
Yes! Bake at 400°F for 20 minutes, flipping halfway through, for a healthier option.
How spicy is the slaw?
The jalapeño adds mild heat, but you can remove the seeds or omit it entirely for a milder version.
Can I use store-bought coleslaw mix?
Definitely! It’s a great time-saver. Just add the dressing and other ingredients as directed.
What’s the best way to reheat leftovers?
Oven reheating at 350°F for 10 minutes works best to restore crispiness. Avoid the microwave.
This Crispy Chicken Salad is more than just a recipe—it’s a celebration of flavors, textures, and good vibes. Whether you’re whipping it up for a quick dinner or sharing it with loved ones, it’s sure to bring smiles to the table. So grab your skillet, roll up your sleeves, and let’s get cooking!