The Crispy Chilli Chicken That Stole My Heart (And My Family’s Appetite!)
You know that magical sound when you bite into something perfectly crispy? That’s the sound my kitchen makes every time I whip up this Crispy Chilli Chicken. It all started when my takeaway-loving teenager declared my homemade version “better than the restaurant.” Talk about a win! This dish is my secret weapon for turning a regular Tuesday into a flavor-packed celebration. It’s sweet, spicy, sticky, and has that incredible crunch we all crave.
A Little Story Behind This Crispy Delight
While Crispy Chilli Chicken is a superstar on Western Chinese takeout menus, its roots are a beautiful fusion. It takes inspiration from classic Chinese sweet and sour dishes and the bold, chili-forward flavors popular in Indo-Chinese cuisine. My version is what I call “weeknight gourmet”—it captures that irresistible restaurant magic but is totally doable at home. I’ve tested the double-fry method more times than I can count, and trust me, it’s the non-negotiable secret to that legendary crunch!
Why You’ll Fall in Love With This Recipe
This isn’t just another chicken recipe. First, the texture is unreal—crispy on the outside, tender inside. Second, the sauce is a perfect balance: not too sweet, not too fiery, just right. It comes together faster than delivery can arrive. Plus, it’s incredibly versatile. Serve it over rice, noodles, or even pile it into lettuce cups for a lighter meal. It’s a guaranteed crowd-pleaser that makes you look like a kitchen rockstar.
When to Make Your Crispy Chilli Chicken
This dish is perfect for so many occasions! It’s my go-to for Friday night fakeaway with the family. It’s also a huge hit at casual dinner parties—just double the batch. Need a impressive but easy dish for a potluck? This travels well. I even make it for game day gatherings; it disappears faster than the chips and dip!
Gathering Your Ingredients
Here’s what you’ll need to create this flavor explosion. Most items are pantry staples!
For the Chicken & Marinade:
- 300g (about 10.5 oz) chicken breast, cut into thin strips
- 100g cornflour (cornstarch) – this is the key to crispiness!
- 1 egg white
- 2 spring onions (green onions), chopped
- 1 tbsp + 1 tsp garlic and ginger paste (divided)
- 2 tbsp dark soy sauce (for marinade)
- 1 tsp sesame oil
- 1 tsp sugar
- 1 tsp white pepper
- Vegetable oil, for frying
For the Stir-Fry Sauce:
- 3 tbsp dark soy sauce
- 4 tbsp honey
- 1 tbsp sriracha (adjust to your heat preference)
- 2 tbsp lemon juice
No Problem! Handy Ingredient Swaps
Don’t have something? No stress! Here are easy substitutions:
- Chicken Breast: Use chicken thighs for even juicier results.
- Cornflour: Potato starch or all-purpose flour work, but cornflour gives the best crisp.
- Dark Soy Sauce: Use regular soy sauce mixed with ½ tsp of brown sugar.
- Honey: Maple syrup or agave nectar are great vegan alternatives.
- Sriracha: Any chili garlic sauce or even a bit of cayenne pepper will do.
- Egg White: For an egg-free version, use 2 tbsp of cold water or milk to help the coating stick.
Let’s Get Cooking: Your Step-by-Step Guide
Put on some music and let’s create some kitchen magic. Follow these steps for perfect Crispy Chilli Chicken every single time.
Step 1: Marinate the Chicken
Start by slicing your chicken breast into thin, even strips. This helps them cook quickly and evenly. Place them in a bowl and add the dark soy sauce, 1 tablespoon of garlic-ginger paste, sesame oil, sugar, and white pepper. Get your hands in there and give it a good massage! Let it sit for at least 10 minutes. This is where the flavor journey begins—the soy and spices will seep into the chicken beautifully.
Step 2: Whisk Together the Magic Sauce
While the chicken is getting happy, make your sauce. In a small bowl, combine the honey, lemon juice, dark soy sauce, and sriracha. Whisk it until it’s smooth and glossy. The honey will thicken when heated, creating that gorgeous sticky glaze we love. Give it a little taste—you should get sweet, salty, tangy, and spicy all at once! Pro tip: If you love extra sauce (especially for rice), feel free to double this part.
Step 3: Coat the Chicken for Maximum Crunch
Now, back to the marinated chicken. Add the single egg white to the bowl and mix it through. This acts as a glue for our crispy coating. Next, pour in the cornflour. Toss and mix until every single piece of chicken is thoroughly coated in a dry, powdery layer. It should look like each strip has a light, dusty jacket. If it looks too wet, add another sprinkle of cornflour.
Step 4: The First Fry for Structure
Heat about 2 inches of vegetable oil in a wok or deep pan to 180°C (350°F). To test, drop a small piece of coated chicken in; it should sizzle and float immediately. Carefully add your chicken pieces in batches. Don’t crowd the pan! Fry for just 1-2 minutes until they are a light golden color and set. Remove them with a slotted spoon and let them drain on a paper towel-lined plate. They won’t be super crispy yet—that’s next!
Step 5: The Second Fry for Legendary Crispiness
Once all the chicken has had its first fry, bring the oil back up to temperature. This is the game-changer! Add the chicken back in for a second fry, this time for 2-3 minutes. Watch them turn a deep, golden brown and become incredibly crispy. The double-cooking method seals in juiciness and makes the coating stay crunchy even after you add the sauce. Drain them again on fresh paper towels.
Step 6: Create the Glaze and Bring It All Together
Heat a clean pan or wok with just one tablespoon of oil. Add the remaining teaspoon of garlic-ginger paste and let it sizzle for literally 5-10 seconds—you’ll smell its amazing aroma. Quickly pour in your prepared stir-fry sauce. Let it bubble and cook for about 30 seconds. It will thicken into a shiny, luxurious glaze. Now, add all your crispy chicken back into the pan. Toss everything quickly and vigorously until each piece is gloriously coated in that sticky, spicy sauce.
Step 7: The Grand Finale & Serve!
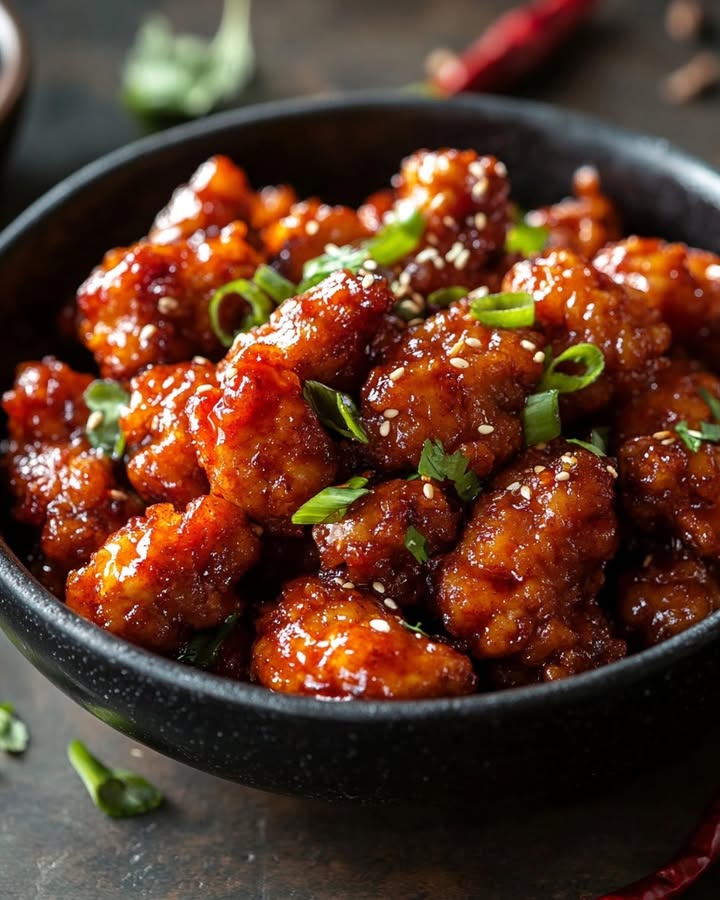
Immediately transfer your glistening Crispy Chilli Chicken to a serving plate. Scatter the freshly chopped spring onions over the top for a pop of color and fresh flavor. Serve it right away while it’s hot and crispy! I love the contrast of the warm, sticky chicken with the cool, sharp onions. Chef’s tip: For an extra touch, sprinkle with toasted sesame seeds or a tiny drizzle of chili oil.
Your Cooking Timeline
Good food doesn’t have to take all day! Here’s your quick schedule:
- Prep Time: 15 minutes (includes marinating)
- Cooking Time: 15 minutes
- Total Time: 30 minutes
My Number One Chef’s Secret
Here’s my secret weapon: freeze your cornflour for 30 minutes before using it. A cold coating hitting hot oil creates an even more explosive and shatteringly crisp texture. It’s a little trick I picked up that makes a noticeable difference!
A Fun Fact About Your Meal
That amazing crisp you get? Thank the cornflour! When coated on wet chicken and fried, the starch granules burst and then re-form into a delicate, crunchy network. This is different from flour, which can get soggy. Science in the kitchen is delicious!
Kitchen Tools You’ll Need
You don’t need fancy gear! Just gather:
- A sharp knife and cutting board
- Two mixing bowls (one for marinade, one for sauce)
- A whisk or fork
- A wok or deep, heavy-based frying pan
- A slotted spoon or spider strainer
- Paper towels for draining
Storing Your Leftover Crispy Chilli Chicken
If you have any leftovers (a rare event in my house!), let the chicken cool completely to room temperature. Do not cover it while it’s still hot, as steam will make the coating soft.
Transfer the cooled chicken to an airtight container. You can store it in the refrigerator for up to 2-3 days. The sauce will continue to soak in, making it even more flavorful, though slightly less crispy.
To reheat, avoid the microwave if you want to save the texture. Instead, spread the pieces on a baking sheet and warm them in a 190°C (375°F) oven for about 10 minutes, or until heated through. They won’t be as perfect as fresh, but they’ll still be delicious!
My Best Tips for Success
- Cut Evenly: Try to cut your chicken strips the same size so they cook at the same rate.
- Oil Thermometer: If you have one, use it! The right oil temperature is crucial for non-greasy, crispy chicken.
- Work in Batches: Frying too much at once drops the oil temperature and leads to soggy chicken. Patience is key.
- Have Everything Ready: Once you start frying, things move fast. Have your sauce mixed, tools out, and plate ready.
How to Plate It Like a Pro
Presentation makes the meal even more special! Try these ideas:
- Serve over a bed of fluffy white or brown rice with steamed broccoli on the side.
- For a restaurant look, pile the chicken in the center of a large plate and garnish with extra spring onion strips and red chili slices.
- Serve with lettuce cups on the side for a DIY wrap experience.
- For a full feast, pair it with other favorites like my Sheet Pan Lemon Garlic Chicken and Potatoes for a variety of flavors and textures.
Mix It Up! 6 Tasty Recipe Variations
Love the base recipe? Here are six fun ways to change it up:
- Sweet & Sour Crispy Chicken: Swap the stir-fry sauce for a mix of pineapple juice, vinegar, ketchup, and brown sugar.
- Korean-Style Gochujang Crispy Chicken: Replace the sauce with gochujang (Korean chili paste), soy sauce, honey, and a splash of rice vinegar.
- Salt & Pepper Crispy Chicken: Skip the sauce altogether. After frying, toss the chicken in a dry mix of salt, white pepper, and five-spice powder.
- Vegetarian Crispy “Chicken”: Use firm tofu or cauliflower florets. Press the tofu well and follow the same coating and frying steps.
- Extra Spicy Firecracker Chicken: Double the sriracha and add 1 tsp of crushed red pepper flakes to the sauce for a serious kick.
- Orange Crispy Chicken: Create a citrus glaze using fresh orange juice, zest, soy sauce, and a bit of honey instead of the standard sauce.
Common Mistakes to Avoid
Even great cooks can slip up! Here’s how to sidestep common pitfalls for perfect Crispy Chilli Chicken.
Mistake 1: Skipping the Double Fry
This is the biggest mistake! Frying once gives you cooked chicken, but frying twice gives you legendary crunch. The first fry cooks the chicken and sets the coating. The second fry at a steady high heat makes the coating incredibly crispy and locks in the juiciness. If you only fry once, the chicken can steam inside its coating and become soggy quickly, especially after adding sauce. Don’t cut this corner—it’s worth the extra few minutes.
Mistake 2: Crowding the Pan During Frying
It’s tempting to fry all the chicken at once to save time. Resist! Adding too many pieces makes the oil temperature plummet. The chicken will absorb oil instead of sealing quickly, leading to a greasy, soggy result. Fry in small, manageable batches. This keeps the oil hot and ensures each piece has space to bubble and crisp up beautifully. While one batch fries, you can coat the next.
Mistake 3: Letting the Sauce Cook Too Long
The stir-fry sauce is simple—honey, soy, lemon, sriracha. When you add it to the hot pan, it only needs 30 seconds or so to bubble and thicken slightly. If you cook it for several minutes, the honey can caramelize too much and become overly thick, sticky, and even bitter. It will also harden too much when it hits the chicken. Your goal is a glossy, pourable glaze, not a hard candy coating. Add the sauce, let it bubble briefly, then immediately add your chicken.
Mistake 4: Not Patting the Chicken Dry Before Marinating
If your chicken strips are wet from packaging or washing, the marinade won’t stick as well. More importantly, excess water can make your cornflour coating clumpy and uneven. Always pat your chicken pieces thoroughly dry with a paper towel before adding them to the marinade bowl. This helps the flavors adhere and creates a smooth, dry surface for the cornflour to cling to, leading to a more even, crispier crust.
Frequently Asked Questions
Can I make Crispy Chilli Chicken ahead of time?
You can prepare components ahead, but for the best texture, serve it fresh. You can marinate the chicken overnight for deeper flavor. You can also mix the sauce ingredients a day in advance. However, I strongly recommend frying the chicken and combining it with the sauce just before serving. If you fry it ahead and reheat, it will lose its signature crispiness. For busy nights, prep the sauce and chop veggies ahead to cut your active cooking time in half.
What’s the best oil for frying this chicken?
You want an oil with a high smoke point and neutral flavor. Vegetable oil, canola oil, peanut oil, or sunflower oil are all excellent choices. They can get hot enough for frying without burning or smoking excessively, and they won’t add their own strong taste to the dish. Avoid oils like extra virgin olive oil or butter, as they have low smoke points and will burn at the high temperature needed for crispy frying, giving your food an off flavor.
How can I make this recipe gluten-free?
It’s very easy! Simply ensure you use a certified gluten-free soy sauce or tamari in place of the regular dark soy sauce. Cornflour (cornstarch) is naturally gluten-free, so your crispy coating is already safe. Double-check that your sriracha or other chili sauce is also labeled gluten-free, as some brands may use wheat-based additives. With those simple swaps, you can enjoy the same delicious, crispy dish without worry.
My sauce became too thick. How can I fix it?
Don’t worry, this happens! If your sauce thickens too much in the pan before you add the chicken, it’s usually because it cooked a bit too long. The honey solidifies as it cools. The fix is simple: just add a tablespoon or two of warm water or chicken broth to the pan and stir it in. This will thin the sauce back to a glossy, coating consistency. Add the liquid slowly until you get the texture you want—it should coat the back of a spoon nicely.
Can I bake the chicken instead of frying it?
Yes, you can bake it for a lighter version, but the texture will be different—more like a baked nugget than a shatteringly crisp takeout-style piece. To bake, coat the marinated chicken as directed. Place the pieces on a wire rack set over a baking sheet (this allows air circulation). Spray generously with cooking oil and bake at 220°C (425°F) for 15-20 minutes, flipping halfway, until cooked and golden. Toss with the sauce as usual.
Is this dish very spicy?
As written, it has a mild to medium kick, thanks to the sriracha. The sweetness from the honey balances it out beautifully. It’s family-friendly but still interesting. You have full control! To make it milder, reduce the sriracha to 1 teaspoon or omit it entirely. To make it spicier, add more sriracha, include some chopped fresh red chilies when you fry the garlic paste, or add a pinch of cayenne pepper to the sauce. Taste as you go!
What can I serve with Crispy Chilli Chicken?
It’s incredibly versatile! Steamed jasmine rice or fried rice are classic pairings. It’s also fantastic with chow mein noodles or lo mein. For a low-carb option, serve it with cauliflower rice or over a bed of crunchy shredded lettuce. Vegetable sides like steamed broccoli, stir-fried bok choy, or snap peas complement it perfectly. It’s a complete meal alongside my easy One-Pot Ground Beef Zucchini Skillet for a protein-packed dinner spread.
How do I know when the oil is hot enough to fry?
If you don’t have a thermometer, use the “wooden chopstick test.” Dip the end of a wooden chopstick or the handle of a wooden spoon into the oil. If steady, small bubbles immediately form around the wood, the oil is ready (around 180°C/350°F). You can also drop a tiny piece of coated chicken or a bit of cornflour into the oil. If it sizzles vigorously and rises to the surface within a few seconds, you’re good to go. If it sinks or barely bubbles, the oil needs more time to heat.
Can I use chicken thighs instead of breasts?
Absolutely! In fact, many people prefer thighs for this recipe. Chicken thighs are more forgiving because they have a slightly higher fat content, which keeps them juicy and tender even if you accidentally overcook them a bit. Just be sure to trim any excess fat and cut them into even strips, following the same marinating and cooking process. The result will be incredibly flavorful and moist inside that crispy shell.
Is the sugar in this recipe necessary?
The small amount of sugar in the marinade (1 tsp) helps balance the saltiness of the soy sauce and promotes browning during frying. The honey in the sauce provides the signature sweet note that contrasts with the spice and salt. For a less sweet dish, you can reduce the honey by a tablespoon. Be mindful that sauces often contain added sugars, so making your own allows you to control the amount. The sugar is a key flavor component, but you can adjust it to your personal taste.
If you’re looking for more fantastic dinner inspiration, explore all our main dish recipes for everything from cozy casseroles to quick skillet meals.
Ready, Set, Cook!
There you have it—my foolproof path to incredible homemade Crispy Chilli Chicken. This recipe has brought so much joy and crunch to my family table, and I know it will do the same for yours. Remember, the double fry is your friend, and don’t be afraid to tweak the sauce to make it your own. It’s a dish that’s meant to be shared and enjoyed loudly (crunching is encouraged!). So grab your wok, and get ready for compliments. For another saucy, crowd-pleasing chicken dish, you have to try this luxurious Marry Me Chicken with Sun-Dried Tomato Cream Sauce. And if you love bold, bowl-food flavors, this Hot Honey Cottage Cheese Sweet Potato Beef Bowl is an absolute must-try. Happy cooking!
Crispy Chilli Chicken
Ingredients
Equipment
Method
- Marinate the chicken by combining it with dark soy sauce, 1 tbsp of garlic and ginger paste, sesame oil, sugar, and white pepper, and let sit for at least 10 minutes.
- Whisk together honey, lemon juice, dark soy sauce, and sriracha in a bowl for the sauce.
- Mix egg white into the marinated chicken and coat it with cornflour.
- Heat vegetable oil in a wok or deep pan to 180°C (350°F) and fry the chicken in batches for 1-2 minutes until light golden; drain.
- For the second fry, heat the oil back up and fry the chicken for 2-3 minutes until dark golden and crispy; drain.
- Heat a clean pan with 1 tbsp oil, add remaining garlic-ginger paste for a few seconds, then pour in the sauce and let it bubble for about 30 seconds.
- Add the fried chicken into the pan, toss to coat, and serve immediately topped with chopped spring onions.