Introduction to Marry Me Chicken with Sun-Dried Tomato Cream Sauce
I still remember the first time my husband took a bite of this creamy, savory chicken dish. He closed his eyes and said it was so good that someone should marry the person who made it. That’s when I understood why they call it Marry Me Chicken with Sun-Dried Tomato Cream Sauce. The name isn’t just clever marketing. It’s a promise that this meal will make people fall head over heels for your cooking.
Hi, I’m Sarah, and I’ve been cooking and sharing recipes for over ten years. Food is my love language, and nothing makes me happier than watching people enjoy meals I’ve prepared. This particular chicken recipe has become my secret weapon for special dinners, date nights, and those moments when I want to impress without spending hours in the kitchen.
So what exactly is Marry Me Chicken? Picture this: golden-brown chicken breasts swimming in a rich, creamy sauce loaded with sun-dried tomatoes, garlic, and Italian herbs. The sauce is velvety smooth with just the right balance of tangy and savory flavors. Every bite melts in your mouth and makes you reach for seconds before you’ve finished your first serving.
This dish took the internet by storm a few years ago, and for good reason. It combines restaurant-quality flavors with home-cook simplicity. You don’t need fancy techniques or hard-to-find ingredients. Just chicken, cream, sun-dried tomatoes, and a handful of pantry staples come together to create pure magic on a plate.
Why do people love this recipe so much? First, it looks and tastes like you slaved away for hours, but it actually takes about 30 minutes from start to finish. Second, the flavor combination is absolutely addictive. The sun-dried tomatoes add a sweet, concentrated tomato flavor that pairs beautifully with the rich cream sauce. Third, it’s versatile enough for a weeknight dinner but fancy enough for entertaining guests.
In this guide, I’ll walk you through everything you need to know to make perfect Marry Me Chicken with Sun-Dried Tomato Cream Sauce. We’ll start with the complete ingredients list and tips for choosing quality items. Then I’ll show you how to prepare and season the chicken properly. You’ll learn my tricks for keeping the meat tender and juicy. By the end, you’ll have all the knowledge you need to make this show-stopping dish with confidence.
Trust me when I say this recipe will become a regular in your dinner rotation. My family requests it at least twice a month, and I’ve shared it with countless friends who now make it for their own families. Ready to learn how to make chicken that might just result in a marriage proposal? Let’s get started.
Ingredients for Marry Me Chicken
Great cooking starts with great ingredients. You can’t expect amazing results if you cut corners on quality. Here’s what you’ll need to make Marry Me Chicken with Sun-Dried Tomato Cream Sauce that tastes like it came from a fancy Italian restaurant:
Main Ingredients
- 4 boneless, skinless chicken breasts (about 6-8 ounces each)
- 1 cup heavy cream (don’t substitute with milk or half-and-half)
- 1/2 cup chicken broth (low-sodium works best)
- 1/2 cup sun-dried tomatoes (oil-packed, drained and chopped)
- 1/2 cup freshly grated Parmesan cheese
- 3 cloves garlic (minced)
- 2 tablespoons olive oil (for cooking)
- 1 teaspoon dried oregano
- 1 teaspoon dried basil
- 1/2 teaspoon red pepper flakes (optional, for a little kick)
- Salt and black pepper (to taste)
- Fresh basil leaves (for garnish)
Choosing Quality Chicken
The chicken is the star of this dish, so don’t grab just any package from the store. I always look for chicken breasts that are similar in size so they cook evenly. Nothing’s worse than having one piece perfectly done while another is dry and overcooked.
Go for organic or free-range chicken if your budget allows. The meat has better flavor and texture. The breasts should look plump and have a pinkish color. Avoid any chicken that looks gray or has an off smell. Fresh chicken should smell clean and barely have any scent at all.
Check the sell-by date and pick the package with the furthest date. If the chicken feels slimy even through the package, put it back. That’s a red flag for chicken that’s past its prime.
Sun-Dried Tomatoes Matter
You have two options with sun-dried tomatoes: oil-packed or dried. For this recipe, I strongly recommend oil-packed sun-dried tomatoes. They’re already soft and ready to use. Plus, that flavored oil is liquid gold that adds depth to your sauce.
Dried sun-dried tomatoes work too, but you’ll need to rehydrate them in hot water for 15 minutes first. Drain them well before adding to the dish. Oil-packed just makes life easier and tastes better in my experience.
Fresh vs. Pre-Grated Cheese
Here’s where I get picky. Always grate your own Parmesan cheese from a block. Pre-grated cheese from a container contains anti-caking agents that prevent it from melting smoothly into your sauce. You’ll end up with a grainy texture instead of silky cream.
A block of real Parmigiano-Reggiano costs more upfront but delivers superior flavor. The nutty, salty taste makes a noticeable difference. Plus, a little goes a long way when the quality is high.
Cream and Broth Selection
Don’t skimp on the heavy cream. This isn’t the time to use skim milk or light cream. The fat content in heavy cream is what creates that luxurious, restaurant-style sauce. It also prevents the sauce from breaking or separating when it simmers.
For chicken broth, low-sodium gives you better control over the salt level. Different brands have wildly different sodium amounts, and you can always add more salt but can’t take it away.
Storing Your Ingredients
Proper storage keeps your ingredients fresh and safe. Keep chicken in the coldest part of your fridge (usually the back of the bottom shelf). Use it within 1-2 days of purchase, or freeze it if you’re not cooking right away.
Store heavy cream in its original container in the fridge. It typically lasts about a week after opening. Give it a sniff before using. Sour cream smells sour, but heavy cream should smell fresh and slightly sweet.
Oil-packed sun-dried tomatoes can live in your pantry until opened. After opening, store them in the fridge with the oil covering the tomatoes. They’ll keep for several months this way. The oil might solidify in the cold, but it will liquify again at room temperature.
Parmesan cheese wrapped tightly in plastic wrap or foil stays fresh in the fridge for weeks. For longer storage, you can freeze the block. Just know that frozen and thawed Parmesan works better for grating into dishes than for eating on its own.
Preparing the Chicken for Marry Me Chicken
Proper chicken prep makes the difference between dry, tough meat and juicy, tender perfection. This step takes just a few minutes but pays off in huge flavor dividends. Let me walk you through my method for preparing chicken that stays moist and cooks evenly.
Getting the Chicken Ready
Take your chicken out of the fridge about 20 minutes before cooking. Room temperature chicken cooks more evenly than cold chicken straight from the fridge. Cold chicken tends to overcook on the outside while staying raw in the thickest part.
Pat each chicken breast completely dry with paper towels. This step is critical. Wet chicken won’t brown properly, and you’ll end up with steamed, gray meat instead of golden, crispy edges. Really press those paper towels into the chicken to absorb all moisture.
Most chicken breasts are thicker on one end and thinner on the other. This uneven thickness means uneven cooking. To fix this, place each breast between two pieces of plastic wrap or parchment paper. Use a meat mallet or heavy pan to gently pound the thick end until the whole breast is about the same thickness (roughly 3/4 inch throughout).
Seasoning for Maximum Flavor
Season your chicken generously. I mean really generously. A lot of the seasoning stays in the pan rather than on the meat, so don’t be shy. Use about 1 teaspoon of salt and 1/2 teaspoon of black pepper for all four breasts.
Season both sides of the chicken right before cooking. If you salt too far in advance, it draws moisture out of the meat. A light coating of salt and pepper on each side works perfectly for this recipe since the sauce will add plenty of flavor later.
I like to add just a pinch of garlic powder to the seasoning mix. This adds another layer of flavor that complements the garlic in the sauce. Some people add a little paprika for color, which looks beautiful but isn’t necessary.
The Resting Period
After pounding and seasoning, let the chicken rest on a plate while you gather the rest of your ingredients. This 5-10 minute rest allows the meat fibers to relax after being pounded. Relaxed meat stays tender during cooking.
This rest time also lets the surface dry out again slightly. Remember, dry surface equals better browning. If you notice any moisture pooling on the chicken, give it another quick pat with a paper towel.
Tips for Tender, Juicy Chicken
The secret to tender chicken is not overcooking it. Chicken breasts are done at 165°F internal temperature. Anything higher and they turn dry and rubbery. Invest in an instant-read meat thermometer if you don’t have one. It’s the best tool for perfect chicken every single time.
Another trick I learned from restaurant chefs: don’t move the chicken around while it cooks. Put it in the hot pan and leave it alone for 3-4 minutes. This allows a proper crust to form. Moving it too soon means the meat sticks and tears, ruining that beautiful golden color.
The chicken will finish cooking in the sauce, so you don’t need to cook it all the way through during the initial sear. I take mine off the heat when it reaches about 155°F. It will coast up to 165°F while simmering in the cream sauce.
If your chicken breasts are particularly thick (more than 1 inch even after pounding), consider butterflying them. Cut horizontally through the thickest part, opening the breast like a book. This creates an even thickness and reduces cooking time.
One last pro tip: resist the urge to press down on the chicken with your spatula while it cooks. This squeezes out all those delicious juices. Just let it sit peacefully in the pan and work its magic.


Making the Sun-Dried Tomato Cream Sauce
Now that your chicken is prepped and ready, let’s talk about the real star of this show. The cream sauce is where all the magic happens, and honestly, it’s what makes this dish so special that people will want to marry you over it.
The beauty of this sauce is that it comes together in the same pan you cooked the chicken in. All those browned bits stuck to the bottom? That’s called fond, and it’s packed with flavor. We’re going to use those bits to build a sauce that’s so good you’ll want to lick the plate.
What Goes Into This Incredible Sauce
You’ll need that minced garlic I mentioned earlier, your oil-packed sun-dried tomatoes (chopped into smaller pieces), the heavy cream, chicken broth, Parmesan cheese, and your dried herbs. The red pepper flakes are optional but I highly recommend them. Just a tiny pinch adds complexity without making it spicy.
Keep everything measured and ready to go before you start. Once you begin making the sauce, things move quickly. You don’t want to be scrambling to measure cream while your garlic burns in the pan.
Building Flavor Step by Step
After you’ve removed the cooked chicken from the pan, lower the heat to medium. Add your minced garlic to the remaining oil and those beautiful browned bits. Stir it constantly for about 30 seconds. You want the garlic fragrant and just barely golden, not brown. Burned garlic tastes bitter and will ruin your sauce.
Next, toss in your chopped sun-dried tomatoes. Let them hang out with the garlic for another 30 seconds or so. This step wakes up their flavor and releases some of that delicious oil they’ve been soaking in. My kitchen smells absolutely incredible at this point.
Here’s where things get fun. Pour in your chicken broth and turn the heat up to medium-high. Use a wooden spoon or spatula to scrape up all those stuck-on bits from the bottom of the pan. This is called deglazing, and it’s a restaurant technique that home cooks should absolutely use. Those bits dissolve into the liquid and add so much depth to your sauce.
Let the broth bubble and reduce for about 2 minutes. You want it to cook down by roughly half. This concentrates the flavors and creates a stronger base for your sauce. If you skip this step, your sauce might taste watery and weak.
Lower the heat back to medium and pour in the heavy cream. Stir everything together until it’s well combined. Add your dried oregano, basil, and red pepper flakes if you’re using them. Let the sauce simmer gently for about 3-4 minutes. It should thicken slightly and take on a beautiful peachy-pink color from the tomatoes.
The Cheese Situation
Remove the pan from the heat before adding your Parmesan. This is important. If the sauce is too hot, the cheese can clump up or turn grainy. Off the heat, stir in the freshly grated Parmesan a little at a time. It should melt smoothly into the sauce, creating this glossy, silky texture that makes you understand why people write poems about Italian food.
Taste your sauce at this point. Does it need more salt? More pepper? This is your chance to adjust. Remember that when you add the chicken back in, it will absorb some of the sauce’s flavor, so you want it slightly more seasoned than you think it needs.
Getting That Perfect Consistency
The sauce should coat the back of a spoon but still flow easily. If it’s too thick, add a splash of chicken broth or even pasta water if you’re serving this over noodles. Too thin? Let it simmer a bit longer to reduce, or add another tablespoon of Parmesan to help thicken it up.
Funny enough, the sauce will continue to thicken as it sits. So if it looks perfect in the pan, it might be too thick by the time you serve it. I aim for slightly thinner than I want the final result to be. The chicken will also release some juices as it finishes cooking in the sauce, which thins things out a bit more.
Why Sun-Dried Tomatoes Work So Well
Let me tell you why sun-dried tomatoes are absolutely essential here. They’re not just regular tomatoes that got left in the sun. The drying process concentrates all the natural sugars and creates this intense, almost sweet tomato flavor that fresh tomatoes just can’t match.
That sweetness balances perfectly with the rich, fatty cream and the salty Parmesan. Plus, the slightly chewy texture adds interest to the smooth sauce. You get little bursts of concentrated tomato goodness in every few bites.
The oil they’re packed in has soaked up all kinds of herbs and tomato essence. Some jars include garlic or Italian seasoning in the oil. Don’t drain that oil completely away. Use some of it for cooking your chicken or drizzle a bit into the sauce for extra flavor.
I’ve tried making this sauce with fresh tomatoes and even roasted cherry tomatoes. Both versions were good, but they couldn’t compete with the concentrated punch that sun-dried tomatoes deliver. If you’re looking for similar bold flavors in other dishes, you might enjoy how ground beef and vegetables come together in a skillet.
Cooking the Chicken to Perfection
Alright, let’s get that chicken cooking. This is where your prep work pays off big time. You’ve got seasoned, evenly-pounded chicken breasts just waiting to hit a hot pan.
The Pan-Frying Method
Heat those 2 tablespoons of olive oil in a large skillet over medium-high heat. I prefer a stainless steel or cast iron skillet because they develop better browning than nonstick pans. The pan needs to be properly hot before the chicken goes in. Test it by flicking a tiny drop of water into the pan. If it sizzles and evaporates immediately, you’re ready.
Carefully lay each chicken breast in the pan, smooth side down. They should make a satisfying sizzle sound. If they don’t, your pan wasn’t hot enough. Don’t crowd the pan. If your skillet isn’t big enough for all four breasts with space between them, cook in two batches. Crowded chicken steams instead of sears.
Now comes the hard part. Leave them alone. Don’t peek, don’t move them, don’t press on them with your spatula. Just let them be for 5-6 minutes. Set a timer if you need to. The chicken will release from the pan naturally once it’s properly seared. If you try to flip it and it’s sticking, give it another minute.
After those 5-6 minutes, flip each piece. They should have gorgeous golden-brown color on the cooked side. Cook the second side for another 5-6 minutes. Again, don’t mess with them. Just let the heat do its work.
Check the internal temperature with your instant-read thermometer. You’re looking for 155-160°F in the thickest part. Remember, the chicken will continue cooking in the sauce, so you don’t want it completely done yet. Transfer the cooked chicken to a clean plate and tent it loosely with foil to keep warm while you make the sauce.
The Baking Method
Not everyone loves standing over a hot stove. I get it. The baking method works beautifully too, though you’ll miss out on those flavorful browned bits in the pan. Similar to how sheet pan dinners simplify cleanup, this approach offers convenience.
Preheat your oven to 400°F. Season your chicken just like before. Heat an oven-safe skillet on the stovetop over medium-high heat with the olive oil. Sear the chicken for 2-3 minutes per side, just enough to get some color. Then transfer the whole pan to the oven.
Bake for 15-18 minutes until the internal temperature reaches 165°F. Take the pan out and remove the chicken to a plate. Now you can make the sauce in that same pan on the stovetop, getting some of those browned bits even though you baked the chicken.
Knowing When It’s Done
Here’s the thing about chicken doneness. Color isn’t always reliable. Sometimes chicken looks white and cooked through but hasn’t hit that safe 165°F yet. Other times, it might have a slight pink tinge near the bone but is actually perfectly cooked. Temperature is the only way to know for sure.
Insert your thermometer into the thickest part of the breast, making sure you’re not touching bone or going all the way through to the pan. The number should read at least 165°F. If you’re taking the chicken off early to finish in the sauce, 155°F is your target.
The chicken should feel firm but still have some give when you press on it. Totally rock-hard chicken is overcooked chicken. There should be clear juices running out when you cut into it. Pink or red juices mean it needs more time, though again, thermometer beats visual checks every time.
Avoiding the Dreaded Dry Chicken
I’ve overcooked more chicken breasts than I care to admit when I was learning to cook. Dry chicken is so disappointing. The biggest mistake people make is cooking it too long at too high a temperature. Medium-high heat is your friend. High heat burns the outside before the inside cooks.
Another common error is cutting into the chicken to check if it’s done. Every time you cut it, juices escape. Those juices are what keep it moist and delicious. Use that thermometer instead of making test cuts.
Resting the chicken after cooking also matters. When meat cooks, the juices get pushed toward the center. Resting for 3-5 minutes lets those juices redistribute throughout the meat. Cut into it immediately and they all run out onto your cutting board instead of staying in the chicken where they belong.
By the way, if you’re looking for other ways to keep chicken interesting during the week, building flavor-packed bowls with different sauces offers endless variety.
Keeping Everything Warm
Once your chicken is cooked, you need to keep it warm while finishing the sauce. The foil tent I mentioned works great for short periods. Just don’t wrap it tightly or you’ll steam the chicken and make the crust soggy.
If your kitchen is cold or you’re taking longer with the sauce, put the plate in a barely warm oven (like 170°F or the “warm” setting). Don’t go hotter than that or the chicken will continue cooking and dry out.
When you’re ready to combine everything, nestle that beautiful golden chicken right into the bubbling cream sauce. Spoon some sauce over the top. Let it simmer together for 3-4 minutes. This final step lets the flavors marry together (see what I did there?) and ensures the chicken reaches that perfect 165°F if it wasn’t quite there yet.
The sauce will cling to the chicken and create this glossy coating that looks absolutely restaurant-worthy. Much like how combining components at the end brings a bowl together, this final step transforms separate elements into one cohesive dish.


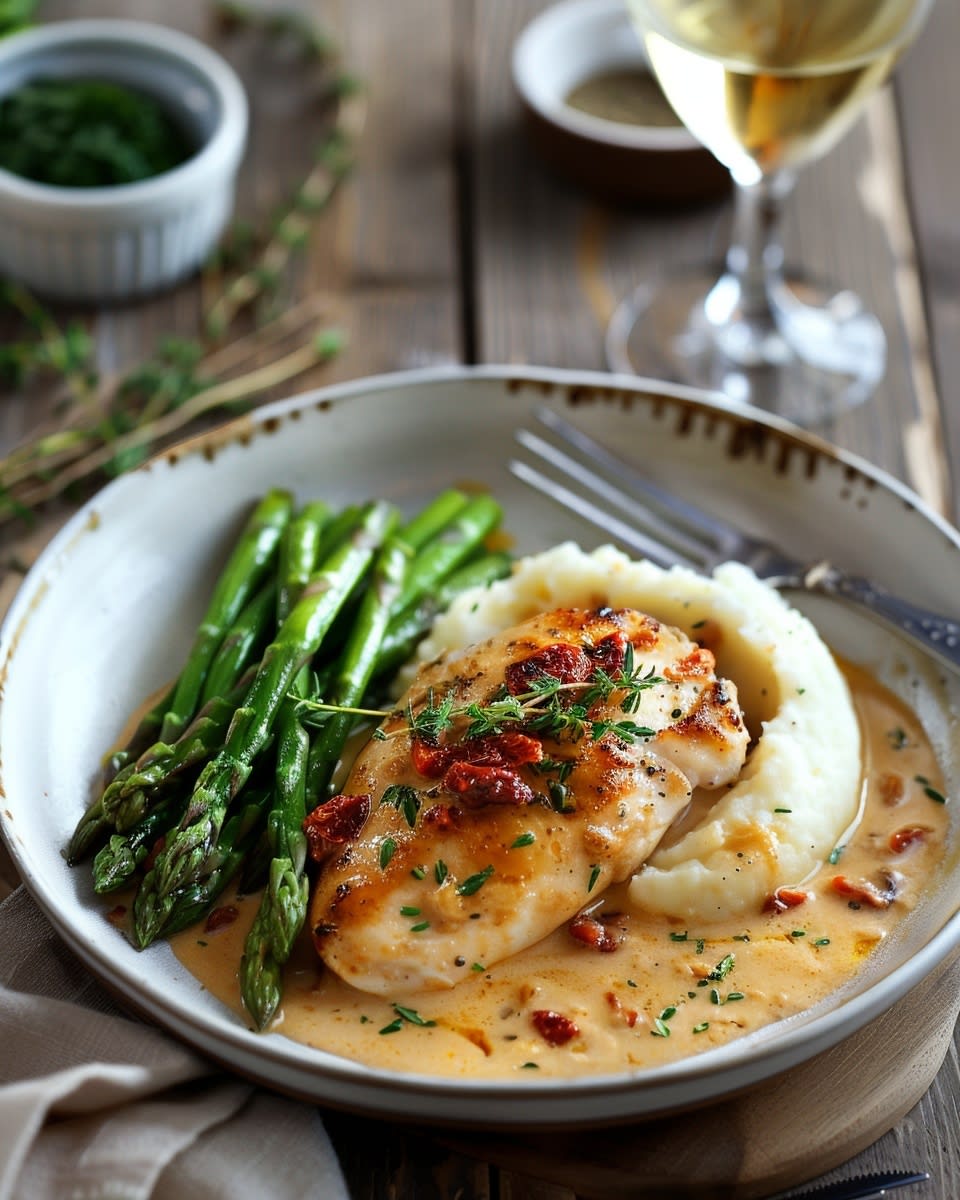
Serving Suggestions for Marry Me Chicken
You’ve made this incredible Marry Me Chicken with Sun-Dried Tomato Cream Sauce, and now it’s time to think about what goes with it. This is a rich, creamy dish that needs the right accompaniments to create a balanced, satisfying meal. Let me share my favorite pairings that I’ve discovered through lots of trial and error.
Perfect Side Dishes to Serve
Honestly, my go-to side is always pasta. Something simple like fettuccine, linguine, or even angel hair works beautifully. The noodles soak up that gorgeous cream sauce, and you don’t waste a single drop. I toss the cooked pasta with a little butter and fresh parsley before plating, then nestle the chicken right on top.
Mashed potatoes are another winner. Creamy garlic mashed potatoes complement the sauce without competing with it. My mom always says that any meal improved by cream sauce is also improved by mashed potatoes, and she’s not wrong. The fluffy spuds absorb the sauce and create this comfort food experience that’s hard to beat.
Rice is a lighter option that still does the job. I prefer jasmine rice or basmati because they have a slightly nutty flavor that pairs nicely with the sun-dried tomatoes. Plain white rice works too, but season it with a little butter and salt so it’s not boring. Some people do rice pilaf, which adds nice texture and flavor variety to the plate.
For vegetables, I lean toward simple preparations. Roasted asparagus with just olive oil, salt, and pepper is elegant and doesn’t fight with the rich sauce. Green beans sautéed with garlic are another favorite in my house. The slight crunch and fresh flavor cut through the creaminess perfectly.
Steamed broccoli might sound basic, but it’s actually ideal here. The little florets catch bits of sauce, and the mild flavor doesn’t compete. Plus, it adds a pop of green color that makes your plate look more appealing. I always finish my broccoli with a squeeze of lemon juice for brightness.
A fresh salad on the side balances the richness of the chicken. I do a simple arugula salad with lemon vinaigrette, shaved Parmesan, and maybe some cherry tomatoes. The peppery arugula and acidic dressing cleanse your palate between bites of the creamy chicken. It’s that little bit of freshness that keeps you from feeling weighed down.
Crusty bread is non-negotiable in my opinion. You need something to mop up every last bit of that sun-dried tomato cream sauce. A good French baguette, Italian ciabatta, or even garlic bread works wonderfully. I slice it thick, toast it lightly, and watch it disappear from the table within minutes.
Drink Pairings That Work
If you’re serving this for a special dinner, wine is the obvious choice. A medium-bodied white wine like Chardonnay complements the cream sauce beautifully. The buttery notes in the wine echo the richness of the dish. I personally love a Pinot Grigio because it’s lighter and more refreshing, which balances the heaviness.
For red wine lovers, go with something that’s not too heavy. A Pinot Noir has enough body to stand up to the chicken but won’t overpower the delicate flavors. Stay away from big, tannic reds like Cabernet Sauvignon. They clash with cream sauces and make everything taste off.
Not a wine drinker? No problem. Sparkling water with lemon is refreshing and helps cut the richness. Iced tea works great for casual dinners. I’ve even served this with a crisp apple cider in the fall, which added a seasonal touch that guests loved.
Making Your Plate Instagram-Worthy
Presentation matters more than people think. You can have the most delicious food in the world, but if it looks like a mess on the plate, it’s less appealing. Here’s how I plate Marry Me Chicken to make it look restaurant-quality.
Start with warm plates. This keeps your food at the right temperature longer and shows you care about details. I run mine under hot water for a minute and dry them right before plating.
For the actual arrangement, I place my starch (pasta, rice, or mashed potatoes) slightly off-center on the plate. Then I lay the chicken breast partially on top of the starch, leaning it at a slight angle. This creates height and visual interest instead of everything sitting flat.
Spoon that beautiful cream sauce generously over the chicken, letting it pool around the base and drip onto the starch. Don’t be stingy with the sauce. It’s the star, and you want people to see those gorgeous sun-dried tomato pieces swimming in all that creamy goodness.
Fresh herbs make everything look more polished. I tear some fresh basil leaves and scatter them over the top. The bright green color against the creamy sauce is stunning. Sometimes I add a small sprinkle of freshly grated Parmesan too. A light crack of black pepper over everything adds those pretty specks that say “this person knows what they’re doing.”
If you’re adding vegetables, place them on the side in a neat pile rather than scattering them randomly. A lemon wedge on the edge of the plate adds a pop of color and gives diners the option to brighten things up with a squeeze of citrus.
By the way, white plates show off the colors of the dish better than patterned ones. The peachy-pink sauce, golden chicken, and green herbs really pop against a simple white background.
Storing and Reheating Leftovers
Good news: this dish reheats surprisingly well, which isn’t always true for cream sauces. The key is storing it properly and using the right reheating method.
Let everything cool to room temperature before storing. Never put hot food directly in the fridge because it raises the temperature inside and can affect other foods. Once cooled, transfer the chicken and sauce to an airtight container. It’ll keep in the fridge for 3-4 days.
Here’s the thing about cream sauce: it thickens significantly when cold. Don’t panic when you open your container the next day and find the sauce has turned into something closer to pudding. That’s totally normal. It’ll loosen up again when you reheat it.
For reheating, the stovetop method works best. Put your chicken and sauce in a skillet over medium-low heat. Add a splash of chicken broth or heavy cream to loosen the sauce. Cover the pan and let it warm through gently, stirring occasionally. This usually takes 8-10 minutes. You want it heated all the way through but not boiling, which can make the sauce break.
The microwave works in a pinch, though it’s not my favorite. Place the chicken in a microwave-safe dish, add a tablespoon or two of broth or cream, and cover loosely with a damp paper towel. Heat in 30-second intervals, stirring between each, until it’s hot throughout. The paper towel keeps moisture in and prevents the chicken from drying out.
Avoid reheating in the oven. It takes forever, and the chicken tends to dry out while the sauce stays cold in the middle. If you’re reheating a large batch for meal prep, stovetop is still your best bet.
Funny enough, some people say the flavors are even better the next day after everything has had time to meld together. I won’t argue with that. I’ve been known to make a double batch specifically so I have leftovers for lunch the next day.
If you’re thinking about meal prepping this dish for the week, understanding how to balance your meals with proper portions and variety is important. The USDA’s MyPlate guidelines for healthy meals can help you round out your week with complementary dishes that keep things nutritious and interesting.
Freezing for Later
Can you freeze Marry Me Chicken? Yes, but with a small caveat. Cream sauces can sometimes separate when frozen and thawed. It’s not the end of the world, but the texture might not be quite as silky smooth.
If you want to freeze it anyway, let everything cool completely. Transfer to a freezer-safe container, leaving about an inch of space at the top for expansion. It’ll keep frozen for up to 2 months. Thaw overnight in the fridge, never at room temperature.
When reheating from frozen, you’ll definitely need to add extra liquid. The sauce will look broken and separated at first. Don’t worry. As you reheat gently on the stovetop with some added broth and cream, whisking constantly, it should come back together mostly. It might not be quite as perfect as fresh, but it’s still delicious.
If you’re exploring more dishes you can prepare and enjoy throughout the week, check out the full collection of main dish recipes for inspiration that’ll keep your dinner table interesting and your family happy.
Turning Leftovers Into New Meals
Leftover Marry Me Chicken is incredibly versatile. I’ve chopped it up and tossed it with pasta for a quick lunch. Slice it thin and pile it on a crusty roll with some fresh arugula for an amazing sandwich. The cream sauce acts as a built-in spread that keeps everything moist.
You can shred the chicken and stir it into cooked rice with some vegetables for a creamy rice bowl. Add it to a frittata or quiche for brunch. Mix it with additional cream and pasta water to create a quick pasta dish. The possibilities are endless once you start thinking creatively.
One of my favorite ways to repurpose leftovers is stuffing them into bell peppers with some rice and cheese, then baking until everything is hot and bubbly. It’s like a completely different meal but requires almost no effort.
When you put love and attention into a dish like this, you want to enjoy every last bite. These storage and serving tips ensure that your effort pays off not just for one meal, but for several delicious experiences.
Common Questions About Marry Me Chicken
What makes Marry Me Chicken special?
The combination of flavors is what sets this dish apart. You’ve got tender, juicy chicken swimming in a rich cream sauce with tangy sun-dried tomatoes, savory Parmesan, and aromatic herbs. It tastes like something from an expensive Italian restaurant but comes together in about 30 minutes with ingredients you can find at any grocery store. The name comes from the idea that it’s so delicious, someone would propose marriage just to keep eating it. Beyond the taste, it’s also beautiful to look at and versatile enough for both weeknight dinners and special occasions.
Can I use different types of protein instead of chicken?
Absolutely! This sauce works beautifully with other proteins. Pork chops or pork tenderloin medallions are my first alternative choice because they cook similarly to chicken and have a mild flavor that doesn’t compete with the sauce. Shrimp would be amazing but cook much faster, so you’d just sauté them briefly and add them to the finished sauce. Turkey cutlets work great too. Even firm white fish like cod or halibut would be delicious, though you’d need to handle them more gently since fish is more delicate than chicken. Just adjust your cooking times based on the protein you choose.
How can I make the dish healthier without compromising flavor?
There are several swaps you can make. Use chicken thighs instead of breasts for more flavor with slightly more fat but better moisture retention. Replace half the heavy cream with half-and-half or even Greek yogurt added at the end off the heat. You can reduce the amount of cream and increase the chicken broth for a lighter sauce that still has good flavor. Use less oil for cooking and opt for a cooking spray instead. Load up on vegetables as sides to balance the richness. The sun-dried tomatoes and Parmesan are flavor powerhouses, so even with lighter cream, you’ll still get plenty of taste.
Is it possible to make the sauce ahead of time?
Yes, you can prep the sauce ahead, which makes dinner assembly super quick. Make the complete sauce, let it cool, and store it in an airtight container in the fridge for up to 2 days. When you’re ready to use it, reheat it gently on the stovetop, adding a splash of cream or broth if it’s too thick. Cook your chicken fresh, then combine with the reheated sauce. You can also prep all your ingredients measured and ready to go so when it’s time to cook, everything comes together in minutes. I wouldn’t recommend making it more than 2 days ahead because cream sauces are best when relatively fresh.
What are some common mistakes to avoid when making this dish?
The biggest mistake is overcooking the chicken, which makes it dry and rubbery. Use a meat thermometer and don’t go past 165°F. Another error is not properly browning the chicken before making the sauce. Those browned bits add crucial flavor. Some people add the Parmesan while the sauce is boiling, which causes it to clump and turn grainy. Always add cheese off the heat. Using pre-grated cheese instead of freshly grated is another problem because it contains anti-caking agents that prevent smooth melting. Finally, not seasoning the chicken well enough before cooking means bland meat even in a flavorful sauce.
Can I substitute sun-dried tomatoes with fresh ones?
You can, but the flavor won’t be the same. Sun-dried tomatoes have concentrated sweetness and intense flavor that fresh tomatoes simply don’t have. If you must substitute, roasted cherry tomatoes are your best bet. Cut them in half, toss with olive oil and salt, and roast at 400°F for about 20 minutes until they’re wrinkled and concentrated. They’ll give you some of that deeper flavor, though still not quite the same punch as sun-dried. Regular diced fresh tomatoes will make the sauce watery and more acidic. If you’re in a pinch and only have fresh, I’d suggest using tomato paste to add depth along with the fresh tomatoes.
How long does the dish take to prepare from start to finish?
From pulling ingredients out of the fridge to sitting down to eat, you’re looking at about 35-40 minutes total. Prepping the chicken takes maybe 5 minutes. Cooking the chicken takes 10-12 minutes. Making the sauce takes another 5-7 minutes. Combining everything and letting it simmer takes the final 5 minutes. If you’re organized and have your ingredients measured out before you start cooking, you might shave off a few minutes. Adding side dishes like pasta or vegetables obviously extends the time, but the main dish itself is definitely doable on a busy weeknight.
Is this dish suitable for a romantic dinner?
Are you kidding? It’s literally called Marry Me Chicken! This is perfect for date night, anniversaries, Valentine’s Day, or any time you want to impress someone special. It looks elegant, tastes incredible, and has that romantic Italian vibe. Light some candles, pour some wine, serve it with pasta and a nice salad, and you’ve got yourself a restaurant-quality romantic dinner at home. The best part is that it doesn’t require you to stress in the kitchen for hours, so you can actually enjoy the evening instead of being exhausted from cooking. Just maybe don’t tell your date how easy it was to make until after they’ve proposed.
Can I make this in a slow cooker or Instant Pot?
The Instant Pot version works pretty well. Season your chicken, then use the sauté function to brown it on both sides. Remove the chicken, add garlic and sun-dried tomatoes, then pour in the broth to deglaze. Add the chicken back, seal the lid, and pressure cook on high for 8 minutes. Quick release, remove the chicken, and stir in the cream and Parmesan on the sauté setting until thickened. For a slow cooker, you miss out on the browning unless you sear the chicken first in a separate pan. Then combine everything except the cream and cheese in the slow cooker for 3-4 hours on low. Stir in the cream and cheese at the end.
What’s the best way to make this for a crowd?
When I’m feeding a group, I use chicken tenderloins instead of breasts because they’re smaller and cook more evenly. They’re also easier for guests to eat. I brown them in batches, then make a larger quantity of sauce in a big skillet or Dutch oven. You can also use bone-in, skin-on chicken thighs for more flavor and less risk of drying out, though they take longer to cook. Double or triple the sauce recipe as needed. Keep everything warm in a 200°F oven until serving time. Set it up buffet-style with the chicken and sauce in one dish, pasta or rice in another, and sides separately so guests can build their own plates.
This dish has brought so much joy to my table over the years, and I hope it does the same for yours. The beauty of cooking is that you can make something truly special without needing years of training or fancy equipment. Just good ingredients, a little technique, and the willingness to try something new. So grab those chicken breasts, that jar of sun-dried tomatoes, and give this recipe a shot. Then come back and tell me if someone actually proposed after tasting it!
Ingredients
Equipment
Method
- Sortez le poulet du réfrigérateur 20 minutes avant la cuisson pour qu'il atteigne la température ambiante.
- Essuyez chaque poitrine de poulet avec des serviettes en papier.
- Aplatissez la viande jusqu'à obtenir une épaisseur homogène en plaçant le poulet entre du film plastique et en l'aplatissant délicatement jusqu'à environ 2 cm.
- Assaisonnez les deux côtés du poulet avec du sel et du poivre.
- Chauffez 2 cuillères à soupe d'huile d'olive dans une poêle à feu moyen-élevé.
- Faites dorer le poulet pendant 5-6 minutes d'un côté jusqu'à ce qu'il soit bien doré, puis retournez-le et faites cuire encore 5-6 minutes.
- Retirez le poulet de la poêle et couvrez-le de papier aluminium pour le garder au chaud.
- Diminuez la chaleur et ajoutez l'ail haché dans la même poêle, en faisant sauter pendant 30 secondes.
- Ajoutez les tomates séchées au soleil et faites cuire encore 30 secondes.
- Déglacez la poêle avec le bouillon de poulet, en grattant les morceaux dorés, et laissez réduire pendant 2 minutes.
- Incorporez la crème épaisse, l'origan, le basilic et les flocons de piment rouge, en laissant mijoter pendant 3-4 minutes jusqu'à ce que la sauce épaississe légèrement.
- Retirez la poêle du feu et incorporez le fromage Parmesan râpé jusqu'à obtenir une sauce lisse.
- Renouez le poulet dans la poêle, le plaçant dans la sauce, et laissez mijoter pendant 3-4 minutes pour mélanger les saveurs.