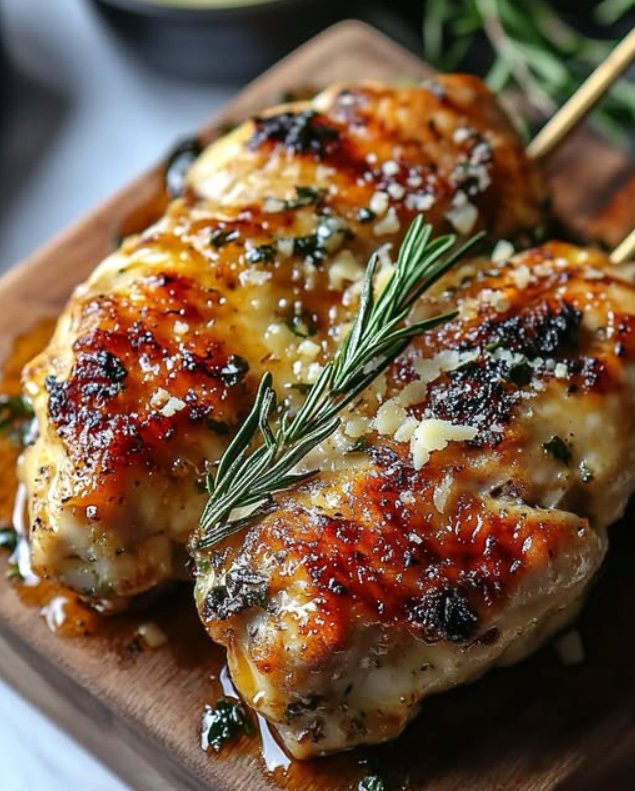
Why This Crispy Garlic Parmesan Chicken Recipe Will Make Your Taste Buds Dance
Picture this: a golden, crispy chicken breast topped with gooey melted parmesan, bursting with the aroma of garlic and fresh herbs. Sounds dreamy, right? I first made this Crispy Garlic Parmesan Chicken for a family dinner when I was desperate to impress my picky nephew. Let me tell you, it was a hit! The crunch, the cheesy goodness, and that garlicky punch had everyone asking for seconds. And guess what? It’s super easy to make. Whether you’re cooking for your family or hosting a casual get-together, this dish is sure to steal the show.
A Little Background on Crispy Garlic Parmesan Chicken
This recipe is inspired by Italian-American comfort food, where crispy textures meet bold flavors. While traditional recipes might use breadcrumbs and plain cheese, this version takes it up a notch with panko for extra crunch and parmesan for a nutty, savory kick. Over the years, I’ve tweaked the recipe to make it simpler without losing its wow factor. Fun fact: Did you know panko breadcrumbs were originally used in Japanese cuisine but have become a staple in Western kitchens? Talk about a global twist!
Why You’ll Love This Recipe
First off, the flavors are insane. Garlic lovers, rejoice! The buttery garlic coating pairs perfectly with the salty, cheesy crust. Plus, it’s beginner-friendly. If you can dip and coat, you’re halfway there. The prep is quick, and the oven does most of the work. Oh, and did I mention how versatile it is? Serve it with pasta, veggies, or even a simple salad—it works every time.
Perfect Occasions to Whip Up This Dish
This Crispy Garlic Parmesan Chicken is perfect for weeknight dinners, potlucks, or even date night at home. Imagine setting this beauty on the table alongside a glass of wine—romantic, right? It’s also kid-approved, so don’t hesitate to make it for family gatherings. Trust me, it’s a crowd-pleaser no matter the occasion.
Ingredients You’ll Need
- 4 boneless, skinless chicken breasts
- 1/2 cup melted butter
- 4 cloves garlic, minced
- 1 cup panko breadcrumbs
- 1 cup grated parmesan cheese
- 2 tablespoons fresh parsley, chopped
- Salt and pepper to taste
Substitution Options
No panko? No problem! Regular breadcrumbs work too, though they won’t be as crispy. Swap the chicken breasts for thighs if you prefer juicier meat. For a dairy-free version, try nutritional yeast instead of parmesan. Fresh parsley can be replaced with dried herbs like oregano or basil. Flexibility is key here!
Step 1: Preheat and Prep
Start by preheating your oven to 190°C (375°F). Grab a baking sheet and line it with parchment paper. This little trick makes cleanup a breeze. While the oven heats up, pat your chicken breasts dry with paper towels. Dry chicken = crispier coating. Pro tip: Use thin chicken breasts or pound them to an even thickness for faster, more even cooking.
Step 2: Make the Garlic Butter Mixture
In a small bowl, mix the melted butter and minced garlic. The aroma alone will make your kitchen smell heavenly. This mixture not only adds flavor but also helps the coating stick to the chicken. Dip each chicken breast into the buttery goodness, making sure it’s fully coated. Don’t skimp on the garlic—it’s the star of the show!
Step 3: Coat with Panko and Parmesan
In another bowl, combine the panko, parmesan, parsley, salt, and pepper. This blend is where the magic happens. Press each butter-coated chicken breast firmly into the mixture, ensuring an even layer. The panko creates a crunchy shell, while the parmesan melts into a golden crust. Chef’s tip: Double-coat the chicken for extra crunch!
Step 4: Bake to Perfection
Place the coated chicken breasts on the prepared baking sheet. Pop them into the oven and bake for 25-30 minutes. Keep an eye on them—they should turn golden brown and crispy. The chicken is done when it reaches an internal temperature of 165°F. The smell will drive you wild, trust me.
Timing Breakdown
- Prep Time: 15 minutes
- Cooking Time: 30 minutes
- Total Time: 45 minutes
Chef’s Secret
Here’s a little secret: Toast your panko breadcrumbs in a dry skillet for 2-3 minutes before using them. This step enhances their flavor and ensures maximum crunchiness. Your guests won’t know why your chicken is so good—they’ll just keep coming back for more.
Extra Info
Parmesan cheese has been around since the Middle Ages and is one of Italy’s oldest cheeses. Fun fact: Real parmesan, or Parmigiano-Reggiano, is aged for at least 12 months. So when you sprinkle that nutty goodness on your chicken, you’re adding centuries of tradition to your plate.
Necessary Equipment
You’ll need a baking sheet, parchment paper, mixing bowls, tongs (for flipping), and a meat thermometer to check doneness. Simple tools, big results!
Storage Tips
If you have leftovers (unlikely!), store them in an airtight container in the fridge for up to 3 days. Reheat in the oven to maintain crispiness—microwaving makes it soggy. For longer storage, freeze the cooked chicken in freezer-safe bags for up to 3 months. Thaw overnight in the fridge before reheating.
Another great option is to freeze the uncooked, breaded chicken. Simply place it on a baking sheet, freeze until solid, then transfer to a bag. This way, you’ll always have a quick meal ready to go.
Pro tip: Label your containers with the date to keep track of freshness.
Tips and Advice
To amp up the flavor, add a pinch of red pepper flakes to the breadcrumb mixture. Want juicier chicken? Brine it in saltwater for 30 minutes before cooking. Always season each layer—don’t forget the breadcrumbs! A well-seasoned dish is a delicious dish.
Presentation Ideas
Garnish with extra parsley for a pop of color. Serve on a platter with lemon wedges for squeezing over the chicken. Pair with roasted veggies or a side of creamy mashed potatoes for a complete meal. Presentation matters, folks!
Healthier Alternatives
Here are six variations to suit different dietary needs:
- Baked Chicken Tenders: Cut the chicken into strips for bite-sized portions.
- Air Fryer Version: Cook at 375°F for 12-15 minutes for less oil.
- Gluten-Free Option: Use gluten-free breadcrumbs and tamari instead of butter.
- Vegan Twist: Substitute chicken with tofu or cauliflower steaks.
- Low-Carb Style: Skip the breadcrumbs and use crushed pork rinds.
- Spicy Kick: Add cayenne pepper or hot sauce to the garlic butter.
Common Mistakes to Avoid
Mistake 1: Skipping the Parchment Paper
Without parchment paper, your chicken might stick to the pan, ruining that beautiful crust. Always line your baking sheet—it’s worth the effort.
Mistake 2: Overcrowding the Pan
Crowded chicken won’t crisp up properly. Leave space between each piece for air circulation. Pro tip: Use two pans if needed.
Mistake 3: Underseasoning
Season generously! Bland chicken is a crime. Taste your breadcrumb mixture before coating to ensure it’s flavorful.
Mistake 4: Overcooking
Overcooked chicken turns dry and tough. Use a meat thermometer to check doneness. Once it hits 165°F, it’s ready.
Mistake 5: Not Double-Coating
For ultimate crunch, dip the chicken twice—first in butter, then in crumbs, repeating the process. It’s a game-changer.
FAQs
Can I use chicken thighs instead of breasts?
Absolutely! Chicken thighs are juicier and take slightly longer to cook. Adjust the baking time accordingly.
How do I reheat leftovers without losing crispiness?
Reheat in the oven at 350°F for 10-15 minutes. Avoid microwaving, which makes the coating soggy.
Can I make this recipe ahead of time?
Yes! Bread the chicken and refrigerate it for up to 24 hours before baking. This saves time on busy days.
What sides pair well with this dish?
Try roasted vegetables, garlic mashed potatoes, or a fresh arugula salad. Balance rich flavors with light sides.
Is this recipe kid-friendly?
Kids love the crispy texture and cheesy flavor. Serve with ketchup or ranch dressing for dipping.
Can I use pre-minced garlic?
Yes, but fresh garlic has a brighter flavor. If using jarred garlic, add a bit more to compensate.
How do I know when the chicken is fully cooked?
Use a meat thermometer. The internal temperature should read 165°F. Juices should run clear, not pink.
Can I freeze this dish?
Yes! Freeze unbaked chicken on a baking sheet, then transfer to a bag. Bake from frozen, adding 5-10 minutes to the cooking time.
What can I substitute for panko?
Regular breadcrumbs or crushed crackers work fine. Just note that panko provides the crispiest texture.
How can I make this dish spicier?
Add red pepper flakes to the breadcrumb mixture or drizzle hot sauce over the finished dish. Spice it up your way!
Final Thoughts
This Crispy Garlic Parmesan Chicken is more than just a recipe—it’s a guaranteed crowd-pleaser. With its crispy exterior, cheesy goodness, and garlicky punch, it’s a dish you’ll want to make again and again. Whether you’re feeding your family or hosting friends, this chicken will leave everyone smiling. So grab your ingredients, fire up that oven, and let’s get cooking!
Crispy Garlic Parmesan Chicken
Ingredients
Equipment
Method
- Preheat your oven to 190°C (375°F) and line a baking sheet with parchment paper.
- Pat the chicken breasts dry with paper towels for a crispier coating.
- In a small bowl, mix the melted butter and minced garlic.
- Dip each chicken breast into the garlic butter mixture, ensuring full coating.
- In another bowl, combine panko, parmesan, parsley, salt, and pepper.
- Press each butter-coated chicken breast into the breadcrumb mixture, ensuring an even layer.
- Place the coated chicken on the prepared baking sheet and bake for 25-30 minutes until golden brown and the internal temperature reaches 165°F.