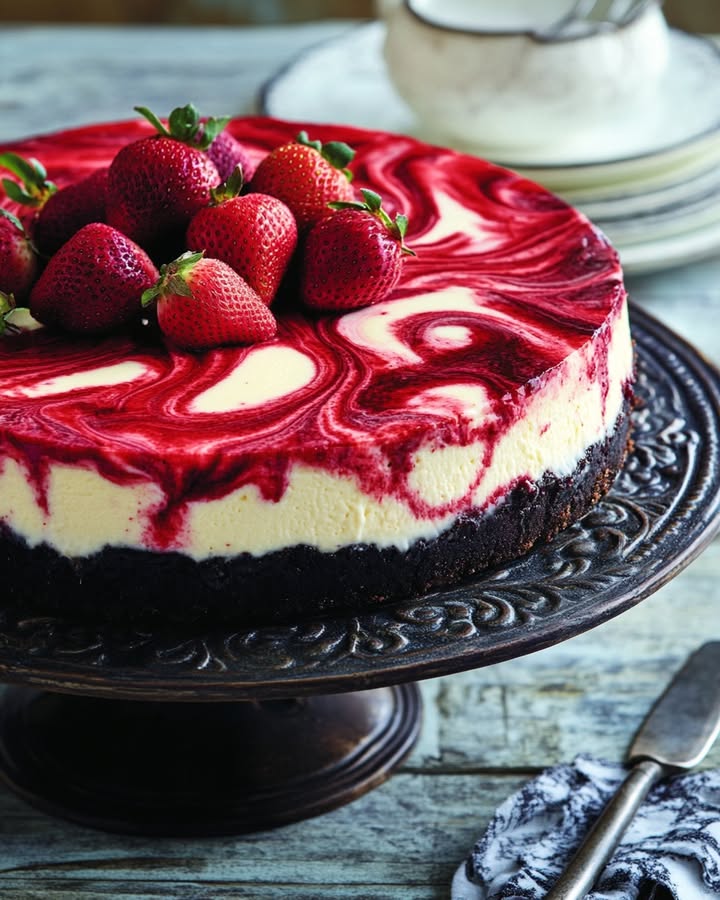
Velvety Red Cheesecake Swirled with Fresh Strawberries: Your New Showstopper Dessert
There’s something magical about a cheesecake that looks as stunning as it tastes. The first time I made this Velvety Red Cheesecake for my daughter’s birthday, the ‘oohs’ and ‘aahs’ were almost as sweet as the dessert itself! This isn’t just any cheesecake. It’s a creamy, dreamy masterpiece with a bold red hue and sweet strawberry ribbons running through it. It feels fancy but is honestly so fun to put together. Let’s bake some joy!
A Cheesecake Worth Blushing About
My love affair with this recipe started on a whim. I wanted a dessert that screamed “celebration” without needing a pastry degree. Cheesecake has deep roots, of course, from ancient Greece to New York delis. This version is my modern twist. It combines the rich, velvety texture of a classic cheesecake with the playful, fruity swirl of fresh strawberries. It’s tradition and a pop of color all in one stunning pan. Every time I serve it, someone asks for the recipe. Now it’s your turn to become a household legend.
Why You’ll Fall in Love With This Red Velvet Cheesecake
You will adore this recipe for so many reasons! First, the flavor is incredible. The chocolate crust, the tangy cream cheese, and the bright strawberry swirl create a perfect bite. Second, it’s surprisingly simple. The steps are straightforward, and the swirl effect looks professional but is easy to do. Finally, it’s versatile. It works for a Tuesday treat or a fancy dinner party. This cheesecake is a guaranteed mood-lifter and crowd-pleaser.
When to Whip Up This Strawberry Swirl Cheesecake
This cheesecake turns any moment into a special occasion. Here are some perfect times to make it:
- Birthdays and Anniversaries: That vibrant red color makes it a festive centerpiece.
- Summer picnics or potlucks. It’s a refreshing yet indulgent choice.
- Girls’ night in or book club meetings. Pair it with coffee for the ultimate chat session.
- Just because! Sometimes, you deserve a luxurious dessert on a regular Wednesday.
Gathering Your Ingredients for the Perfect Cheesecake
Using quality ingredients makes all the difference. Here’s what you’ll need:
For the Crust:
- 2 cups crushed chocolate graham crackers
- 1/4 cup melted butter
For the Cheesecake Filling:
- 24 oz cream cheese, softened
- 1 cup granulated sugar
- 3 large eggs
- 1/2 cup sour cream
- 1/4 cup heavy cream
- 2 teaspoons vanilla extract
- 1 tablespoon cocoa powder
- 2 teaspoons red food coloring
For the Strawberry Swirl:
- 1 cup fresh strawberries, chopped
- 1 tablespoon cornstarch
- 1/4 cup strawberry jam
For Garnish:
- Fresh strawberries
Smart Substitution Options for Your Cheesecake
No stress if you’re missing an item! Here are some easy swaps:
- Chocolate Graham Crackers: Use regular graham crackers and add 2 tablespoons of cocoa powder to the crumbs.
- Fresh Strawberries: Frozen strawberries (thawed and drained) work in a pinch for the swirl.
- Sour Cream: Plain full-fat Greek yogurt is a great substitute.
- Heavy Cream: Whole milk or half-and-half can be used, though the filling will be slightly less rich.
- Strawberry Jam: Any seedless red jam, like raspberry, will taste delicious.
Creating Your Velvety Red Cheesecake Masterpiece
Follow these steps for a flawless, swoon-worthy dessert. Take your time and enjoy the process!
Step 1: Preheat the Oven
Start by heating your oven to 325°F (160°C). This steady, gentle heat is key for a crack-free top. Grab your 9-inch springform pan and give it a good grease. I use a little butter or baking spray on the bottom and sides. The smell of the oven warming up already feels like a hug. It sets the stage for baking magic.
Step 2: Prepare the Crust
In a medium bowl, combine the crushed chocolate graham crackers and melted butter. Mix them with a fork until the crumbs look like dark, wet sand. They should hold together when you pinch them. Pour this mixture into your prepared pan. Use the bottom of a glass or a measuring cup to press it down firmly and evenly. A solid crust foundation means every slice will hold together beautifully. Pro tip: Press some crumbs slightly up the sides for a lovely edge.
Step 3: Make the Cheesecake Filling
In a large bowl, beat the softened cream cheese and sugar together. Use a hand mixer or stand mixer on medium speed. You want it to be completely smooth, with no lumps. This might take a few minutes. Scrape down the bowl often. Then, add the eggs one at a time. Mix each egg in fully before adding the next. This careful incorporation helps create that signature velvety, dense texture we love in a perfect cheesecake.
Step 4: Combine and Color
Now, stir in the sour cream, heavy cream, and vanilla extract. The batter will become gloriously glossy and smooth. Next, sift in the cocoa powder to avoid clumps. Then, add the red food coloring. Watch as the white batter transforms into a deep, romantic red. Keep mixing until the color is uniform. It should look like the richest red velvet cake batter you’ve ever seen. The aroma is already divine.
Step 5: Layer the Cheesecake
Pour half of that beautiful red batter over your crust. Spread it gently with a spatula. In a small bowl, toss the chopped strawberries with cornstarch, then mix in the strawberry jam. This creates a thick, fruity sauce. Drop spoonfuls of this strawberry mixture randomly over the first layer of batter. Then, carefully pour the rest of the cheesecake batter on top. Try to cover the strawberry dollops completely.
Step 6: Create the Swirl
Here’s the fun part! Take a thin knife or a skewer. Insert it into the batter and gently make figure-eight patterns or small circles. You’re dragging the strawberry mixture up into the red batter to create a marbled effect. Don’t overdo it—just a few passes is enough. You want to see distinct ribbons of strawberry, not a muddy mix. Chef’s tip: For a more dramatic swirl, reserve a tablespoon of the plain strawberry mix to drop on top before swirling.
Step 7: Bake the Cheesecake
Place the pan in the center of your preheated oven. Bake for 50 to 60 minutes. The cake is done when the edges are set but the center still has a slight jiggle, like Jell-O. It should not be liquidy. When it reaches that point, turn off the oven. Crack the oven door open with a wooden spoon and let the cheesecake cool inside for one hour. This slow cooling prevents shocking the cake and causing cracks.
Step 8: Chill to Perfection
After its oven bath, move the cheesecake to a wire rack to cool to room temperature. Then, cover it loosely with plastic wrap and refrigerate for at least 4 hours, but overnight is best. This patience is the secret to the perfect slice! The filling firms up, the flavors meld, and it becomes irresistibly creamy.
Step 9: Garnish and Serve
Run a thin knife around the edge of the springform pan before releasing the clamp. Place fresh, hulled strawberries on top just before serving. You can arrange them in a circle or scatter them artfully. Slice with a sharp knife dipped in hot water for clean cuts. Serve each glorious piece on a plate and get ready for the compliments to roll in!
Timing Your Cheesecake Creation
Good things take time, and this dessert is no exception. Here’s a handy breakdown:
- Prep Time: 20 minutes (getting everything ready is quick!)
- Cooking Time: 60 minutes (for baking)
- Cooling & Chilling Time: 5 hours (mostly hands-off)
- Total Time: About 6 hours and 20 minutes from start to finish.
Plan to make it the day before your event. The wait is absolutely worth it.
My Chef’s Secret for the Ultimate Swirl
My best trick is to use cold strawberry mixture. After making the strawberry swirl mix, pop it in the freezer for 10-15 minutes before layering. The slightly thicker consistency holds its shape better in the batter. This gives you more defined, beautiful swirls instead of them sinking or bleeding too much.
A Fun Fact About Red Velvet
That iconic red color in desserts has a interesting past! Originally, the red tint in “red velvet” cakes came from a reaction between natural cocoa powder and acidic ingredients like buttermilk. Today, we use food coloring for that vibrant burst. In this cheesecake, the cocoa powder deepens the flavor while the food coloring gives it that festive, cheerful look that makes everyone smile.
Equipment You’ll Need for This Recipe
You don’t need fancy tools. Here’s the basics:
- 9-inch springform pan (the MVP for easy removal)
- Mixing bowls (large and medium)
- Electric hand mixer or stand mixer
- Measuring cups and spoons
- Spatula
- Knife and cutting board
- Wire cooling rack
How to Store Your Velvety Red Cheesecake
Proper storage keeps your cheesecake delicious for days. First, make sure it’s completely chilled after baking. Keep it in the springform pan or transfer it to a cake carrier.
Cover the top tightly with plastic wrap or place it in an airtight container. Store it in the refrigerator. The cold environment keeps the creamy filling firm and prevents spoilage.
Your cheesecake will stay fresh and tasty for up to 5 days in the fridge. For longer storage, you can freeze individual slices wrapped in plastic and foil for up to 2 months. Thaw in the fridge overnight before serving.
Tips and Advice for Cheesecake Success
- Always use room temperature cream cheese and eggs. This prevents lumps and leads to a smoother batter.
- Don’t overmix the batter after adding the eggs. This can incorporate too much air and cause cracks.
- Place a pan of water on the lower oven rack while baking. The steam creates a humid environment for an even bake.
- If small cracks appear, don’t panic! Your gorgeous strawberry swirl and fresh berry garnish will hide them perfectly.
Presentation Ideas to Impress Your Guests
Make your slice look extra special with these simple ideas:
- Drizzle each plate with a little chocolate or caramel sauce before placing the slice.
- Add a dollop of freshly whipped cream and a mint leaf beside the cheesecake.
- For a party, make mini cheesecakes in a muffin tin using the same method (adjust baking time down).
- Dust the top with a light sprinkling of powdered sugar for an elegant finish.
Healthier Alternative Recipes and Variations
Love the idea but want to mix it up? Here are six delightful twists on this velvety cheesecake:
- Lighter Berry Cheesecake: Use reduced-fat cream cheese and Greek yogurt. Swap the sugar for a natural sweetener like honey or maple syrup. Keep the fresh strawberry swirl for a guilt-free treat.
- No-Bake Strawberry Swirl Cheesecake: Perfect for hot days. Use a gelatin or agar-agar setting method for the filling. The crust and swirl remain the same, but you skip the oven entirely.
- Chocolate Ganache Topped Cheesecake: After chilling, pour a layer of dark chocolate ganache over the entire top. Let it set before adding strawberries. This is for true chocolate lovers.
- Mixed Berry Bliss Cheesecake: Replace the strawberry swirl with a mix of raspberries, blueberries, and blackberries. The colorful swirl will be stunning and packed with antioxidants.
- Gluten-Free Velvety Cheesecake: Simply use gluten-free chocolate cookies for the crust. Ensure all other ingredients are certified gluten-free for a safe and delicious dessert.
- Vegan Red Velvet Cheesecake: Use cashew-based cream cheese, coconut cream, and agar-agar. Natural beet juice can provide a gorgeous red color instead of food coloring.
Common Mistakes to Avoid for a Perfect Cheesecake
Mistake 1: Using Cold Cream Cheese
This is the biggest culprit for a lumpy batter. Cold cream cheese doesn’t blend smoothly with sugar. You’ll end up with tiny bits of cheese throughout your filling. Always take the cream cheese out of the fridge at least an hour before you start. It should feel soft to the touch. This ensures a silky, velvety texture in every bite.
Mistake 2: Overbaking the Cheesecake
It’s easy to think a cheesecake needs to be completely firm in the center. But that leads to a dry, crumbly texture. The key is that slight jiggle. The residual heat will continue to cook it as it cools. Set a timer for the minimum bake time and check it. If the center is still very wobbly, give it 5 more minutes. Remember, it will firm up significantly in the fridge.
Mistake 3: Skipping the Gradual Cool-Down
Pulling a hot cheesecake right out of the oven and plopping it on the counter is a shock. This sudden temperature change almost always causes the top to crack. Letting it cool slowly in the turned-off oven with the door ajar is non-negotiable. It gently brings the temperature down, protecting that beautiful smooth surface you worked so hard for.
Mistake 4: Not Letting it Chill Long Enough
Impatience is the enemy here! Slicing into a cheesecake that hasn’t set fully is a mess. It will be runny and won’t hold its shape. The long chill in the refrigerator is what gives it structure. Plan ahead. Making it the day before you need it is the best strategy. You’ll get clean, picture-perfect slices every time.
Frequently Asked Questions About Cheesecake
Can I use frozen strawberries for the swirl?
Yes, you absolutely can! Thaw the frozen strawberries completely first. Then, drain them very well in a colander to remove excess liquid. You might even want to pat them dry with a paper towel. Too much liquid can make your swirl watery and affect the texture of the cheesecake batter. Chopped frozen berries work just fine in a pinch.
Why did my cheesecake crack on top?
Cracks usually happen from overmixing, overbaking, or cooling too quickly. Adding too much air to the batter makes it rise and then fall, creating cracks. Overbaking dries it out and causes shrinkage. Cooling it suddenly shocks the delicate structure. Follow the tips: don’t overmix, bake until just jiggly, and cool it slowly in the oven. But remember, cracks taste just as good and are easy to cover with toppings!
Can I make this cheesecake ahead of time?
This is actually the best make-ahead dessert! Cheesecake needs that long chill time to set properly. You can bake it up to two days before you plan to serve it. Keep it covered in the refrigerator. Add the fresh strawberry garnish right before serving so they don’t get soggy. The flavors often taste even better the next day after they’ve had time to meld together.
What can I use instead of red food coloring?
If you prefer natural coloring, you have options. Beet powder is a great choice. Mix a tablespoon or two into the wet ingredients until you get the desired red color. You can also use a reduced puree of raspberries or strawberries, though the color will be more pink than red. Just know that natural colors might bake out slightly and be less vibrant.
How do I know when the cheesecake is done baking?
The “jiggle test” is your best friend. At around 50 minutes, gently shake the oven rack. The edges of the cheesecake should look set and puffed slightly. The center, about a 3-inch circle, should have a slight wobble. It should move like firm Jell-O, not like liquid. If it sloshes, it needs more time. If it’s completely firm, it might be overdone.
Can I freeze this strawberry swirl cheesecake?
Freezing works wonderfully for this cheesecake. Wrap the whole chilled cheesecake (or individual slices) tightly in plastic wrap. Then, wrap it again in aluminum foil or place it in a freezer-safe bag. It will keep for 1-2 months. Thaw it overnight in the refrigerator before serving. The texture remains creamy and delicious.
Do I have to use a springform pan?
A springform pan is highly recommended. The removable sides make it easy to get the cheesecake out without damaging it. If you don’t have one, you can use a regular 9-inch cake pan lined with parchment paper. Let the paper hang over the sides so you can lift the cheesecake out. It’s a bit trickier, but it can be done.
My strawberry swirl sank to the bottom. What went wrong?
This happens if the strawberry mixture is too runny or if the cheesecake batter is too thin. Make sure your strawberry mix has the cornstarch added to thicken it. Also, ensure your cream cheese batter is thick and creamy, not watery. Dropping the swirl onto the first layer and then covering it with more batter helps anchor it throughout the cake.
Is it normal for the color to change after baking?
Yes, a slight change is normal. The vibrant red batter may bake into a deeper, sometimes slightly brownish-red hue. This is because of the cocoa powder and the baking process. It will still be a beautiful red color, just a bit more muted. Don’t worry, the flavor is all there!
Can I use a different fruit for the swirl?
Get creative! Raspberries, blackberries, or a mix of berries would be fantastic. For a tropical twist, try mango puree. Just remember to adjust the cornstarch if your fruit is very juicy. The method remains the same: cook the fruit with a little thickener to create a swirlable sauce. Each variation brings its own wonderful flavor.
Your Journey to Cheesecake Glory
Making this Velvety Red Cheesecake Swirled with Fresh Strawberries is more than just baking. It’s about creating a moment of joy. It’s about the pride of presenting something beautiful you made with your own hands. Whether it’s for a special someone or just for you, this dessert is a celebration in a pan. So preheat that oven, grab your mixing bowl, and get ready for the sweetest success. Happy baking!
Decadent Caramel Chocolate Cake
Ingredients
Equipment
Method
- Preheat the oven to 325°F (160°C). Grease a 9-inch springform pan.
- Combine crushed chocolate graham crackers and melted butter, then press into the bottom of the prepared pan.
- In a large bowl, beat cream cheese and sugar until smooth.
- Add eggs one at a time, mixing well after each addition.
- Stir in sour cream, heavy cream, and vanilla extract until glossy.
- Sift in cocoa powder and mix well, then add red food coloring.
- Pour half of the batter over the crust and spread gently.
- Mix chopped strawberries with cornstarch and strawberry jam, then spoon over the first layer of batter.
- Pour the remaining cheesecake batter over the strawberry mixture.
- Use a knife or skewer to swirl the strawberry mixture through the batter gently.
- Bake for 50 to 60 minutes until edges are set and center jiggles slightly.
- Let cool in the oven for one hour, then refrigerate for at least 4 hours or overnight.
- Garnish with fresh strawberries before serving.