The Cozy Magic of Apple Fritter Bread
There’s something about the smell of cinnamon and apples baking that makes a house feel like a home. I first made this apple fritter bread on a rainy Saturday, trying to recreate the joy of a weekend donut shop visit. The moment that warm, spiced aroma filled my kitchen, I knew I had a winner. This recipe isn’t just bread. It’s a hug in loaf form. It captures all the goodness of a crispy, sugary apple fritter but in a soft, easy-to-slice bread perfect for sharing.
A Slice of Sweet History
Apple fritters have been a beloved treat for centuries, with roots in many European cooking traditions. They were a clever way to use up seasonal fruit. The modern donut shop fritter is a deep-fried delight, often gloriously messy. My version turns that classic idea into a simple, homestyle quick bread. It brings all the comforting flavors home without needing a fryer. It’s a modern twist on a timeless favorite, perfect for today’s baker who wants big flavor with simple steps.
Why You’ll Fall in Love With This Recipe
You will love this recipe because it’s incredibly forgiving and always delicious. The batter comes together in minutes. The reward is a moist, dense bread packed with tender cinnamon apples in every bite. The sweet glaze on top adds that perfect bakery-style finish. It fills your kitchen with an incredible scent that will have everyone asking when it’s done. Best of all, it uses simple ingredients you likely already have in your pantry. This bread promises and delivers pure comfort.
When to Bake This Apple Fritter Bread
This bread is your secret weapon for so many occasions! It’s a star at weekend brunches with friends. It makes a thoughtful gift for a new neighbor or a teacher. Bake it for a cozy Sunday breakfast with your family. Bring it to a potluck or a holiday gathering. It’s also the perfect “just because” treat to make an ordinary Tuesday feel special. Any moment calls for a little sweetness and spice.
What You’ll Need: The Ingredients List
- 1 ½ cups all-purpose flour
- 2 medium apples, peeled and cubed
- ½ cup (1 stick) butter, room temperature
- ½ cup milk
- ½ cup granulated sugar
- ½ cup brown sugar
- 1 teaspoon ground cinnamon
- 2 large eggs
- 1 ½ teaspoons baking soda
- 1 teaspoon pure vanilla extract
For the Glaze:
- ½ cup powdered sugar
- 1 tablespoon milk
Easy Ingredient Swaps
No worries if you’re missing something! Here are some easy swaps:
- Apples: Use any baking apple you like. Granny Smith, Honeycrisp, or Fuji all work wonderfully.
- Milk: Any milk works—whole, 2%, almond, or oat milk.
- Butter: You can use an equal amount of neutral oil, like vegetable or canola oil.
- Sugar: You can use all granulated or all brown sugar if needed.
Let’s Get Baking: Your Step-by-Step Guide
Step 1: Get Your Oven Ready
First, preheat your oven to 350°F (175°C). This is crucial for even baking. Grab a 9×5-inch loaf pan and grease it well with butter or non-stick spray. I like to add a little parchment paper sling for easy removal. The scent of melted butter in the pan is the first sign you’re making something wonderful.
Step 2: Prepare the Apple Filling
This step makes the magic. In a medium bowl, toss your peeled, cubed apples with the ½ cup of brown sugar and 1 teaspoon of cinnamon. The sugar will start to coat the apples, creating a lovely syrup. The mix of dark sugar and warm spice smells amazing. Set this aside to let the flavors mingle while you make the batter.
Pro tip: Cutting your apples into small, uniform cubes ensures they soften perfectly and distribute evenly throughout the bread.
Step 3: Cream the Wet Ingredients Together
In a large mixing bowl, beat the room-temperature butter and ½ cup granulated sugar together. Use a hand mixer or a strong wooden spoon. Beat until it’s light and fluffy. Then, add the two eggs and the teaspoon of vanilla extract. Mix until everything is beautifully combined and smooth. The vanilla adds that deep, warm flavor we all love.
Step 4: Mix in the Dry Ingredients
Now, add your 1 ½ cups of flour and 1 ½ teaspoons of baking soda right into the wet mixture. Stir gently with a spatula. Mix just until you no longer see dry streaks of flour. We want to avoid overmixing here. Overmixing can make the bread tough instead of tender and soft.
Step 5: Bring It All Together with Milk
Slowly pour in the ½ cup of milk as you stir. The batter will transform from thick to luxuriously smooth and pourable. It should have a lovely, creamy golden color. This is the base that will hold all our spiced apples. The smell is already fantastic!
Step 6: Gently Fold in the Apples
Here comes the best part. Take your bowl of sugary, cinnamony apples and pour it into the batter. Use your spatula to fold them in gently. You want every bit of that spiced sugar syrup to go in too. Watch as the batter becomes studded with apple pieces. It promises a delicious surprise in every single bite.
Chef’s tip: For an extra flavor boost, reserve a small handful of the apple mixture. Sprinkle it on top of the batter in the pan before baking for a gorgeous, caramelized top.
Step 7: Bake to Golden Perfection
Pour the batter into your prepared loaf pan. Use the spatula to spread it out evenly. Place it in the center of your preheated oven. Bake for 55 to 60 minutes. You’ll know it’s done when the top is a deep golden brown. A toothpick poked into the center should come out clean or with just a few moist crumbs. Your kitchen will smell absolutely divine.
Step 8: Whip Up the Simple Glaze
While the bread bakes, make the glaze. In a small bowl, combine ½ cup of powdered sugar with 1 tablespoon of milk. Whisk until it’s completely smooth and has a thick, drizzle-able consistency. If it’s too thick, add a few more drops of milk. If it’s too thin, add a bit more sugar. Set this aside while the bread cools slightly.
Step 9: Cool, Glaze, and Serve
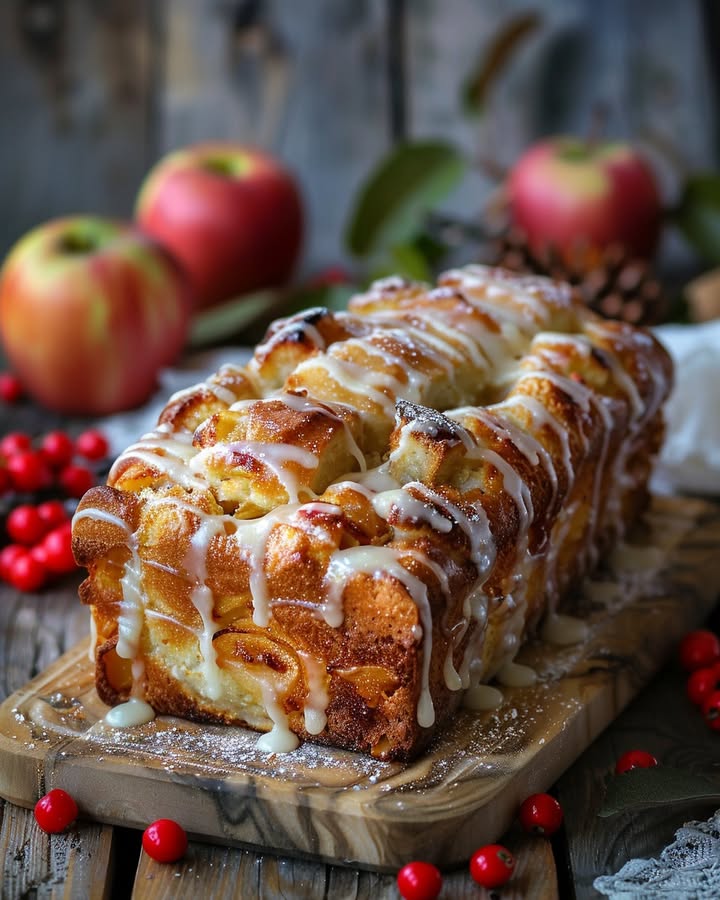
Once baked, take the loaf pan out of the oven. Let the bread cool in the pan for about 10 minutes. This lets it set so it doesn’t fall apart. Then, carefully turn it out onto a wire rack. While it’s still warm, use a spoon to drizzle the glossy white glaze all over the top. Watch it drip down the sides beautifully. Let it cool a bit more before slicing—if you can wait!
Apple Fritter Bread Timing Breakdown
Good baking is all about timing. Here’s what to expect:
- Prep Time: 15-20 minutes (peeling apples, mixing batter)
- Cook Time: 55-60 minutes
- Cooling Time: 15-20 minutes before slicing
- Total Time: About 1 hour 30 minutes from start to first delicious bite.
My Secret for the Best Bread
My number one secret is all about the apples. Let the apple, sugar, and cinnamon mixture sit for a full 10-15 minutes before folding it in. This draws out the apple’s natural juices. It creates a incredible cinnamony syrup that soaks into the batter. This makes the bread unbelievably moist and flavorful. Trust me, this waiting time is worth every second!
A Fun Apple Fact
Did you know there are over 7,500 varieties of apples grown around the world? For baking, we want apples that hold their shape and offer a balance of sweet and tart. That’s why varieties like Granny Smith or Honeycrisp are so popular. They provide a lovely texture and flavor that doesn’t get lost in the sweet batter.
Tools You’ll Need
You don’t need fancy equipment for this recipe! Here’s your simple toolkit:
- 9×5 inch Loaf Pan
- Two Mixing Bowls (one large, one medium)
- Wooden Spoon or Spatula
- Hand Mixer (helpful, but not required)
- Measuring Cups and Spoons
- Cooling Rack
- Small Whisk or Fork for the glaze
How to Store Your Apple Fritter Bread
Once completely cooled, wrap the bread tightly in plastic wrap or aluminum foil. You can also place it in an airtight container. It will stay fresh and moist at room temperature for up to 3 days. The glaze will soften into the bread, making it even more delicious.
For longer storage, you can freeze this bread. Wrap the unglazed or glazed loaf tightly in plastic wrap, then a layer of foil. Label it with the date. It will keep well in the freezer for up to 3 months. Thaw it overnight at room temperature when you’re ready to enjoy it.
If you love it warm, simply pop a slice in the microwave for 10-15 seconds. It will taste just like it came out of the oven. I don’t recommend refrigerating it, as the fridge can dry out the bread’s beautiful texture.
My Best Tips for Success
- Make sure your butter and eggs are at true room temperature. This helps them blend smoothly and creates a better texture.
- Don’t overmix the batter after adding the flour. Mix just until combined for a tender crumb.
- Use a toothpick or a thin knife to test for doneness. If it comes out with wet batter, bake for 5 more minutes and test again.
- Let the bread cool in the pan. This prevents it from breaking apart when you take it out.
Make It Look Beautiful
Presentation is part of the fun! Here are a few ideas:
- Dust the glazed loaf with a little extra cinnamon for a pretty finish.
- Serve slices on a rustic wooden board for a homey feel.
- Add a thin apple slice on the side of each plate for decoration.
- For a party, cut the loaf into thick slices and arrange them on a cake stand.
Try These Tasty Variations
Love this recipe? Mix it up with one of these delicious twists:
- Apple Cranberry Bread: Add ½ cup of dried cranberries to the apple mixture for a tart, festive burst of flavor and color.
- Pecan Streusel Bread: Skip the glaze. Instead, mix ¼ cup flour, ¼ cup brown sugar, 2 tbsp cold butter, and ½ cup chopped pecans into a crumbly topping. Sprinkle it over the batter before baking for a crunchy finish.
- Whole Wheat Apple Bread: Substitute half of the all-purpose flour with whole wheat flour for a heartier, nuttier flavor and added fiber.
- Dairy-Free Delight: Use plant-based butter and your favorite non-dairy milk (like almond or oat) to make this recipe dairy-free for everyone to enjoy.
- Pear and Ginger Bread: Swap the apples for ripe diced pears. Add 1 teaspoon of freshly grated ginger to the batter for a warm, spicy twist.
- Double Apple Spice: Use apple cider instead of milk in the batter. Add ¼ teaspoon of nutmeg and ¼ teaspoon of allspice to the dry ingredients for an extra-spiced autumn treat.
Common Mistakes to Avoid
Mistake 1: Using Cold Butter and Eggs
This is a very common mistake. Cold butter won’t cream properly with the sugar. It leads to a dense, heavy bread. Cold eggs can also cause the batter to curdle or not emulsify well. Always plan ahead. Take your butter and eggs out of the fridge at least 30-60 minutes before you start baking. Room temperature ingredients blend smoothly. This creates a light and airy texture in your finished loaf.
Mistake 2: Overmixing the Batter
Once you add the flour, it’s time to be gentle. Overmixing develops the gluten in the flour. This makes the bread tough and chewy, not soft and tender. Mix the dry ingredients in just until you no longer see white streaks of flour. It’s okay if the batter looks a little lumpy. A few lumps are much better than an overmixed, tough batter. I always switch to a spatula for this step for more control.
Mistake 3: Not Testing for Doneness Properly
Relying only on the clock or the color of the top can lead to underbaked or overbaked bread. Ovens vary. Always use the toothpick test. Insert a toothpick or a thin knife into the very center of the loaf. If it comes out with wet batter, it needs more time. If it comes out with just a few moist crumbs clinging to it, it’s perfect. A completely clean pick is also fine. This is the best way to guarantee a perfectly baked center every single time.
Mistake 4: Slicing the Bread While It’s Too Hot
I know it’s hard to wait! The smell is incredible. But if you slice into the bread right out of the oven, it will likely crumble and fall apart. The structure needs time to set as it cools. Let it rest in the pan for 10 minutes. Then, transfer it to a wire rack to cool for another 15-20 minutes before you make the first slice. The wait makes for a much prettier, neat slice. It’s worth the patience.
Your Apple Fritter Bread Questions, Answered
Can I use a different type of apple?
Absolutely! The best apples for baking are varieties that hold their shape and offer a balance of sweet and tart. Granny Smith apples are a classic choice for their tartness. Honeycrisp, Braeburn, or Fuji apples are also excellent. They add a wonderful sweetness. I would avoid very soft apples like Red Delicious. They can turn mushy during baking. Feel free to use a mix of two different kinds for a more complex flavor.
Why did my bread sink in the middle?
A sunken middle usually means the bread was underbaked. The structure didn’t have time to set fully. Oven temperatures can be off. Always test for doneness with a toothpick in the very center. Another cause could be using too much baking soda. Be sure to measure your leavening agents accurately. Using a dark-colored loaf pan can also cause the outside to bake faster than the inside. If you use a dark pan, try reducing the oven temperature by 25 degrees.
Can I make this recipe into muffins?
Yes, this batter makes fantastic muffins! Grease a muffin tin or use liners. Fill each cup about ⅔ full with the batter. The baking time will be much shorter. Start checking them at 18-20 minutes. Use the toothpick test in the center of a muffin. They are done when it comes out clean. This is a great way to make individual portions for lunches or a quick breakfast on the go.
My glaze is too thin/thick. How do I fix it?
Glaze consistency is easy to adjust. The rule is simple: add more liquid to thin it, add more sugar to thicken it. If your glaze is too thick and won’t drizzle, add more milk just a few drops at a time. Whisk well after each addition. If it’s too thin and runs right off the bread, whisk in more powdered sugar a tablespoon at a time. Aim for a consistency similar to thick honey. It should ribbon off your whisk.
Can I add nuts to this bread?
Nuts are a wonderful addition for extra crunch and flavor. Chopped walnuts or pecans pair perfectly with the apples and cinnamon. I recommend adding about ½ to ¾ cup of chopped nuts. Fold them in at the same time you add the apple mixture to the batter. Toasting the nuts in a dry pan for a few minutes before chopping them will bring out their natural oils. This makes them even more flavorful in the finished bread.
How do I know when my apples are cubed small enough?
Your apple cubes should be about ½ inch in size. Think of them as being slightly smaller than a standard dice. This size is perfect. They will soften completely during baking. They will also distribute evenly throughout the loaf. If the pieces are too big, they might remain too firm. They could also cause the bread to be uneven. A quick, uniform chop is the goal here. It ensures a perfect texture in every single bite.
Can I omit the glaze?
You can definitely skip the glaze if you prefer. The bread is wonderfully sweet and flavorful on its own from the brown sugar and apples. For a lighter option, you could simply dust the cooled loaf with a sprinkle of powdered sugar. Another idea is to brush the top of the warm bread with a little melted butter. Then, sprinkle it with a mix of cinnamon and sugar. This gives a lovely sparkly crust without the glaze.
What’s the best way to bring cold eggs to room temperature quickly?
Forgot to take your eggs out? No problem. Place the whole, uncracked eggs in a bowl of warm (not hot) tap water. Let them sit for about 5-10 minutes. They will warm up nicely. For butter, you can cut it into small cubes. Spread the cubes out on a plate. They will come to room temperature much faster than a whole stick. Just don’t microwave them, as melting the butter changes its properties.
Why is my bread dry?
Dry bread often comes from overbaking. Even a few extra minutes can dry it out. Always set a timer and check early. Using too much flour is another common culprit. Be sure to spoon your flour into the measuring cup. Then level it off with a knife. Don’t scoop the cup directly into the flour bag. This can pack in too much flour. Measuring accurately makes a huge difference in the final texture of your bread.
Can I freeze the unbaked batter?
I don’t recommend freezing the unbaked batter. The baking soda will likely lose its leavening power in the freezer. This will result in a dense, flat loaf. It’s much better to bake the bread first. Then, freeze the fully baked and cooled loaf. Wrap it tightly as described in the storage section. When you’re ready to eat, thaw it and enjoy. You can even warm up individual slices for a fresh-from-the-oven taste.
Time to Bake Some Memories
This apple fritter bread recipe is more than just a list of steps. It’s an invitation to create a moment of pure, simple joy in your kitchen. The process is easy and forgiving. The result is always a showstopper. I hope this loaf brings as much happiness to your home as it has to mine. Share a slice with someone you love, enjoy it with your morning coffee, or simply savor it as a treat for yourself. Happy baking, and enjoy every delicious bite!
Delicious Homemade Tortillas
Ingredients
Equipment
Method
- Preheat your oven to 350°F (175°C) and grease a 9x5-inch loaf pan.
- Toss cubed apples with ½ cup brown sugar and 1 teaspoon cinnamon in a medium bowl and set aside.
- In a large bowl, beat butter and ½ cup granulated sugar until fluffy, then add eggs and vanilla, mixing until combined.
- Add flour and baking soda to the wet mixture, stirring gently until no dry streaks remain.
- Slowly incorporate ½ cup milk into the batter until smooth.
- Fold in the sugary apple mixture gently, ensuring even distribution.
- Pour the batter into the prepared loaf pan and spread it out evenly.
- Bake for 55-60 minutes until the top is golden brown and a toothpick comes out clean.
- Prepare the glaze by whisking together ½ cup powdered sugar and 1 tablespoon milk until smooth, adjusting consistency as needed.
- Let the bread cool in the pan for about 10 minutes before transferring to a wire rack. Drizzle the glaze over the bread while it's still warm.