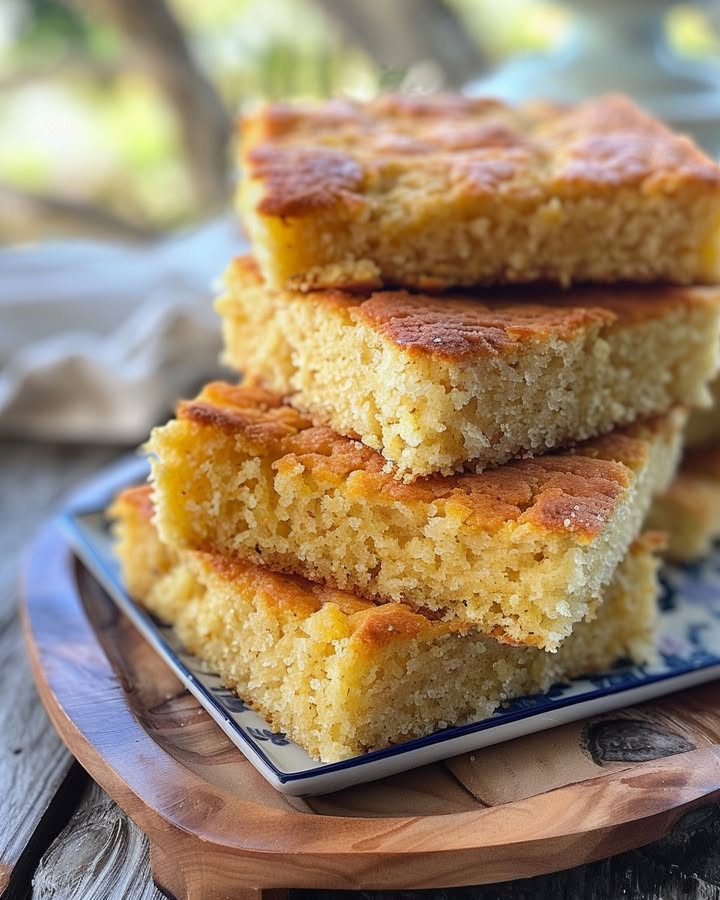
Easy Amish Sour Cream Cornbread: Your New Favorite Comfort Food
You know that warm, happy feeling you get when something delicious is baking in the oven? That’s the magic this Amish Sour Cream Cornbread brings to my kitchen every single time. It’s not just cornbread; it’s the ultimate cozy companion to a big pot of chili, a perfect breakfast slice slathered with honey, and the star of every potluck I’ve ever brought it to. Let me show you why this simple loaf is about to become your new go-to recipe.
A Slice of Humble History: Where This Cornbread Comes From
Amish cooking has a beautiful philosophy: simple ingredients, made from scratch, meant to nourish and gather people. This cornbread recipe is a shining example of that. It doesn’t rely on fancy techniques or hard-to-find items. Instead, it uses staples like cornmeal, sour cream, and a touch of sugar to create something truly special. While many traditional Amish recipes are passed down through generations, the genius of this one is in the sour cream. It adds a rich tanginess and incredible moisture that sets it apart from the crumbly, dry cornbreads you might have had before. It’s a recipe built for sharing and for satisfying hungry families after a long day.
Why You’ll Absolutely Adore This Cornbread Recipe
If you’re looking for reasons to bake this today, I’ve got a whole list! First, it’s incredibly easy. You mix the dry stuff, mix the wet stuff, combine them, and bake. No fancy equipment or chef skills needed. Second, that hit of sour cream makes it unbelievably moist and tender. It stays that way for days. Third, the flavor is perfectly balanced—a little sweet, a little savory, and wonderfully buttery. It’s the kind of bread that everyone, from kids to grandparents, will ask for seconds of. I promise, once you try it, the boxed mixes will be a thing of the past.
Perfect Occasions for Baking This Hearty Loaf
This isn’t just a side dish; it’s an event starter! Here are my favorite times to whip it up:
- Game Day Gatherings: Picture a big pot of chili and slices of this warm cornbread. It’s a crowd-pleasing combo.
- Cozy Family Dinners: Serve it alongside soups, stews, or a big Sunday roast. It soaks up gravy like a dream.
- Holiday Feasts: It makes a wonderful, homey addition to a Thanksgiving or Christmas spread.
- Brunch with Friends: Toast a slice, add a pat of butter and a drizzle of honey, and you have a star brunch item.
- Just Because: Sometimes, a Tuesday night needs a little extra comfort. This is it.
Gathering Your Ingredients
Here’s everything you’ll need to make this delicious cornbread. I bet you have most of it in your pantry already!
- 3/4 cup cornmeal (Fine or medium grind both work great!)
- 1 cup all-purpose flour
- 2 1/2 tablespoons white granulated sugar
- 1 teaspoon baking soda
- 1 teaspoon cream of tartar
- 1 teaspoon salt
- 1 cup sour cream (Regular or reduced fat; full fat gives the best richness)
- 1 large egg, beaten
- 2 tablespoons butter, melted
- 1/4 cup milk (Whole milk is best for tenderness)
Simple Swaps: Substitution Options
Out of something? Don’t worry! Here are some easy swaps that work beautifully:
- Sour Cream: Plain, full-fat Greek yogurt is a fantastic 1:1 substitute and adds similar tang and moisture.
- Milk: Any milk you have on hand—2%, skim, or even a non-dairy milk like almond or oat—will work in a pinch.
- Butter: You can use an equal amount of vegetable oil or melted coconut oil.
- Cream of Tartar: If you don’t have it, you can replace both the baking soda AND cream of tartar with 2 teaspoons of baking powder. It’s not exactly the same, but it will still rise nicely.
Let’s Get Baking: Your Step-by-Step Guide
Ready to fill your home with that amazing smell? Follow these simple steps for perfect cornbread every time.
Step 1: Preheat and Prep
First things first, get that oven nice and hot. Crank it up to 400°F (200°C). This high heat is key for a beautiful, golden-brown top. While it’s warming, grab your 9×5-inch loaf pan. Give it a good spray with non-stick cooking spray. You can also butter it generously if you prefer. A well-greased pan means your bread will slide right out after baking, leaving you with a perfect, intact loaf. Pro tip: A light dusting of cornmeal over the greased pan adds a nice finishing touch and extra insurance against sticking.
Step 2: Mix the Dry Team
Now, let’s build our flavor base. In a large mixing bowl, combine the cornmeal, all-purpose flour, sugar, baking soda, cream of tartar, and salt. I like to use a whisk for this. It does a wonderful job of blending everything evenly and getting rid of any little flour lumps. You’ll see the pale yellow cornmeal mix with the white flour, and those little crystals of sugar will disappear into the blend. This ensures every bite of your finished bread is consistently seasoned and perfectly risen.
Step 3: Bring in the Wet Team
In another bowl, or right in the measuring cup you used for the sour cream, combine your wet ingredients. Add the cool, thick sour cream, the beaten egg, the wonderfully aromatic melted butter, and the milk. Give this a gentle stir with a fork just until it’s a homogenous, creamy, pale yellow mixture. Now, pour this lovely, rich liquid into the bowl with your dry ingredients. This is the fun part!
Step 4: Combine With Care
Here’s the secret to tender cornbread: do not overmix. Use a sturdy spoon or spatula and stir just until the dry ingredients are moistened. A few lumps are absolutely fine—in fact, they’re perfect! Over-mixing develops the gluten in the flour and can lead to a tough, dense bread. You want a batter that is thick, scoopable, and speckled with the gorgeous color of cornmeal. It should look rustic and homemade, not smooth like cake batter.
Step 5: Bake to Golden Perfection
Carefully scrape every last bit of that beautiful batter into your prepared loaf pan. Use your spatula to spread it evenly into the corners and smooth the top. Slide the pan onto the middle rack of your hot oven. Now, set your timer for 30 minutes. The magic is happening! Your kitchen will start to smell like buttery, toasted corn. After 30 minutes, do the trusty toothpick test. Insert it into the center of the loaf. If it comes out clean or with just a few dry crumbs, it’s done. If not, give it another 3-5 minutes.
Step 6: Cool and Serve with Love
Once it’s golden and perfect, take the pan out of the oven. This is the hardest part—waiting! Let the cornbread cool in the pan for a solid 10 minutes. This allows it to set so it doesn’t break when you take it out. Then, run a knife around the edges, invert it onto a cooling rack or a plate, and let it finish cooling just until it’s warm to the touch. Chef’s tip: The absolute best way to enjoy it? Slice it while still warm, slather it with soft butter, and watch it melt into every nook and cranny. Pure bliss.
Your Baking Timeline
From start to finish, this recipe is a quick win!
- Prep Time: 10 minutes
- Cook Time: 30-35 minutes
- Cooling Time: 10 minutes
- Total Time: About 55 minutes
Chef’s Secret for the Best Crust
For an extra-special, crispier crust that everyone will rave about, place a small, oven-safe dish of water on the bottom rack of the oven while the cornbread bakes on the middle rack. The steam helps the bread rise beautifully and creates a fantastic texture contrast with the soft, tender interior.
A Little Extra Info: The Sour Cream Superpower
You might wonder why this recipe uses sour cream instead of more common buttermilk. Sour cream is thicker and has a higher fat content. This means it adds incredible richness and moisture that lasts for days. It’s the secret weapon that makes this Amish-style cornbread so memorably delicious and different.
What You’ll Need (Equipment)
No fancy tools required! Just gather:
- 9×5-inch loaf pan
- Large mixing bowl
- Medium bowl or large measuring cup (for wet ingredients)
- Whisk
- Spatula or large mixing spoon
- Measuring cups and spoons
- Toothpick or cake tester
- Cooling rack (helpful, but a plate works too)
Storing Your Delicious Cornbread
Once your cornbread is completely cool, the best way to keep it fresh is to wrap it tightly in plastic wrap or aluminum foil. You can also place it in an airtight container or a resealable plastic bag. Stored this way at room temperature, it will stay moist and delicious for up to 3 days.
If you want to keep it longer, freezing is a great option. Wrap the whole loaf or individual slices tightly in plastic wrap, then place them in a freezer bag. It will keep well for up to 3 months. When you’re ready for a slice, just thaw it at room temperature or pop it straight into the toaster or microwave.
To bring back that fresh-from-the-oven warmth, simply reheat a slice in the microwave for less than 10 seconds. For a crisper edge, toasting it lightly in a toaster or a dry skillet works wonders. It’s almost as good as the first day!
Tips and Advice for Baking Success
- Room Temperature Ingredients: Let your egg and sour cream sit out for 20-30 minutes before baking. They’ll blend into the batter much more smoothly.
- Check Your Expiration Dates: Baking soda and cream of tartar lose their power over time. If yours are old, your bread might not rise properly.
- Don’t Peek! Resist the urge to open the oven door during the first 25 minutes of baking. The rush of cold air can cause the bread to fall.
- Customize It: Feel free to stir in up to 1 cup of add-ins like shredded cheddar cheese, chopped jalapeños, or cooked corn kernels for a fun twist.
Presentation Tips to Impress Your Guests
- Serve the warm loaf right on a wooden cutting board for a rustic, homey feel.
- Drizzle the top of the whole loaf with a little honey and sprinkle with flaky sea salt for a gorgeous finish.
- Cut the bread into thick slices and fan them out on a platter with a small bowl of whipped honey butter in the center.
- For a picnic or party, bake the batter in a muffin tin for easy, individual portions. Just reduce the baking time to about 18-20 minutes.
Healthier & Fun Variations to Try
Love this base recipe? Here are six ways to mix it up!
- Whole Wheat & Honey: Replace half the all-purpose flour with whole wheat flour and swap the white sugar for an equal amount of honey. It adds a lovely, deep flavor and extra fiber.
- Cheesy Jalapeño Delight: Fold 3/4 cup of shredded sharp cheddar cheese and 1/4 cup of finely diced fresh jalapeños into the batter before baking. Spicy, cheesy, and irresistible!
- Sweet Berry Cornbread: Gently fold 1 cup of fresh or frozen blueberries or raspberries into the batter. The bursts of fruit are a delightful surprise.
- Herb Garden Cornbread: Add 2 tablespoons of fresh chopped herbs like chives, rosemary, or thyme. Perfect for serving with savory soups and salads.
- Skillet Cornbread: Bake the batter in a preheated, well-seasoned 10-inch cast iron skillet for an extra-crispy, rustic crust. It’s a classic presentation.
- Gluten-Free Version: Use a 1:1 gluten-free flour blend in place of the all-purpose flour. Ensure your cornmeal is certified gluten-free. The result is just as tasty!
Common Mistakes to Avoid
A few small missteps can change your cornbread. Here’s how to steer clear of them.
Mistake 1: Over-Mixing the Batter
This is the number one reason cornbread turns out tough and dense. When you mix the wet and dry ingredients together, you activate the gluten in the flour. Too much mixing makes the gluten strong and chewy. The batter should be lumpy and just combined. Stir until you no longer see dry flour patches, then stop immediately. A few lumps are your friend!
Mistake 2: Using Expired Leaveners
Baking soda and cream of tartar are the dynamic duo that makes this bread rise. If they are old or stale, they lose their chemical reaction power. Your bread will be flat and heavy. To test baking soda, drop a 1/4 teaspoon into a small amount of vinegar. It should fizz vigorously. For cream of tartar, check the color; it should be bright white, not yellowish or clumpy. When in doubt, buy fresh.
Mistake 3: Not Preheating the Oven Fully
Putting your batter into an oven that hasn’t reached the right temperature is a recipe for uneven baking. The leaveners start working as soon as the wet and dry ingredients meet. If the oven isn’t hot enough, they can exhaust themselves before the bread sets, leading to poor rise. Always wait for your oven to beep or signal that it has reached the correct 400°F before you put the pan in.
Mistake 4: Overbaking the Loaf
Dry cornbread is a sad thing. Overbaking happens when we rely solely on the timer and don’t check for actual doneness. Ovens vary, so always start checking at the 30-minute mark with a toothpick. If it comes out with wet batter, it needs more time. If it comes out with just a few moist crumbs, it’s perfect. Remember, it will continue to cook a little as it cools in the pan.
Mistake 5: Slicing It Too Soon
I know it’s tempting to dive right in, but slicing into a hot loaf of cornbread is a mess. The structure hasn’t set yet, so the crumb will be gummy and it will fall apart easily. Letting it cool in the pan for 10 minutes allows the steam to finish cooking the interior and lets everything firm up. You’ll get much cleaner, prettier slices if you can be patient.
Frequently Asked Questions
Can I make this Amish Sour Cream Cornbread in a different pan, like an 8×8 square?
Absolutely! You can bake this batter in a greased 8×8-inch or 9×9-inch square baking pan. The cornbread will be thinner and will bake faster, so start checking for doneness around 20-25 minutes. You’ll get more edges, which is a bonus for those who love the crispy parts! Muffin tins are also a great option for portion-controlled pieces; bake for about 18-20 minutes.
My cornbread turned out very crumbly. What did I do wrong?
A crumbly cornbread often means there wasn’t enough binding agent or it was overbaked. First, double-check that you used a large egg, as specified. A smaller egg might not provide enough structure. Second, ensure you measured your flour correctly. Fluff the flour in the bag, spoon it into your measuring cup, and level it off with a knife. Scooping directly packs the flour down, leading to too much dry ingredient and a dry, crumbly result. Finally, make sure you didn’t overbake it.
Can I use buttermilk instead of sour cream?
You can, but it will change the texture and flavor. Buttermilk is much thinner than sour cream. If you substitute it 1:1, your batter will be runnier and the final bread will be lighter and less rich. For a closer result, I’d recommend using 3/4 cup of buttermilk and reducing the milk in the recipe to just 1-2 tablespoons. The tang will be similar, but the dense, moist quality of the Amish version comes directly from the thick sour cream.
Why do I need both baking soda AND cream of tartar?
This combination is essentially a homemade baking powder! Baking soda (a base) needs an acid to create the carbon dioxide bubbles that make your bread rise. Cream of tartar is that acid. Together, they create a powerful and immediate leavening reaction when combined with the liquid in the batter. This gives the bread a nice, quick lift in the hot oven.
Can I add sugar to make it sweeter, like cake?
You can, but this isn’t meant to be a dessert cornbread. The 2 1/2 tablespoons provide a subtle balance to the corn’s natural flavor. If you prefer a sweeter “Northern-style” cornbread, you could increase the sugar to 1/3 or 1/2 cup. Keep in mind that adding more sugar might make the top brown faster, so you may need to tent it with foil towards the end of baking to prevent burning.
How can I tell if my cornbread is done without a toothpick?
No toothpick? No problem! Gently press the top center of the cornbread with your fingertip. If it springs back and feels firm, it’s likely done. You can also look at the edges; they should be pulling away slightly from the sides of the pan and be a deep golden brown. Lastly, listen for a slight sizzling sound to stop—that means the water has finished cooking out.
Is it okay to use low-fat or fat-free sour cream?
It’s okay, but I don’t recommend it for the best results. Full-fat sour cream provides the richest flavor and creamiest texture, which translates to a more moist and tender crumb. Low-fat or fat-free versions have more water and stabilizers, which can make the bread slightly gummier and less flavorful. For a truly special loaf, full-fat is the way to go.
Can I prepare the batter ahead of time and bake it later?
I don’t recommend it. Once the wet and dry ingredients are mixed, the leavening agents (baking soda and cream of tartar) start working immediately. If you let the batter sit, those bubbles will deflate before the bread goes in the oven, resulting in a dense, flat loaf. For best results, mix and bake right away.
What’s the best way to reheat leftover cornbread?
My favorite method is a quick toast! Pop a slice in the toaster or toaster oven for a minute or two. It brings back the crispy edges. For the microwave, wrap a slice in a damp paper towel and heat for 10-15 seconds. This adds steam and prevents it from drying out. For a whole loaf, wrap it in foil and warm it in a 300°F oven for 10-15 minutes.
Can I freeze the baked cornbread?
Yes, freezing works wonderfully! Let the completely cooled loaf (or slices) wrap tightly in plastic wrap, then again in aluminum foil or place in a heavy-duty freezer bag. It will keep for up to 3 months. Thaw overnight in the fridge or at room temperature, then reheat using your preferred method. It tastes nearly as fresh as the day you baked it.
Ready to Bake Some Memories?
There you have it—my all-time favorite, foolproof recipe for Easy Amish Sour Cream Cornbread. It’s more than just a recipe; it’s a ticket to a warm, comforting, and delicious moment. Whether you’re serving it at a big family dinner or enjoying a quiet slice with your morning coffee, I hope this bread brings as much joy to your table as it has to mine. Don’t forget to grab that butter and honey! Now, go preheat that oven and get baking. You’ve got this!
Delicious Kolacky Treats
Ingredients
Equipment
Method
- Preheat the oven to 400°F (200°C) and prepare a 9x5-inch loaf pan by greasing it.
- In a large mixing bowl, combine cornmeal, all-purpose flour, sugar, baking soda, cream of tartar, and salt.
- In another bowl, mix sour cream, beaten egg, melted butter, and milk until smooth.
- Pour the wet mixture into the dry ingredients and stir gently until just combined, being careful not to overmix.
- Transfer the batter to the prepared loaf pan, smoothing the top.
- Bake for 30-35 minutes, checking for doneness with a toothpick.
- Allow to cool in the pan for 10 minutes, then invert onto a cooling rack and slice while warm.
Nutrition
Notes
Customize this recipe by adding up to 1 cup of shredded cheese, herbs, or fruit for a unique twist.
Store any leftover cornbread tightly wrapped at room temperature for up to 3 days, or freeze for up to 3 months. Reheat slices in a toaster or microwave for best results. Enjoy with butter and honey for an extra treat!