Angel Kiss Cake: A Heavenly Trio of Texture
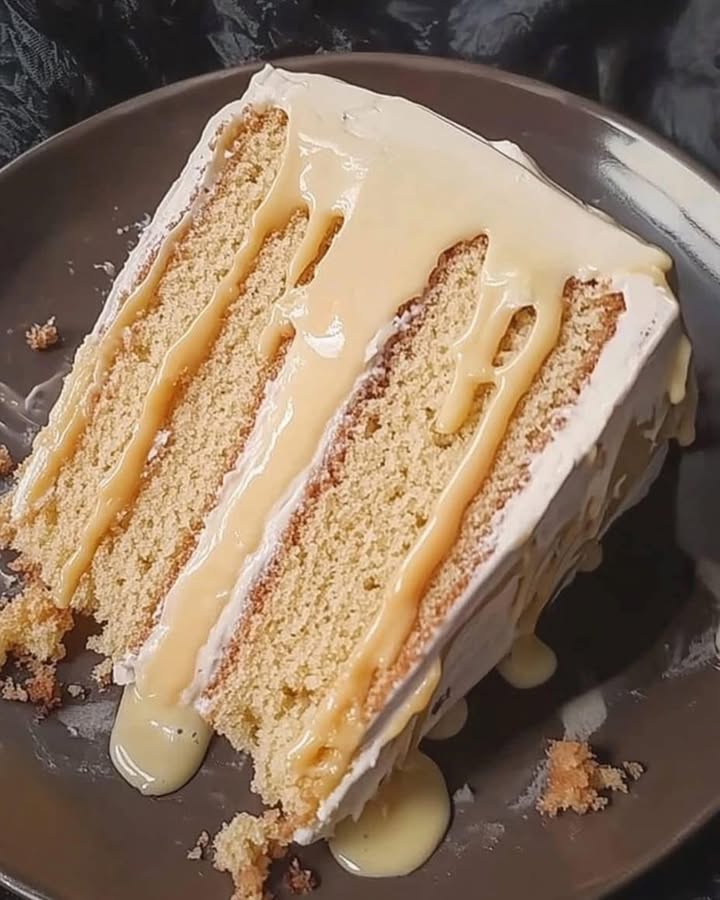
You know that moment when you take the first bite of a dessert and you just have to close your eyes? That’s Angel Kiss Cake. It’s not just a cake; it’s a whole experience in a single slice. Picture this: a soft, springy sponge cake, a layer of dreamily creamy flan, all soaked in a sweet, milky syrup that whispers “comfort.” I first had this at a friend’s baby shower and honestly, I think I sighed out loud. I knew right then I had to learn to make it for my own family. After a few delightful (and tasty) experiments, here is my foolproof version, packed with every bit of love that makes it so special.
A Cake Born from Love and Tradition
While its exact origin is a sweet mystery, Angel Kiss Cake feels like a hug from generations of home bakers. It’s a beautiful fusion of classic techniques—the European-style sponge meeting the rich, custardy flan popular in Latin American desserts. The magic is in the layering, a tradition of creating something extraordinary from simple, humble ingredients. My modern twist? Using cream cheese in the flan for an extra layer of tangy richness that balances the sweetness perfectly. It’s a cake that honors tradition while inviting you to make it your own.
Why You’ll Fall Head Over Heels for This Recipe
This dessert is a total showstopper, but the process is surprisingly straightforward. The joy comes from creating three distinct components that come together in harmony. You get the satisfaction of baking from scratch with a spectacular result. The flavors are deeply comforting—vanilla, milk, and egg—like the best parts of your favorite childhood desserts combined. Plus, it’s a make-ahead dream! Assembling it the night before lets the syrup work its magic, making your party day completely stress-free. Trust me, the compliments will rain down like… well, angel kisses.
Perfect Occasions for a Slice of Heaven
This cake is celebration defined. It’s perfect for birthdays, anniversaries, and holidays when you want to express real, heartfelt joy. I love bringing it to potlucks because it’s always the star of the dessert table. Sunday family dinners feel extra special with it waiting in the fridge. Honestly, any day that needs a little extra sweetness and love is the right day for an Angel Kiss Cake.
Gathering Your Ingredients
Here’s your shopping list for this triple-delight dessert. Measure with love!
For the Sponge Cake:
- 3 cups of flour, sifted 3 times
- 6 eggs, whites and yolks separated
- 1 cup of whole milk
- 1 cup of sugar
- 2 teaspoons of vanilla extract
- 4 teaspoons of baking powder
For the Creamy Flan:
- 1 packet of gelatin (Grenetina), hydrated in ¼ cup of water
- 1 can (14 oz) of sweetened condensed milk
- 1 can (12 oz) of evaporated milk
- 1 bar (8 oz) of cream cheese, softened
- 5 eggs
- 2 teaspoons of vanilla extract
For the Celestial Syrup:
- 1 can (14 oz) of sweetened condensed milk
- 1 can (12 oz) of evaporated milk
- 1 cup of whole milk
- ½ cup of vanilla-flavored milk (or more whole milk with extra vanilla)
- 1 teaspoon of vanilla extract
Optional for assembly: Whipped cream for layering and topping.
Handy Substitution Options
No stress if you’re missing an item! Here are some easy swaps:
- For the flour: A 1:1 gluten-free baking blend works beautifully for the cake.
- For the cream cheese: Mascarpone cheese is a lovely, richer alternative.
- For the gelatin: You can use an equal amount of agar-agar for a vegetarian version.
- For the milks: Feel free to use all regular whole milk in the syrup if you can’t find vanilla-flavored milk. Just add an extra splash of vanilla extract.
Crafting Your Angel Kiss Cake Step-by-Step
Step 1: The Fluffy Sponge Cake
Start by preheating your oven to 350°F (180°C). Take your impeccably clean bowl of egg whites and beat them until they form stiff, glossy peaks that hold their shape. This is the secret to a light-as-air cake. Gradually rain in the sugar while beating, then gently incorporate the egg yolks one by one. In a separate bowl, whisk together your sifted flour, baking powder, and a pinch of salt. Now, tenderly fold the dry ingredients into the egg mixture in three parts, alternating with the milk and vanilla. Use a big, gentle folding motion to keep all that lovely air inside. Pour the beautiful, pale batter into a greased and floured cake pan. Bake for about 30 minutes until golden and a toothpick comes out clean. Your kitchen will smell like a bakery dream. Pro tip: Let the cake cool completely in the pan before removing it to prevent sinking.
Step 2: The Luxurious Creamy Flan
While the cake cools, prepare the flan. Lightly grease your cake pan again and line it with easy-release aluminum foil, letting the edges hang over. This is your flan mold. In your blender, combine the softened cream cheese, condensed milk, evaporated milk, eggs, and vanilla. Blend until you have a perfectly smooth, creamy, pale yellow liquid. Gently heat your hydrated gelatin until it liquefies, then quickly blend it into the milk mixture for a few seconds. Pour this silky custard into your prepared pan. Place this pan inside a larger baking dish and pour hot water into the larger dish until it comes halfway up the sides of the flan pan—this is a water bath. Bake for about 40 minutes until the flan is set but still has a slight jiggle in the center. It will firm up beautifully as it chills.
Step 3: The Dreamy Celestial Syrup
This is the “kiss” that brings it all together. Simply combine the condensed milk, evaporated milk, whole milk, vanilla milk, and vanilla extract in your blender. Blend on high for a full minute until everything is homogenous and slightly frothy. Taste it—it’s like sweet, liquid velvet. Set this aside while you prepare for assembly.
Step 4: The Magical Assembly
Once your cake and flan are completely cool, it’s time for the fun part. Carefully remove the flan from its pan using the foil overhang and place it on a plate. Slice your sponge cake horizontally into two even layers. Place the first cake layer on your serving plate. Poke it all over with a fork or skewer. Generously spoon about one-third of your celestial syrup over this layer, letting it soak in like a sponge. Spread a thin layer of whipped cream over the soaked cake. Gently place the set flan on top of this cream layer. Now, add your second cake layer on top of the flan, poke it again, and drench it with more syrup. You can finish the top with a final flourish of whipped cream if you like. Chef’s tip: The real secret is patience! Cover the assembled cake and let it refrigerate overnight. This allows all the textures to meld and the syrup to fully permeate every bite.
Your Angel Kiss Cake Timeline
Good things take time, but planning makes it easy!
- Prep Time: 45 minutes
- Cooking Time: 1 hour 10 minutes (cake + flan)
- Resting/Chilling Time: Overnight (minimum 8 hours)
- Total Time: About 10 hours (mostly hands-off chilling)
My Special Chef’s Secret
For an unbelievable flavor boost, infuse your syrup milks! Before blending, gently warm them in a saucepan with a cinnamon stick and a strip of lime zest. Let it cool completely, then remove the aromatics and proceed with blending. This adds a subtle, sophisticated depth that will have everyone asking, “What is that amazing flavor?”
A Sweet Slice of History
Combining cake and flan is a beloved tradition in many cultures, often called “Chocoflan” or “Pastel Imposible” (Impossible Cake) because the flan and cake layers mysteriously swap places during baking. Our Angel Kiss version is a bit simpler, building the layers separately for guaranteed success, but it captures that same magical spirit of two desserts becoming one unforgettable treat.
Necessary Equipment
You likely have most of this in your kitchen!
- Two 9-inch round cake pans (springform is ideal)
- Stand mixer or hand mixer
- Blender
- Large roasting pan for the water bath
- Mixing bowls, spatulas, measuring cups/spoons
- Sifter for the flour
Storing Your Heavenly Creation
Because this cake is soaked in syrup, it needs to live in the refrigerator. Cover it well with plastic wrap or place it in a large cake carrier. It will keep beautifully for up to 4 days. The flavors actually improve after a day or two!
You can also freeze individual slices for a future treat. Wrap each slice tightly in plastic wrap and then in aluminum foil. Thaw overnight in the refrigerator before serving.
Do not leave the cake out at room temperature for more than two hours, especially due to the dairy-rich flan and cream. Always serve it chilled for the best texture and taste.
Helpful Tips and Advice
- Sifting is key: Sifting the flour three times for the cake might seem like a chore, but it incorporates air and ensures a supremely light, tender crumb. Don’t skip it!
- Room temperature ingredients: Let your eggs, milk, and cream cheese come to room temperature before starting. This helps everything blend smoothly and evenly.
- Test for doneness: For the flan, the center should still be a bit wobbly like Jell-O when you take it out. It sets fully as it cools. Overbaking can make it rubbery.
- Soak generously: Don’t be shy with the syrup! The cake layers should be thoroughly moistened for that signature melt-in-your-mouth quality.
Presentation Tips to Impress
Make your Angel Kiss Cake look as divine as it tastes!
- Dust the top with a light snowfall of powdered sugar or cocoa powder.
- Decorated with fresh berries like raspberries or strawberries around the base or on top.
- Add edible gold flakes or silver dragées for a truly celestial, festive look.
- Serve each slice with a dollop of freshly whipped cream and a mint leaf.
- Drizzle a little caramel sauce or strawberry coulis on the plate before placing the slice.
Healthier Alternative Twists
Love the idea but want a lighter version? Try these tweaks:
- Angel Kiss Sponge-Only: Make just the sponge cake and syrup, skipping the flan. Use low-fat milk in the syrup for a lighter, still-delicious soaked cake.
- Ricotta Flan Version: Substitute the cream cheese and some of the condensed milk with part-skim ricotta cheese for a higher-protein, less sweet flan layer.
- Sugar-Free Swap: Use a sugar substitute specifically formulated for baking in the cake and a sugar-free condensed milk alternative for the flan and syrup.
- Coconut Milk Dream: Replace all the dairy milks in the flan and syrup with full-fat and light coconut milk for a dairy-free, tropical twist.
- Chocolate Angel Kiss: Add ½ cup of unsweetened cocoa powder to the cake batter and use chocolate-flavored milk in the syrup for a chocolate-lover’s paradise.
- Mini Individual Trifles: Skip the large assembly. Cube the cake and flan, layer them in glasses with the syrup and fresh fruit for portion-controlled, beautiful desserts.
Common Mistakes to Avoid
Mistake 1: Not Beating the Egg Whites Enough
This is the biggest culprit for a dense, flat sponge cake. If your egg whites aren’t beaten to stiff peaks—meaning they stand straight up when you lift the beaters—your cake won’t have enough air to rise properly. Ensure your bowl and beaters are completely clean and free of any grease or yolk. Beat on medium-high speed until you have firm, glossy peaks. This creates the structure for a light and fluffy cake.
Mistake 2: Overmixing the Cake Batter
Once you add the flour, you must switch from beating to folding. Stirring vigorously deflates all the precious air bubbles you just created with the egg whites. Use a large spatula and a gentle, sweeping motion to incorporate the dry ingredients and milk just until no streaks remain. A few small lumps are better than a tough, overmixed batter.
Mistake 3: Skipping the Water Bath for the Flan
Baking the flan without a water bath (baño maría) is a surefire way to get a rubbery, curdled texture with cracks on top. The water bath provides gentle, even heat that cooks the custard slowly and smoothly. Simply place your flan pan inside a larger pan, pour hot water around it, and bake. This gentle steam is non-negotiable for that silky-smooth texture.
Mistake 4: Assembling with Warm Components
If your cake or flan is even slightly warm when you assemble and add the cold syrup, you can create a soggy, unstable mess. Patience is key. Let both the cake and the flan cool completely to room temperature, or even better, chill the flan for a few hours first. This ensures clean layers and proper syrup absorption.
Mistake 5: Not Letting it Chill Overnight
Cutting into the cake after just a few hours in the fridge is so tempting, but you’ll miss out on the magic. The overnight rest allows the syrup to distribute evenly, softening the cake perfectly without making it mushy. It lets the flavors marry and the whole dessert firm up, making it easy to slice cleanly. Trust me, wait for it!
Your Angel Kiss Cake Questions Answered
Can I make this cake without gelatin?
Yes, but the flan will have a much softer, less sliceable texture. The gelatin helps the flan layer hold its shape when layered and sliced. For a gelatin-free version, you can try using 3 extra egg yolks in the flan to help it set more firmly, but know it will be more delicate. Agar-agar is a great plant-based substitute; use about 1 tablespoon powdered agar-agar dissolved in a little water and heated before blending into the flan mixture.
My flan cracked on top. What did I do wrong?
Cracking usually means the flan baked at too high a temperature or without a proper water bath. The oven was likely too hot, causing the custard to cook too quickly and tense up. Next time, ensure your water bath is in place, check your oven temperature with a separate thermometer, and try reducing the heat by 25°F. Also, avoid opening the oven door frequently during baking, as temperature swings can cause cracking.
Can I use a boxed cake mix for the sponge layer?
Absolutely, if you’re in a pinch! Prepare a standard yellow cake mix according to the package directions, baking it in the required pan size. While it won’t be quite as light and airy as the from-scratch version, it will still taste delicious. The real stars are the flan and the syrup, so you’ll still have an amazing dessert. Just be sure to poke and soak the box-mix cake well with the syrup.
The syrup seems too thin. Should I thicken it?
No, don’t thicken it! The syrup is meant to be a pourable, milky liquid. Its purpose is to soak into the cake, not to sit on top like a glaze. The magic happens in the fridge as the cake absorbs it all. If it seems thin straight from the blender, that’s perfectly correct. Just keep blending until it’s completely smooth and unified.
How do I know when the flan is done baking?
The classic test is the “jiggle.” Gently shake the pan. The edges should look set and firm, but the center (about the size of a quarter) should have a slight, gelatin-like wobble. It will continue to cook from residual heat as it cools. Overbaking until the center is completely firm will result in a denser, less creamy texture.
Can I make this recipe in a different pan shape?
You can, but adjustments are needed. A 9×13 inch rectangular pan is a great option for a larger crowd. You would bake the cake and flan separately in similar-sized pans, then cut them to fit the rectangle for assembly. For individual servings, use small ramekins for the flan and a sheet pan for the cake, cutting out circles to match the ramekins for a stunning personal presentation.
Why did my sponge cake sink in the middle?
This usually happens if the cake is underbaked, if the oven door was opened too early in the baking process, or if there was too much leavening (baking powder). Ensure your oven is fully preheated. Do not open the door for at least the first 25 minutes of baking. Also, measure your baking powder accurately using the spoon-and-level method.
Is it possible to make this dessert ahead of time?
It’s not just possible; it’s recommended! In fact, you must make it ahead. The cake needs that overnight chill for the flavors and textures to perfect themselves. You can bake the cake and flan up to two days in advance, store them separately wrapped in the fridge, and then assemble and syrup the day before you need it.
My cake layers are very crumbly. How do I handle them?
A crumbly sponge is often due to overbaking or not enough fat/liquid. To salvage it, don’t panic! Just be extra gentle when handling the layers. You can lightly brush the layers with some of the syrup before moving them to help the exterior hold together. Once assembled and soaked, the syrup will bind everything beautifully.
Can I add other flavors to this cake?
Please do! This cake is a wonderful canvas. Add a tablespoon of instant coffee or espresso powder to the flan for a mocha twist. Mix a bit of cinnamon or pumpkin pie spice into the cake batter. Add a layer of mashed ripe bananas or dulce de leche between the cake and flan. A splash of rum, brandy, or Kahlúa in the syrup is divine for an adult version. Get creative!
A Final Sweet Thought
Making an Angel Kiss Cake is a labor of love, but every single minute is worth it. From the careful folding of the batter to the patient overnight wait, you’re building not just a dessert, but a memory. When you present it and see that first look of wonder, you’ll know it was all worthwhile. This cake is about sharing joy, celebrating moments, and creating something truly special with your own hands. So gather your ingredients, play your favorite music, and bake a little piece of heaven. I promise, the sigh of delight from your first bite will be the best thank you of all. Now go on, spread the love!
Double Cheesy Bliss
Ingredients
Equipment
Method
- Preheat your oven to 350°F (180°C).
- Beat egg whites until they form stiff peaks in a clean bowl.
- Gradually add sugar while beating, then mix in egg yolks one at a time.
- In a separate bowl, whisk together sifted flour, baking powder, and a pinch of salt.
- Fold dry ingredients into the egg mixture in three parts, alternating with milk and vanilla.
- Pour batter into a greased and floured cake pan and bake for about 30 minutes.
- Once cooled, prepare the flan by lightly greasing another cake pan and lining it with foil.
- Blend softened cream cheese, condensed milk, evaporated milk, eggs, and vanilla until smooth.
- Warm hydrated gelatin until it liquefies and blend into the milk mixture.
- Pour the mixture into the prepared pan and place in a larger baking dish with hot water for a water bath.
- Bake for about 40 minutes until flan is set with a slight jiggle in the center.
- To make the syrup, blend condensed milk, evaporated milk, whole milk, vanilla milk, and vanilla extract until smooth.
- Allow cake and flan to cool completely before assembly.
- Slice the sponge cake horizontally into two layers and soak the first layer with syrup.
- Spread a layer of whipped cream over the soaked cake.
- Carefully place the flan on top and add the second layer of cake, soaking it with more syrup.
- Refrigerate assembled cake overnight before serving.