The Fluffy Funnel Bites That Stole My Heart (And My Family’s Appetite!)
You know that moment when the house fills with the warm, buttery smell of baking bread? That’s pure magic. For the longest time, I thought making soft, cloud-like bread at home was a chef’s secret. Then I found this recipe. My “Fluffy Funnel Bites” aren’t funnel-shaped at all—the name came from my kids, who said eating them was like a “fun tunnel” of flavor! This easy milk bread is the golden ticket to that bakery-fresh feeling, right from your own oven. It’s simpler than you think, and I’m here to walk you through every step.
A Little Slice of Bread History
Milk bread, or “Hokkaido milk bread,” has roots in Japan. It became famous for its incredibly soft and springy texture. The secret is often a special starter called “tangzhong.” My version is a wonderful shortcut that captures that same tender crumb without the extra step. It’s a perfect blend of traditional softness and modern, easy baking. I’ve made it for years, tweaking it here and there, and it’s now the most-requested item at our family brunches. It bridges the gap between classic homemade white bread and something extra special.
Why You’ll Fall in Love With This Fluffy Bread
First, the texture is unbelievable. We’re talking about pillows of joy that practically melt in your mouth. Second, it’s surprisingly straightforward. If you can mix and knead, you can make this. The smell as it bakes is worth the effort alone. Finally, it’s versatile. This bread is perfect for toast, sandwiches, or just tearing apart while it’s still warm. It’s a reliable recipe that makes you look like a baking pro.
When to Whip Up These Golden Loaves
This bread is a crowd-pleaser for any event! It’s a star at Sunday breakfast with jam and butter. Bring it to a potluck—it always disappears first. It makes a thoughtful homemade gift for a neighbor. It’s also the perfect comfort food for a cozy night in with soup. Honestly, any day feels special with a fresh loaf on the counter.
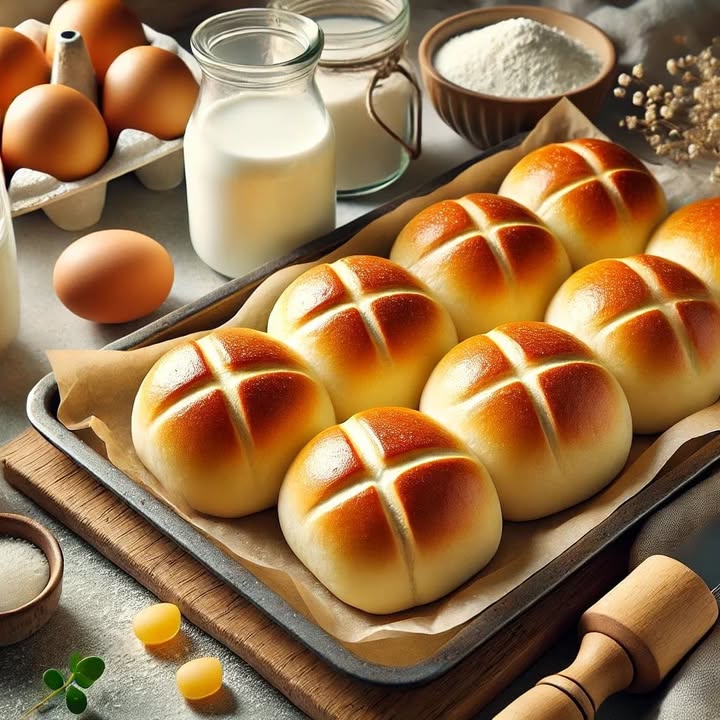
Gathering Your Ingredients
Here’s what you need for your own fluffy funnel bites magic:
- 450 g all-purpose flour
- 2 large eggs
- 225 ml warm milk
- 50 g granulated sugar
- 1 good pinch of salt
- 50 g softened butter
- 25 g fresh yeast
No Problem! Handy Substitution Options
Out of something? Don’t worry! Here are easy swaps:
Fresh Yeast: You can use 7g (one packet) of active dry yeast instead. Just mix it right in with the flour.
Milk: Any milk works—whole, 2%, or even a plain, unsweetened non-dairy milk like almond or oat.
Butter: A neutral oil like vegetable or canola oil can be used in a pinch, but butter gives the best flavor.
Let’s Make Some Fluffy Funnel Bites!
Ready to bake? Roll up your sleeves, and let’s create some delicious memories together.
Step 1: Wake Up the Yeast
Take your warm milk—it should feel like a pleasant bath temperature, not hot. Crumble in the fresh yeast and give it a gentle stir. Watch it dissolve into a creamy mixture. This wakes the yeast up so it can work its rising magic later. If you see a few little bubbles forming on the surface, you’re on the right track! Pro tip: If the milk is too hot, it will kill the yeast. Too cold, and it won’t activate.
Step 2: The Dry Team Assembly
In your large mixing bowl, whisk together the flour, sugar, and that important pinch of salt. This ensures everything is evenly distributed. The flour will look like a soft, snowy mountain. Making a well in the center now makes adding the wet ingredients easier and less messy.
Step 3: Bring It All Together
Pour the yeasty milk, crack in the eggs, and add the softened butter right into the well. Use a wooden spoon or your hands to start mixing. It will be shaggy and sticky at first. Keep going until no dry flour patches remain. You’ll see the dough start to form a rough ball. This is where the fun begins!
Step 4: The Kneading Dance
Turn the dough out onto a lightly floured surface. Now, push, fold, and turn. Knead for a good 10 minutes. Feel the texture change from sticky and ragged to smooth, elastic, and supple. It’s a wonderful workout! The dough should feel soft like a baby’s cheek and spring back gently when poked. Pro tip: Set a timer! It’s easy to under-knead, and those 10 minutes are key for developing the gluten for that perfect fluffy texture.
Step 5: The First Cozy Rest
Place your beautiful smooth dough ball back in a lightly oiled bowl. Cover it with a damp kitchen towel or plastic wrap. Let it rest in a warm, draft-free spot. I like to put it in my oven with just the light on. Wait patiently as it grows to double its size. This can take 1 to 1.5 hours. You’ll know it’s ready when you poke it gently and the indentation stays.
Step 6: Shape Your Loaves
Gently punch the dough down to release the air—this is oddly satisfying! Divide it into portions for rolls or small loaves. Shape them into smooth balls or ovals by tucking the edges underneath. Place them on a parchment-lined baking tray, leaving space for them to grow into each other for soft sides, or apart for crispier edges.
Step 7: The Final Rise
Cover your shaped loaves again and let them have a second rest. They need to puff up nicely, which usually takes about 30-45 minutes. They should look plump and almost ready for the oven. This second rise is what gives your fluffy funnel bites their light and airy final texture.
Step 8: Bake to Golden Perfection
Preheat your oven to 180°C (350°F). While it heats, you can brush the tops of the loaves with a little milk or egg wash for extra shine. Bake for 15-20 minutes. Keep an eye on them! They are done when they sound hollow if tapped underneath and are a deep, glorious golden brown all over. Chef’s tip: For an extra-soft crust, brush the hot bread with a little melted butter as soon as it comes out of the oven.
Your Fluffy Bread Timeline
Here’s a quick breakdown of the time commitment:
- Prep Time: 25 minutes (mixing and kneading)
- Resting Time: 1.5 – 2 hours (both rises combined)
- Baking Time: 20 minutes
- Total Time: About 2.5 hours start to finish
Most of the time is hands-off waiting, so you can do other things!
My Secret Chef’s Weapon
My one secret is all about the butter. Make sure it’s softened, not melted. Room-temperature butter incorporates into the dough perfectly, creating tiny pockets of fat that lead to an incredibly tender crumb. If you forget to take it out, you can grate cold butter on a box grater. It will warm up fast and mix in easily!
A Fun Bread Fact
That amazing smell of baking bread has a name! It’s partly due to a chemical reaction called the Maillard reaction. This happens between the sugars and amino acids in the dough, creating those beautiful brown colors and complex, irresistible aromas. So, you’re not just baking—you’re conducting delicious science!
What You’ll Need in Your Kitchen
- Large mixing bowl
- Wooden spoon or silicone spatula
- Kitchen scale or measuring cups/spoons
- Clean work surface for kneading
- Baking tray
- Parchment paper (optional, but helpful)
- Kitchen towel or plastic wrap
Keeping Your Fluffy Funnel Bites Fresh
Once your bread is completely cool, store it the right way. The best place is in a bread box or a paper bag at room temperature. This keeps the crust at a nice texture. It will stay fresh and soft for about 2-3 days this way.
If you want to keep it longer, freezing is your friend. Wrap the whole loaf or individual slices tightly in plastic wrap, then put them in a freezer bag. Squeeze out all the air. Frozen bread can last for up to 3 months.
To enjoy again, just thaw slices at room temperature or pop them straight from the freezer into the toaster. Avoid storing fresh bread in the fridge. The cold temperature actually makes it go stale much faster by speeding up a process called retrogradation.
My Best Tips for Success
- Use a kitchen scale for flour. Measuring by cups can pack too much in, leading to dry dough.
- Don’t rush the rises. Letting the dough double in size is non-negotiable for fluffiness.
- If your kitchen is cold, place the dough bowl in your oven with just the light on for a warm spot.
- Test for doneness with a thermometer. The internal temperature should be about 190°F (88°C).
Make It Look Fancy: Presentation Ideas
- Dust the tops with powdered sugar for a sweet treat.
- Serve warm with flavored butters (honey, cinnamon, or garlic herb).
- Cut into thick slices and arrange on a wooden board with jams and cheeses.
- Use cookie cutters on slices for fun-shaped French toast for kids.
Healthier Twists on the Classic
Love the recipe but want to mix it up? Here are six tasty variations:
- Whole Wheat Fluffy Bites: Swap half the all-purpose flour for whole wheat flour. It adds a nutty flavor and more fiber. You might need a tiny bit more milk, as whole wheat flour absorbs more liquid.
- Honey Sweetened Bread: Replace the white sugar with an equal amount of honey. Add the honey to the warm milk so it mixes in easily. It gives a lovely, floral sweetness.
- Cheese and Herb Pull-Apart Bread: After the first rise, roll the dough flat. Sprinkle with grated cheddar and your favorite dried herbs. Roll it up, slice into rounds, and place in a pan for a stunning, savory pull-apart loaf.
- Cinnamon Swirl Delight: Mix cinnamon and sugar. Roll the dough into a rectangle, sprinkle the mixture, roll it up into a log, and bake. Perfect for a sweet breakfast.
- Dairy-Free Fluffy Bread: Use a plant-based milk and replace the butter with a neutral oil or vegan butter block. It will still be wonderfully soft and perfect for those with dietary needs.
- Everything Bagel Style: Before the final bake, brush the tops with egg wash and sprinkle generously with an “everything bagel” seasoning mix. It creates a savory, crunchy, seeded crust that’s absolutely addictive.
Common Mistakes to Avoid
Mistake 1: Using Milk That’s Too Hot or Too Cold
This is the number one yeast killer. If your milk is too hot, it will kill the yeast and your bread won’t rise. If it’s too cold, the yeast stays asleep. Aim for a temperature between 105°F and 115°F (40°C-46°C). It should feel warm to your finger, not hot. A simple thermometer is a great investment, but your wrist test works too—it should feel like a comfortable warm bath.
Mistake 2: Not Kneading the Dough Enough
Under-kneaded dough won’t develop enough gluten. Gluten is the protein network that gives bread its structure and chew. Without it, your bread will be dense and crumbly. Set a timer for the full 10 minutes of kneading. The dough is ready when it’s smooth, elastic, and springs back slowly when you poke it gently.
Mistake 3: Skipping or Rushing the Rise Times
I know, waiting is hard! But the rises are when the yeast creates air bubbles, making the bread light and fluffy. If you skip the second rise, your bread will be heavy. Let the dough double in size both times. Look for the visual cues, not just the clock. A warm, draft-free spot is essential for a good rise.
Mistake 4: Adding Too Much Flour While Kneading
The dough will be sticky at first. It’s tempting to keep adding flour to your hands and the surface. Resist! Adding too much extra flour makes the dough stiff and dry, leading to a tough final bread. Use just a light dusting to prevent sticking. The dough will become less sticky as you knead and the gluten develops.
Your Fluffy Funnel Bites Questions, Answered!
Can I use instant yeast instead of fresh yeast?
Yes, you absolutely can! Instant yeast (sometimes called rapid-rise yeast) is a great substitute. You would use about 7 grams, which is one standard packet. The big difference is you can mix instant yeast directly in with your dry ingredients. There’s no need to dissolve it in the milk first. Just add it to the bowl with the flour, sugar, and salt. Then proceed with the recipe as written. Your rise times might be a little faster, so keep an eye on the dough’s size, not just the clock.
Why did my bread turn out dense and not fluffy?
A dense loaf usually points to an issue with the yeast or the kneading/rising process. First, check that your yeast was fresh and active. If your milk was too hot, it could have killed it. Second, you may not have kneaded the dough long enough to develop the gluten structure. Third, the dough might not have risen fully during its rest times. Make sure it’s in a warm enough place. Always let it double in size. Using old yeast or flour can also sometimes cause problems, so check those dates in your pantry.
How do I know when the bread is fully baked?
There are two great ways to check for doneness beyond just looking at the color. First, the visual cue: the bread should be a deep, golden brown all over. Second, the sound test: carefully turn a loaf over and tap the bottom with your knuckle. It should sound hollow. For the most accurate method, use an instant-read thermometer. Insert it into the center of the loaf. It should read between 190°F and 200°F (88°C-93°C). If it’s there, your bread is perfectly baked inside and out.
Can I make the dough ahead of time and bake it later?
You can! This is a great time-saver. After the first rise (when the dough has doubled), you can punch it down, wrap it tightly in plastic wrap, and put it in the refrigerator. It will slow the yeast way down. You can keep it there for up to 24 hours. When you’re ready, take the dough out, let it come to room temperature for about an hour, then shape it, let it have its second rise, and bake. The cold ferment can even develop more flavor.
What’s the best way to knead dough without a mixer?
Hand-kneading is very effective and kind of therapeutic! On a clean, lightly floured surface, use the heels of your hands to push the dough away from you. Then fold it back over itself, give it a quarter turn, and repeat. Push, fold, turn. It’s a rhythmic motion. Keep going until the dough transforms from shaggy and sticky to smooth and elastic. It should feel soft and springy. A good 10 minutes of this is usually perfect. If your arms get tired, just remember the fluffy results are worth it!
My dough isn’t rising. What should I do?
Don’t panic! First, check the environment. Is it warm enough? Yeast loves warmth. Try moving the bowl to a warmer spot, like near a heater or in an oven with just the light on. Second, your yeast might be old. Test it by mixing a pinch with a little warm water and a pinch of sugar. If it doesn’t foam up after 10 minutes, it’s time for new yeast. If the dough is still not rising, you can try adding a bit more sweetener (a teaspoon of sugar or honey) to give the yeast more food to work with.
Can I make these into rolls instead of a loaf?
Of course! This dough is perfect for making individual fluffy rolls. After the first rise, punch the dough down and divide it into equal-sized pieces. A good size is about the size of a golf ball for dinner rolls. Shape each piece into a smooth ball by pulling the edges underneath. Place them on a baking sheet close together for soft sides, or spaced apart for crispier edges. Let them rise until puffy, then bake. They may bake a few minutes faster than a large loaf, so keep an eye on them after 12 minutes.
Can I add flavors like garlic or herbs to this bread?
Adding savory flavors is a fantastic idea! The best time to add dry herbs, garlic powder, grated cheese, or seeds is when you are mixing the dry ingredients. This ensures they get evenly distributed. For fresh herbs like rosemary or thyme, chop them finely and add them with the wet ingredients. If you want a swirl of something like pesto or cinnamon sugar, roll the dough out after the first rise, spread your filling, roll it up, and then shape it before the second rise.
How long should I let the bread cool before slicing?
I know it’s incredibly hard to wait when it smells so good, but please try! Let the bread cool completely on a wire rack. This usually takes 1 to 2 hours. Slicing into hot bread traps steam inside, which makes the crumb gummy and dense. The bread is actually still cooking from residual heat as it cools. Letting it cool fully gives you those perfect, clean slices and the ideal soft-yet-structured texture. For the best experience, patience is key.
Is this recipe suitable for beginners?
This easy milk bread recipe is absolutely perfect for beginners! It uses simple, common ingredients and straightforward techniques. There’s no complex starter or fancy folding methods. The steps are clear: mix, knead, let rise, shape, rise again, bake. It teaches you the fundamental skills of bread baking—activating yeast, kneading, and judging rises. Even if it’s not perfect the first time, it will still be delicious. Every baker starts somewhere, and this fluffy bread is a wonderful, rewarding place to begin your journey.
Time to Bake Your Own Happiness
And there you have it—my tried-and-true path to creating the most wonderful, fluffy funnel bites. This easy milk bread recipe is more than just instructions. It’s an invitation to create warm moments and fill your home with a smell that says “all is well.” Don’t be intimidated. Baking bread is a loving act, and even the little imperfections make it yours. So, gather your ingredients, put on some music, and get ready for the magic. I can’t wait for you to pull your own golden, perfect loaves from the oven. Happy baking
Fluffy Funnel Bites
Ingredients
Equipment
Method
- Take warm milk and crumble in the fresh yeast, stir gently until dissolved.
- In a large mixing bowl, whisk together flour, sugar, and salt to combine.
- Pour yeasty milk, crack in the eggs, and add softened butter into the well in the flour mixture, then mix until no dry flour remains.
- Turn the dough onto a lightly floured surface and knead for about 10 minutes until smooth and elastic.
- Place the kneaded dough in a lightly oiled bowl, cover it, and let it rise in a warm place until doubled in size (1 to 1.5 hours).
- Punch down the dough to release air and divide it into portions, shaping into balls or ovals.
- Place shaped dough on a parchment-lined baking tray and let them rise again for 30-45 minutes.
- Preheat the oven to 180°C (350°F). Brush tops with milk or egg wash and bake for 15-20 minutes until golden brown and hollow-sounding when tapped.