Get Ready for the Ultimate Apple Treat!
There’s a magical moment when the crisp autumn air rolls in, and all I can think about is filling my kitchen with the warm scent of cinnamon and baked apples. But who has time to fuss with a whole pie? That’s exactly why I became obsessed with perfecting these Flaky Apple Pie Bars. They give you every single bit of that classic, comforting flavor, but in a portable, shareable bar that’s perfect for a busy family, a potluck, or just because Tuesday deserves dessert!
The Story Behind These Apple Pie Bars
This recipe feels like a hug from my grandma’s kitchen. She was the queen of making something incredible out of simple pantry staples. The idea for these bars came from wanting her legendary apple pie taste without the stress of a perfect lattice crust on a weekday. I spent a whole season testing versions—some too dry, some too soft. Finally, this one came out of the oven with the most gorgeous golden crust and a bubbly, sweet apple filling. It was the “aha!” moment. It’s my modern, easy-going tribute to that old-fashioned, all-day pie-making love.
Why You’ll Love These Flaky Apple Pie Bars
Listen, if you love pie but hate the patience it requires, these bars are your new best friend! They are incredibly forgiving. The crust is tender and flaky, the apple filling is warmly spiced, and that sweet vanilla drizzle on top is just the perfect finish.
Here’s why they’re a winner:
- No Pie Pan Required: A simple 9×13 pan is all you need.
- Feeds a Crowd: One batch makes 12 generous servings.
- Make-Ahead Magic: They taste just as amazing the next day.
- Pure Comfort Food: The smell alone will make your house feel like a home.
Perfect Occasions for These Apple Treats
These bars are the ultimate team player. They’ve saved my skin more times than I can count!
- School Bake Sales: They travel like a dream and kids go crazy for them.
- Thanksgiving Dessert Table: Offer a pie-alternative that guests can easily grab.
- Weekend Coffee Date: Pair a warm bar with your morning coffee for pure bliss.
- Neighborly Gift: A plate of these homemade bars says, “I’m glad we’re friends.”
Ingredients You’ll Need
- 2 cups all-purpose flour
- 2 tbsp white sugar
- 2 egg yolks
- 1/2 cup milk
- 1/2 tsp salt
- 1 cup shortening
- 2 egg whites (for brushing the crust)
- 9 apples (peeled, cored, and sliced)
- 3/4 cup white sugar (for the filling)
- 1 tsp ground cinnamon
- 1 1/2 cups confectioners sugar
- A pinch of salt
- 1 tsp vanilla extract
- 3 tbsp milk
Handy Substitution Options
Don’t sweat it if you’re out of something! Here are some easy swaps:
- Shortening: Cold, unsalted butter works beautifully. Just cube it before cutting it into the flour.
- Apples: I love a mix of Granny Smith and Honeycrisp. Use any firm baking apple you like!
- Milk: Any milk you have—whole, 2%, or even a non-dairy alternative like almond milk—will do just fine.
- Egg Wash: If you’re out of egg whites, a simple brush of cream or even just milk will give a nice color.
Let’s Make These Flaky Apple Pie Bars!
Step 1: Prep Your Pan and Oven
Start by preheating your oven to 350°F (175°C). This gives it time to get perfectly hot. Grab your 9×13 inch pan and give it a good greasing with butter or non-stick spray. You want to make sure every last crumb comes out easily. Pro tip: A little flour dusted over the grease helps even more!
Step 2: Create the Flaky Crust Dough
In a large bowl, whisk together your flour, the 2 tablespoons of sugar, and the salt. Now, take your cold shortening and “cut” it into the flour. You can use a pastry cutter, two forks, or even your fingertips. You’re looking for a mixture that looks like coarse, sandy crumbs. In a separate small bowl, lightly beat the egg yolks and milk together. Pour this wet mixture into the crumbly flour and gently stir with a fork until a soft dough just starts to form.
Step 3: Layer the Base and Apples
Divide your dough in half. On a lightly floured surface, roll out one half to roughly fit your 9×13 pan. Gently press it in, making sure it goes into the corners. Now, grab those egg whites and give the entire crust a light brush. This creates a seal so the bottom crust stays wonderfully flaky and doesn’t get soggy. Layer all of your lovely sliced apples right on top. In a small bowl, mix the 3/4 cup sugar and cinnamon, then sprinkle this sweet spice magic all over the apples.
Step 4: Top, Seal, and Bake to Golden Perfection
Roll out your second half of dough and carefully place it over the mountain of apples. You can pinch the edges to seal, or just press them together gently. Use a fork to poke a few steam vents in the top—this lets the hot apple steam escape and prevents a soggy top. Pop it in the oven and bake for 40-45 minutes. You’ll know it’s done when the whole kitchen smells amazing and the top is a beautiful, deep golden brown.
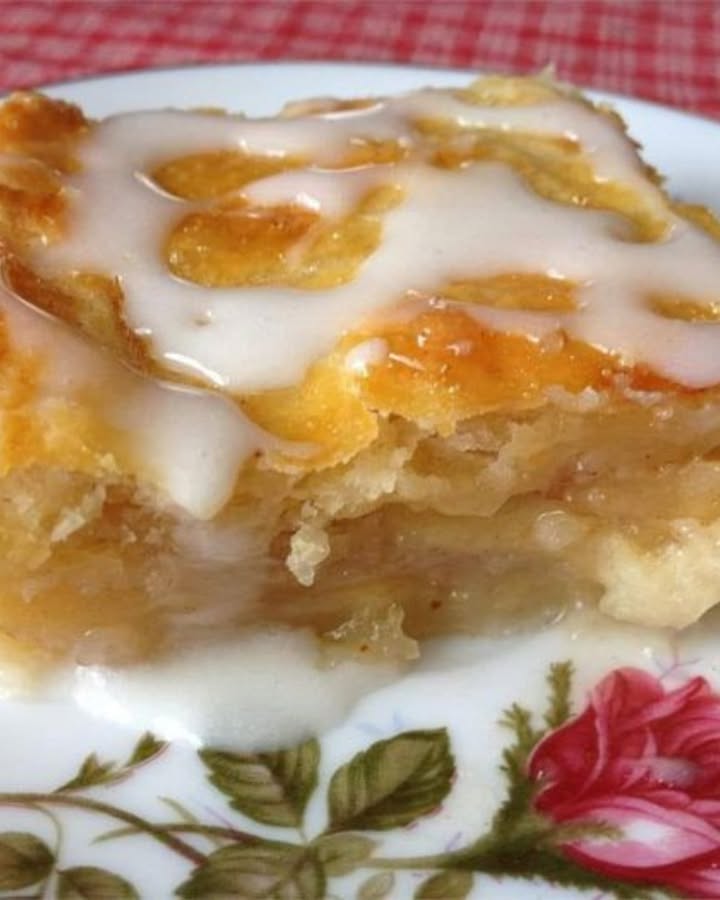
Step 5: The Final Sweet Drizzle
Let the bars cool completely in the pan on a wire rack. This patience is key for clean cuts! While you wait, make the simple glaze. Whisk together the confectioners sugar, 3 tablespoons of milk, vanilla extract, and that tiny pinch of salt. The salt makes the vanilla flavor sing! You want a drizzle consistency—thick but pourable. Chef’s tip: Drizzle the glaze back and forth with a fork or a small spoon for those perfect bakery-style lines.
Recipe Timing
- Prep Time: 20 minutes
- Bake Time: 45 minutes
- Cooling Time: 1 hour (trust me, it’s worth it!)
- Total Time: About 2 hours 5 minutes
- Serves: 12 happy people
My Secret for the Flakiest Crust
The secret is all in keeping things cold. I even pop my measured flour in the freezer for 10 minutes before I start. When you cut the shortening into the flour, you want little pea-sized bits of fat. Those bits melt in the oven and create steam, which is what makes those dreamy, tender, flaky layers. Don’t overwork the dough—you want to see those fat streaks!
A Fun Apple Fact
Did you know there are over 7,500 varieties of apples grown around the world? But only about 100 of those are grown commercially in the U.S. That’s why trying different kinds in your baking, like a tart Granny Smith with a sweet Fuji, can create such an amazing depth of flavor in these bars!
Necessary Equipment
- 9×13 inch baking pan
- Large mixing bowls
- Pastry cutter or two forks
- Rolling pin
- Measuring cups and spoons
- Whisk
- Small bowl for egg wash and glaze
- Sharp knife or apple peeler/corer
How to Store Your Apple Pie Bars
At Room Temperature: Once completely cooled, cover the pan tightly with foil or plastic wrap. They will stay fresh and delicious at room temperature for up to 2 days.
In the Refrigerator: For longer storage, place the cut bars in an airtight container. They’ll keep in the fridge for up to 5 days. Let them come to room temperature for the best texture and flavor, or warm them slightly in the microwave.
Freezing for Later: These bars freeze wonderfully! Wrap individual bars tightly in plastic wrap, then place them all in a freezer-safe bag. They can be frozen for up to 3 months. Thaw overnight in the fridge.
Tips For The Best Bars Ever
- Slice your apples evenly, about 1/4-inch thick, so they cook at the same rate.
- If your dough feels too soft when rolling, chill it for 15-20 minutes. Cold dough is easier to handle.
- Let the glaze set for at least 15 minutes before slicing for those clean, beautiful lines.
- Serve with a scoop of vanilla ice cream for an over-the-top treat!
Presentation Ideas To Impress
- Dust the platter with a light sprinkle of cinnamon before placing the bars.
- Serve on a rustic wooden board with a small bowl of caramel sauce for dipping.
- Cut them into smaller, bite-sized squares for a party platter.
- Garnish each bar with a tiny, thinly sliced apple fan on top.
Healthier Variations to Try
Feel like mixing it up? Here are some fun twists on the classic recipe:
- Whole Wheat Crust: Swap half the all-purpose flour for whole wheat flour for a nuttier flavor and more fiber.
- Reduced Sugar: Cut the sugar in the apple filling by half and use a sugar substitute in the glaze.
- Vegan Version: Use plant-based butter, a flax egg for the yolks, and your favorite non-dairy milk.
- Gluten-Free Bars: Use a 1-to-1 gluten-free flour blend in place of the all-purpose flour.
- Added Nuts: Sprinkle chopped walnuts or pecans over the apple layer for a delightful crunch.
- Spiced Up: Add a pinch of nutmeg or cardamom to the cinnamon sugar for a more complex spice profile.
Common Mistakes to Avoid
Mistake 1: Using Warm Dough
If your kitchen is warm and your dough gets soft, it becomes a sticky mess to roll out. The shortening melts into the flour instead of staying in little chunks. This leads to a tough crust, not a flaky one. Always start with cold ingredients and chill the dough if it feels too soft. Pro tip: Roll the dough between two sheets of parchment paper for easy handling.
Mistake 2: Skipping the Egg White Wash
It might seem like a tiny, extra step, but brushing the bottom crust with egg white is a game-changer. That thin layer creates a waterproof barrier between the juicy apples and the dough. Without it, you risk a soggy bottom crust. It’s the secret for that perfect crisp, flaky base everyone loves.
Mistake 3: Overloading the Pan with Apples
It’s tempting to use all those apple slices, but piling them too high creates a steam bomb. The top crust can crack or even lift off from the pressure. The apples also won’t cook down properly, leaving you with a crunchy filling. Aim for an even, generous layer, but keep it level.
Mistake 4: Slicing While Warm
I know the smell is intoxicating and you want a taste immediately! But cutting into these bars while they’re hot from the oven is a recipe for a gooey, collapsed mess. The filling needs time to set as it cools. Letting them cool completely ensures you get neat, clean slices that hold their shape.
Frequently Asked Questions
Can I use store-bought pie crust for these apple pie bars?
You absolutely can! Using refrigerated pie dough is a great shortcut. You’ll need two rolls of dough. Simply press one into the pan for the bottom, add your apples, and top with the second roll. Follow the same instructions for brushing with egg white and baking. The flavor of the homemade crust is special, but store-bought will still give you a delicious, easy treat.
What are the best apples to use for baking?
You want apples that hold their shape and offer a balance of sweet and tart flavor. My top picks are Granny Smith for their tangy punch, Honeycrisp for their sweet crispness, or Braeburn and Jonagold which are fantastic all-purpose bakers. Using a mix of two different types gives you the most interesting and delicious filling. Avoid apples like Red Delicious that tend to get mushy.
My top crust cracked a lot while baking. Did I do something wrong?
A few small cracks are totally normal and even charming—it’s homemade! But large cracks usually mean the dough was rolled a bit too thin or was slightly dry. It can also happen if the apple filling is piled very high. Don’t worry, the yummy drizzle glaze will cover any cracks, and the taste will be just as fantastic.
How do I know when the bars are done baking?
The number one sign is color. The top crust should be a lovely, even golden brown. You might also see some bubbly, caramel-colored juices peeking out from the steam vents or the sides. If the top is browning too quickly, you can loosely tent it with a piece of aluminum foil for the last 10 minutes of baking.
Can I make these apple pie bars ahead of time?
Yes, they are perfect for making ahead! You can bake them up to 24 hours in advance. Let them cool completely, then cover the pan tightly and store at room temperature. Wait to add the glaze until just before you’re ready to serve for the prettiest presentation. The unfrosted bars also freeze beautifully.
Why do I need to “cut in” the shortening? Can’t I just mix it?
“Cutting in” the fat is crucial for flakiness. If you just stir it in, the shortening blends completely with the flour, making the crust more cookie-like and dense. By cutting it in and leaving small pea-sized pieces, those bits create steam pockets in the hot oven. This steam is what lifts the layers apart, giving you that tender, flaky texture we all love in a good pie crust.
My glaze is too thin/too thick. How can I fix it?
Glaze consistency is easy to adjust! If it’s too thin and runny, simply whisk in a little more confectioners’ sugar, a tablespoon at a time. If it’s too thick and pasty, add more milk just a teaspoon at a time until it reaches a drizzle-able consistency. Remember, it should ribbon off your whisk.
Do I have to peel the apples?
You don’t have to, but I strongly recommend it. Apple peels can become tough and chewy when baked, and they can separate from the apple slices, creating a weird texture in your filling. Peeling ensures a smooth, soft, and cohesive apple layer that melts in your mouth.
Can I add other fruits to the filling?
Absolutely! Feel free to get creative. A handful of fresh cranberries adds a lovely tart pop. Sliced pears mixed with the apples is another delicious combo. If using berries, toss them in a little extra flour to absorb their extra juice so your filling isn’t too wet.
Is there a way to make these bars less sweet?
Sure! You can reduce the sugar in the apple filling by a few tablespoons. The apples themselves have natural sweetness. You can also choose a tarter apple variety like Granny Smith. For the glaze, you can use less confectioners’ sugar or simply skip it altogether and dust the top with a light sprinkle of powdered sugar instead.
Time to Bake Some Memories!
So there you have it, my friend—everything you need to make the most delicious, flaky apple pie bars. This recipe is my tried-and-true, bring-to-every-gathering, guaranteed-to-please winner. It turns simple ingredients into pure comfort. So put on your favorite apron, preheat that oven, and get ready for the compliments to roll in. Happy baking!
Fluffy Soufflé Pancakes
Ingredients
Equipment
Method
- Preheat your oven to 350°F (175°C) and grease a 9x13 inch pan.
- In a large bowl, whisk together flour, sugar, and salt; cut the cold shortening into the flour until it resembles coarse crumbs.
- Lightly beat egg yolks and milk together in a separate bowl, then add to the flour mixture and stir until a soft dough forms.
- Divide the dough in half, roll one half out, and press it into the greased pan before brushing with egg whites.
- Layer the sliced apples over the crust and sprinkle with a mix of sugar and cinnamon.
- Roll out the second half of the dough and place it over the apples, sealing the edges and poking steam vents.
- Bake for 40-45 minutes until golden brown and fragrant.
- Allow to cool completely, then prepare the glaze by whisking together confectioners sugar, milk, vanilla, and salt.
- Drizzle the glaze over the cooled bars and let set before slicing.