One Bite, and You’re in Beijing!
I’ll never forget the first time I tried Garlic Ginger Chicken. It was at a tiny Chinese restaurant tucked away in a bustling city. The aroma alone was enough to make my mouth water, and the first bite? Pure magic. This dish is everything you love about Asian cuisine: crispy, juicy chicken coated in a rich, glossy sauce bursting with garlic and ginger flavors. Today, I’m sharing my take on this classic recipe, complete with tips and tricks to make it your new go-to meal.
A Little History of Garlic Ginger Chicken
This dish is inspired by traditional Chinese cooking methods that celebrate bold flavors and simple ingredients. Garlic and ginger are staples in Chinese kitchens, often used together to create dishes that balance heat, sweetness, and umami. While this recipe stays true to its roots, it’s been adapted for modern home cooks who want restaurant-quality food without the fuss. I’ve made this dish countless times for friends and family, and it’s always a hit. Once, I even served it at a dinner party where everyone kept asking for seconds—and the recipe!
Why You’ll Love This Recipe
What makes this Garlic Ginger Chicken so special? First, it’s incredibly flavorful. The combination of garlic, ginger, and a touch of spice creates a sauce that’s both comforting and exciting. Second, it’s easy to make. Even if you’re new to cooking, this recipe will guide you step by step. Finally, it’s versatile. Serve it with rice, noodles, or even as a standalone dish. Plus, the vibrant colors of the peppers and green onions make it as beautiful as it is delicious.
Perfect Occasions to Make Garlic Ginger Chicken
This dish is perfect for weeknight dinners when you need something quick but satisfying. It’s also great for dinner parties or themed nights like “Taste of Asia.” I once made it for a potluck, and it disappeared within minutes. If you’re hosting a holiday gathering, this Garlic Ginger Chicken can be a standout dish that impresses your guests without requiring hours in the kitchen.
Ingredients for Garlic Ginger Chicken
- For the chicken:
- 500 g boneless chicken thighs
- 1 tablespoon cornstarch (maizena)
- 1 tablespoon dark soy sauce
- 1.5 tablespoons minced garlic
- 1 teaspoon minced ginger
- 1 red bell pepper, sliced
- ½ cup green onions, cut into pieces
- ½ cup cooking oil for frying
- For the sauce:
- 2 tablespoons soy sauce
- ½ cup chicken broth
- 2 teaspoons rice vinegar
- 1 tablespoon light brown sugar
- 1 teaspoon sesame oil
- 1 teaspoon sriracha
- ¼ cup water
- ½ teaspoon black pepper
- 1 tablespoon cornstarch mixed with 2 tablespoons water
Substitution Options
If you don’t have all the ingredients on hand, don’t worry! You can swap boneless chicken thighs for breast meat if you prefer. For a gluten-free version, use tamari instead of soy sauce. If you’re out of sriracha, a dash of chili flakes or hot sauce works just as well. No red bell pepper? Try zucchini or carrots instead. The beauty of this recipe is its flexibility.
Step 1: Prepare the Sauce & Marinate the Chicken
Start by mixing all the sauce ingredients in a bowl. This step is crucial because it allows the flavors to meld together while you prep the rest of the dish. Next, cut the chicken into bite-sized pieces and toss them with dark soy sauce and cornstarch. Let the chicken marinate for 15–20 minutes. Pro tip: Don’t skip the marinating step—it helps the chicken stay juicy and tender during cooking.
Step 2: Cook the Chicken
Heat the oil in a large skillet over medium heat. Fry the chicken in batches, about 2–3 minutes per side, until golden and crispy. Remove the chicken and drain any excess oil, leaving just one tablespoon in the pan. This ensures the chicken doesn’t become greasy. Chef’s tip: Use tongs to handle the chicken easily and avoid splatters.
Step 3: Add Aromatics & Sauce
In the same skillet, sauté the garlic and ginger for 30 seconds until fragrant. Add the cooked chicken, bell pepper, and green onions, then pour in the sauce. Let it simmer for 2–3 minutes until the sauce thickens and coats the chicken beautifully. Watch closely—this part goes fast!
Step 4: Serve Your Masterpiece
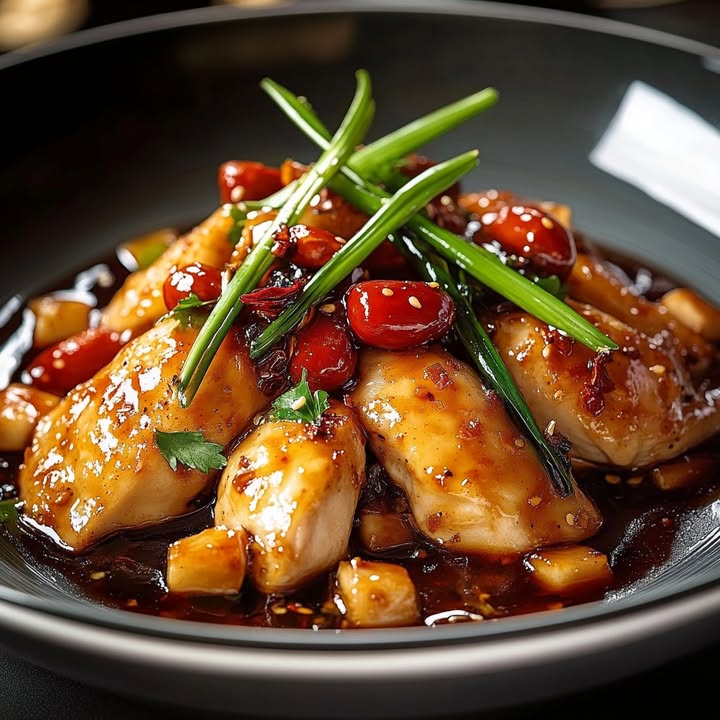
Serve the Garlic Ginger Chicken hot, garnished with cilantro or sesame seeds if desired. Pair it with steamed rice or noodles for a complete meal. The glossy sauce and colorful veggies make it look almost too good to eat—but trust me, you’ll dive right in.
Timing Breakdown
- Preparation Time: 10 minutes
- Cooking Time: 15 minutes
- Total Time: 25 minutes
Chef’s Secret
To elevate the dish, toast your sesame seeds before sprinkling them on top. It adds a nutty aroma that complements the savory sauce perfectly.
An Interesting Fact About Garlic and Ginger
Did you know garlic and ginger have been used in traditional medicine for centuries? They’re not only packed with flavor but also offer health benefits like boosting immunity and aiding digestion. So, enjoy this dish guilt-free—it’s good for your body and soul!
Necessary Equipment
- Large skillet or wok
- Tongs
- Mixing bowls
- Measuring spoons and cups
Storage Tips
Let the Garlic Ginger Chicken cool completely before storing it. Transfer leftovers to an airtight container and refrigerate for up to 3 days. Reheat gently on the stovetop or microwave, adding a splash of water to loosen the sauce. Freezing isn’t recommended, as the texture of the vegetables may change upon thawing.
If you plan to store the sauce separately, keep it in a jar in the fridge for up to a week. Simply reheat and toss with freshly cooked chicken or tofu for a quick meal.
For meal prep enthusiasts, divide the dish into individual portions and freeze without the sauce. When ready to eat, thaw overnight and reheat with fresh sauce.
Tips and Advice
- Use fresh garlic and ginger for the best flavor.
- Don’t overcrowd the skillet when frying the chicken; cook in batches for crispier results.
- Taste the sauce before adding it to the pan—you can adjust the seasoning to suit your preferences.
Presentation Ideas
- Garnish with chopped cilantro or scallions for a pop of color.
- Serve in a shallow bowl with steamed jasmine rice arranged neatly alongside.
- Drizzle a bit of extra sesame oil on top for shine.
Healthier Alternatives
Looking to lighten up this dish? Here are six variations:
- Low-Sodium Version: Use low-sodium soy sauce and reduce the amount of salt.
- Vegan Option: Replace chicken with tofu or tempeh.
- Gluten-Free Twist: Swap regular soy sauce with tamari.
- Less Oil: Bake the chicken instead of frying it.
- Spice Lover’s Delight: Add more sriracha or red pepper flakes.
- Vegetable-Packed: Include broccoli, snap peas, or mushrooms.
Mistake 1: Overcrowding the Pan
Cooking too much chicken at once causes it to steam rather than fry, resulting in soggy, unappetizing bites. To avoid this, work in small batches and give each piece space to breathe. Pro tip: Pat the chicken dry before frying to ensure maximum crispiness.
Mistake 2: Skipping the Sauce Thickener
Without cornstarch, the sauce won’t thicken properly and may end up watery. Always mix cornstarch with water before adding it to the pan for a smooth, glossy finish.
Mistake 3: Burning the Garlic and Ginger
Garlic and ginger burn quickly, turning bitter and ruining the dish. Sauté them briefly—just 30 seconds—and keep the heat medium-low.
FAQ
Can I use chicken breast instead of thighs?
Absolutely! Chicken breast works fine, but thighs are juicier and more flavorful. If using breast, avoid overcooking to prevent dryness.
Is this dish spicy?
It has a mild kick from the sriracha, but you can adjust the spice level to your liking. Omit the sriracha entirely for a milder version.
Can I make this ahead of time?
Yes, prepare the components separately and assemble before serving. Store the sauce and chicken in the fridge for up to 3 days.
What sides pair well with this dish?
Steamed rice, fried rice, or lo mein noodles complement the flavors beautifully. A side of stir-fried greens like bok choy is also a great choice.
Can I freeze this dish?
Freezing isn’t ideal due to the texture changes in the vegetables. However, you can freeze the cooked chicken alone and add fresh sauce later.
How do I reheat leftovers?
Reheat gently on the stovetop or in the microwave, adding a splash of water to loosen the sauce. Avoid high heat to preserve the flavors.
What if I don’t have sesame oil?
You can omit it, but sesame oil adds a distinct nutty flavor. Substitute with a neutral oil like vegetable or canola.
Can I double the recipe?
Definitely! Just make sure your pan is large enough to accommodate the increased quantity. Adjust cooking times slightly if needed.
What other proteins can I use?
Try shrimp, beef strips, or tofu for a different twist. Each option pairs wonderfully with the garlic-ginger sauce.
How do I know when the sauce is ready?
The sauce should coat the back of a spoon and cling to the chicken. If it’s too thin, simmer a bit longer; if too thick, add a splash of water.
Final Thoughts
This Garlic Ginger Chicken recipe is a celebration of bold flavors, vibrant colors, and simple techniques. Whether you’re cooking for yourself or entertaining guests, it’s a dish that promises satisfaction and smiles. So grab your skillet, channel your inner chef, and let this recipe transport you straight to Beijing—one delicious bite at a time!
Garlic Ginger Chicken
Ingredients
Equipment
Method
- Mix all the sauce ingredients in a bowl.
- Cut the chicken into bite-sized pieces and toss with dark soy sauce and cornstarch.
- Let the chicken marinate for 15–20 minutes.
- Heat the oil in a large skillet over medium heat.
- Fry the chicken in batches, about 2–3 minutes per side, until golden and crispy.
- Remove the chicken and drain excess oil, leaving just one tablespoon in the pan.
- Sauté the garlic and ginger in the same skillet for 30 seconds until fragrant.
- Add the cooked chicken, red bell pepper, and green onions to the skillet.
- Pour in the sauce and let it simmer for 2–3 minutes until thickened.
- Serve the Garlic Ginger Chicken hot, garnished as desired.