Why Garlic Herb Grilled Shrimp is a Game-Changer for Your Next Meal
Picture this: a warm summer evening, the smell of charred seafood wafting through the air, and a plate of plump shrimp glistening with garlic butter. That’s exactly what happened when I first made Garlic Herb Grilled Shrimp. It was love at first bite! This dish is so simple yet delivers restaurant-quality flavor. If you’ve never tried it, you’re in for a treat. Trust me, once you taste these juicy, garlicky shrimp, they’ll become a staple in your kitchen.
A Little History Behind Garlic Herb Grilled Shrimp
This recipe has roots in Mediterranean and coastal cuisines, where fresh seafood meets bold flavors like garlic, herbs, and citrus. Traditionally, fishermen would grill their daily catch with whatever ingredients were on hand—often olive oil, garlic, and parsley. Modern versions have added butter to the mix, giving the dish an extra layer of richness. When I tested this recipe for my family BBQ last summer, everyone raved about how the flavors popped. It’s proof that sometimes the simplest dishes are the most memorable!
Why You’ll Love This Recipe
What makes Garlic Herb Grilled Shrimp irresistible? First, it’s quick—ready in under 20 minutes. Second, the combination of garlic, butter, and fresh parsley creates a mouthwatering aroma that will make your stomach growl. And finally, it’s versatile. Serve it as an appetizer, main course, or even a topping for salads and pasta. Plus, it’s a crowd-pleaser that works for both casual dinners and fancy gatherings.
Perfect Occasions to Make Garlic Herb Grilled Shrimp
This dish shines during summer cookouts, but it’s also perfect for date nights, holiday parties, or cozy weeknight meals. Imagine serving it alongside chilled white wine at a beachside dinner or pairing it with grilled veggies for a healthy weekday option. Whether you’re hosting friends or cooking for yourself, this recipe fits any occasion like a glove.
Ingredients You’ll Need
- 12 large shrimp (or jumbo prawns), cleaned but with heads and shells kept for extra flavor
- 100g softened butter
- 4 cloves of garlic, finely chopped
- 1 small bunch of fresh parsley, chopped
- Juice from half a lemon
- Salt and pepper, to taste
- A drizzle of olive oil
- Lemon slices for serving
Substitution Options
If you can’t find fresh parsley, substitute cilantro or basil. For dairy-free diets, swap the butter with olive oil or plant-based margarine. Lime juice works just as well as lemon if you’re out of lemons. And while jumbo shrimp are ideal, medium-sized ones will do in a pinch.
Step 1: Preparing the Shrimp
Start by cleaning your shrimp. Gently remove the vein running along the back using a paring knife or deveiner tool. Keep the heads and shells intact because they add incredible depth of flavor during grilling. Rinse them under cold water and pat dry with paper towels. Pro tip: Drying the shrimp thoroughly ensures they sear beautifully instead of steaming on the grill.
Step 2: Making the Garlic Butter Mixture
In a bowl, mix the softened butter with minced garlic, chopped parsley, lemon juice, salt, and pepper. Mash everything together until smooth and fragrant. The vibrant green parsley against the creamy yellow butter looks almost too pretty to eat—but don’t worry, we’ll get there soon! This mixture is the heart of the dish, so take your time blending the flavors.
Step 3: Heating Up Your Grill
Preheat your grill or stovetop grill pan over medium-high heat. Brush the surface lightly with olive oil to prevent sticking. If you’re using a charcoal grill, wait until the coals turn ash-white for optimal temperature. A hot grill gives the shrimp those beautiful char marks and locks in their juiciness.
Step 4: Grilling the Shrimp
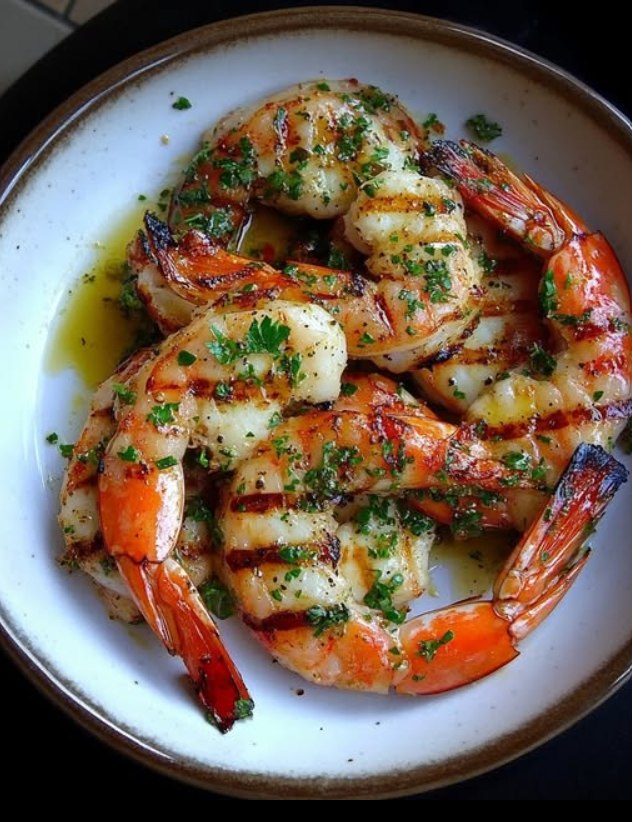
Brush each shrimp generously with the garlic butter mixture before placing them on the grill. Cook for about 3-4 minutes per side, flipping carefully with tongs. They should turn pink and opaque with slightly crispy edges. Be careful not to overcook; shrimp go from tender to rubbery quickly. Pro tip: Use a timer to avoid distractions.
Step 5: Serving Your Masterpiece
Transfer the grilled shrimp to a serving platter and drizzle any remaining melted garlic butter over the top. Garnish with fresh lemon wedges for a pop of color and acidity. Serve immediately while they’re still sizzling. Watching people dig into this dish is one of life’s greatest joys!
Chef’s Tip
For an extra burst of flavor, let the shrimp marinate in the garlic butter mixture for 15-20 minutes before grilling. This step infuses every bite with savory goodness. Just don’t leave them too long, or the acid from the lemon juice might start “cooking” the shrimp ceviche-style.
Timing Breakdown
- Prep Time: 10 minutes
- Cooking Time: 8-10 minutes
- Total Time: Approximately 20 minutes
Extra Info
Did you know shrimp are one of the fastest-cooking proteins? Their delicate texture means they require precision, but the payoff is worth it. Also, leaving the shells on isn’t just for flavor—it helps protect the meat from drying out during cooking.
Necessary Equipment
- Grill or grill pan
- Tongs
- Paring knife or deveiner tool
- Mixing bowls
- Basting brush
Storage Tips
Leftovers? Lucky you! Store cooked shrimp in an airtight container in the fridge for up to two days. Reheat gently in a skillet with a splash of butter to keep them moist. Avoid microwaving, which can make them tough.
If freezing, place the shrimp in a single layer on a baking sheet, freeze until solid, then transfer to a freezer bag. They’ll stay good for up to three months. Thaw overnight in the fridge before reheating.
Never refreeze thawed shrimp, as this compromises texture and safety. Always aim to use leftovers within a reasonable timeframe.
Tips and Advice
To elevate your dish, serve it with crusty bread to soak up all that garlicky butter sauce. Pair it with a crisp salad or roasted vegetables for balance. And remember, fresh ingredients always shine brighter than dried substitutes.
Presentation Ideas
- Serve on a wooden plank for rustic charm.
- Garnish with extra parsley sprigs for freshness.
- Add colorful bell peppers or cherry tomatoes around the plate.
Healthier Alternatives
Looking to lighten things up? Here are six variations:
- Low-Fat Version: Swap butter with Greek yogurt mixed with garlic and herbs.
- Keto-Friendly: Skip the carbs entirely and serve with zucchini noodles.
- Vegan Option: Replace shrimp with king oyster mushrooms for a meaty texture.
- Spicy Twist: Add red chili flakes or sriracha to the butter mixture.
- Herb Swap: Try dill or chives instead of parsley.
- Gluten-Free: Ensure all seasonings and accompaniments are certified gluten-free.
Mistake 1: Overcrowding the Grill
Cramming too many shrimp onto the grill prevents proper caramelization. Spread them out evenly to allow airflow and even cooking. Pro tip: Cook in batches if needed.
Mistake 2: Skipping the Pat Dry
Wet shrimp steam instead of sear, resulting in mushy textures. Always pat them dry before seasoning.
Mistake 3: Overcooking
Shrimp cook lightning-fast. Pull them off the heat as soon as they turn opaque. Remember, residual heat continues cooking them after removal.
Mistake 4: Using Old Herbs
Fresh herbs make a world of difference. If your parsley looks sad, consider swapping it for another fresh herb or skipping it altogether.
Mistake 5: Ignoring Resting Time
Letting the shrimp rest briefly after grilling allows juices to redistribute. Rushing to serve can lead to uneven flavors.
FAQ: Can I Use Frozen Shrimp?
Yes, but thaw them completely first. Place frozen shrimp in the fridge overnight or run them under cold water for quicker results. Never toss frozen shrimp directly onto the grill.
FAQ: What’s the Best Side Dish?
Grilled veggies, quinoa salad, or garlic bread pair wonderfully. Anything light complements the rich shrimp without overpowering.
FAQ: How Do I Know When Shrimp Are Done?
They’re done when they turn pink, curl into a C-shape, and feel firm to the touch. Avoid waiting for tight O-shapes, as that indicates overcooking.
FAQ: Can I Bake Instead of Grill?
Absolutely! Arrange shrimp on a parchment-lined tray and bake at 400°F for 8-10 minutes. Baste with butter halfway through.
FAQ: Why Does My Butter Separate?
High heat causes butter to separate. Keep temperatures moderate and stir frequently to maintain emulsion.
FAQ: Is Lemon Juice Essential?
While optional, lemon adds brightness that balances the richness of butter and garlic. Lime or vinegar works too.
FAQ: Can I Prep Ahead?
Yes, prepare the butter mixture and clean shrimp a day in advance. Store separately in the fridge.
FAQ: Should I Remove Shells Before Eating?
It depends. Leaving shells on enhances flavor, but removing them makes eating easier. Decide based on your audience.
FAQ: Can Kids Enjoy This Dish?
Of course! Just skip spicy additions and ensure no shellfish allergies exist.
FAQ: What Wine Pairs Well?
A crisp Sauvignon Blanc or Chardonnay complements the dish perfectly. For non-alcoholic options, try sparkling water with lemon.
There you have it—a complete guide to mastering Garlic Herb Grilled Shrimp. With its bold flavors, ease of preparation, and versatility, this dish deserves a spot in your culinary repertoire. So fire up that grill and treat yourself to something truly special. Bon appétit!
Garlic Herb Grilled Shrimp
Ingredients
Equipment
Method
- Clean the shrimp, removing the vein along the back while keeping the heads and shells intact.
- Rinse the shrimp under cold water and pat dry with paper towels.
- In a bowl, mix the softened butter with minced garlic, chopped parsley, lemon juice, salt, and pepper until smooth.
- Preheat your grill or stovetop grill pan over medium-high heat and brush with olive oil.
- Brush each shrimp generously with the garlic butter mixture and place them on the grill.
- Cook for about 3-4 minutes per side, flipping carefully with tongs until pink and opaque.
- Transfer the grilled shrimp to a serving platter and drizzle any remaining melted garlic butter over the top.
- Garnish with fresh lemon wedges and serve immediately.