Okay, let’s be real. The “quick pizza night” dream often crashes into the “who has time to make dough?” reality. I was facing exactly that panic. My former coworkers are coming over this week for a big reunion, and I promised homemade pizza. But I also promised myself no last-minute chaos. The solution? My freezer, and this brilliant pizza dough. Making a big batch now means I can have fresh, incredible pizza on demand, with zero fuss on the day. It’s my secret weapon for effortless hosting, and today, I’m sharing it with you.
The Story Behind My Freezer-Friendly Pizza Dough
This recipe, affectionately called “Bim’s Dough” in my kitchen, has a funny origin. My friend Bim, who is an absolute sourdough wizard, gifted me some starter last year. I was terrified of killing it! To conquer my fear, I started experimenting. Traditional Neapolitan dough is amazing, but it needs precise timing. I wanted something more forgiving for my busy life. I played with Bim’s starter, added a touch of olive oil and lard for flexibility and flavor, and nailed a dough that not only tastes fantastic but freezes like a dream. Now, “Bim’s Dough” is what I make for every gathering, turning my freezer into a pizza parlor ready for action.
Why You’ll Absolutely Love This Recipe
First, the flavor from the sourdough starter is unbeatable—a slight tang, incredible depth. Second, the convenience is a game-changer. Imagine pulling a perfectly risen dough ball from your freezer, letting it thaw, and having pizza ready faster than delivery. It makes you feel like a superhero. Finally, it’s incredibly versatile. Top it with anything from classic margherita to a rich Garlic Parmesan Chicken. Having this dough on hand transforms a regular Tuesday into a special occasion.
Perfect Occasions for Your Frozen Pizza Dough
- Last-Minute Gatherings: Friend texts “What are you up to?” You reply, “Come over for pizza!”
- Busy Weeknights: No prep, no takeout guilt. A healthy, homemade meal in under 30 minutes.
- Kids’ Playdates: Let them choose their own toppings. It’s fun, interactive, and everyone eats.
- Sports Night: Better than any frozen snack. Perfect for feeding a hungry crowd watching the game.
- Potlucks: Bring the dough and a topping bar. You’ll be the most popular person there.
Ingredients for Bim’s Legendary Pizza Dough
- 1000 g Bread Flour: High-protein flour is key for that chewy, structured crust.
- 200 g Sourdough Starter: Active and bubbly! This is the flavor powerhouse.
- 750 g Water: Lukewarm, please. It wakes up the starter and helps everything blend.
- 30 g Olive Oil: Adds richness and makes the dough easier to work with.
- 30 g Lard: Don’t skip this! It creates an incredibly tender, flavorful crumb. A chef’s secret.
- 60 g Sugar: Feeds the starter and helps with browning.
- 20 g Salt: Balances all the flavors beautifully.
Easy Substitutions If You Need Them
- No Sourdough Starter? Use 7g of instant yeast mixed directly into the flour. The flavor will be different but still delicious.
- All-Purpose Flour: You can use it, but the crust will be less chewy and more crisp.
- Vegetable Shortening: Can replace the lard in a pinch, but lard is truly best for flavor.
- Honey or Maple Syrup: A one-to-one swap for the white sugar if you prefer.
Preparing Your Pizza Dough for the Freezer
Step 1: The Big Mix
In a very large bowl, combine the bread flour, sugar, and salt. Give it a quick whisk to distribute everything evenly. Make a well in the center. Pour in the lukewarm water, your bubbly sourdough starter, olive oil, and lard. Now, get your hands in there! Squish and squeeze until there are no dry patches of flour left. The dough will be shaggy and sticky—that’s exactly right. Embrace the mess. Pro tip: Wetting your hands slightly can prevent the dough from sticking to you too much.
Step 2: The Stretch and Fold Routine
Cover the bowl with a damp towel or plastic wrap. Set a timer for 20 minutes. When it dings, wet your hand, reach under one side of the dough, stretch it up, and fold it over the top. Turn the bowl a quarter turn and repeat. Do this 4-6 times around. You’ll feel the dough transform from a loose blob to a smoother, more cohesive ball. This gentle technique builds strength without hard kneading. Repeat this set every 20 minutes for about 2 hours total.
Step 3: The First Proof
After your last set of stretches, cover the bowl tightly. Let the dough rest and rise at room temperature (around 25°C/77°F is ideal) for another 2 hours. You’ll know it’s ready when it looks puffy, airy, and has nearly doubled. It should feel alive and jiggly when you shake the bowl.
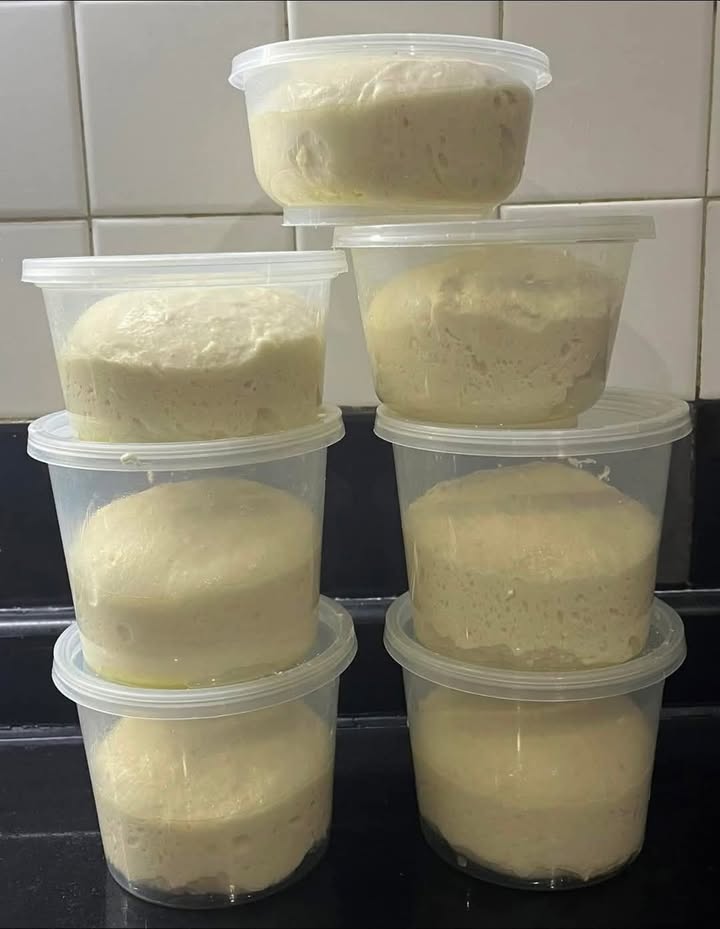
Step 4: Portioning and Prepping for the Freezer
Lightly flour your work surface. Gently dump the dough out—you don’t want to deflate it completely. Using a bench scraper or sharp knife, divide it into 280-300 gram pieces. This makes perfect personal-sized pizzas. Shape each piece into a tight ball by tucking the edges underneath. Get small, round plastic containers with lids. Brush the inside of each container generously with olive oil. Place one dough ball inside, swirl it around to coat it in oil, then pop the lid on. Chef’s tip: The oil coating prevents freezer burn and makes the thawed dough incredibly easy to handle.
Step 5: Into the Deep Freeze
Label your containers with the date. Straight into the freezer they go! The dough will freeze slowly, preserving its beautiful structure. It will keep happily for up to 2 months. That’s two months of spontaneous pizza possibilities at your fingertips.
Timeline: From Mixing to Freezer
- Active Prep Time: 30 minutes (mixing and portioning)
- Stretch & Fold Time: 2 hours (hands-on time is only a few minutes every 20)
- First Proof Time: 2 hours
- Total Time to Freezer: About 4.5 hours, mostly hands-off.
- Freezer Life: Up to 2 months.
My Freezer Thawing Secret
Here’s my foolproof method: The night before pizza night, move the frozen dough container from the freezer to the refrigerator. It will thaw slowly and even do a little secondary rise. About 2 hours before baking, take it out of the fridge to come fully to room temperature. It will be soft, supple, and ready to stretch.
A Fun Fact About Sourdough
That sourdough starter isn’t just for flavor. It’s a natural preservative! The acids produced by the wild yeast and bacteria actually help the dough stay fresher longer and improve its freeze-thaw stability. So, you’re not just making tasty dough; you’re making *smart* dough.
Necessary Equipment
- A very large mixing bowl
- Kitchen scale (for accuracy)
- Bench scraper or sharp knife
- Small, round plastic containers with airtight lids (about 16-20 oz size works great)
- Pastry brush (for the oil)
How to Store Your Pizza Dough Masterpieces
Freezing is Key: This recipe is designed specifically for the freezer. The oiled, sealed containers are the perfect environment. They prevent ice crystals from forming and protect the dough’s texture. Always write the date on the lid so you can use the oldest dough first.
Refrigerator Short-Term Hold: If you plan to use the dough within 2-3 days, you can skip the freezer. After portioning and oiling, just put the containers directly in the fridge. The dough will slowly ferment, developing even more flavor.
After Thawing: Once thawed, use the dough within 24 hours. Do not refreeze it, as this will damage the yeast structure and make the crust tough.
Top Tips for Pizza Perfection
- Let your frozen dough thaw slowly in the fridge. Rushing it on the counter can make it sticky.
- When stretching, use your fingertips to press from the center out, leaving a thicker rim for the crust. Don’t use a rolling pin!
- Preheat your oven and your pizza stone or steel for a full hour on the highest setting. A blazing hot surface is what gives you that professional blister and lift.
- Less is more with toppings. Overloading a pizza makes the center soggy.
Presenting Your Homemade Pizza
- Set up a “Pizza Bar” with small bowls of toppings: shredded mozzarella, fresh basil, pepperoni, cooked sausage, mushrooms, and a bowl of our star—shredded Garlic Parmesan Chicken.
- Finish with a flourish! After baking, drizzle with high-quality olive oil or a swirl of spicy honey.
- Use scissors to cut fresh herbs like basil or parsley over the hot pizza for a vibrant, aromatic finish.
- Serve on a large wooden board in the middle of the table for a rustic, shareable feel.
Six Fantastic Recipe Variations to Try
- Whole Wheat Blend: Substitute 300g of the bread flour with whole wheat flour for a nuttier, heartier crust with extra fiber.
- Herb-Infused Dough: Add 2 tablespoons of dried Italian herbs (oregano, basil, thyme) to the dry ingredients for a fragrant base perfect for vegetable toppings.
- Everything Bagel Dough: After the final proof, roll the dough balls in an “Everything Bagel” seasoning mix before freezing. Makes an incredible crust for breakfast pizza.
- Garlic Knot Dough: Use this same dough to make garlic knots! Thaw, divide into small pieces, tie into knots, let rise, bake, and brush with garlic butter.
- Sweet Dessert Pizza Base: Increase the sugar to 100g. Top after baking with Nutella, fruit, and powdered sugar or mascarpone and berries.
- Flatbread Style: Roll or stretch the thawed dough very thin. Bake until crisp. Perfect for dipping or topping with hummus and Greek salad.
Common Mistakes to Avoid
Mistake 1: Using Cold Starter or Water
If your sourdough starter and water are straight from the fridge, they will put the yeast to sleep. This leads to a dough that takes forever to rise, or doesn’t rise at all. Always use your starter when it’s active and bubbly, and use lukewarm water (about 85-90°F). This wakes everything up and gets the fermentation party started right away.
Mistake 2: Rushing the Stretch and Folds
It’s tempting to do all the stretches at once, but the 20-minute rests are crucial. This “autolyse” period lets the flour fully hydrate and the gluten strands relax and reorganize. Skipping the rests gives you a dough that’s hard to stretch and might tear. Set that timer and be patient—it’s mostly waiting time anyway!
Mistake 3: Not Oiling the Storage Container Enough
A light brush of oil isn’t enough. You need to generously coat the entire inside of the container and swirl the dough ball in it. This creates a barrier that locks in moisture. If you skimp, the dough’s surface will dry out in the freezer, forming a tough skin that’s hard to work with later. Be generous with that olive oil!
Mistake 4: Thawing the Dough Too Quickly
Placing a frozen dough ball directly on the counter seems faster, but it thaws unevenly. The outside becomes warm and sticky while the inside is still an ice block. This ruins the texture. The best method is the slow thaw in the fridge overnight, followed by a couple of hours at room temperature. Your dough will be perfectly even and easy to handle.
Your Pizza Dough Questions, Answered
Can I use instant yeast instead of sourdough starter?
Absolutely! You can substitute the 200g of sourdough starter with 7g (about 2 ¼ teaspoons) of instant yeast. Add it directly to the dry flour. You’ll also want to reduce the water by about 50g, as starter adds hydration. The flavor will be more straightforwardly “yeasty” rather than tangy, but it will still be a fantastic, reliable dough that freezes beautifully.
What’s the purpose of the lard in the recipe?
Lard is a magic ingredient for texture. It creates a more tender, flakier crust compared to using only olive oil. It also adds a very subtle, rich flavor that tastes wonderfully authentic. If you’re hesitant, just try it once. It makes a noticeable difference in creating a professional-quality crust that’s not tough or chewy in a bad way.
My dough is too sticky to handle after mixing. Did I do something wrong?
No, you’re likely right on track! This is a higher-hydration dough, which means it’s intentionally sticky. A wet dough leads to those beautiful, airy bubbles in the baked crust. Resist the urge to add more flour during mixing. The stretch-and-fold process and the oil coating before freezing will make it much more manageable. Trust the process and wet your hands when handling it.
How do I know if my sourdough starter is active enough to use?
Feed your starter 4-12 hours before you plan to make the dough. It’s ready when it’s at least doubled in size, looks bubbly and frothy on top, and passes the “float test.” Drop a small spoonful into a glass of water. If it floats, it’s filled with gas and ready to leaven your dough. If it sinks, it needs more time to eat and get active.
Can I freeze the dough after it has risen once, or do I have to portion it first?
You must portion it first! Freezing the dough as one big mass is a recipe for disaster. It would take forever to thaw and be impossible to shape evenly. Portioning it into individual pizza balls before freezing is non-negotiable. It gives you portion control and ensures quick, even thawing when you’re ready for pizza night.
What’s the best way to stretch my thawed dough without tearing it?
Gently does it! Start by pressing the dough ball into a thick disk in the center of your floured surface. Then, use the pads of your fingers to press from the center outward, leaving a thicker rim for the crust. Pick it up and let gravity help. Drape the dough over your knuckles and gently stretch it by rotating it like a steering wheel. Never use a rolling pin, as it pushes all the precious air bubbles out.
Can I use this dough to make something other than pizza?
Yes, this dough is incredibly versatile! You can use it for calzones, stuffed breadsticks, or focaccia. For focaccia, press the thawed dough into an oiled pan, dimple it with your fingers, add toppings like rosemary and sea salt, let it rise, and bake. The sourdough flavor makes an outstanding focaccia that’s perfect for sandwiches or dipping.
My baked crust is too hard. What happened?
A hard crust usually means one of two things: your oven wasn’t hot enough, or you baked it for too long. Pizza needs intense, fast heat. Ensure your oven is preheated to its absolute maximum temperature (often 500°F-550°F) with a pizza stone or steel inside for at least an hour. The pizza should bake in 5-10 minutes, resulting in a crisp-yet-chewy crust, not a hard one.
Is it okay to add toppings before baking a frozen dough?
No, never top a frozen dough. Always thaw it completely first. If you put toppings on frozen dough, the toppings will burn long before the dough cooks through. The slow, even thaw in the fridge is essential to get the dough to a state where it can bake quickly and evenly with its toppings.
I don’t have a pizza stone. What can I use instead?
No problem! A heavy, upside-down baking sheet or cast-iron skillet preheated in the oven works well. You can also bake the pizza directly on a parchment-lined sheet pan. Preheat the pan if you can. While you won’t get the exact same bottom crust as with a stone, you’ll still get a delicious homemade pizza. The key is getting whatever surface you use as hot as possible.
So there you have it—my not-so-secret weapon for stress-free entertaining and easy weeknight wins. This freezer-friendly pizza dough has saved me more times than I can count, and it’s about to do the same for you. Just think of the joy of telling your friends, “Sure, we can have homemade pizza!” and knowing it’s already done. Whip up a batch of Bim’s dough this weekend, stash it away, and get ready for your own pizza party. My coworker reunion is going to be a breeze, and yours can be too. Now, who’s ready to bake?
Garlic Parmesan Chicken
Ingredients
Equipment
Method
- In a large bowl, combine the bread flour, sugar, and salt, whisking to distribute evenly.
- Make a well in the center and add lukewarm water, sourdough starter, olive oil, and lard.
- Mix with hands until no dry flour remains; the dough will be shaggy and sticky.
- Cover the bowl and set a timer for 20 minutes, then perform the stretch and fold technique.
- Cover and let the dough rise at room temperature for 2 hours until puffy and airy.
- Lightly flour a surface, dump the dough out gently, and divide it into 280-300 gram pieces.
- Shape each piece into a tight ball and place in oiled plastic containers, sealing them.
- Label and freeze the containers.