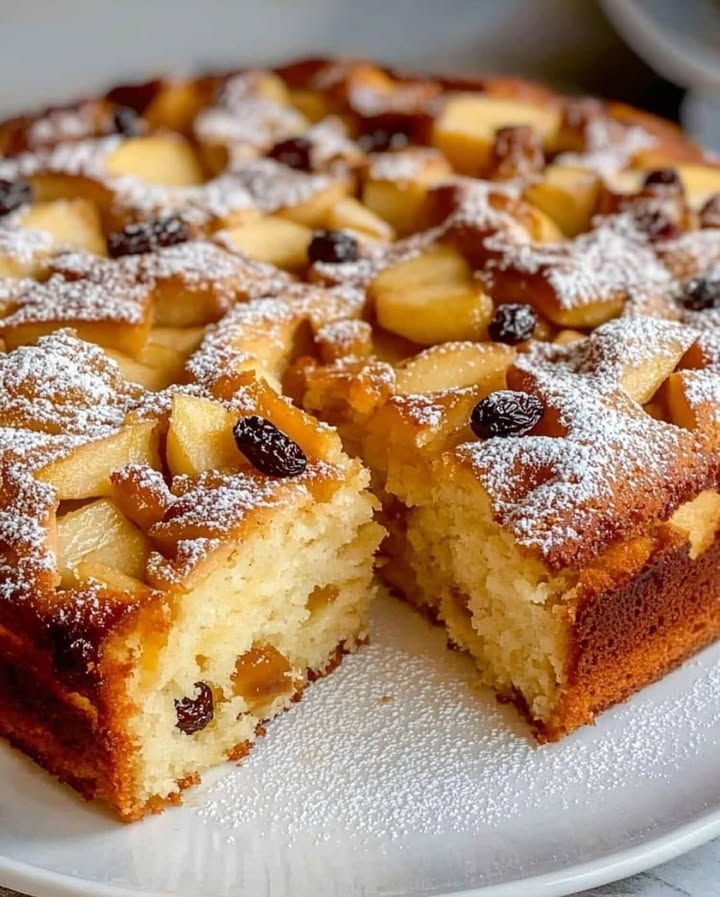
Apple Pie That Melts In Your Mouth: Your New Family Favorite
Oh, the smell of warm apples and buttery pastry! It hits you right in the heart. It is pure cozy joy. I remember my grandma’s apple pie. It was the star of every family gathering. My version is a bit simpler and quicker, perfect for busy days. It is a forgiving recipe. I tested this apple pie on a hectic Tuesday afternoon. My kids were asking for a treat. The result was magical. The pie was tender, juicy, and absolutely delicious. It quickly became our new favorite. Let me share this simple joy with you.
A Slice of History: From Farmhouse to Your House
Apple pie has deep roots in American tradition. It is a symbol of home and comfort. Early colonists brought apple seeds and pie recipes across the ocean. They adapted them to new ingredients. The classic double-crust pie is iconic. My version is a simpler, single-layer cake-style pie. It captures all the warm flavors but in an easier form. It is a modern take on a timeless dessert. It respects tradition while fitting into our fast-paced lives perfectly.
Why You Will Absolutely Love This Apple Pie Recipe
You will love this recipe for three big reasons. First, the dough comes together in just 5 minutes. No chilling, no rolling, no stress! Second, the natural yogurt makes it incredibly moist. Every bite truly melts in your mouth. Third, it uses simple, everyday ingredients. You probably have most of them in your pantry right now. It is a foolproof path to a stunning dessert. Your family will ask for it again and again.
Perfect Occasions for This Melt-In-Your-Mouth Apple Pie
This apple pie shines at so many moments! It is perfect for a lazy family Sunday afternoon. Serve it warm with a cup of tea. It is a fantastic dessert for casual dinner parties. It feels homemade and special without being fussy. Bake it for a school bake sale—it will be a hit. It is also a wonderful treat during the fall. Celebrate apple season with this simple, glorious pie.
Ingredients for Your Magical Apple Pie
- 3 eggs
- 150 g of sugar (about 6 tablespoons)
- 1 teaspoon vanilla essence
- A pinch of salt
- 100 g melted butter (about 7 tablespoons)
- 100 g of natural yogurt (about 4.5 tablespoons)
- 240 g of flour (about 1.5 cups + 1 tablespoon)
- 10 g baking powder (2 teaspoons)
- 4 apples (I love using Granny Smith or Honeycrisp)
- 1 tablespoon lemon juice
- Apricot jam for decorating (about 2-3 tablespoons)
Smart Substitution Options
Don’t worry if you lack an ingredient! Here are easy swaps. For yogurt: use sour cream or even buttermilk. They add similar tang and moisture. For butter: vegetable oil works well. Use the same amount. For fresh apples: canned apple pie filling can be a shortcut. Drain it well before using. For apricot jam: any clear jam like peach or apple jelly will give that lovely shine.
Let’s Bake! The Simple Steps to Your Perfect Pie
Step 1: Prepare the Base Mix
Get your eggs, sugar, vanilla, and salt ready. Crack the eggs into a large bowl. Add the sugar. The vanilla essence brings that warm, cozy aroma. A pinch of salt balances all the sweetness. Start beating! Use a whisk or electric mixer. Beat until the mixture is pale, fluffy, and well combined. You will see it become lighter and increase in volume. This creates the foundation for a light, melting texture. Pro tip: If your eggs are cold, let them sit out for 10 minutes. Room-temperature eggs blend better and whip up more easily.
Step 2: Add the Butter and Yogurt
Now for the rich, moist ingredients! Take your melted butter. Make sure it is cooled slightly, not hot. Pour it into the egg mixture. Then add the natural yogurt. The yogurt is the secret star. It keeps the pie incredibly tender. Stir everything well until it becomes a smooth, creamy, homogeneous batter. The color will turn a lovely pale yellow. The smell is already fantastic!
Step 3: Integrate the Dry Ingredients
Time to bring structure to our batter. Sift your flour and baking powder together into another bowl. Sifting prevents lumps and aerates the flour. Add these dry ingredients to your wet mix little by little. I add about a third at a time. Beat gently after each addition. Stop when you have a smooth, lump-free batter. It will be thick but still pourable. Do not overmix! Just blend until combined.
Step 4: Prepare the Apples
Let’s work on our star fruit! Peel your apples. I find a good vegetable peeler makes this quick. Cut them into small, bite-sized cubes. The smaller pieces distribute evenly in the pie. Now, sprinkle the cubes with the tablespoon of lemon juice. Toss them gently. This magic trick stops the apples from turning brown. It also adds a hint of bright flavor that balances the sweetness.
Step 5: Assemble the Cake
Bring the dough and fruit together! Gently fold the apple cubes into the batter. Use a spatula and stir with care. You want every piece coated without crushing the apples. Then, prepare your baking pan. Grease it well with butter or a little oil. Pour the beautiful batter into the pan. For a pretty touch, place a few extra apple pieces on top. They will bake into a lovely decoration.
Step 6: Bake
The transformation happens here! Preheat your oven to 180°C (350°F). Place your pan in the oven. Bake for about 40 minutes. The wait is filled with an irresistible aroma of apples and cake. Check if it’s done by inserting a toothpick into the center. If it comes out clean, your pie is perfect! The top should be golden brown. Pro tip: If your oven tends to bake hotter on one side, rotate the pan halfway through.
Step 7: Decorate with Glitter
The final touch of shine! Once the pie is out of the oven, let it cool for just 5 minutes. Warm the apricot jam slightly to make it easier to spread. Using a pastry brush or spoon, glaze the entire top of the pie with the jam. This gives a gorgeous, glossy finish. It also adds a subtle extra layer of fruity sweetness. Your apple pie now looks and tastes professionally beautiful!
Chef’s tip: For an extra flavor boost, add a teaspoon of cinnamon or nutmeg to the dry flour mixture. It is a classic spice pairing with apples that everyone loves.
Timing Breakdown: Quick and Efficient
This recipe respects your busy schedule.
- Prep Time: 15 minutes (including apple prep)
- Cooking Time: 40 minutes
- Resting Time: 10 minutes (optional before serving)
- Total Time: About 55 minutes
You can have a stunning dessert ready in under an hour!
My Chef’s Secret for the Perfect Texture
My secret is in the yogurt. Using full-fat, natural yogurt is key. It adds moisture and a slight tang. This tang prevents the pie from being overly sweet. It also creates a tender, almost custard-like texture around the apples. This makes each bite truly melt in your mouth. Do not skip it or use a flavored yogurt. Plain is perfect.
A Little Extra Apple Pie Info
Did you know apples are one of the most symbolic fruits in baking? In America, apple pie is so loved it has its own saying: “as American as apple pie.” The variety of apple you choose changes the pie. Tart apples like Granny Smith give a bright flavor. Sweet apples like Fuji make a richer, deeper pie. Experiment with mixes! It is fun.
Necessary Equipment
You don’t need fancy tools! Here is your simple list:
- A large mixing bowl
- A whisk or electric hand mixer
- A spatula for folding
- A vegetable peeler and knife
- A 9-inch (23 cm) round baking pan or springform pan
- A pastry brush for the jam glaze (a spoon works too)
That’s all! Your kitchen basics are enough.
How to Store Your Apple Pie
If you have leftovers, store them properly to keep that moisture. First, let the pie cool completely. Then, cover it tightly with plastic wrap or aluminum foil. You can place it in a cake keeper if you have one. Store it at room temperature for up to two days. The glaze will keep it from drying out.
For longer storage, refrigeration is a good choice. Place the covered pie in the refrigerator. It will stay fresh for up to four days. The cool temperature keeps the apples and yogurt fresh. Remember, the texture is best when served slightly warm. You can reheat a slice in the microwave for 20 seconds before serving.
You can also freeze this apple pie! Wrap the whole pie or individual slices tightly in plastic wrap. Then place them in a freezer-safe bag. It can freeze for up to two months. To enjoy, thaw it at room temperature. Then warm it gently in the oven. The flavor will still be wonderful.
Tips and Advice for Success Every Time
- Apple choice: Firm apples work best. They hold their shape and give nice bites.
- Pan prep: Grease your pan well! I use butter and a little sprinkle of flour to prevent any sticking.
- Oven check: Ovens vary. Start checking at 35 minutes with the toothpick test.
- Cooling: Let the pie cool in the pan for 10 minutes before glazing. This sets the structure.
Presentation Tips to Impress Your Guests
Make your pie look as good as it tastes!
- Serve it on a beautiful cake stand.
- Add a dollop of whipped cream or vanilla ice cream on each slice.
- Dust with a little powdered sugar before glazing for a snowy effect.
- Garnish with a few thin apple slices or mint leaves on the plate.
- Cut it into neat slices with a clean, sharp knife wiped between cuts.
Simple touches make it feel extra special.
Healthier Alternative Recipe Variations
You can adapt this recipe to different dietary needs or tastes. Here are six wonderful variations.
- Gluten-Free Apple Pie: Replace the all-purpose flour with a gluten-free flour blend. Ensure it contains a binder like xanthan gum. The result is just as tender.
- Sugar-Free Apple Pie: Use a natural sugar substitute like erythritol or stevia blend. Use very sweet apples like Fuji to compensate.
- Vegan Apple Pie: Swap eggs for flax eggs (1 tbsp flaxmeal + 3 tbsp water per egg). Use plant-based yogurt and coconut oil instead of butter.
- Apple Pie with Nuts: Add a half cup of chopped walnuts or pecans to the batter. They add crunch and rich flavor.
- Spiced Apple Pie: Add 1 tsp cinnamon, ½ tsp nutmeg, and a pinch of cardamom to the flour. It is a warm, festive version.
- Individual Mini Pies: Bake the batter in muffin tins! They become personal mini apple pies. Bake for 20-25 minutes. Perfect for kids.
Common Mistakes to Avoid
Mistake 1: Not Measuring Flour Correctly
This is a very common error. People often scoop flour directly with the measuring cup. This packs the flour down. You end up with too much flour. The result is a dense, dry pie that does not melt in your mouth. Always spoon the flour lightly into the cup. Then level it off with a knife. Or better, use a kitchen scale for perfect accuracy every time.
Mistake 2: Overmixing the Batter
Once you add the flour, mixing too much is a problem. Overmixing develops the gluten in the flour. This makes the pie tough and chewy, not tender. Mix just until you see no dry flour pockets. Use a folding motion with a spatula for the last additions. Gentle mixing keeps the texture light and perfect.
Mistake 3: Using Hot Melted Butter
If you add butter that is still hot from melting, it can cook the eggs. This ruins the fluffy texture of your base mix. It can also make the batter greasy. Always let melted butter cool for a few minutes. It should be warm, not hot. Test it by touching it—it should feel comfortable, not scalding.
Mistake 4: Skipping the Lemon Juice on Apples
It seems like a small step, but it is important. Without lemon juice, apple cubes can oxidize and turn brown during prep. This does not affect taste much but looks less appealing. The brown specks in your golden pie are not pretty. Lemon juice keeps them bright and fresh. It also adds a nice flavor balance.
Mistake 5: Opening the Oven Too Early
We all want to check on our beautiful pie! But opening the oven door early in the baking process lets heat escape. This can cause the pie to sink or bake unevenly. Trust the process. Set your timer and only open the door to check after at least 35 minutes. Use the toothpick test quickly and close the door gently.
Your Apple Pie Questions Answered (FAQ)
Can I use a different type of fruit instead of apples?
Absolutely! This recipe is very flexible with fruit. You can use pears, peaches, or even berries. Just keep the total amount about the same. For softer fruits like berries, fold them in very gently at the end to avoid crushing. For peaches or pears, treat them like apples: peel and cube. The moisture and baking time should stay similar. It is a great way to use seasonal fruit.
My pie is baking but the top is getting very dark. What should I do?
If the top is browning too quickly, it might be due to your oven’s top heat. You can place a loose sheet of aluminum foil over the top of the pan. Do not wrap it tightly. Just lay it on top to shield the surface. This slows down the browning without stopping the cooking. Also, check your oven temperature with a thermometer. It might be running hotter than the setting.
Why is natural yogurt important? Can I use Greek yogurt?
Natural yogurt (plain, regular yogurt) has a specific moisture content and mild tang. Greek yogurt is thicker and has less moisture. If you use Greek yogurt, the batter might become too dense. You can use it, but consider adding a tablespoon of milk or water to loosen the batter slightly. The goal is a pourable, creamy mix. Regular yogurt is the easiest choice for the perfect melt-in-your-mouth texture.
Can I prepare this dough ahead of time and bake it later?
I do not recommend making the full batter ahead and leaving it raw. The baking powder starts working once mixed with wet ingredients. Waiting too long can make it less effective. Your pie might not rise well. However, you can prep the apples ahead. Cube them, toss with lemon juice, and keep them in a sealed container in the fridge for a few hours. Then just make the batter and combine when ready to bake.
How do I know when the pie is perfectly baked without a toothpick?
If you do not have a toothpick, use a thin knife or a skewer. Insert it into the center. It should come out with no wet batter sticking. Also, look at the edges. They should be pulling away slightly from the pan. The top will be golden brown. Another sign is the smell—it will be richly fragrant and the top will feel firm to a gentle touch.
What is the best apple variety for this recipe?
For a balanced flavor, I love using a mix. Tart apples like Granny Smith give a bright punch. Sweet apples like Honeycrisp or Fuji add deep sweetness. Using two different types creates a complex, wonderful taste. If you want a pure sweet pie, go for Fuji. For a tarter, more traditional pie, use Granny Smith. Try a mix first—you might discover your new favorite combination.
My pie sank in the middle after baking. Why did this happen?
A sunken middle often means too much moisture or underbaking. Ensure your apples are cubed, not grated. Large pieces of fruit add moisture in pockets. Too much liquid can weigh down the center. Also, make sure you bake it fully. The toothpick must come out clean. Another cause could be too much batter in a small pan. Use the recommended 9-inch pan size for this quantity.
Can I make this recipe without eggs?
Yes, you can make a vegan version as mentioned. Use flax eggs or commercial egg replacer. The texture will be slightly different but still very good. It will be more dense and moist. Ensure your other ingredients like yogurt and butter are also plant-based. Bake it as usual. It is a great option for those with egg allergies or dietary preferences.
How can I make the top glaze shinier and more professional?
The apricot jam glaze is perfect. To make it extra shiny and smooth, warm the jam gently. You can add a tiny splash of water or lemon juice to thin it. Strain it through a fine sieve if there are fruit pieces. This gives a clear, glossy syrup. Apply it with a soft pastry brush in even strokes. Let it set for a few minutes. It will look like a bakery masterpiece.
Is it possible to double this recipe for a larger crowd?
Doubling is easy! Simply double all ingredients. Use a larger baking pan, like a 9×13 inch rectangular pan. The baking time might increase slightly. Start checking at 45 minutes. Ensure your mixing bowl is big enough to handle the larger volume. Mix well so all ingredients combine properly. It is a fantastic dessert for parties and big family gatherings.
A Final Sweet Word from My Kitchen to Yours
This apple pie recipe is a little piece of happiness. It is simple, quick, and always brings smiles. I love how it turns basic ingredients into something magical. The smell fills the house with warmth. The taste brings everyone together. It is more than a dessert. It is a moment of joy. I hope you try it and share it with your loved ones. May your kitchen be filled with the wonderful aroma of baking apples. Happy baking!
Herbed Creamy Mussels
Ingredients
Equipment
Method
- Preheat your oven to 180°C (350°F).
- In a large bowl, crack the eggs and add sugar, vanilla essence, and salt. Beat until pale and fluffy.
- Pour cooled melted butter and natural yogurt into the egg mixture; stir until smooth and creamy.
- Sift flour and baking powder into a separate bowl, then gradually add to the wet mix, beating gently until combined.
- Peel apples, cut into small cubes, and sprinkle with lemon juice to prevent browning.
- Fold apple cubes into the batter gently, then pour into a greased 9-inch baking pan.
- Bake for about 40 minutes, checking doneness with a toothpick.
- Allow the pie to cool for 5 minutes, then glaze with warmed apricot jam.