The Joy of Homemade Italian Bomboloni: My Kitchen’s Happy Accident
I have a confession. The first time I tried to make bomboloni, they were… well, let’s call them doorstops. Dense, sad little pucks. But then, on a snowy Sunday, with my kids’ hopeful faces watching, I tweaked this recipe just once more. The moment that first golden puff came out of the oil, light as a cloud and dusted in snowy sugar, I knew we had magic. Now, these Italian cream-filled doughnuts are our most requested treat. They’re easier than you think, and the look of pure joy when someone takes that first creamy bite? That’s my secret ingredient.
A Taste of Sweet Italian Tradition
Bomboloni are Italy’s answer to the jelly doughnut, but oh, so much more elegant. Hailing from Tuscany, these pillowy treats are a staple at Italian cafés for breakfast or a mid-afternoon “merenda” (snack). Traditionally, they can be filled with pastry cream (“crema pasticcera”), jam, or even chocolate. While the classic is divine, I love that this recipe gives you the perfect, tender base to get creative with. My version sticks with a luscious vanilla pastry cream because, in my house, vanilla never gets old. It’s a taste of a relaxed Italian morning, right from your own kitchen.
Why This Bomboloni Recipe is a Keeper
You’ll fall in love with this recipe for so many reasons! First, the dough is incredibly forgiving. It rises into a beautiful, soft pillow that fries up with a crisp exterior and an airy, melt-in-your-mouth interior. Second, making the pastry cream from scratch sounds fancy, but it’s simple and tastes a million times better than anything from a box. Finally, it’s a total crowd-pleaser. Making fresh, warm doughnuts for friends and family creates moments of pure, sugary happiness that everyone remembers.
Perfect Occasions for a Platter of Bomboloni
These little gems turn any gathering into a celebration. I love making a big batch for weekend brunches—they pair wonderfully with strong coffee. They’re the star of any birthday breakfast or holiday morning (imagine them on Christmas day!). For a fun twist, set up a “Bomboloni Bar” at a party with different fillings and toppings for guests to customize. They’re also my secret weapon for winning over new neighbors or cheering up a friend. A box of homemade bomboloni is a gift straight from the heart.
What You’ll Need: Bomboloni Ingredients
Gather these simple ingredients. Trust me, you probably have most of them already!
For the Dough:
- 2 cups all-purpose flour
- 2 cups bread flour (for extra chew!)
- 1 packet active dry yeast (2 1/4 teaspoons)
- 1/3 cup granulated sugar
- 1/2 teaspoon salt
- 2 large eggs, beaten
- 1 teaspoon vanilla extract
- 2 oz unsalted butter, softened
- 1 cup warm milk (about 110°F)
- Oil for frying (like vegetable or canola)
- Powdered sugar for the glorious dusting
For the Pastry Cream:
- 3 egg yolks
- 1/4 cup sugar
- 1/4 cup all-purpose flour
- 1 tablespoon cornstarch
- 1 teaspoon vanilla extract
- 2 cups warm whole milk
No Bread Flour? No Problem! Substitution Ideas
Don’t let a missing ingredient stop you. Here are easy swaps:
- Bread Flour: Use all-purpose flour for all 4 cups. Your bomboloni will be slightly less chewy but still deliciously tender.
- Whole Milk: 2% milk works perfectly fine for both the dough and the cream.
- Active Dry Yeast: Instant yeast works the same. You can mix it right in with the dry ingredients—no need to proof it separately.
- Vanilla Extract: Try almond extract for a nutty flavor, or scrape the seeds from a vanilla bean into the warm milk for the cream for a truly special touch.
- Filling: Not in the mood for pastry cream? Use your favorite fruit jam, lemon curd, or even Nutella!
Let’s Make Some Magic: Step-by-Step Preparation
Step 1: Wake Up the Yeast and Make the Dough
In a large, cozy bowl, whisk together both flours, the yeast, sugar, and salt. This ensures every bite is evenly sweet and the yeast is ready to work. Create a little well in the center. Pour in the beaten eggs, vanilla, soft butter, and warm milk. The warmth is key here—it should feel like a pleasant bath temperature, not hot. Use a wooden spoon or your hands to mix everything into a shaggy, sticky dough. It will look messy, but that’s perfect! This is where the fun begins.
Step 2: The Therapeutic Knead and First Rise
Dust your counter with a little flour. Turn out the dough and start to knead. Push it away from you with the heel of your hand, then fold it back over itself. You’ll feel it transform from sticky to smooth and elastic in about 8-10 minutes. Pro tip: If it’s sticking badly, add flour a single tablespoon at a time. You want it soft, not tough. Place this beautiful ball in a lightly oiled bowl, turn it to coat, and cover it with a damp towel. Let it rise in a warm, draft-free spot until tripled. This is your chance for a coffee break!
Step 3: Shape Your Little Clouds
Once your dough is big and puffy (poke it—the indent should stay), gently punch it down. Roll it out on a floured surface to about 1/2-inch thickness. Use a 3-inch round cutter (or a clean glass) to stamp out your bomboloni. Place the rounds on a parchment-lined baking sheet, cover them again, and let them get puffy for about an hour. They won’t double, but they’ll look noticeably plumper and relaxed.
Step 4: Fry to Golden Perfection
In a deep, heavy pot or fryer, heat 2-3 inches of oil to 350°F (175°C). A candy thermometer is your best friend here. Carefully add a few dough rounds at a time—don’t crowd the pot. They will sink, then blissfully float to the top. Fry for about 1-2 minutes per side until they’re a deep, golden brown. The smell is heavenly! Use a slotted spoon to transfer them to a rack or paper towels to drain. Let them cool completely before filling.
Step 5: Whisk Up the Silky Pastry Cream
While the dough rises, make the cream. In a medium bowl, whisk the egg yolks and sugar vigorously until they turn pale and thick—a ribbon should form when you lift the whisk. Whisk in the flour and cornstarch until smooth. Slowly pour in the warm milk while whisking constantly. Now, pour this mixture into a saucepan. Cook over medium-low heat, stirring non-stop with a whisk. It will thicken suddenly into a beautiful, lump-free pudding. Off the heat, stir in the vanilla. Press plastic wrap directly on the surface and chill. Pro tip: Straining the cream through a fine sieve guarantees silkiness!
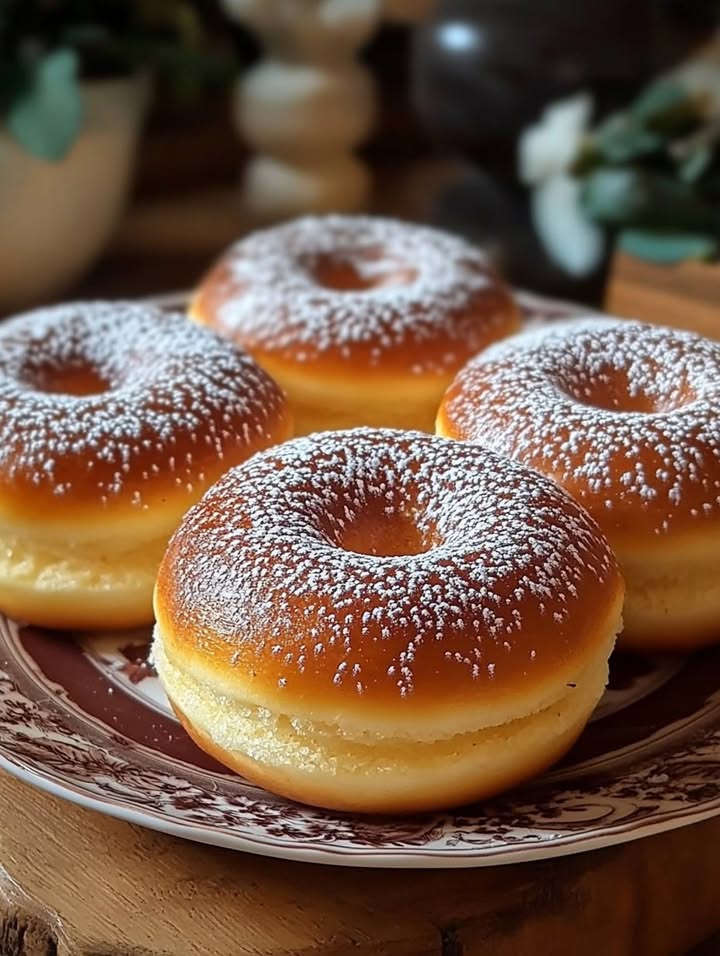
Step 6: The Grand Finale: Fill and Sugar!
Once everything is cool, fit a piping bag with a medium round tip (or a bismarck tip) and fill it with the cold pastry cream. Use a skewer or small knife to poke a hole in the side of each bomboloni. Gently insert the piping tip and squeeze until you feel the doughnut plump up slightly. Finally, roll each filled bomboloni generously in a bowl of powdered sugar. The classic look is a snowy, sugary exterior that cracks with every bite.
Chef’s tip: Fill them just before serving! If you fill them too early, the sugar can dissolve, and the doughnut can get soggy. For the best texture, I fill, sugar, and serve within an hour.
Timing is Everything
Plan a little ahead for the rising times, but the active work is a joy.
- Prep Time: 30 minutes
- Rising Time: 3-4 hours (mostly hands-off)
- Cook Time: 20 minutes (frying in batches)
- Chill Time: 2 hours for the cream
- Total Time: About 6 hours (but most of it is waiting)
My Bomboloni Secret
The secret to an unbelievably light texture is in the double-rise and the gentle fry. Letting the shaped rounds have that final, full hour to puff up is non-negotiable. It creates those airy pockets inside that are just begging to be filled with cream. Also, keep that oil temperature steady. Too hot, and they brown before cooking through. Too cool, and they’ll soak up grease.
A Fun Little Doughnut Fact
Did you know the idea of frying sweet dough is ancient? Romans fried strips of dough and coated them in honey. The modern doughnut’s hole is famously credited to a 19th-century American sea captain, Hanson Gregory, who poked out the soggy center so it would cook evenly. Our bomboloni keep their center, but we fix the “soggy” problem by injecting deliciousness straight into the heart of it!
Helpful Equipment for Bomboloni Success
You don’t need fancy gear, but these help:
- Stand mixer with a dough hook (for easy kneading)
- Digital kitchen thermometer (for oil and milk)
- Rolling pin and 3-inch round cutter
- Deep, heavy-bottomed pot or Dutch oven for frying
- Slotted spoon or spider skimmer
- Piping bag with a round or bismarck tip
- Fine-mesh sieve (for the cream)
How to Keep Your Bomboloni Fresh
Bomboloni are truly best enjoyed the day they are made, ideally within a few hours of filling. The contrast of the crisp, sugared shell and the cool, creamy center is at its peak then. Any leftovers (a rare thing in my home!) need special care.
If you have unfilled doughnuts, you can store them in an airtight container at room temperature for one day. Re-crisp them for a few seconds in an air fryer or warm oven before filling and sugaring. The texture won’t be quite as perfect, but they’ll still be tasty.
For filled bomboloni, they must be stored in a single layer in the refrigerator. The powdered sugar will melt, and the exterior will soften, but they’ll still be edible for a day. I don’t recommend freezing the filled ones, as the cream can separate and become watery upon thawing.
Tips and Advice from My Kitchen to Yours
- Test your yeast if you’re unsure it’s active. Mix it with the warm milk and a pinch of sugar. If it doesn’t get foamy after 10 minutes, start with new yeast.
- When frying, adjust the heat as you go. The temperature will drop when you add cold dough. Let it recover between batches.
- Don’t skip the cornstarch in the pastry cream. It stabilizes the flour and gives the cream a gorgeous, sliceable texture.
- Let the doughnuts cool on a wire rack, not on paper towels alone. This prevents the bottoms from steaming and getting soggy.
Making Them Look as Good as They Taste
Presentation is part of the fun! Dust them with powdered sugar just before serving for a fresh, snowy look. For a party, try these ideas:
- Roll some in cinnamon sugar instead of powdered sugar.
- Drizzle with melted chocolate or a simple glaze.
- Serve on a beautiful cake stand with fresh berries on the side.
- Offer different fillings in separate piping bags so guests can choose.
Healthier? Maybe. Delicious? Absolutely! Alternative Variations
Want to mix it up? Here are six fantastic ways to reinvent your bomboloni:
- Lemon Zest Delight: Add the zest of two lemons to the dough. Fill with lemon curd instead of pastry cream for a bright, tangy pop.
- Chocolate-Hazelnut Dream: Fill with pure Nutella and roll the finished bomboloni in chopped, toasted hazelnuts. A decadent treat.
- Baked, Not Fried: For a lighter version, place the shaped rounds on a baking sheet, brush with melted butter, and bake at 375°F for 12-15 minutes. They’ll be more like sweet rolls, but still yummy.
- Jam-Filled Classic: Skip the pastry cream and use a high-quality seedless raspberry or apricot jam. This is the traditional way in many parts of Italy.
- Spiced Apple Bomboloni: Add a teaspoon of cinnamon to the dough. Fill with a thick, homemade apple pie filling. Perfect for fall.
- Ricotta Cream Filling: Mix whole-milk ricotta with a little sugar, vanilla, and mini chocolate chips for a lighter, cheesecake-like filling.
Common Mistakes to Avoid for Bomboloni Bliss
Mistake 1: Killing the Yeast with Hot Liquid
This is the number one reason dough doesn’t rise. If your milk or water is too hot, it will kill the yeast, leaving you with a dense, flat dough. The liquid should feel warm to the touch, around 110°F—like a baby’s bottle, not a hot bath. When in doubt, err on the side of too cool. The rise will just be slower, which is better than no rise at all.
Mistake 2: Skipping the Second Rise After Shaping
You let the dough rise once, so why do it again? This second, shorter rise is crucial. It allows the cut dough rounds to relax and puff up. Frying them right after shaping gives you tough, dense bomboloni. Give them that full hour to get light and airy. You’ll see and feel the difference when you pick one up.
Mistake 3: Frying at the Wrong Oil Temperature
An inconsistent oil temperature is a bomboloni killer. Too cold, and the doughnuts become greasy sponges. Too hot, and they burn on the outside while staying raw inside. Use a thermometer and aim for a steady 350°F. Only fry a few at a time so the oil temperature doesn’t plummet. Adjust your burner as needed to maintain the heat.
Mistake 4: Filling Them While They’re Still Warm
I know it’s tempting to dig in right away! But if you inject cold pastry cream into a warm doughnut, the cream can melt and make the inside soggy. It can also cause the sugar coating to dissolve into a sticky mess. Patience is key. Let the fried doughnuts cool completely on a rack before you even think about the piping bag.
Mistake 5: Overworking the Dough When Kneading
Kneading develops gluten for structure, but there is a point of no return. If you add too much flour and knead for too long, your bomboloni will be tough and chewy instead of tender and light. The dough should be soft and slightly tacky, not stiff and dry. Stop kneading when it’s smooth, elastic, and passes the “windowpane test” (you can stretch a small piece thin enough to see light through it without it tearing).
Your Bomboloni Questions, Answered
Can I make the bomboloni dough ahead of time?
Yes, you absolutely can! This is a great time-saver. After the first rise, punch down the dough, wrap it tightly in plastic, and put it in the refrigerator. It can stay there for up to 24 hours. When you’re ready, take it out, let it sit at room temp for 30 minutes, then roll, cut, and proceed with the second rise. The cold retard actually develops more flavor. The pastry cream can also be made 2-3 days ahead and kept covered in the fridge.
What’s the best oil for frying bomboloni?
You want an oil with a high smoke point and a neutral flavor. My top choices are vegetable oil, canola oil, or peanut oil. Avoid olive oil as its flavor is too strong and its smoke point is too low for proper frying. Make sure you have enough oil in your pot to submerge the bomboloni by at least an inch, typically 2-3 inches deep. This allows them to float and fry evenly.
My dough didn’t rise. What went wrong?
This is usually due to one of three things: old/dead yeast, liquid that was too hot and killed the yeast, or a place that was too cold for rising. Yeast loves a warm, cozy environment. If your kitchen is chilly, create a warm spot. Place the covered bowl in an oven with just the light on, or on top of the fridge. The ideal rising temperature is between 75-85°F. Always check the expiration date on your yeast too!
Can I bake bomboloni instead of frying them?
You can bake them, but they will be a different (though still delicious) treat—more like very soft, sweet dinner rolls. Bake the shaped, risen rounds at 375°F for 12-15 minutes until golden. Brush them with melted butter as soon as they come out, then roll in sugar. They won’t have that classic crisp, fried shell or quite the same airy texture, but they are a wonderful lighter option.
How do I know when the pastry cream is done cooking?
You’ll know the pastry cream is ready when it thickens to the consistency of pudding and large bubbles start to “bloop” up to the surface. It should coat the back of a spoon heavily. Another test: draw a line through the cream on the back of the spoon with your finger. If the line holds its shape cleanly without the cream running back into it, it’s perfectly cooked. Remember to whisk constantly to prevent lumps and scorching on the bottom.
What can I do with leftover egg whites from the pastry cream?
Don’t throw them out! You have the start of another treat. Leftover egg whites are perfect for making light, crispy meringue cookies, angel food cake, or a fluffy pavlova topping. You can also add them to your morning scramble for extra protein. Store them in an airtight container in the fridge for 2-3 days or freeze them for later use.
My bomboloni are greasy. How can I fix this?
Greasy bomboloni are almost always a sign of oil that was not hot enough. The dough soaks up the oil instead of quickly sealing on the outside. To avoid this next time, ensure your oil is at a steady 350°F before adding the dough and let it come back to temperature between batches. For the ones you have now, try placing them on a fresh paper towel and popping them in a warm oven (250°F) for about 5 minutes. This can sometimes help render out a little excess grease.
Can I freeze unfilled bomboloni?
Yes, this works well! Let the fried and cooled (but unfilled) bomboloni come to room temperature. Place them in a single layer on a baking sheet to flash-freeze for an hour. Then, transfer them to a heavy-duty freezer bag, squeezing out all the air. They’ll keep for 1-2 months. To serve, thaw them at room temperature, warm them in a 300°F oven for 5-7 minutes to refresh the exterior, then fill and sugar as usual.
What’s the best way to fill them without making a mess?
A piping bag fitted with a long, narrow tip is the cleanest method. A bismarck tip is designed for this, but a simple round tip works too. Poke a hole in the side with a skewer or small knife first, then insert the tip. Squeeze gently until you see or feel the bomboloni plump up slightly. If you don’t have a piping bag, you can carefully slice a small pocket in the side and spoon the cream in, but it’s trickier to get it deep inside.
Are bomboloni the same as American jelly doughnuts?
They are similar cousins but with key differences. Traditional American jelly doughnuts (like bismarcks) often have a heartier, cake-like texture. Bomboloni dough is enriched with eggs, butter, and milk, making it richer, softer, and more bread-like. Bomboloni are also typically larger, filled with pastry cream more often than jelly, and rolled in powdered sugar rather than granulated. Both are wonderful, but bomboloni have a distinct, luxurious Italian flair.
The Sweet Reward of a Little Effort
There you have it—the path to homemade bomboloni that will make you feel like a pastry chef. Yes, they take a little time and patience. But the process is part of the joy. The smell of yeast and sugar in your kitchen, the sight of that dough rising, the shared anticipation as you fill each one… it’s an experience. And biting into that soft, creamy, sugar-dusted masterpiece you made with your own hands? That’s pure, sweet victory. Gather your ingredients, put on some music, and give it a try. Your friends, your family, and most importantly, your taste buds will thank you. Happy baking (and frying)!
Honey Garlic Shrimp
Ingredients
Equipment
Method
- In a large bowl, whisk together both flours, yeast, sugar, and salt.
- Create a well in the center and add the beaten eggs, vanilla, butter, and warm milk; mix into a shaggy dough.
- Turn the dough onto a floured surface and knead for 8-10 minutes until smooth and elastic.
- Place the dough in an oiled bowl, cover with a damp towel, and let it rise until tripled in size.
- Punch down the dough, roll it out to 1/2-inch thickness, and cut out rounds.
- Place the dough rounds on a parchment-lined baking sheet, cover, and let them puff up for an hour.
- Heat oil to 350°F (175°C) in a deep pot and fry the rounds for 1-2 minutes per side until golden brown.
- Meanwhile, make the pastry cream by whisking egg yolks and sugar until pale, then mix in flour and cornstarch.
- Gradually add warm milk while whisking, then transfer to a saucepan and cook over medium-low heat until thickened.
- Fill a piping bag with cooled pastry cream, poke holes in the bomboloni, and fill them with cream.
- Roll each filled bomboloni in powdered sugar before serving.