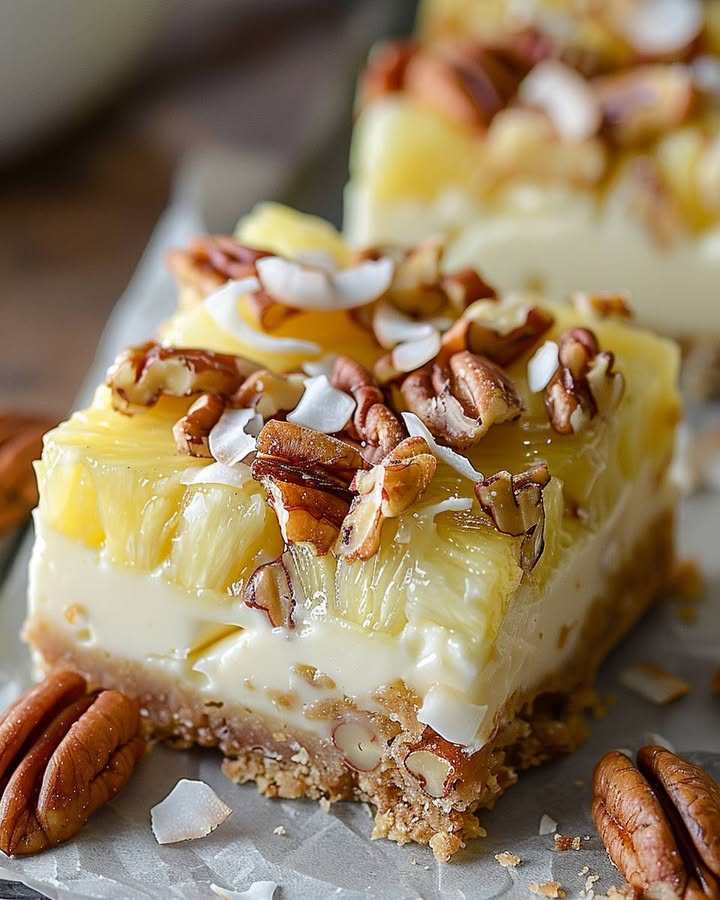
Heavenly Pineapple Coconut Pecan Cheesecake Bars: A Tropical Escape in Every Bite
Have you ever had a dessert that instantly transports you? For me, it was a bite of a tropical cheesecake years ago at a beachside cafe. I spent ages trying to recreate that feeling of sunshine and vacation at home. After many happy kitchen experiments (and a few happy taste-testers), I finally nailed it. These Heavenly Pineapple Coconut Pecan Cheesecake Bars are my beloved result. They pack all that dreamy, creamy, nutty, and fruity magic into one perfect, no-fuss square. It’s a hug for your taste buds!
The Story Behind These Tropical Cheesecake Bars
Cheesecake itself is ancient, dating back to Greece! But the tropical twist with pineapple and coconut feels distinctly American, a nod to the love for Hawaiian and Caribbean flavors. My version is the easy-going, bar cookie cousin of a formal baked cheesecake. I wanted something I could whip up for a last-minute potluck or a casual family movie night without the stress of a water bath. The graham cracker and pecan crust adds a homey, comforting touch, while the white chocolate drizzle makes it feel just a bit fancy. It’s the perfect blend of tradition and a fun, modern flavor vacation.
You’re Going to Adore This Recipe, I Promise!
Why will you fall in love with this recipe? Let me count the ways! First, the flavor combo is unbeatable. The creamy, tangy cheesecake, the sweet-tart burst of pineapple, the chewy coconut, and the rich, buttery pecans create a symphony. Second, it’s surprisingly simple. No special skills are needed, just some mixing and baking. Finally, it’s incredibly versatile. It’s equally at home on a holiday buffet as it is in a lunchbox. It’s a crowd-pleaser that looks like you spent way more effort than you actually did. That’s my kind of recipe!
When to Whip Up This Slice of Paradise
These cheesecake bars are your secret weapon for so many events! They scream summer barbecues and pool parties. They’re a bright spot at holiday gatherings during the colder months. I always make them for our annual book club meeting—they disappear fast! Consider them for:
- Potlucks and picnics (they travel so well!)
- Mother’s Day or bridal shower brunches
- A “just because” treat to brighten a weekday
- Thank-you gifts for neighbors, packed in a cute box
What You’ll Need: The Ingredients List
Gathering your ingredients is the first step to paradise! Here’s your shopping list:
For the Crust:
- 1 cup graham cracker crumbs
- 1/4 cup melted butter
- 1/4 cup chopped pecans
For the Filling:
- 16 oz (two 8-oz blocks) cream cheese, softened
- 1/2 cup granulated sugar
- 2 large eggs
- 1/2 cup crushed pineapple, thoroughly drained
- 1/4 cup shredded sweetened coconut
For the Topping:
- 1/4 cup chopped pecans
- White chocolate drizzle for garnish (about 1/4 cup chips melted)
No Problem! Handy Ingredient Substitutions
Don’t have something? No worries! Cooking should be fun, not stressful.
- Graham Cracker Crumbs: Digestive biscuits or vanilla wafer crumbs work great.
- Pecans: Walnuts or macadamia nuts would be delicious too.
- Cream Cheese: Use full-fat for best results, but reduced-fat will work in a pinch.
- Shredded Coconut: Unsweetened coconut can be used if you prefer less sweetness.
- White Chocolate Drizzle: A simple sprinkle of toasted coconut or a dusting of powdered sugar looks pretty too.
Let’s Make Some Magic: The Preparation
Alright, tie on your apron! Let’s create these heavenly bars together.
Step 1: Prepare the Crust & Preheat
First, fire up your oven to 350°F (175°C). This gives it time to get perfectly hot. While it heats, grab a medium bowl. Combine the graham cracker crumbs, melted butter, and those fragrant chopped pecans. Stir until it looks like wet sand and smells like buttery goodness. Pour this mixture into a greased 9×9-inch pan. Now, use your fingers or a flat-bottomed cup to press it down firmly and evenly. A solid crust is key so your filling doesn’t sink in! Pro tip: Greasing the bottom of your measuring cup helps it not stick when you’re pressing.
Step 2: Make the Luscious Filling
In a large bowl, beat your softened cream cheese and sugar. You want it completely smooth, with no lumps. The sound will change from gritty to creamy. Next, add your eggs one at a time. Beat well after each egg until just combined. Over-beating here can incorporate too much air. Now, for the tropical flair! Gently fold in the drained crushed pineapple and fluffy shredded coconut. The batter will turn a lovely pale yellow and smell incredible. Pour this dreamy filling over your waiting crust and spread it out evenly.
Step 3: Add Toppings and Bake to Perfection
Take your remaining 1/4 cup of chopped pecans and sprinkle them right over the top. They’ll toast beautifully in the oven, adding crunch and nutty aroma. Slide the pan into your preheated oven. Bake for 30-35 minutes. You’re looking for the edges to be lightly golden and puffed, and the center to be just set. It might still have a slight jiggle, like firm Jell-O. That’s perfect! It will firm up as it cools. Chef’s tip: An oven that’s too hot can cause cracks. Use an oven thermometer to be sure!
Step 4: Cool and Add the Final Flourish
Patience is the hardest part! Let the pan cool completely on a wire rack. Rushing this can lead to a gooey mess. Once it’s fully cool, you can lift it out using the parchment paper overhang (if you used it) for easy cutting. Melt your white chocolate slowly. Then, take a fork or a spoon and drizzle it back and forth over the bars in a pretty pattern. Let the drizzle set before you slice. Now, behold your creation!
Your Game Plan: Timing is Everything
Here’s a quick timeline so you can plan your baking adventure:
- Prep Time: 15 minutes (fun, hands-on time)
- Cooking Time: 35 minutes (time for a cup of tea!)
- Cooling/Chilling Time: At least 2 hours (crucial for clean slices)
- Total Time (inc. cooling): About 3 hours
- Kcal: Approximately 320 per serving
- Servings: 12 generous bars
A Little Chef’s Secret Just Between Us
My absolute secret for the creamiest texture? Room temperature everything. I take the cream cheese and eggs out of the fridge at least an hour before I start. This lets them blend seamlessly, preventing a lumpy filling. It also helps the batter bake more evenly. It makes a huge difference!
A Fun Slice of Food Trivia
Did you know the pineapple has been a symbol of hospitality for centuries? In colonial America, hosts would place a fresh pineapple in the center of their table when guests visited. It was a rare and expensive treat, showing a warm welcome. So when you serve these bars, you’re carrying on a sweet, welcoming tradition!
Gear You’ll Need in Your Kitchen
You don’t need fancy tools. Just gather:
- 9×9 inch baking pan
- Parchment paper (for easy lifting and clean-up)
- Mixing bowls (one medium, one large)
- Hand mixer or stand mixer (a whisk and strong arm can work too!)
- Spatula
- Measuring cups and spoons
Keeping Your Cheesecake Bars Divine: Storage Tips
These bars store beautifully, so you can make them ahead. Once cooled and drizzled, cover the pan tightly with plastic wrap or foil. You can keep them in the fridge for up to 5 days. The flavors actually get better after a day!
For longer storage, they freeze wonderfully. Cut them into bars first. Place them in a single layer on a parchment-lined baking sheet and freeze until solid. This is called “flash freezing.” Then, transfer the frozen bars to a freezer bag or airtight container. They’ll keep for 2-3 months.
When you’re ready to enjoy a frozen bar, just thaw it in the refrigerator for a few hours or on the counter for about 30 minutes. The texture will be perfect, and the white chocolate drizzle will stay lovely.
My Best Tips and Advice for Success
- Drain that pineapple well! Squeeze it in a clean kitchen towel or press it in a fine-mesh strainer. Extra liquid can make your filling runny.
- For super clean cuts, run your knife under hot water and wipe it dry between each slice.
- If you love coconut, try toasting the 1/4 cup for the topping before sprinkling it on. It adds amazing depth!
Make Them Shine: Presentation Ideas
Make your bars look extra special with these easy ideas:
- Place a small piece of fresh pineapple or a toasted coconut curl on top of each bar.
- Serve them on a platter lined with banana leaves for a true tropical vibe.
- For a party, cut them into smaller, bite-sized pieces for easy grabbing.
- Dust a tiny bit of toasted pecan dust around the plate for a restaurant-style look.
Mix It Up! Healthier & Fun Variations
Love the base recipe? Try these twists!
- Gluten-Free Delight: Use certified gluten-free graham crackers or almond flour for the crust.
- Lighter Version: Use Neufchâtel cheese (1/3 less fat), reduce sugar by 2 tbsp, and use egg whites.
- Pina Colada Bars: Add a teaspoon of rum extract to the filling for that classic cocktail flavor.
- Berry Tropical: Swap the pineapple for well-drained crushed mango or pureed strawberries.
- Chocolate Dream: Add 1/4 cup cocoa powder to the crust and use a dark chocolate drizzle.
- Lemon Coconut: Replace pineapple with 1/4 cup lemon juice and zest for a bright, tangy bar.
Common Mistakes to Avoid
Avoid these simple pitfalls for perfect bars every single time.
Mistake 1: Using Cold Cream Cheese
This is the number one cause of a lumpy filling. Cold cream cheese won’t blend smoothly with the sugar and eggs. You’ll end up with little bits of cheese throughout your batter. Always plan ahead. Take the cream cheese out of the fridge at least one hour before you start baking. It should feel soft and spreadable when you poke it.
Mistake 2: Not Draining the Pineapple Enough
That juice in the can is tasty, but it’s trouble for your cheesecake filling. Extra liquid can prevent your bars from setting properly. They might be soggy or sink in the middle. After opening the can, dump the pineapple into a fine-mesh strainer. Press down on it with the back of a spoon. For the best results, squeeze it in a handful of paper towels. It’s worth the extra minute!
Mistake 3: Over-baking the Bars
We want creamy cheesecake, not dry cheesecake! The bars continue to cook as they cool. If you bake them until the center is completely firm in the oven, they’ll be overdone. The perfect doneness is when the edges are lightly browned and puffed, but the center still has a slight wobble. Think of it like set Jell-O. It will firm up beautifully as it cools on the counter.
Mistake 4: Cutting Before Completely Cool
I know it’s tempting to dig in right away. But if you slice into warm cheesecake bars, they will fall apart. The filling needs time to set and firm up. Let the pan cool on a wire rack until it’s at room temperature. For the cleanest, most perfect squares, I often pop them in the fridge for another hour after that. Then use a sharp, warm knife to cut.
Your Questions, Answered: FAQ
Can I make these cheesecake bars ahead of time?
Absolutely! In fact, I recommend it. Making them a day ahead allows the flavors to meld perfectly and makes slicing much easier. Just bake, cool completely, cover tightly, and store in the refrigerator. Add the white chocolate drizzle right before you plan to serve them for the prettiest presentation. They will stay fresh and delicious for up to 5 days in the fridge.
What’s the best way to get clean slices?
Clean slices are all about the right tools and timing. First, make sure the bars are completely chilled. Then, take a sharp, non-serrated knife and run the blade under very hot water. Wipe it dry with a towel. Make your first cut, pressing straight down—don’t saw back and forth. Clean the knife blade (re-heat and dry it) after every cut. This method melts through the chocolate drizzle and cream cheese cleanly, giving you professional-looking bars.
Can I use fresh pineapple instead of canned?
You can, but you need to prepare it carefully. Fresh pineapple contains an enzyme called bromelain that can break down protein and prevent your filling from setting properly. It can make the texture weird. If you want to use fresh, cook the crushed pineapple in a small saucepan first. Cook it until it softens and most of the liquid evaporates. Let it cool completely before folding it into the batter. Canned crushed pineapple is already cooked, so it’s easier and more reliable.
My filling cracked on top. What did I do wrong?
Don’t worry, they’ll still taste amazing! Cracks usually happen from a few things. The oven temperature might be too high. An oven thermometer helps you check. Over-mixing the batter after adding the eggs can incorporate too much air, which then collapses. Also, cooling the bars too quickly in a drafty spot can cause cracks. To prevent this, you can place a pan of hot water on the bottom oven rack while baking to add steam. But honestly, we cover it with pecans and drizzle, so no one will ever see a little crack!
Can I freeze these pineapple coconut cheesecake bars?
Yes, they freeze very well. For the best results, freeze them before adding the white chocolate drizzle. Flash-freeze the uncut or cut bars on a parchment-lined tray until solid. Then, wrap each bar tightly in plastic wrap and place them all in a heavy-duty freezer bag. Thaw in the refrigerator overnight. Add the drizzle after they are thawed. This keeps the texture creamy and the garnish looking perfect.
Is there a way to make these without nuts?
Of course! Simply omit the pecans from both the crust and the topping. For the crust, use just the graham cracker crumbs and butter—it will still be delicious and hold together. For the topping, you could sprinkle on some extra shredded coconut instead of the pecans. Or, just leave it plain and let the pineapple coconut flavor be the star. The recipe is very flexible.
What can I use if I don’t have white chocolate?
No white chocolate? No problem. You have several tasty options. A simple dusting of powdered sugar looks elegant. A drizzle of caramel sauce would be decadent and delicious. A sprinkle of toasted sweetened coconut flakes adds great texture. Or, just leave them as is! The bars are plenty gorgeous with their golden pecan topping peeking through.
Can I double this recipe?
You sure can, and it’s a great idea for a crowd. Simply double all the ingredients. Instead of a 9×9 pan, bake it in a 9×13 inch baking dish. You will likely need to add a few more minutes to the baking time. Start checking at about 40 minutes. Look for the same visual cues: set edges, slightly jiggly center. The cooling time will also be a bit longer due to the larger volume.
Why is my crust soggy?
A soggy crust usually happens if the filling was very wet or if the bars were stored while still warm. The key is to drain the pineapple extremely well. Also, make sure the bars cool completely on a wire rack before you cover them and put them in the fridge. The rack allows air to circulate underneath the pan, which helps the bottom crust stay crisp. If you line your pan with parchment, it also helps prevent sogginess.
Are these like pineapply cheesecake bars?
Yes, they are very similar! These Heavenly Pineapple Coconut Pecan Cheesecake Bars are a specific, tropical-inspired version. The addition of shredded coconut and pecans in the crust and topping gives them extra layers of flavor and texture. The white chocolate drizzle adds a sweet, creamy finish. So, you could call them a dressed-up, supremely decadent cousin of a classic pineapple cheesecake bar. They have that same fantastic creamy and fruity base but with more going on.
Ready for a Taste of Heaven?
There you have it, my friends—my cherished recipe for a little square of tropical bliss. These Heavenly Pineapple Coconut Pecan Cheesecake Bars are more than just a dessert. They’re a mood-lifter, a party-starter, and a surefire way to make any day feel special. I love sharing them with people I care about, and I hope you do too. So, preheat that oven, grab your mixing bowl, and get ready for the compliments to roll in. Happy baking, and enjoy every single bite of paradise!
Oreo Chocolate Delights
Ingredients
Equipment
Method
- Preheat your oven to 350°F (175°C).
- In a medium bowl, combine graham cracker crumbs, melted butter, and chopped pecans. Stir until it resembles wet sand.
- Press the crumb mixture into a greased 9x9-inch pan evenly to form the crust.
- In a large bowl, beat softened cream cheese and sugar until smooth. Add eggs one at a time and mix until just combined.
- Gently fold in the drained crushed pineapple and shredded coconut into the cream cheese mixture.
- Pour the filling over the crust and spread it evenly.
- Sprinkle the remaining chopped pecans on top.
- Bake in the preheated oven for 30-35 minutes until edges are lightly golden and center is set but slightly jiggly.
- Allow the pan to cool completely on a wire rack.
- Melt white chocolate and drizzle it over the cooled bars.
- Let the drizzle set before slicing into bars.
Nutrition
Notes
Drain the pineapple well to prevent a soggy filling.
These bars can be made ahead; store in the fridge for up to 5 days or freeze for 2-3 months. Thaw before serving.
Try variations with different fruits or add rum extract for a Pina Colada flavor. Use gluten-free alternatives for the crust if needed.