Pan-Fried Apple Fritters: A Cozy, No-Fuss Treat
Let me tell you about the day I rediscovered a classic. It was a rainy Sunday, my cupboard felt bare, and I craved something sweet and warm. All I had were a few apples and the usual pantry staples. That’s when I remembered my grandma’s skillet technique. Instead of a messy deep fryer, I reached for my trusty non-stick pan. The result? Golden, fluffy Pan-Fried Apple Fritters that filled my kitchen with the scent of cinnamon and vanilla. They were so easy, so light, and my family devoured them before they even had a chance to cool. This recipe is my happy accident, and I can’t wait for you to try it.
A Little Slice of History: From Fairs to Family Kitchens
Apple fritters have roots that stretch back through time. In many cultures, frying fruit in batter was a delicious way to preserve and enjoy the harvest. You often see them as a decadent fairground treat, swimming in oil and piled high with powdered sugar. My version, the skillet apple fritter, is a modern, home-cook’s twist. It’s all about capturing that same comforting flavor without the fuss or the heavy feeling of deep frying. It takes the spirit of a traditional dessert and makes it something you can whip up on a simple weeknight, turning an ordinary moment into a little celebration.
Why You’ll Fall in Love With These Easy Apple Fritters
You’ll adore this recipe because it’s genuinely simple and incredibly rewarding. First, the smell is pure magic. Second, it’s a no-fry dessert that feels lighter and is less messy. You get all the crispy edges and tender apple centers without a vat of oil. Third, it’s versatile! Serve them for dessert with ice cream, as a special weekend breakfast, or a fancy afternoon snack. They come together in about 30 minutes, transforming simple apples into something that feels truly special and indulgent.
Perfect Occasions for Skillet Apple Fritters
These fritters are your secret weapon for making any moment feel a bit sweeter. Think of a cozy family breakfast on a chilly morning. Imagine impressing guests at a brunch with a plate of warm, sugar-dusted fritters. They are the perfect quick family-friendly dessert after a weeknight dinner. Pack them in a lunchbox (they’re great at room temperature!) for a sweet surprise. Honestly, any time you hear “What’s for something sweet?” is the right occasion for these easy fritters.
Gathering Your Ingredients
This recipe uses simple ingredients you likely already have. Here’s what you need:
- 4 apples like Golden Delicious or Pink Lady
- 120g (about 1 cup) all-purpose flour
- 1 tablespoon granulated sugar
- 1/2 packet (about 1.5 tsp) baking powder
- A pinch of salt
- 2 large eggs
- 150ml (about 2/3 cup) milk
- 1 teaspoon vanilla extract
- 1 tablespoon rum (optional)
- Butter or oil for cooking
- Powdered sugar for decoration
Smart Ingredient Swaps
Don’t have something? No worries! Here are easy swaps:
- Apples: Use any firm, sweet-tart apple you love. Granny Smith, Honeycrisp, or Fuji work beautifully.
- Milk: Any milk works—dairy, almond, oat, or soy. The batter might be a tad thicker with some alternatives.
- Rum: Skip it or use orange blossom water, a dash of apple juice, or a bit more vanilla.
- Gluten-Free: Use a 1-to-1 gluten-free flour blend for the all-purpose flour.
Your Step-by-Step Guide to Perfect Pan-Fried Apple Fritters
Step 1: Prepping the Apple Stars
Start by peeling your apples. A sharp peeler makes this quick. Then, use an apple corer to remove the core neatly. Slice the apples into rounds about 1/3-inch thick. You want them sturdy enough to hold the batter but thin enough to cook through. If you’re not cooking immediately, give the slices a quick squeeze of lemon juice. This little trick keeps them looking fresh and bright, not brown. It adds a subtle zing that plays nicely with the sweet batter too.
Step 2: Whisking Up the Dreamy Batter
Now, let’s make the magic coat. In a medium bowl, whisk together the flour, sugar, baking powder, and salt. In another bowl, crack the eggs and whisk them with the milk, vanilla, and rum if you’re using it. Pour the wet ingredients into the dry. Gently whisk until you have a smooth, slightly thick batter. A few small lumps are perfectly fine—over-mixing makes tough fritters. The batter should beautifully coat the back of a spoon. Pro tip: Let the batter rest for 5 minutes while your pan heats. This allows the flour to hydrate fully for a lighter texture.
Step 3: The Skillet Transformation
Heat a large non-stick skillet or griddle over medium heat. Add a small knob of butter or a light drizzle of oil. Dip an apple slice into the batter, let the excess drip off, and lay it gently in the hot pan. Don’t overcrowd the pan; give each fritter some breathing room. Cook for 2-3 minutes until the edges look set and the underside is a gorgeous golden brown. Flip carefully with a spatula. Cook for another 2-3 minutes until puffed and golden on the other side. The smell at this point is absolutely heavenly.
Step 4: The Grand Finale: Serving Your Fritters
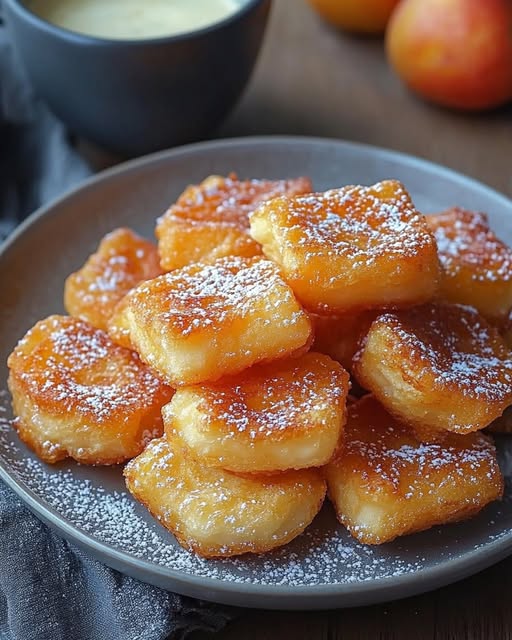
Transfer your beautiful pan-fried apple fritters to a wire rack or plate. This prevents them from getting soggy on the bottom. Just before serving, give them a generous snowy shower of powdered sugar. I like to use a small sieve for a nice, even dusting. Serve them warm! They are fantastic on their own, but a scoop of vanilla ice cream melting over the top, or a tiny drizzle of warm honey, turns them into a restaurant-worthy dessert. Chef’s tip: For extra flavor, mix a little cinnamon into your powdered sugar before dusting.
Timing is Everything
This recipe is wonderfully fast. From start to finish, you’re looking at about 30 minutes of kitchen time. Prep work takes about 15 minutes—slicing apples and making batter. Cooking takes another 15 minutes, depending on the size of your skillet. Since there’s no yeast or resting time, you can go from craving to eating in half an hour. Perfect for when a sweet tooth strikes unexpectedly!
My Secret Weapon: The Batter Rest
Here’s my little secret for the fluffiest texture: let your mixed batter sit for 5 minutes before you start cooking. This brief rest allows the flour to fully absorb the liquid and the baking powder to start activating. It makes for a more cohesive batter that puffs up beautifully around the apple slices, giving you that perfect, tender interior.
A Fun Fact About Apples
Did you know there are over 7,500 varieties of apples grown worldwide? Choosing a firm, crisp variety like Pink Lady or Golden Delicious for this recipe is key because they hold their shape beautifully during cooking. A soft apple might turn to mush, but a crisp one stays tender yet distinct inside its fluffy, golden jacket.
Equipment You’ll Need
You don’t need any fancy gadgets! Just:
- A good chef’s knife and cutting board
- Apple peeler and corer (optional, but helpful)
- Two mixing bowls and a whisk
- A large non-stick skillet or griddle
- A spatula for flipping
- A wire rack (a plate works too)
How to Store Your Apple Fritters
These fritters are truly best eaten the day they are made, right out of the pan. The crisp edges soften over time, but they’re still delicious.
If you have leftovers, let them cool completely. Store them in an airtight container at room temperature for up to one day. You can also layer them between sheets of parchment paper to prevent sticking.
To reheat, place them in a single layer on a baking sheet in a 300°F oven for 5-10 minutes until warmed through. This helps revive a bit of crispness. I do not recommend microwaving, as it will make them very soft.
Tips and Tricks for Fritter Success
- Pan Temperature is Key: If your pan is too hot, the outside will burn before the apple cooks. Too low, and they’ll absorb too much fat and become greasy. Medium heat is perfect.
- Test the Batter: Drop a tiny bit of batter into the pan. If it sizzles gently and starts to puff, your pan is ready.
- Don’t Overcrowd: Give each fritter space. This ensures even cooking and browning.
- Keep Warm: As you finish batches, keep cooked fritters warm in a 200°F oven on a wire rack-lined baking sheet.
Presentation Ideas to Wow Your Guests
A pretty plate makes everything taste better! Try stacking them in a small tower on a cake stand. Drizzle with caramel or chocolate sauce in a zigzag pattern. Serve with a dollop of whipped cream or a side of vanilla custard. For a brunch board, place them alongside fresh berries and a dusting of cinnamon.
6 Delicious Recipe Variations
Once you master the basic apple fritter recipe, have fun with these twists:
- Cinnamon-Spiced: Add 1 teaspoon of ground cinnamon to the dry flour mixture for a classic warm flavor.
- Lemon-Zested: Add the zest of one lemon to the wet ingredients for a bright, fresh twist that complements the apple.
- Whole Wheat & Honey: Substitute half the all-purpose flour with whole wheat flour and replace the sugar with 2 tablespoons of honey.
- Chocolate Chip: Fold 1/4 cup of mini chocolate chips into the batter before dipping the apples.
- Banana-Peanut Butter: Swap the apples for slices of firm banana. Add a tablespoon of powdered peanut butter to the dry ingredients.
- Savory Herb: For a completely different take, omit the sugar and vanilla. Add 1/2 cup of shredded cheese (like cheddar) and 1 tablespoon of chopped fresh herbs (like chives) to the batter. Use apple slices and serve as an appetizer.
Common Mistakes to Avoid With Pan-Fried Apple Fritters
Mistake 1: Slicing the Apples Too Thick or Thin
If your apple slices are too thick, the middle won’t cook through before the batter gets too dark. If they’re paper-thin, they might become mushy and hard to handle. Aim for that sweet spot of about 1/3-inch thickness. This gives you a satisfying bite of tender apple inside each fluffy fritter. A uniform thickness also ensures even cooking across all your fritters.
Mistake 2: Making the Batter Too Thin or Too Thick
The batter consistency is crucial. A batter that’s too runny will slide right off the apple, leaving you with a bare patch. One that’s too thick will create a doughy, uncooked layer around the fruit. You want a batter that’s smooth and coats the back of a spoon nicely. If it’s too thick, add a splash more milk. If too thin, sprinkle in a little extra flour. Remember, it’s easier to thin a thick batter than to thicken a thin one!
Mistake 3: Cooking on the Wrong Heat
This is the most common pitfall. A pan that’s not hot enough will make your fritters absorb oil and become greasy. A pan that’s too hot will scorch the outside while the apple inside remains raw. Always preheat your pan over medium heat and do a test with a tiny spoonful of batter. It should sizzle upon contact and start to bubble and set within 30 seconds. Adjust your heat as needed during cooking.
Mistake 4: Flipping the Fritters Too Soon
Patience is key! If you try to flip the fritter before the first side is properly set, the batter will tear and stick to the pan. Wait until you see bubbles forming on the surface and the edges look matte and cooked. The underside should be a consistent golden brown when you peek. A good spatula slide underneath will tell you it’s ready to flip easily.
Your Pan-Fried Apple Fritter Questions, Answered
Can I make the batter ahead of time?
I don’t recommend making the batter too far in advance. The baking powder starts working as soon as it gets wet. If you let the batter sit for more than an hour, it will lose its leavening power. Your fritters won’t puff up as nicely. The best plan is to prep your apple slices (with lemon juice) and mix your dry ingredients ahead. Then, whisk the wet ingredients and combine everything just before you’re ready to cook.
What’s the best type of apple to use for fritters?
You want an apple that’s firm and holds its shape when heated. Soft apples like Red Delicious can turn mushy. My top picks are Pink Lady, Granny Smith, Honeycrisp, or Golden Delicious. Granny Smith gives a lovely tart contrast to the sweet batter, while Golden Delicious and Pink Lady are sweeter and soften beautifully. A mix of tart and sweet can also be fantastic!
Why are my fritters soggy instead of crisp?
Sogginess usually comes from three places. First, the oil or butter in the pan wasn’t hot enough. Second, the pan was overcrowded, which lowers the temperature and steams the fritters. Third, they were stacked on a plate while hot, trapping steam. Always cook on confirmed medium heat, don’t overcrowd, and let them drain on a wire rack for a minute after cooking. This keeps the bottom crisp.
Can I bake these apple fritters instead of pan-frying?
You can try, but the texture will be different. Baking won’t give you that distinctive crispy, golden edge you get from pan-frying. If you bake, place battered apple slices on a parchment-lined baking sheet, spray lightly with oil, and bake at 400°F for 10-15 minutes, flipping halfway. They’ll be more cake-like than the classic fritter texture.
Is there a way to make these apple fritters vegan?
Absolutely! For a vegan version, use a flax egg (1 tbsp ground flax mixed with 2.5 tbsp water per egg) or commercial egg replacer. Use your favorite plant-based milk like almond or oat. Ensure your sugar is vegan-friendly (most are), and use oil instead of butter for cooking. The method stays exactly the same!
Can I use pancake mix instead of making batter from scratch?
Yes, this is a great shortcut! Use a complete “just add water” pancake mix. Prepare the mix according to the package directions for a slightly thicker batter (maybe a touch less liquid). Then, proceed with dipping and cooking the apple slices as directed. It’s a fantastic hack for an even quicker easy dessert.
My fritters are browning unevenly. What did I do wrong?
Uneven browning often means your pan’s heat isn’t even. Electric stove burners can have hot spots. Try rotating the pan halfway through cooking each batch. Also, make sure your apple slices are of uniform thickness so they cook at the same rate. Lastly, check that your batter is coating the apple evenly—a thick glob on one side will cook differently.
How can I tell when the apple inside is cooked?
The best test is the toothpick test. Insert a toothpick or a thin skewer into the apple piece through the batter. If it slides in and out with just a little resistance (like a baked potato), it’s done. The apple should be tender, not crunchy. Visual cues are golden-brown batter and a slightly puffed appearance.
What can I use if I don’t have a non-stick pan?
A well-seasoned cast iron skillet or a heavy-bottomed stainless steel pan will work. You’ll just need to be more generous with your cooking fat (butter or oil) to prevent sticking. Make sure the pan is properly heated before adding the battered apples. Let the fritters form a solid crust before attempting to flip them.
Can I freeze cooked apple fritters?
Yes, but with a note on texture. Let them cool completely. Place them in a single layer on a baking sheet to freeze solid (this is called flash-freezing). Then, transfer them to a freezer-safe bag for up to 2 months. To reheat, don’t thaw. Place frozen fritters on a baking sheet in a 350°F oven for 10-15 minutes. They will be softer than fresh but still tasty.
The Joy of a Simple, Homemade Treat
And there you have it! My foolproof guide to making incredible Pan-Fried Apple Fritters right in your own kitchen. This recipe proves you don’t need special equipment or complicated steps to create a dessert that feels like a hug. It’s about the simple joy of turning a few basic ingredients into something warm, comforting, and shared. I hope this recipe becomes a new favorite in your home, creating sweet moments and happy memories around your table. Now, go grab those apples and get cooking—your perfect, fluffy, golden-brown fritters are waiting!
Pan-Fried Apple Fritters
Ingredients
Equipment
Method
- Peel the apples, remove the cores, and slice them into 1/3-inch thick rounds.
- In a medium bowl, whisk together the flour, sugar, baking powder, and salt.
- In another bowl, whisk the eggs with the milk, vanilla extract, and rum if using.
- Pour the wet ingredients into the dry ingredients and gently whisk until smooth, with small lumps remaining.
- Let the batter rest for 5 minutes.
- Heat a large non-stick skillet over medium heat and add butter or oil.
- Dip each apple slice into the batter, allowing excess batter to drip off, and place it in the hot pan.
- Cook for 2-3 minutes until golden brown, then flip and cook for another 2-3 minutes.
- Transfer cooked fritters to a wire rack or plate and dust with powdered sugar before serving.