Say Hello to Your New Favorite Dessert: Cheesecake Stuffed Chocolate Chip Cookies
Have you ever stared at a dessert menu, torn between the gooey comfort of a chocolate chip cookie and the creamy luxury of a cheesecake? I have, and let me tell you, it’s a delicious dilemma. Then, one rainy Sunday, I decided to end the debate for good. I combined them. The result? Pure, unadulterated joy in a bite. These Cheesecake Stuffed Chocolate Chip Cookies are more than a cookie; they’re a moment. A warm, melty, sweet-and-tangy hug that makes any day feel special. My kids call them “magic cookies,” and honestly, they might just be right.
A Sweet Kitchen Mash-Up Story
This recipe isn’t from a dusty old cookbook. It’s a product of modern-day kitchen creativity, born from the trend of “stuffed” everything! Think about it: we’ve stuffed cupcakes, stuffed French toast, so why not our most beloved cookie? The classic chocolate chip cookie is an American icon, a simple pleasure. Cheesecake, with its rich history, is a decadent treat. Marrying them is a stroke of genius that feels both nostalgic and totally new. It’s the best of both dessert worlds, a fun twist that will have everyone asking, “How did you do that?”
Why You’ll Fall in Love With These Cookies
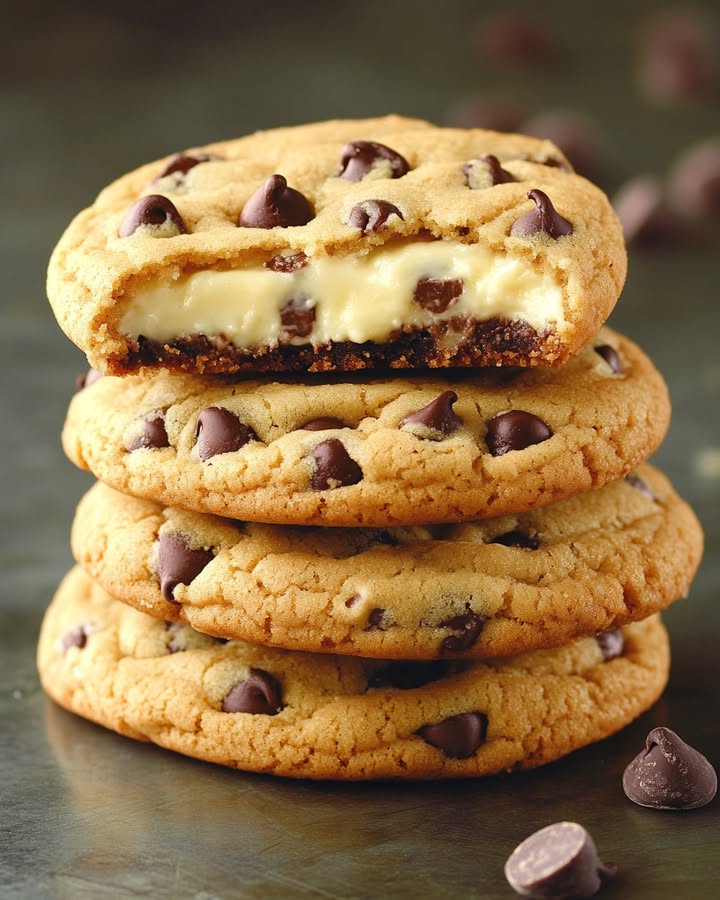
First, the texture is a dream. You get the crisp, buttery edge of a perfect cookie, giving way to a soft, chewy center that cradles a hidden pocket of cool, creamy cheesecake. Then there’s the flavor—the deep, caramel-like notes from the brown sugar cookie, the bittersweet bursts of chocolate, and the bright, tangy surprise of filling. They’re also incredibly fun to make. Assembling them feels like a little kitchen craft project. Best of all, they look and taste like you spent hours in a fancy bakery, but the process is wonderfully simple.
Perfect Occasions for a Cookie Surprise
These aren’t your everyday cookies. These are your secret weapon for special moments. Bring them to a potluck and watch them disappear first. They make a stunning and thoughtful homemade gift for birthdays or holidays. A plate of these with a glass of cold milk is the ultimate after-school surprise that will make you “Mom of the Year.” They’re also perfect for book club, girls’ night in, or just because it’s Tuesday and you deserve a spectacular treat. Anywhere you want to deliver a serious dose of happiness, these cookies are your ticket.
What You’ll Need for Your Cookie Magic
For the Cookie Dough:
- 2 cups all-purpose flour
- 1 tsp baking soda
- 1 tsp salt
- 1 cup unsalted butter, melted
- 1 cup packed brown sugar
- 1/2 cup granulated sugar
- 1 tbsp vanilla extract
- 1 large egg + 1 egg yolk
- 2 cups chocolate chips
For the Cheesecake Filling:
- 8 oz cream cheese, softened
- 1/4 cup granulated sugar
- 1 tsp vanilla extract
Easy Ingredient Swaps (No Stress!)
Out of something? No worries! This recipe is flexible. You can use salted butter; just reduce the added salt in the dough to 1/2 a teaspoon. For the chocolate, use chunks, dark chocolate, or even white chocolate chips. You can swap the all-purpose flour for a 1-to-1 gluten-free baking blend if needed. If you only have block cream cheese, that’s perfect—just be sure it’s very soft. These little changes won’t hurt our delicious goal one bit.
Baking Your Cheesecake Stuffed Chocolate Chip Cookies
Step 1: Get Your Kitchen Ready
Start by preheating your oven to 325°F (165°C). This lower temperature is key for baking these thick cookies evenly without burning the edges. Line your cookie sheets with parchment paper. This isn’t just for easy cleanup; it prevents the bottoms from browning too quickly. Get out your bowls and measuring tools now. A little organization makes the whole process smooth and enjoyable. This is your moment to set the stage for cookie greatness.
Step 2: Create the Cookie Dough Base
In a medium bowl, whisk together the flour, baking soda, and salt. See those little grains swirling together? That’s your dry team getting ready. In a large bowl, mix the melted, golden butter with both sugars. You’ll get a beautiful, glossy, caramel-colored mixture. Beat in the vanilla, the whole egg, and the extra egg yolk. That extra yolk is our secret for a super chewy texture. Gradually add the flour mixture until just combined. Finally, fold in those glorious chocolate chips until every scoop is studded with them. Pro tip: Don’t overmix once you add the flour. A few streaks are okay.
Step 3: Whip Up the Dreamy Filling
Now for the creamy heart of our cookie. In a small bowl, beat the softened cream cheese until it’s completely smooth. No lumps allowed! Add the sugar and vanilla and beat again. You’re looking for a silky, spreadable, sweet cloud. The aroma is already incredible. Taste a tiny bit (chef’s privilege!) to make sure it’s perfect. If you want to get fancy, you could add a little lemon zest here for a bright kick. Set this aside while you get ready to assemble your masterpieces.
Step 4: The Fun Part: Assembly
Here’s where the magic happens. Scoop out a heaping tablespoon of cookie dough. Use your thumb to make a deep, wide well in the center. Now, take about a teaspoon of the cheesecake filling and place it right in that well. Gently take another smaller piece of dough, flatten it slightly in your hand, and place it over the filling. Carefully press and seal the edges all the way around, rolling it lightly in your palms to form a sealed ball. The goal is to completely encase that creamy surprise. Repeat with love and excitement!
Step 5: Bake to Golden Perfection
Place your stuffed dough balls on the prepared sheets, leaving plenty of room for them to spread. Bake for 15-18 minutes. You’ll know they’re done when the edges are a lovely light golden brown, but the centers still look slightly soft. They will finish setting as they cool. Let them rest on the baking sheet for at least 5 minutes. This is crucial—it lets the cheesecake filling set a little. Then, transfer them to a wire rack to cool completely. The wait is the hardest part!
Chef’s Tip: For a bakery-style look, press a few extra chocolate chips onto the tops of the warm cookies right when they come out of the oven.
Your Cookie Timeline
Getting these treats from your mind to your mouth is quicker than you think.
- Prep Time: 20 minutes
- Cook Time: 18 minutes
- Chill Time (Recommended): 30 minutes
- Total Time: About 1 hour 8 minutes
- Servings: 24 glorious cookies
A Secret for Picture-Perfect Cookies
My number one trick is to chill the stuffed dough balls for 30 minutes before baking. I know, I know, it’s tempting to skip. But this step makes a world of difference. It firms up the butter, which prevents the cookies from spreading too flat in the oven. It also keeps that cheesecake center from leaking out. The result is a taller, thicker, more beautiful cookie with a perfect creamy pocket inside. Trust me on this one!
A Sweet Little Cookie Fact
Did you know the modern chocolate chip cookie was invented by accident? In the 1930s, Ruth Wakefield expected her chocolate bits to melt fully into her “Butter Drop Do” cookie dough. They didn’t, and the world said “Thank you, Ruth!” Our cheesecake stuffed version is a happy accident in its own right, a joyful evolution of a classic that Ruth would probably approve of.
Gear You’ll Need in Your Kitchen
You don’t need any special equipment! Just the basics: two or three mixing bowls (one large, one medium, one small), a whisk, a hand mixer or sturdy spoon, measuring cups and spoons, a rubber spatula, a tablespoon cookie scoop (a lifesaver for even cookies!), and baking sheets lined with parchment paper. A wire cooling rack is also very helpful.
Storing Your Cookie Creations
Once completely cooled, store these cookies in an airtight container in the refrigerator. The cheesecake filling means they need to stay chilled. They will keep beautifully for up to 4-5 days this way.
You can also freeze the baked and cooled cookies for up to 3 months. Place them in a single layer on a tray to freeze solid, then transfer to a freezer bag. They taste amazing slightly thawed or warmed for a few seconds in the microwave.
To freeze the unbaked dough, assemble the stuffed dough balls and freeze them on a tray. Once frozen, bag them up. You can bake them straight from the freezer, just add 2-3 extra minutes to the bake time. Fresh-baked cookies anytime!
Tips for Cookie Success Every Time
- Soft Cream Cheese is a Must: Let it sit on the counter for a good hour. This ensures a smooth, lump-free filling that’s easy to work with.
- Don’t Overfill: A teaspoon of filling is plenty. Too much and it might burst through the dough during baking.
- The Sea Salt Finish: Right before baking, sprinkle a tiny pinch of flaky sea salt on top of each dough ball. It elevates all the flavors like you wouldn’t believe.
- Cool Completely: Let the cookies cool on the rack. The filling sets as they cool, creating that perfect creamy texture.
Presenting Your Masterpiece
These cookies deserve a special stage! Serve them on a cute cake stand for a party. For gifts, stack them in a clear cellophane bag tied with a ribbon. Dust them with a little powdered sugar for a snowy effect. Pair them with a small glass of cold milk, a shot of espresso, or even a scoop of vanilla ice cream for the ultimate “cookie sundae.”
Mix It Up! Fun Recipe Variations
Feel like playing? Try these delicious twists on the classic cheesecake stuffed cookie.
- Snickerdoodle Style: Roll the cookie dough balls in a cinnamon-sugar mixture before baking for a warm, spiced crust.
- Peanut Butter Cup: Add 1/2 cup of peanut butter to the cookie dough and use peanut butter chips. For the filling, mix a tablespoon of peanut butter into the cream cheese.
- Cookie Dough Center: For a safe-to-eat cookie dough center, use a simple mix of butter, brown sugar, flour, and mini chips for the filling instead of cheesecake.
- S’mores Delight: Add crushed graham crackers to the dough and use mini marshmallows along with the chocolate chips. A marshmallow fluff filling would be incredible too!
- Birthday Cake Fun: Mix rainbow sprinkles into both the cookie dough and the cheesecake filling for a festive, colorful treat.
- Dark Chocolate & Raspberry: Use dark chocolate chips. Before adding the cheesecake filling to the dough ball, place a single fresh raspberry in the well, then top with the cream cheese and seal.
Common Mistakes to Avoid
Mistake 1: Using Cold or Lumpy Cream Cheese
If your cream cheese is cold, it will be impossible to beat smooth. You’ll end up with lumpy filling that’s hard to scoop and might create pockets of pure cream cheese in your baked cookie. Always plan ahead. Take the cream cheese out of the fridge at least an hour before you start baking. It should be soft to the touch and spreadable. This ensures a silky, seamless filling that bakes up perfectly.
Mistake 2: Skipping the Dough Chill Time
You mixed the dough, you’re excited, you just want to bake! I get it. But popping warm dough straight into the oven is a recipe for flat, greasy cookies. The melted butter needs time to firm up. Chilling the dough, especially after you’ve assembled the stuffed balls, is non-negotiable. It prevents excessive spreading, helps the cookies hold their shape, and stops the cheesecake from oozing out. Your patience will be rewarded with thick, bakery-style cookies.
Mistake 3: Overbaking the Cookies
These cookies rely on a soft, chewy center. If you bake them until they look completely “done” in the oven, they’ll be dry and crumbly once cooled. They continue to cook on the hot baking sheet. The key is to pull them out when the edges are just set and lightly golden, but the centers still look puffy and underdone. They will finish setting as they cool, leaving you with the most amazing, tender texture.
Mistake 4: Not Sealing the Dough Properly
If you just plop the filling on top of a dough ball and lightly push another piece on, it will leak. The seal must be complete. Take a moment to really pinch the dough together around the filling, smoothing any cracks. Roll it gently into a neat ball to ensure the filling is completely enclosed. Think of it like making a tiny, delicious stuffed dumpling. A good seal is what keeps the surprise inside until that first amazing bite.
Your Cheesecake Cookie Questions, Answered
Can I make the dough ahead of time?
Absolutely! You can prepare the cookie dough and the cheesecake filling separately, cover them tightly, and refrigerate for up to 2 days. Let the dough sit at room temperature for about 15 minutes to soften slightly before assembling. You can also freeze the fully assembled, unbaked cookie dough balls for up to 3 months and bake from frozen, adding a few extra minutes.
Why did my cheesecake filling leak out?
Leaking usually happens for two reasons. First, the dough wasn’t sealed tightly enough around the filling. Make sure to completely encase it with no thin spots. Second, the oven might be too hot, causing the butter to melt too fast and creating cracks. Always bake at 325°F, not a higher temperature. Chilling the dough balls also helps prevent this by solidifying the butter first.
Can I use a different kind of cheese for the filling?
For the classic creamy, tangy flavor, full-fat block cream cheese is really the only option. Lower-fat or tub-style cream cheese has more water and additives, which can make the filling runny and affect texture. Mascarpone could work in a pinch, but it’s much richer and less tangy. For the best results, stick with good old Philadelphia-style cream cheese.
How do I know when the cookies are done baking?
Don’t wait for them to look fully cooked. Look for the edges to be firm and have a light golden-brown color. The centers should still look puffy, soft, and slightly underbaked. They will deflate a little as they cool, creating that perfect chewy texture. If the edges are dark brown, they are overdone. Remember, they keep cooking on the hot tray!
My cookies turned out flat. What went wrong?
Flat cookies are often caused by butter that’s too warm. If you used very hot melted butter or didn’t chill the dough, the fat spreads immediately in the oven. Also, double-check your measurements—too little flour or old baking soda can lead to flat cookies. Make sure your baking soda is fresh and always give the stuffed dough a good chill before they hit the oven.
Can I make these without a mixer?
Yes, you can! A sturdy wooden spoon and a bit of elbow grease will work just fine. For the cookie dough, make sure your melted butter has cooled slightly so you don’t scramble the eggs. Mix vigorously when combining the wet ingredients. For the cream cheese filling, just ensure it is very, very soft before you start beating it with the sugar. It might take a little more arm power, but it’s totally doable.
What’s the purpose of the extra egg yolk?
That extra egg yolk is a little baker’s secret for amazing texture. Egg whites can make cookies cakey or help them spread. The yolk, rich with fat and emulsifiers, gives the cookie dough a richer flavor, a more tender crumb, and that coveted chewy, soft-baked center. It holds moisture beautifully. Don’t skip it—it makes a noticeable difference in the final cookie.
Are these cookies served warm or cold?
They are fantastic both ways, but my favorite is slightly warmed. After they’ve cooled completely, a 10-second zap in the microwave makes the chocolate gooey and the cheesecake filling just slightly warm and soft—sheer heaven. They are traditionally served at room temperature or chilled because of the dairy filling. Storing them in the fridge is a must for food safety.
Can I add nuts or other mix-ins to the dough?
Go for it! This dough is a great base. Chopped walnuts or pecans are a classic addition. You could try pretzel pieces for a sweet-and-salty kick, or toffee bits for extra caramel flavor. Just keep the total volume of add-ins (chips plus extras) to about 2 to 2.5 cups so the dough can still hold together around the filling.
How many cookies does this recipe make?
This recipe yields about 24 generously sized cookies. If you use a heaping tablespoon of dough per cookie, you should get exactly two dozen. If you make them smaller or larger, the yield will change. They are rich, so one cookie is often plenty for a satisfying treat. But let’s be real… nobody will judge you for having two.
Ready to Bake Some Smiles?
So there you have it—the complete guide to creating these unforgettable cookies. They’re more than just a dessert; they’re a baking adventure and a guaranteed smile-maker. The process is fun, the kitchen smells divine, and the final reward is a bite of pure, creamy, chocolatey joy. Whether you’re making them for a special someone or just for a cozy night in, these Cheesecake Stuffed Chocolate Chip Cookies are a little act of edible love. Now, go preheat that oven and get ready for the compliments to roll in. Happy baking!
Shrimp Stir-Fry Delight
Ingredients
Equipment
Method
- Preheat your oven to 325°F (165°C) and line cookie sheets with parchment paper.
- In a medium bowl, whisk together the flour, baking soda, and salt.
- In a large bowl, mix melted butter with both sugars until glossy.
- Beat in vanilla, the whole egg, and the extra egg yolk.
- Gradually add the flour mixture until just combined, then fold in chocolate chips.
- In a small bowl, beat cream cheese until smooth, then add sugar and vanilla and mix well.
- Scoop a tablespoon of cookie dough, create a well, add cheesecake filling, and seal with more dough.
- Place the stuffed dough balls on the baking sheet and bake for 15-18 minutes until edges are golden.
- Let them cool on the baking sheet for at least 5 minutes before transferring to a wire rack.