Last Tuesday night, I found myself staring at a pound of shrimp in my fridge, wondering how to turn it into something that would make my family jump up from the couch. That’s when I remembered this incredible spicy honey shrimp recipe I’d been dying to try. Let me tell you, the moment those golden, crispy beauties hit the table, drizzled with that sweet and spicy honey glaze, my husband actually put down his phone. That’s how I knew I had a winner on my hands!
What Makes This Spicy Honey Fried Shrimp So Special
This spicy honey shrimp recipe is the perfect marriage of textures and flavors that’ll have you licking your fingers like nobody’s watching. We’re talking about juicy shrimp wrapped in a perfectly seasoned, crispy coating, then kissed with a sweet and spicy honey glaze that creates the most addictive combination. The buttermilk marinade keeps the shrimp tender while creating the perfect base for that crunchy exterior. What really sets this dish apart is the balance between the heat from the cayenne pepper and the sweetness of the honey, creating a flavor profile that keeps you reaching for just one more piece.
I’ve made this recipe at least a dozen times now, tweaking it here and there until it became absolutely perfect. My kids, who usually turn their noses up at anything remotely spicy, actually ask me to make these honey glazed shrimp for dinner. That’s the magic of this recipe – it’s customizable, foolproof, and honestly tastes like something you’d order at a fancy restaurant but costs a fraction of the price.
The Story Behind Crispy Honey Shrimp
Fried shrimp with sweet and spicy glazes has roots in both Southern American cooking and Asian fusion cuisine. The Southern tradition of buttermilk-fried seafood meets the Asian-inspired sweet and spicy honey sauces that have become wildly popular in recent years. This beautiful collision of culinary cultures has given us dishes that satisfy our cravings for both comfort food and bold flavors.
In the South, fried shrimp has been a staple for generations, often served at fish fries and family gatherings. The buttermilk technique came from traditional fried chicken methods, creating that signature tender and juicy interior. Meanwhile, honey-glazed dishes have been trending in Asian-American restaurants, particularly with chicken and seafood. Someone brilliant decided to combine these two approaches, and the result is pure magic.
The modern version of spicy honey fried shrimp has become a restaurant favorite across the country. You’ll find variations in gastropubs, seafood shacks, and upscale dining establishments. Each chef adds their own twist, but the core concept remains the same: crispy, sweet, spicy, and absolutely irresistible.
Why This Spicy Honey Shrimp Recipe Will Become Your Go-To
The beauty of this recipe lies in its simplicity and wow factor. You only need about 30 minutes from start to finish, which makes it perfect for those nights when you want something special without spending hours in the kitchen. The ingredient list is straightforward – no hunting down obscure spices or specialty items at three different grocery stores.
The texture combination is what really makes this dish shine. That golden, crunchy exterior gives way to plump, succulent shrimp that practically melts in your mouth. The spicy honey coating adds a glossy finish and creates layers of flavor that hit different taste buds with each bite. It’s sweet, it’s spicy, it’s savory, and it’s exactly the kind of food that makes people close their eyes and do a little happy dance.
Another reason to love this recipe? It’s incredibly versatile. Serve it as an appetizer at your next party and watch it disappear in minutes. Make it the star of your dinner table with some rice and vegetables. Pack it for lunch the next day (if you have any leftovers, which is doubtful). However you serve it, these honey shrimp will steal the show.
Perfect Occasions for Serving Honey Glazed Fried Shrimp
These spicy honey shrimp are absolute party favorites. I brought them to my sister’s game night last month, and people were still talking about them weeks later. They’re finger-friendly, which makes them perfect for gatherings where people are standing and mingling. Plus, they look impressive arranged on a platter with some fresh herbs scattered on top.
They’re also fantastic for family dinners when you want to make something that feels special but doesn’t require you to be a professional chef. My teenage daughter requested these for her birthday dinner instead of her usual pasta dish, which tells you everything you need to know about how good they are.
Consider making these crispy shrimp for date night at home, Super Bowl parties, potlucks, summer barbecues, or even as a fun weekend lunch. They’re also great for holidays when you want an alternative to traditional heavy dishes. The bright flavors and light, crispy texture are refreshing and satisfying without leaving you feeling overly full.
Everything You Need for Perfect Spicy Honey Shrimp
Here’s what you’ll need to gather before you start cooking:
- 1 pound (450g) large shrimp, thawed, peeled, deveined, tails on
- 1 cup (245g) buttermilk
- 1 cup (125g) all-purpose flour
- 1 teaspoon paprika
- 1 teaspoon garlic powder
- ½ teaspoon onion powder
- ½ teaspoon kosher salt
- ½ teaspoon black pepper
- ¼ teaspoon cayenne pepper
- Vegetable oil for frying
- ⅔ cup (170g) spicy honey (homemade or store-bought)
- Fresh parsley, chopped for garnish
Smart Ingredient Substitutions for Honey Fried Shrimp
Don’t have buttermilk? No problem! Mix 1 cup of regular milk with 1 tablespoon of lemon juice or white vinegar. Let it sit for 5 minutes, and you’ve got a perfect buttermilk substitute. I’ve used this trick more times than I can count when I realize I’m out of buttermilk mid-recipe.
If you can’t find spicy honey, just warm regular honey and stir in a pinch of red pepper flakes or a dash of your favorite hot sauce. You can also use maple syrup with a bit of hot sauce for a different but equally delicious sweet and spicy combo.
All-purpose flour can be swapped with rice flour for an extra crispy coating, though you might need to adjust the amount slightly. For a gluten-free version, use your favorite gluten-free flour blend. The texture will be slightly different but still delicious.
Feel free to adjust the spice level by reducing or increasing the cayenne pepper. I sometimes use smoked paprika instead of regular paprika for an extra depth of flavor. You can also substitute shrimp with chicken tenders or cauliflower florets for a completely different take on this recipe.
How to Make the Best Spicy Honey Shrimp
Step 1: Marinate the Shrimp in Buttermilk
Place your cleaned shrimp in a medium bowl and pour the buttermilk over them, making sure every piece gets completely coated. The buttermilk does double duty here – it tenderizes the shrimp while creating a sticky surface that helps the flour coating adhere beautifully. Let them soak at room temperature for at least 15 minutes, though I sometimes let mine sit for up to 30 minutes if I’m prepping other things. You’ll notice the shrimp become slightly plumper and the buttermilk takes on a slightly pink tinge. This marinating step is crucial for achieving that restaurant-quality texture, so don’t skip it even if you’re in a hurry.
Pro tip: Cold shrimp from the fridge will drop your oil temperature too quickly, so letting them come to room temperature during the marinade helps maintain consistent frying temperature.
Step 2: Create Your Seasoned Flour Mixture
In a separate medium bowl, whisk together the flour, paprika, garlic powder, onion powder, kosher salt, black pepper, and cayenne pepper until everything is evenly distributed. The flour should have a lovely peachy-orange color from the paprika, and you should be able to smell that beautiful blend of spices. This seasoned coating is what creates that incredible flavor in every bite, not just from the honey glaze. I like to mix my dry ingredients really well because nobody wants to bite into a spot that’s all cayenne or all garlic powder. Make sure you break up any clumps in the flour so your coating goes on smooth and even.
Pro tip: Mix more flour than you think you need. It gets clumpy as you coat the shrimp, and having extra ensures every piece gets properly covered.
Step 3: Coat Each Shrimp Perfectly
This is where things get a little messy, but it’s worth it. Pull each shrimp out of the buttermilk, letting the excess drip back into the bowl, then drop it into your seasoned flour. Press the flour mixture onto both sides of the shrimp, making sure you get complete coverage, especially around the curves and in the little crevices. The tail can stay relatively clean for easy handling later. Place each coated shrimp on a large baking sheet in a single layer. As you work through the batch, you’ll see them transform into these beautiful, flour-dusted crescents ready for frying. Let the coated shrimp rest on the baking sheet for about 5 minutes before frying – this helps the coating stick better and creates an even crispier result.
Pro tip: Use one hand for wet ingredients and one for dry to avoid getting your fingers completely caked in gummy flour paste.
Step 4: Heat Your Oil to the Perfect Temperature
Pour about 2 inches of vegetable oil into a large, heavy-bottomed pot or Dutch oven. The heavy bottom is important because it helps maintain even heat distribution. Clip a frying thermometer to the side of the pot and heat the oil over medium heat until it reaches exactly 350°F (175°C). This temperature is the sweet spot for frying shrimp – hot enough to create that crispy exterior quickly, but not so hot that the coating burns before the shrimp cooks through. Watch the thermometer carefully as the oil heats up. It can take anywhere from 5 to 10 minutes depending on your stove and the amount of oil. The oil should shimmer and look slightly wavy when it’s ready, but it shouldn’t be smoking.
Pro tip: If you don’t have a thermometer, test the oil by dropping in a small pinch of flour. It should sizzle immediately and turn golden within about 30 seconds.
Step 5: Fry the Shrimp to Golden Perfection
Before you start frying, gently pat or shake off any loose excess flour from the shrimp. Working in small batches of 4 to 6 shrimp at a time, carefully lower them into the hot oil using tongs or a slotted spoon. Don’t overcrowd the pot or the temperature will drop and you’ll end up with greasy, soggy shrimp instead of crispy ones. The shrimp should sizzle enthusiastically when they hit the oil. Fry for 2 to 3 minutes, turning them halfway through with tongs or a spider strainer. You’ll know they’re done when they turn a gorgeous golden brown color and float to the surface. The coating should look crispy and slightly bubbly. Remove them from the oil and let the excess oil drip off before placing them on your prepared baking sheet. Let the oil come back up to 350°F between batches, which usually takes about a minute.
Pro tip: Fry a test shrimp first to check your timing and oil temperature. It’s better to sacrifice one shrimp than ruin the whole batch.
Step 6: Glaze with Spicy Honey While Hot
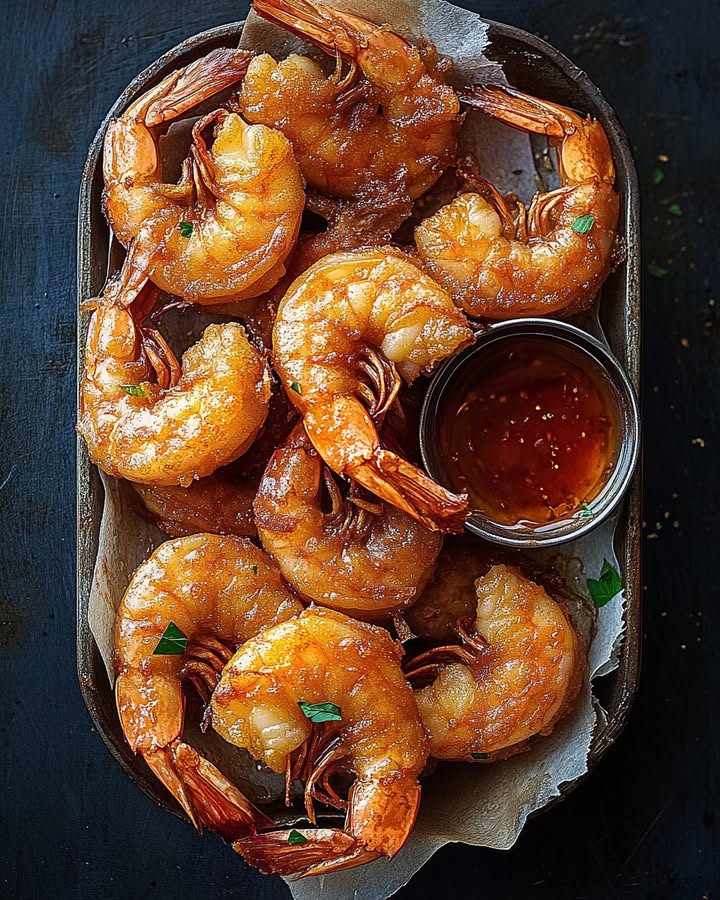
As soon as you remove the fried shrimp from the oil and place them on a parchment-lined baking sheet, immediately drizzle them with the spicy honey while they’re still piping hot. The heat helps the honey become more liquid and coat every crispy ridge and valley of the shrimp. You can drizzle it from a spoon, use a squeeze bottle for more control, or even toss the shrimp gently in a bowl with the honey. The honey will sizzle slightly when it hits the hot shrimp, creating this amazing caramelized effect. Don’t be shy with the honey – these shrimp can handle a generous coating. Some of the honey will pool on the parchment paper, creating these sweet, spicy puddles that are dangerously delicious for dipping extra shrimp.
Pro tip: If your honey is too thick to drizzle, warm it in the microwave for 10 to 15 seconds to make it more pourable.
Step 7: Garnish and Serve Immediately
Sprinkle the freshly glazed shrimp with chopped fresh parsley for a pop of color and a hint of fresh flavor that cuts through the richness. The bright green against the golden shrimp and glossy honey looks absolutely stunning. Transfer them to your serving platter while they’re still warm – these spicy honey shrimp are best enjoyed hot and fresh from the fryer. The coating stays crispiest in the first 15 to 20 minutes after frying, so gather everyone around and dig in. I like to put out some extra napkins because these are definitely finger-licking good. Some lemon wedges on the side are a nice touch if anyone wants a little citrus brightness to cut through the sweetness.
Chef’s tip: Save any leftover spicy honey for drizzling over the shrimp as you eat them, or for dipping bread – it’s liquid gold!
Timing Your Spicy Honey Shrimp Perfectly
The total time commitment for this recipe is refreshingly short, making it perfect for weeknight dinners or last-minute entertaining. Your prep time will run about 10 minutes, which includes peeling and deveining the shrimp if you’re starting with whole shrimp, gathering your ingredients, and setting up your workspace. Some grocery stores sell pre-peeled and deveined shrimp with the tails on, which can cut your prep time down to just 5 minutes.
The marinade time is 15 minutes minimum, though you can let the shrimp soak in buttermilk for up to an hour if you want even more tender results. During this time, you can prepare your flour mixture, set up your frying station, and heat your oil. The actual cooking time is only about 3 minutes per batch, and you’ll probably have 3 to 4 batches depending on the size of your pot. Factor in about a minute between batches for the oil to come back to temperature.
From start to finish, you’re looking at about 28 to 35 minutes total, which includes everything from preparation through the final garnish. This makes these honey shrimp one of the fastest impressive meals you can make. I’ve had elaborate pasta dishes take longer than this, and they definitely don’t get the same reaction from my family.
The Secret to Restaurant-Quality Honey Shrimp
Here’s the secret that restaurants know but home cooks often miss: the key to incredibly crispy fried shrimp is letting the coated shrimp rest for 5 to 10 minutes before frying. This resting time allows the flour coating to hydrate slightly from the buttermilk underneath, creating a kind of paste that adheres to the shrimp like cement. When this coating hits the hot oil, it forms an incredibly crispy shell that stays crunchy even after you drizzle it with honey.
Another professional trick is maintaining your oil temperature religiously. Home cooks often let the temperature fluctuate wildly, which results in greasy, heavy coating instead of light, crispy perfection. Invest in a good thermometer and watch it like a hawk. When the temperature drops below 325°F, stop adding shrimp and let the oil heat back up. When it climbs above 375°F, reduce your heat slightly. This attention to detail makes all the difference between okay fried shrimp and absolutely spectacular ones.
Fascinating Facts About Honey and Shrimp
Did you know that honey has been used as a glaze for cooked foods for thousands of years? Ancient civilizations discovered that honey not only added sweetness but also created a beautiful shine and helped preserve food. The combination of honey with spicy elements like chili peppers dates back centuries in various cultures around the world.
Shrimp is actually one of the most popular seafood choices in America, with the average person eating about 4 pounds per year. It’s also one of the quickest-cooking proteins, which is why it’s perfect for weeknight meals. The buttermilk marinade technique we use in this recipe has roots in Southern cooking traditions that date back to when buttermilk was a common byproduct of butter-making and cooks needed to find delicious ways to use it.
The science behind why buttermilk makes such tender, juicy shrimp is fascinating. The lactic acid in buttermilk gently breaks down proteins, making the shrimp more tender without turning them mushy. It’s the same principle that makes buttermilk fried chicken so incredibly good. This chemical reaction is why marinating time matters – you need at least 15 minutes for the acid to do its work.
Essential Equipment for Making Crispy Honey Shrimp
You’ll need a heavy-bottomed pot or Dutch oven for frying – something that holds heat well and is deep enough to safely hold at least 2 inches of oil with plenty of room above for the shrimp to bubble without overflowing. A 5-quart pot is perfect for this recipe. The heavy bottom prevents hot spots that can burn your coating.
A candy or deep-fry thermometer is absolutely essential unless you have a lot of experience judging oil temperature by eye. I’ve tried the bread cube test and the flour test, but nothing beats an actual thermometer for consistent results. You can find decent ones for under 10 dollars, and they’ll change your frying game completely.
You’ll also want tongs or a spider strainer for safely lowering shrimp into the hot oil and removing them. A spider strainer is especially nice because it lets the oil drain off as you lift the shrimp out. Two medium bowls for the buttermilk and flour mixture, a large baking sheet lined with parchment paper, and plenty of paper towels for draining are also necessary. Having everything set up before you start frying makes the process much smoother and safer.
Storing Your Spicy Honey Fried Shrimp
Let’s be honest – if you’re like my family, leftovers are rarely an issue with these addictive honey shrimp. But on the off chance you have some remaining, proper storage is important to maintain as much of that crispy texture as possible. Let the shrimp cool completely to room temperature before storing them. If you put hot shrimp in a container, the steam will make them soggy. Once cooled, transfer them to an airtight container lined with paper towels. The paper towels will absorb any excess moisture. Store them in the refrigerator for up to 2 days.
When you’re ready to eat the leftovers, resist the urge to microwave them. The microwave will turn that beautiful crispy coating into a sad, rubbery mess. Instead, reheat them in a 375°F oven on a wire rack set over a baking sheet for about 8 to 10 minutes. The wire rack allows hot air to circulate around the shrimp, re-crisping the coating. You can also use an air fryer set to 375°F for about 5 minutes, which works beautifully and is even faster than the oven. The shrimp won’t be quite as crispy as when they were fresh, but they’ll still be pretty darn good.
If you want to prep ahead, you can bread the shrimp up to 4 hours in advance and keep them refrigerated on a baking sheet until you’re ready to fry. Don’t try to freeze fried shrimp – the texture suffers significantly. However, you can freeze the raw, breaded shrimp before frying them. Place them on a baking sheet in a single layer and freeze until solid, then transfer to a freezer bag. They’ll keep for up to 2 months. Fry them straight from frozen, adding an extra minute or two to the cooking time.
Expert Tips for Perfect Honey Glazed Shrimp
Pat your shrimp really dry after thawing and before marinating them in buttermilk. Excess water dilutes the buttermilk and prevents the coating from adhering properly. I learned this lesson the hard way when my first batch had patches where the coating just slid right off.
Don’t skip the marinating time even if you’re in a rush. Those 15 minutes make a huge difference in both texture and flavor. If you absolutely must speed things up, 10 minutes is the bare minimum, but you’ll notice the difference in tenderness.
Use a thermometer for your oil temperature, but also watch the shrimp themselves. If they’re browning too quickly on the outside but still feel soft and raw inside, your oil is too hot. If they’re taking more than 3 to 4 minutes to brown and seem to be absorbing a lot of oil, your temperature is too low.
Make your own spicy honey by warming regular honey with red pepper flakes, a splash of hot sauce, or even some minced fresh chilies. Let it steep for at least 30 minutes before using it, and strain out any solids. This way you can control exactly how spicy you want it.
Set up a proper draining station with paper towels or a wire rack. Good drainage is crucial for maintaining crispiness. If the shrimp sit in pooled oil, they’ll get greasy and lose that satisfying crunch.
Making Your Honey Shrimp Look Amazing
Presentation matters, especially if you’re serving these at a party or special dinner. Arrange the glazed shrimp on a white platter in a circular pattern with all the tails pointing outward like rays of sunshine. The contrast between the golden shrimp and white plate is stunning.
Create a bed of fresh lettuce or cabbage leaves on your serving platter before adding the shrimp. This adds height, color, and also catches any dripping honey. Thinly sliced cucumbers or radishes arranged around the edge add a fresh, crisp element that complements the rich shrimp.
Garnish with more than just parsley. Try adding sesame seeds, thinly sliced green onions, or even some fresh cilantro leaves. A sprinkle of red pepper flakes adds visual interest and signals that there’s some heat in the dish.
Serve them in individual portions in small paper cones or baskets lined with parchment paper for a fun, street-food vibe. This works great for parties because people can grab a cone and mingle without needing plates.
Add lemon or lime wedges to the platter, not just for looks but because the citrus really does brighten the flavors. Some people love squeezing a little lemon over their honey shrimp just before eating.
Healthier Ways to Enjoy Spicy Honey Shrimp
While the traditional fried version is absolutely delicious, there are several ways to make this recipe lighter without sacrificing too much flavor. Here are some alternatives that still deliver on taste while being kinder to your waistline.
Air Fryer Spicy Honey Shrimp
The air fryer method gives you a crispy exterior with a fraction of the oil. After coating your shrimp in the seasoned flour, lightly spray them with cooking oil spray and arrange them in a single layer in your air fryer basket. Cook at 400°F for 8 to 10 minutes, flipping halfway through, until they’re golden and crispy. The texture won’t be quite as crunchy as deep-fried, but it comes pretty close and you’ll save hundreds of calories. Drizzle with the spicy honey just like the original recipe. I make these on busy weeknights when I want something healthier but still crave that sweet and spicy combination.
Baked Honey Shrimp with Panko Crust
For an even lighter option, skip the flour coating and use panko breadcrumbs instead. After marinating in buttermilk, dredge the shrimp in panko mixed with your spices. Arrange them on a baking sheet sprayed with cooking spray, then lightly spray the tops of the shrimp too. Bake at 425°F for 10 to 12 minutes until golden and cooked through. The panko creates a wonderfully crunchy texture that’s surprisingly similar to fried. Toss them with the spicy honey immediately after baking. This method is perfect for feeding a crowd because you can cook them all at once instead of working in batches.
Grilled Honey Glazed Shrimp Skewers
Take this recipe outdoors with grilled shrimp skewers. Skip the flour coating entirely and just marinate the shrimp in buttermilk with the spices mixed in. Thread them onto soaked wooden skewers or metal ones, then grill over medium-high heat for 2 to 3 minutes per side. Brush with the spicy honey during the last minute of cooking, letting it caramelize slightly from the heat. The char from the grill adds another layer of flavor that pairs beautifully with the sweet and spicy glaze. I make these all summer long for cookouts, and they disappear even faster than the fried version.
Coconut-Crusted Honey Shrimp
Add a tropical twist by mixing shredded coconut into your flour coating. Use half flour and half unsweetened shredded coconut, along with all the spices. The coconut adds sweetness and a different kind of crunch that’s absolutely addictive. You can fry these traditionally or bake them for a lighter option. The coconut flavor pairs wonderfully with the honey and adds complexity to each bite. My kids actually prefer this version because it’s slightly less spicy, and the coconut mellows everything out while adding its own subtle sweetness.
Asian-Inspired Honey Sesame Shrimp
Give your shrimp an Asian fusion makeover by adding sesame seeds and ginger to the mix. Add 2 tablespoons of sesame seeds to your flour coating and marinate the shrimp in buttermilk mixed with 1 teaspoon of fresh grated ginger. After frying and glazing with honey, sprinkle with additional toasted sesame seeds and sliced green onions. You can also add a splash of rice vinegar to the honey for extra tang. This version is slightly less sweet and has more complex flavors that work beautifully over rice or in lettuce wraps.
Spicy Honey Popcorn Shrimp
Turn this recipe into bite-sized popcorn shrimp by using small or medium shrimp instead of large ones. Cut the cooking time down to about 1 to 2 minutes since smaller shrimp cook faster. These are perfect for parties, kids’ meals, or adding to salads. The smaller size means more surface area gets coated in that delicious honey glaze, and they’re super fun to eat. I also find that smaller shrimp are often more budget-friendly, making this an economical option when you’re feeding a crowd.
Common Mistakes to Avoid When Making Honey Fried Shrimp
Mistake 1: Overcrowding the Frying Pot
One of the biggest mistakes people make is trying to fry too many shrimp at once because they’re impatient to get dinner on the table. When you overcrowd the pot, the oil temperature drops dramatically, sometimes by 50 degrees or more. This means your shrimp will absorb more oil instead of crisping up, resulting in greasy, heavy coating that’s more soggy than crunchy. The shrimp will also stick together, making it impossible to get even browning on all sides. Always fry in small batches of 4 to 6 shrimp, depending on the size of your pot. Yes, it takes longer, but the difference in quality is absolutely worth those extra few minutes. Trust me, I’ve rushed this step before and ended up with disappointing results that I was embarrassed to serve.
Mistake 2: Not Drying the Shrimp Properly
Excess moisture is the enemy of crispy coating, yet so many people skip the step of patting their shrimp dry before starting. When you rinse thawed shrimp or buy them fresh from the seafood counter, they’re covered in water. If you add wet shrimp directly to buttermilk and then to flour, you end up with a gummy, pasty coating that won’t crisp properly no matter how perfect your oil temperature is. Take an extra minute to pat each shrimp thoroughly dry with paper towels before you start marinating. This simple step makes a huge difference in how well the coating adheres and how crispy it gets during frying. I keep a roll of paper towels right next to my prep area specifically for this purpose.
Mistake 3: Using Old or Improper Oil
The type of oil you use for frying matters more than most people realize. Some folks try to use olive oil because it’s healthier, but olive oil has a low smoke point and will burn before reaching proper frying temperature, leaving you with bitter-tasting shrimp. Using old oil that’s been sitting in your pantry for months, or reusing oil too many times, can also create off-flavors and reduce crispiness. Stick with fresh vegetable oil, canola oil, or peanut oil – all have high smoke points perfect for deep frying. Make sure your oil is fresh and hasn’t been used more than once or twice before. Dark, cloudy oil or oil that smells even slightly off should be discarded. Fresh oil not only tastes better but also fries more efficiently, creating that light, crispy texture we’re aiming for.
Mistake 4: Glazing the Shrimp Too Early or Too Late
Timing is everything when it comes to adding that spicy honey glaze. Some people make the mistake of tossing the shrimp in honey before they’ve cooled at all, which can make them a bit too sticky and cause the coating to get soggy. Others wait until the shrimp have cooled completely, which means the honey won’t flow and coat as nicely. The sweet spot is adding the honey when the shrimp are still hot but have had about 30 seconds to a minute of draining time. The residual heat helps the honey become more liquid and creates a beautiful glaze without making everything soggy. I set a timer after each batch hits the draining rack so I remember to glaze at the perfect moment. This timing creates that gorgeous glossy finish you see in restaurants.
Mistake 5: Skipping the Rest Time After Coating
Many home cooks coat their shrimp and immediately drop them into the hot oil without letting the coating set. This seems efficient, but it actually leads to coating that falls off during frying or doesn’t crisp up properly. The flour needs a few minutes to hydrate and form a proper bond with the buttermilk layer underneath. Let your coated shrimp rest on the baking sheet for at least 5 minutes before frying. During this time, the coating transforms from loose flour into a more cohesive layer that will fry up beautifully crispy and stay attached to the shrimp. I usually coat all my shrimp first, then heat my oil while they rest. By the time the oil reaches temperature, the coating has had plenty of time to set, and I get perfect results every time.
Everything You Wanted to Know About Spicy Honey Shrimp
Can I use frozen shrimp for this recipe?
Absolutely! In fact, most shrimp you buy at the grocery store has been frozen at some point, even if it’s displayed in the fresh seafood case. The key is thawing them properly. Place frozen shrimp in a colander and run cold water over them for about 10 to 15 minutes until they’re completely thawed. Never use hot water or the microwave, as this starts cooking the outside while the inside is still frozen. Once thawed, pat them very dry with paper towels before starting your recipe. Frozen shrimp often release more liquid than fresh, so the drying step is especially important. I actually prefer using frozen shrimp because you can buy them in bulk when they’re on sale and always have some ready in your freezer for dinner emergencies.
What’s the best size shrimp to use for this recipe?
Large shrimp, typically labeled 21/25 or 26/30 (meaning 21 to 25 or 26 to 30 shrimp per pound), work best for this recipe. They’re big enough to stay juicy and tender inside while the coating gets crispy, but not so large that they take forever to cook through. Extra-large or jumbo shrimp can work too, but you’ll need to increase the frying time by about a minute. Small or medium shrimp cook so quickly that they can easily become overcooked and rubbery before the coating browns properly. The large size also makes them perfect for serving as an appetizer because people can easily pick them up by the tail. If you can only find a different size, just adjust your cooking time accordingly and keep a close eye on them during frying.
How do I know when the shrimp are fully cooked?
Properly cooked shrimp should be opaque throughout with a firm texture, never translucent or mushy. When you cut one open, the flesh should be white or light pink (depending on the variety) with no translucent or gray areas. The shrimp will also naturally curl into a C-shape when they’re perfectly cooked. If they curl into a tight O-shape, they’ve been overcooked and will be tough. Since these shrimp are coated, it’s harder to see the color change, but the golden brown coating is usually a good indicator. The internal temperature should reach 120°F if you have an instant-read thermometer, though this is tricky to test with small shrimp. Generally, 2 to 3 minutes in 350°F oil is perfect for large shrimp. If you’re nervous about undercooking, sacrifice one shrimp from your first batch and cut it open to check before continuing with the rest.
Can I make the spicy honey glaze ahead of time?
Yes, and it’s actually a great time-saver! You can make spicy honey up to a week in advance and store it in an airtight container at room temperature. If you’re making it from scratch by infusing honey with chili flakes or hot sauce, the flavors actually improve over time as they meld together. Just give it a good stir before using because the ingredients may separate slightly during storage. If your honey crystallizes or becomes too thick to drizzle, simply warm it gently in the microwave for 10 to 15 seconds or set the container in a bowl of hot water until it liquefies again. Making the glaze ahead means one less thing to worry about on the day you’re cooking, which is especially helpful if you’re making these for a party. I usually make a double batch of spicy honey because it’s delicious drizzled on everything from chicken to biscuits.
What can I serve with honey glazed shrimp?
These versatile shrimp pair beautifully with so many different sides. For a complete meal, serve them over steamed white or brown rice with some sautéed vegetables. Asian-style coleslaw provides a cool, crunchy contrast to the hot, crispy shrimp. French fries or sweet potato fries make this a fun, casual meal that kids love. For something lighter, serve them over a fresh green salad with a tangy vinaigrette. They’re also fantastic in tacos with shredded cabbage and a drizzle of lime crema. Roasted broccoli, grilled asparagus, or garlic green beans add a healthy vegetable component. For parties, I serve them as an appetizer with toothpicks and extra spicy honey on the side for dipping. Really, these shrimp are so flavorful that they work with almost anything. I’ve even put leftovers in a sandwich the next day and it was amazing.
How can I make this recipe less spicy for kids?
The beauty of this recipe is how easily you can adjust the heat level. Simply reduce or completely omit the cayenne pepper from the flour mixture – the shrimp will still be delicious with all the other seasonings. You can also use regular honey instead of spicy honey for the glaze. If you want just a tiny hint of heat that most kids can handle, reduce the cayenne to 1/8 teaspoon instead of 1/4 teaspoon. Another option is to make two batches – one spicy for adults and one mild for children, using the same basic recipe but adjusting the spice levels. I do this all the time for family dinners. The mild version is still full of flavor from the garlic powder, paprika, and onion powder, so nobody feels like they’re missing out. You can always offer hot sauce on the side for adults who want extra heat.
Why is my coating falling off during frying?
Coating that falls off usually happens for one of several reasons. First, your shrimp might have been too wet when you coated them, preventing the flour from adhering properly. Always pat them very dry after thawing. Second, you might not have let the coated shrimp rest before frying. That 5-minute rest time allows the coating to bond with the buttermilk layer underneath, creating a secure coating. Third, your oil might not be hot enough. If the oil is below 325°F, the coating can absorb oil and become heavy and loose before it has a chance to crisp and set. Finally, you might be moving the shrimp around too much in the oil. Let them fry undisturbed for at least a minute before attempting to turn them – this gives the coating time to set. If you’re still having problems, try double-coating: dip in buttermilk, coat with flour, dip again in buttermilk, and coat again with flour for an extra-thick, secure coating.
Can I use something other than buttermilk for marinating?
While buttermilk works best because of its tenderizing properties and thick consistency, there are alternatives. Regular milk mixed with a tablespoon of lemon juice or vinegar creates a buttermilk substitute that works quite well. Plain yogurt thinned with a little milk is another option that provides similar tenderizing effects. Some people use beaten eggs mixed with a splash of milk, though this creates a slightly different texture. For a dairy-free version, you can use coconut milk mixed with a tablespoon of lemon juice. The key is using something acidic and thick enough to coat the shrimp and help the flour adhere. I’ve tried all these alternatives at various times when I’ve run out of buttermilk, and while buttermilk is definitely superior, the substitutes still produce tasty results. The texture might be slightly different, but you’ll still end up with delicious, crispy shrimp.
Is it safe to reuse the frying oil?
Yes, you can safely reuse frying oil if you handle it properly. After frying, let the oil cool completely, then strain it through a fine-mesh strainer or cheesecloth to remove any food particles. Store the strained oil in an airtight container in a cool, dark place. You can reuse it once or twice more for frying, though the quality decreases with each use. However, if the oil is very dark, smells off, or foams excessively when heated, it’s time to discard it. Oil used for frying seafood tends to retain fishy flavors, so I recommend only reusing it for seafood dishes, not for other foods. For safety and best flavor, I usually only reuse my oil once, then dispose of it properly. Never pour used cooking oil down your drain as it can cause plumbing issues. Instead, let it cool, pour it back into the original container, and throw it in the trash.
What’s the difference between regular honey and spicy honey?
Regular honey is simply the sweet nectar collected by bees from flowers, with no additional ingredients or flavorings. Spicy honey, also called hot honey, is honey that’s been infused with chili peppers or mixed with hot sauce to create a sweet-spicy combination. You can buy spicy honey at many grocery stores now, or make your own by warming honey and steeping it with red pepper flakes, fresh chilies, or adding a few dashes of your favorite hot sauce. The heat level can vary widely depending on the brand or how you make it, from barely spicy to quite hot. The beauty of spicy honey is how the sweetness and heat complement each other, creating a complex flavor that’s more interesting than either element alone. If you’re new to spicy honey, start with a mild version or make your own so you can control the heat level. It’s also fantastic drizzled on pizza, fried chicken, biscuits, or even cheese boards.
Why These Spicy Honey Shrimp Deserve a Place at Your Table
If you’ve made it this far, you’re ready to create some seriously delicious spicy honey shrimp that will have everyone asking for the recipe. This dish brings together everything we love about great food – it’s crispy, juicy, sweet, spicy, and absolutely satisfying. The best part is that despite tasting like something from a high-end restaurant, it’s actually simple enough for any home cook to master.
I’ve shared this recipe with countless friends and family members, and it never fails to become one of their regular rotation meals. There’s something magical about that combination of crunchy coating and sticky-sweet glaze that makes these shrimp completely irresistible. Whether you’re making them for a special occasion or just because it’s Tuesday and you want something exciting for dinner, these honey-glazed beauties deliver every single time.
Don’t be intimidated by the frying process. With a thermometer and a little patience, you’ll be turning out perfectly crispy shrimp like a pro. And once you’ve mastered the basic recipe, feel free to experiment with the variations and make it your own. Add different spices to the coating, try various types of honey, or serve them in creative ways that suit your family’s tastes. The recipe is forgiving and flexible, which is exactly what busy home cooks need.
So grab some shrimp, heat up that oil, and get ready to impress yourself and everyone lucky enough to sit at your table. These spicy honey shrimp are about to become your new favorite way to enjoy seafood!
Spicy Honey Shrimp
Ingredients
Equipment
Method
- Marinate the shrimp in buttermilk for at least 15 minutes.
- In a separate bowl, mix flour, paprika, garlic powder, onion powder, kosher salt, black pepper, and cayenne pepper.
- Coat each shrimp with the seasoned flour mixture, ensuring even coverage.
- Heat vegetable oil in a heavy-bottomed pot to 350°F (175°C).
- Fry the shrimp in small batches for about 2 to 3 minutes until golden brown.
- Remove fried shrimp and drizzle with spicy honey immediately while hot.
- Garnish with chopped parsley and serve warm.