Oh, Chocolate Lasagna! Let’s Talk About This Magical No-Bake Dessert
Have you ever stumbled upon a dessert so decadent and fun that it instantly becomes your go-to for every gathering? I have a folder full of such recipes, but the one that always steals the show is my Chocolate Lasagna. It’s not your traditional pasta dish, of course! Imagine layers of crunchy Oreo crust, creamy cheesecake filling, rich chocolate and vanilla pudding, and fluffy whipped topping. It’s like all the best parts of a dessert buffet decided to live together in one pan. The first time I made it for my book club, there was a moment of pure silence followed by a chorus of “WHAT is this?!”—the highest compliment a home baker can receive. It’s become our family’s celebratory staple, and I can’t wait to share every delicious detail with you.
The Delightful History of a No-Bake Sensation
While the classic Italian lasagna has roots centuries old, our beloved Chocolate Lasagna is a wonderfully modern, American invention. It’s a child of the mid-to-late 20th century, born from the convenience of products like instant pudding and Cool Whip. This dessert is a testament to the joy of creative, no-fuss home cooking. It doesn’t claim a specific cultural origin but rather celebrates the universal love for chocolate, cream, and crunch. Over the years, home cooks (like you and me!) have put their own spin on it, sometimes adding peanut butter, swapping in different cookies, or turning it into individual parfaits. My version stays true to the beloved classic—simple, reliable, and utterly irresistible.
Why You’ll Fall in Love With This Recipe
This recipe is the ultimate crowd-pleaser for so many reasons. First, it requires exactly zero oven time, making it perfect for hot summer days or when you just don’t want to heat up the kitchen. Second, it’s a visual masterpiece. Those clean, distinct layers look incredibly impressive, but I promise the process is straightforward. The flavor is a perfect harmony of sweet and creamy with that satisfying cookie crunch. Best of all, it’s a make-ahead dream. The longer it chills, the better it sets, which means less stress for you when company arrives. It’s the dessert that looks like you spent hours, but secretly, it’s all about smart assembly.
Perfect Occasions for Your Chocolate Lasagna Masterpiece
This dessert is incredibly versatile! I’ve brought it to just about every event imaginable, and it’s always a hit. Here are some of my favorite times to whip it up:
- Potlucks and Picnics: It travels well in its pan and serves a crowd easily.
- Birthday Parties: A fantastic alternative to cake, especially for chocolate lovers.
- Holiday Feasts: It’s a sweet, cool contrast to a heavy Thanksgiving or Christmas dinner.
- Weekend Family Treat: Making it on a Friday means you have a special dessert ready all weekend long.
- “Just Because” Days: Sometimes, a Tuesday just needs a little chocolate lasagna magic.
What You’ll Need: The Chocolate Lasagna Ingredients
Gather these simple ingredients. Trust me, the magic is in the layering!
For the Crust:
- 14.3 ounces Oreo cookies (regular, not Double Stuf)
- 1/2 cup melted butter or margarine
For the Cream Cheese Layer:
- 8 ounces cream cheese, softened
- 8 ounces Cool Whip, thawed
- 1 cup powdered sugar
For the Pudding Layer:
- 5.1 ounces instant vanilla pudding mix
- 5.1 ounces instant chocolate pudding mix
- 3 cups cold milk
For the Topping:
- 8 ounces Cool Whip, thawed
- 1 cup reserved crushed Oreos (from the crust)
- Chocolate syrup
- Optional: Chocolate curls or your favorite chocolate candy
No Stress Substitutions
Don’t have every item? No problem! Here are some easy swaps:
- Oreos: Any chocolate sandwich cookie will work. For a minty twist, try mint Oreos!
- Cool Whip: You can use an equal amount of homemade sweetened whipped cream. Just know it may not hold its shape quite as long.
- Pudding Mix: You can use two boxes of chocolate or two boxes of vanilla for a different flavor profile.
- Milk: Whole milk gives the richest pudding, but any milk you have will work.
Let’s Build Your Chocolate Lasagna!
Ready to create layers of joy? Follow these steps. I’ll walk you through every part.
Step 1: Creating the Crunchy Oreo Foundation
First, let’s make the base. Toss the whole Oreos, creamy filling and all, into your food processor. Pulse them until you have fine, even, dark crumbs. You’ll hear a wonderful sandy sound. Now, here’s a key move: scoop out 1 cup of these crumbs and set them aside in a small bowl for your topping later. Pour the remaining crumbs into a mixing bowl. Pour the melted, golden butter over them. The smell is amazing! Stir until every dark crumb is glistening and feels like wet sand. Dump this mixture into your 9×13-inch pan. Using your fingers or the bottom of a glass, press it down firmly into a beautiful, even layer. Pop the pan into the fridge to set. This chill time is what gives us a solid foundation that won’t crumble when we slice.
Pro tip: If you don’t have a food processor, place the cookies in a sturdy zip-top bag and crush them with a rolling pin. It’s a great way to take out any stress!
Step 2: The Dreamy Cream Cheese Layer
For this layer, your cream cheese must be soft. I leave mine on the counter for a good hour. In a large bowl, beat the softened cream cheese with an electric mixer until it’s smooth and fluffy, about a minute. No one wants lumpy lasagna! Now, gently fold in the powdered sugar and the thawed Cool Whip. You’ll see the mixture transform into a light, creamy, cloud-like filling. Pull your chilled crust from the fridge. Spread this velvety cream cheese mixture over the crust as evenly as you can. A small offset spatula works wonders here. Once it’s smoothed out, return the pan to the refrigerator. This second chill helps the layers stay distinct.
Step 3: The Rich and Velvety Pudding Duo
This is where the chocolate magic deepens. In a large bowl, whisk together both pudding mixes—the golden vanilla and the deep brown chocolate. The colors mix into a lovely mocha powder. Pour in the 3 cups of cold milk all at once. Immediately start whisking! You’ll watch it thicken before your eyes, becoming a luscious, spoonable pudding in just about 2 minutes. The aroma is pure comfort. Take your pan out and carefully spread this pudding over the firm cream cheese layer. Try to spread it gently so you don’t disturb the layer below. This creates our signature chocolate and vanilla ribbon.
Step 4: The Grand Finale Toppings
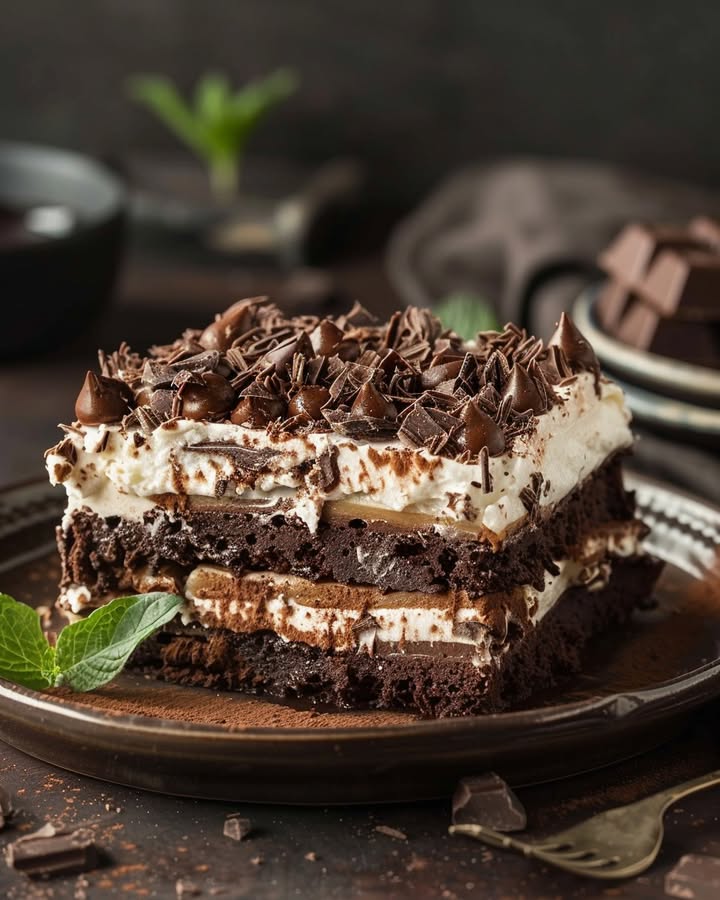
We’re in the home stretch! Grab your second tub of Cool Whip and spread it lovingly over the pudding layer. This gives us a light, fluffy topping. Now, sprinkle that reserved cup of Oreo crumbs all over the white landscape. It adds such a wonderful textural contrast. Finally, take your chocolate syrup and drizzle it artfully back and forth across the entire dessert. If you’re feeling fancy, sprinkle on some chocolate curls or chopped candy bars. It’s your masterpiece—decorate it with joy!
Chef’s tip: For clean lines when drizzling chocolate syrup, I sometimes put it in a small zip-top bag, snip a tiny corner, and use it like a piping bag.
Step 5: The Essential Patience (Refrigeration)
This might be the hardest step! You must let your chocolate lasagna chill. Cover the pan loosely with plastic wrap or foil. I highly recommend letting it set in the fridge for at least 4 hours, but overnight is truly best. This long chill allows every layer to firm up perfectly, making it easy to cut into stunning, clean squares. The flavors also meld together beautifully, creating that unforgettable taste.
Timing is Everything
Let’s break down the time commitment so you can plan your day.
- Prep Time: 30 minutes (it’s fun, active time!)
- Chill Time: 4 hours minimum (overnight is ideal)
- Total Time: 4 hours 30 minutes (plus overnight chilling)
- Servings: A generous 12-15 squares
My Secret Chef’s Tip
For the absolute cleanest slices, I run my sharp knife under very hot water for a few seconds, wipe it dry, and then make my cut. The heat helps the knife glide smoothly through the cold layers without sticking or dragging the toppings. Wipe and reheat the knife between each cut for picture-perfect pieces every single time.
A Fun Fact: The Name Game
The name “Chocolate Lasagna” is a perfect example of playful Americana. Just like the savory dish, it’s all about the art of layering. While an Italian nonna might raise an eyebrow, the name instantly tells you what to expect: rich, distinct strata of deliciousness. It’s a name that sparks curiosity and guarantees a smile, which is exactly what a great dessert should do!
Tools You’ll Need
You likely have everything already!
- 9×13-inch baking pan (glass or metal)
- Food processor or zip-top bag and rolling pin
- Large mixing bowls (2-3)
- Electric hand mixer or stand mixer
- Whisk
- Rubber spatula and/or offset spatula
- Measuring cups and spoons
Storing Your Chocolatey Creation
Cover the pan tightly with plastic wrap or aluminum foil, or transfer individual slices to an airtight container. It will keep beautifully in the refrigerator for up to 5 days. The crust may soften slightly over time, but it will still taste amazing.
Yes, you can freeze it! Freeze the whole pan or individual slices on a parchment-lined tray until solid, then wrap tightly in plastic and foil. It will keep for up to 2 months. Thaw it overnight in the refrigerator before serving. The texture of the Cool Whip may be a tiny bit less fluffy, but the flavor will still be spot-on.
I do not recommend leaving it out at room temperature for more than an hour or two, as the dairy-based layers can start to soften and become unstable, especially on a warm day.
My Best Tips and Advice
- Room Temp is Key: Softening the cream cheese fully is non-negotiable for a smooth, lump-free layer.
- Cold Milk for Pudding: Using cold milk is what allows the instant pudding to thicken quickly and properly.
- Thaw Cool Whip: Let it thaw in the fridge so it’s easy to fold and spread.
- For Parfaits: Simply layer the components in clear glasses for a stunning individual presentation.
- Customize It: Add a layer of sliced strawberries or a drizzle of caramel sauce between the cream cheese and pudding for a new twist.
Presentation Ideas to Wow Your Guests
- Serve each square on a white plate with a fresh raspberry and a mint leaf.
- Drizzle extra chocolate syrup and a little caramel sauce on the plate before placing the slice.
- For parties, cut into small, bite-sized squares and serve on a tiered dessert tray.
- Top each serving with a dollop of extra whipped cream and a whole mini Oreo cookie.
Healthier & Fun Variations to Try
Love the idea but want to mix it up? Here are six delicious spins on the classic Chocolate Lasagna.
- Peanut Butter Cup Lasagna: Add 1/2 cup of creamy peanut butter to the cream cheese layer. Use peanut butter Oreos for the crust and top with chopped peanut butter cups.
- Cookies and Cream Dream: Use only vanilla pudding mix. After spreading the final Cool Whip layer, fold in some mini chocolate chips before sprinkling with Oreo crumbs.
- Mint Chocolate Chip: Use mint Oreos for the crust. Add 1/2 teaspoon of peppermint extract to the cream cheese layer and fold in mini chocolate chips. So refreshing!
- Berry Chocolate Delight: After the cream cheese layer, add a thin layer of sliced fresh strawberries or a seedless raspberry jam. Then proceed with the pudding. It’s a fruity surprise!
- Turtle Chocolate Lasagna: Add 1/2 cup of chopped pecans to the Oreo crust. Drizzle caramel sauce over the final topping along with the chocolate syrup.
- Decadent Mocha Version: Dissolve 1 tablespoon of instant espresso powder into the cold milk before whisking in the chocolate and vanilla pudding mixes.
Common Mistakes to Avoid
Avoid these simple pitfalls for a perfect dessert every time.
Mistake 1: Using Cold Cream Cheese
This is the #1 cause of a lumpy, difficult-to-spread cream cheese layer. Cold cream cheese will not blend smoothly with the powdered sugar and Cool Whip. You’ll end up with little white bits throughout your otherwise smooth layer. To avoid this, take the cream cheese out of the fridge at least an hour before you start. It should feel soft to the touch. If you forget, you can soften it quickly by placing the sealed block in a bowl of warm water for 10-15 minutes.
Mistake 2: Not Pressing the Crust Firmly Enough
A loosely packed crust will fall apart when you try to serve a slice. It should be a compact, even layer that holds together. When you mix the crumbs with butter, they should look like wet sand. Don’t just sprinkle them in the pan. Use the flat bottom of a glass or a measuring cup to press down really firmly over the entire surface. That initial chill in the fridge is crucial to help the butter solidify and bind the crumbs.
Mistake 3: Rushing the Chill Time
Patience is the key to beautiful layers. If you try to add the next layer before the previous one has firmed up, or try to cut and serve it too soon, you’ll get a delicious but messy pudding soup. Each layer needs time to set before adding the next. The final, long chill (overnight is gold standard) is what allows you to cut clean squares that proudly show off all your work. Plan ahead—this is a make-ahead dessert for a reason!
Mistake 4: Using Warm Milk for the Pudding
Instant pudding mix is designed to thicken with cold liquid. If you use room-temperature or warm milk, the pudding will be thin, runny, and may not set at all. It will seep into your other layers and make the whole dessert soggy. Always use milk straight from the refrigerator. I even chill my mixing bowl for a few minutes before I start for good measure.
Your Chocolate Lasagna Questions, Answered!
Can I make Chocolate Lasagna ahead of time?
Absolutely, and I highly recommend it! This dessert is designed to be made ahead. It needs at least 4 hours to set, but making it the night before is the best plan. This gives all the layers plenty of time to firm up completely, making it easy to slice. The flavors also blend and deepen overnight. Just cover it tightly and let it sleep in the fridge. This makes it the ultimate stress-free party dessert.
Can I use homemade whipped cream instead of Cool Whip?
Yes, you can. Beat 2 cups of heavy whipping cream with 1/4 cup of powdered sugar and a teaspoon of vanilla until stiff peaks form. Use this in place of the 8-ounce portions of Cool Whip. The taste will be fantastic! Just know that real whipped cream is a bit softer and may deflate a little faster, so keep the dessert well-chilled until serving. Your layers might also be slightly less defined but just as delicious.
Why can’t I use Double Stuf Oreos for the crust?
You can, but you’ll need to adjust the butter. Double Stuf Oreos have more cream filling, which adds extra moisture and fat. This can make your crust too soft or greasy. If you only have Double Stuf, you can try using them, but you may want to reduce the melted butter by a tablespoon or two. The classic recipe is formulated for regular Oreos to achieve that perfect crumbly-yet-firm texture.
How do I get perfectly clean slices?
For those Instagram-worthy clean cuts, use a long, sharp knife. Run the blade under very hot water, wipe it completely dry with a towel, and then cut straight down in one smooth motion. Do not saw back and forth. After each cut, wipe the knife clean and reheat the blade. This little trick melts through the creamy layers just enough to give you a pristine edge.
Can I freeze Chocolate Lasagna?
You sure can. It freezes very well for up to 2 months. Freeze it in the pan, covered tightly with several layers of plastic wrap and then foil. Or, cut it into individual portions, wrap each piece separately, and store them in a freezer bag. Thaw it overnight in the refrigerator, never at room temperature. The texture may be just a tad softer after freezing, but it’s a great way to have a ready-made treat on hand.
How long does it last in the fridge?
Properly stored in an airtight container or with the pan well-wrapped, your chocolate lasagna will stay fresh and delicious for 4 to 5 days in the refrigerator. The Oreo crust will gradually soften from the moisture of the layers above, becoming more cake-like, but the flavor remains wonderful. It rarely lasts that long in my house!
What can I use instead of a food processor to crush the Oreos?
No food processor? No problem. Place the Oreos in a large, sturdy zip-top plastic bag. Press out all the air and seal it. Then, use a rolling pin, a heavy skillet, or even a canned good to crush them. Roll over the bag repeatedly until you have fine, even crumbs. It’s a very satisfying method and easy to clean up—just toss the bag!
Can I use sugar-free pudding or low-fat ingredients?
You can experiment with sugar-free pudding mixes and low-fat or Neufchâtel cream cheese. The dessert will still set and will have a lighter calorie count. Using light Cool Whip is also an option. However, remember that fat carries flavor and contributes to texture. The final result might be slightly less rich and the layers a bit softer. I suggest doing a small test batch first if you plan to serve it for a special event.
My pudding layer seems thin. What did I do wrong?
This usually happens for one of two reasons: the milk wasn’t cold enough, or the pudding wasn’t whisked for long enough. You need to whisk the pudding and cold milk vigorously for a full two minutes. It will seem liquid at first but will thicken dramatically by the end. If it’s still thin, just pop the whole bowl (or even the assembled dessert) into the fridge. The pudding will continue to set as it chills.
Is this recipe kid-friendly to make?
It’s a fantastic recipe to make with kids! There’s no oven involved, and the steps are simple and fun. They can help crush the cookies (in the bag!), press the crust into the pan, and sprinkle the final toppings. It’s a wonderful way to teach them about layering and assembling a recipe. Just be sure an adult handles the food processor or electric mixer. The joy on their faces when they serve a dessert they helped create is priceless.
Ready to Be the Dessert Hero?
There you have it—everything you need to make the most incredible, crowd-pleasing Chocolate Lasagna. This dessert holds a special place in my recipe box because it never, ever fails. It brings people together, sparks happy conversations, and satisfies that deep chocolate craving in the most fun way possible. It’s simple enough for a weeknight treat yet impressive enough for any holiday table. So gather your ingredients, take your time with those beautiful layers, and get ready for the compliments to roll in. Don’t forget to snap a picture of your masterpiece before it disappears! Happy cooking, and enjoy every delicious, layered bite.
Strawberry Chocolate Delight
Ingredients
Equipment
Method
- Crush whole Oreos in a food processor until fine crumbs form; reserve 1 cup for topping.
- Mix remaining crumbs with melted butter and press into a 9x13-inch baking pan; chill to set.
- Beat softened cream cheese until smooth; fold in powdered sugar and thawed Cool Whip; spread over crust.
- Whisk together both pudding mixes and cold milk until thick; pour over cream cheese layer.
- Spread remaining Cool Whip over pudding layer; sprinkle reserved Oreo crumbs on top and drizzle with chocolate syrup.
- Chill in the refrigerator for at least 4 hours (overnight is ideal) to set.