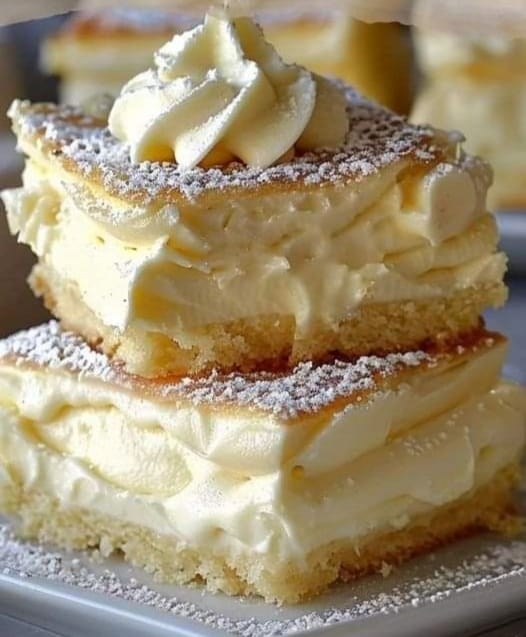
The Ultimate Comfort Dessert: Vanilla Custard Cream Squares
Isn’t it funny how the simplest treats can make the biggest memories? For me, it’s a perfect square of creamy vanilla custard on a buttery crust. I first made this for my daughter’s school bake sale, and let me tell you, they sold out in ten minutes flat! I got requests for the recipe from parents for weeks. This isn’t just a dessert; it’s a little edible hug. It’s rich, smooth, and so comforting. I’m thrilled to share my foolproof recipe with you today.
From Pudding to Perfection: A Story in Layers
Think of this as the elegant cousin of the classic pudding cup. Custard itself is a tale as old as cooking. It dates back to the Middle Ages, a simple mix of milk, eggs, and sweetener. Our vanilla custard cream squares take that timeless foundation and build it up. We give it a crunchy, sweet graham cracker base and a fluffy cloud of whipped cream on top. It’s a classic dessert parfait, but in a neat, handheld square. This version is my family’s favorite. It combines the best parts of a cheesecake and a custard pie, without all the fuss.
Why You’ll Fall in Love with Vanilla Custard Cream Squares
Let me count the ways you’ll adore this recipe! First, the texture is pure magic. You get a crispy crust, a silky-smooth custard, and light whipped cream. Every bite is a delightful mix. Second, it’s a make-ahead superstar. You can whip it up in the afternoon and let it chill until your dinner party. No last-minute stress! Finally, it’s incredibly versatile. Feel like chocolate? Sprinkle some on top. Love fruit? Add a berry sauce. It’s your canvas.
When to Shine with Your Vanilla Custard Squares
This dessert is your secret weapon for almost any occasion. It’s always a hit at potlucks because it travels so well in the pan. For summer picnics, it’s a cool and refreshing treat that won’t melt in the sun. I love serving it for holiday gatherings like Easter or Mother’s Day. The creamy white layers look so festive. It’s also just perfect for a “Treat Yourself” Tuesday. You deserve a little square of happiness, don’t you think?
What You Need: The Shopping List
Gathering your ingredients is the first step to deliciousness. Here’s your list, divided by layer for easy checking.
For the Graham Cracker Crust:
- 1 ½ cups graham cracker crumbs (about 12 full sheets)
- ⅓ cup melted butter
- ¼ cup granulated sugar
For the Vanilla Custard Layer:
- 2 cups whole milk
- 1 cup heavy cream
- ½ cup granulated sugar
- 5 large egg yolks
- 2 tsp pure vanilla extract
- 3 tbsp cornstarch
For the Whipped Cream Topping:
- 1 ½ cups heavy cream, cold
- ¼ cup powdered sugar
- 1 tsp vanilla extract
No Stress Substitutions
Out of something? Don’t run to the store. Let’s swap!
- Graham Crackers: Use digestive biscuits, vanilla wafers, or even crushed pretzels for a salty-sweet twist.
- Butter: Margarine works in a pinch for the crust.
- Whole Milk & Cream: You can use 3 cups of half-and-half instead. For a lighter version, use all whole milk, but the custard will be less rich.
- Cornstarch: An equal amount of all-purpose flour can thicken the custard, but it may make it slightly less silky.
Let’s Make Vanilla Custard Cream Squares!
Follow these steps, and you’ll be a custard pro in no time. I promise it’s easier than it looks.
Step 1
First, get your oven ready. Heat it to 350°F (175°C). Now, take your 9×9 inch baking dish and line it with parchment paper. Let the paper hang over the sides. This little trick is a lifesaver. It means you can lift the whole dessert out later for perfect, clean cuts. No digging and making a mess in the pan!
Step 2
Time for the crust! Grab a medium bowl. Mix the graham cracker crumbs, melted butter, and sugar. It should look like wet sand and hold together when you pinch it. Dump it into your prepared pan. Use a glass or measuring cup to press it down really firmly and evenly. Bake it for just 10 minutes. This sets the crust and gives it a lovely toasted flavor. Let it cool on a rack.
Pro tip: Press the crumbs up the sides a tiny bit to create a small wall. This helps contain the custard.
Step 3
Now for the star: the custard. Pour the milk and heavy cream into a medium saucepan. Warm it over medium heat until you see small bubbles around the edge. Don’t let it boil. While that heats, whisk the sugar, egg yolks, vanilla, and cornstarch in a separate bowl. Whisk until it’s completely smooth and a beautiful pale yellow.
Step 4
This step is crucial: tempering the eggs. Take a ladle of the hot milk mixture. Slowly pour it into the egg yolk bowl while whisking non-stop. This gently raises the eggs’ temperature. If you just dumped them in the hot pot, you’d get sweet scrambled eggs! After the first ladle is mixed in, you can slowly pour in the rest of the milk, still whisking.
Step 5
Pour everything back into the saucepan. Cook over medium heat, stirring constantly with a whisk or spatula. You’ll feel it start to thicken. Keep stirring! After 5-7 minutes, it will begin to bubble with slow, thick pops. That’s your sign it’s done. Cook it for one more minute after that bubble, then immediately take it off the heat. The custard will be gloriously thick and smell like vanilla dreams.
Step 6
Pour the hot custard over your cooled crust. Spread it gently into an even layer. This is where patience comes in. Pop the whole pan into the fridge. You need to let it chill for at least 2 hours, but 4 is even better. The custard needs to become completely firm and set before you add the whipped cream.
Step 7
When you’re ready to serve, make the whipped cream. Use a large, cold bowl and cold beaters. Beat the heavy cream, powdered sugar, and vanilla on medium-high speed. Watch it go from liquid to soft peaks to stiff peaks. Stop when you can turn the bowl upside down without it falling out! Don’t overbeat, or you’ll start making butter.
Step 8
The grand finale! Take your set custard out of the fridge. Dollop the whipped cream on top and spread it into a beautiful, fluffy, even layer. Use a warm knife to cut perfect squares. Dip the knife in hot water and wipe it clean between each cut. This gives you stunningly clean slices.
Chef’s tip: For extra flavor, mix a tablespoon of instant vanilla pudding powder into the whipping cream. It stabilizes the cream and boosts the vanilla taste!
Step 9
Time to decorate. A little extra dollop of whipped cream on each square looks lovely. I also love grating a bit of white chocolate or a tiny sprinkle of cinnamon on top. Serve these squares immediately. Keep them chilled until the very last second for the best texture.
Your Timeline to Dessert Success
Good things take a little time, but most of it is hands-off!
- Prep Time: 20 minutes of active work.
- Cooking Time: 20 minutes (10 for crust, 10 for custard).
- Chilling Time: This is key! At least 2 hours, but 4 is ideal.
- Total Time: About 40 minutes of active time, plus chilling.
- Servings: 9 generous squares.
- Kcal: Approximately 350 per square.
A Secret for Super Smooth Custard
Here’s my little trick for a flawless custard every single time. After you cook the custard and take it off the heat, press it through a fine-mesh sieve as you pour it over the crust. This catches any tiny bits of cooked egg or stubborn cornstarch lumps. It guarantees a texture as smooth as silk. It adds one extra dish to wash, but trust me, it’s worth it for that professional finish.
Why We Use Egg Yolks
Ever wonder why this recipe calls for just the yolks? Egg yolks are the superstars of richness and thickening. They contain fat and a natural thickener called lecithin. The cornstarch helps, but the yolks give custard its signature velvety mouthfeel and luxurious yellow color. Save the whites for a healthy omelet the next morning!
Helpful Tools for the Job
You don’t need fancy equipment for this recipe.
- 9×9 inch baking dish
- Parchment paper
- Medium saucepan
- Mixing bowls (a few different sizes)
- Whisk and rubber spatula
- Electric hand mixer or stand mixer (for the whipped cream)
- Fine-mesh sieve (my secret weapon for smooth custard!)
How to Store Your Vanilla Custard Cream Squares
These squares must be stored in the refrigerator. Cover the pan tightly with plastic wrap or transfer individual squares to an airtight container. They will stay fresh and delicious for up to 3-4 days. The crust may soften a tiny bit after day two, but the flavor will still be wonderful.
Can you freeze them? I don’t recommend freezing the fully assembled squares. The whipped cream topping doesn’t freeze and thaw well. It can become grainy and separate. The custard layer can also weep when thawed, making the dessert soggy.
If you want to get ahead, you can make and bake the crust a day in advance. Let it cool, then cover it. You can also make the custard layer and spread it on the crust. Cover it tightly and refrigerate for up to a day. Then, just before serving, add the fresh whipped cream topping. This keeps everything at its absolute best.
My Best Tips for You
- Use real vanilla extract, not imitation. The flavor difference is huge.
- Make sure your heavy cream for whipping is very cold. It whips up faster and higher.
- Let the baked crust cool completely before adding the warm custard. A hot crust will melt the butter and make it greasy.
- For clean cuts, use that warm knife trick! It’s a game-changer for presentation.
Make It Look Fancy
Presentation is part of the fun! Try one of these ideas:
- Serve on a pool of raspberry or strawberry coulis.
- Top with fresh berries like blueberries or sliced strawberries.
- Garnish with a mint leaf for a pop of color.
- Dust the top lightly with cocoa powder using a small sieve.
- Serve in a mini trifle dish, crumbling the layers for a deconstructed look.
Delicious Variations to Try
Once you master the classic, get creative!
- Chocolate Swirl: Melt ½ cup of chocolate chips. Dollop it over the custard before chilling and swirl with a knife.
- Lemon Bliss: Replace the vanilla in the custard with 2 tablespoons of fresh lemon juice and 1 tablespoon of zest.
- Berry Compote Layer: Spread a thin layer of your favorite berry jam or compote over the cooled crust before adding the custard.
- Chocolate Crust: Use chocolate graham crackers or Oreo cookie crumbs (without the filling) for the base.
- Coconut Dream: Add ½ cup of toasted coconut to the crust and use coconut extract in the custard.
- Mocha Magic: Dissolve 1 tablespoon of instant espresso powder into the warm milk mixture before making the custard.
Common Mistakes to Avoid
Let’s walk through a few common slip-ups so your squares are perfect.
Mistake 1: Not Tempering the Eggs
This is the biggest mistake. Pouring cold eggs directly into hot milk will cook them instantly. You’ll end up with sweet, chunky scrambled eggs in your liquid. Always temper! Slowly add the hot liquid to the eggs while whisking constantly. This raises their temperature gently and creates a smooth, luxurious base for your custard.
Mistake 2: Undercooking the Custard
If your custard is runny and doesn’t set, you likely didn’t cook it long enough. Cornstarch needs to reach a full boil to activate its thickening power. Cook the custard until you see those slow, thick bubbles popping in the center. Let it bubble for a full minute while stirring. It will thicken significantly as it cools.
Mistake 3: Skipping the Chill Time
Impatience is the enemy here. If you try to add whipped cream to warm custard, it will melt into a soupy mess. The custard layer must be completely cold and firm. This takes at least 2 hours in the fridge. Rushing this step ruins the beautiful layers. Plan ahead for the best results.
Mistake 4: Overbeating or Underbeating the Cream
Whipped cream has stages. Underbeaten cream is soft and will slump on your squares. Overbeaten cream looks curdled and turns into butter. Stop beating when you have stiff peaks. That means when you lift the beaters, the peak of cream stands straight up and doesn’t fold over. It should look fluffy and hold its shape.
Your Vanilla Custard Cream Squares Questions, Answered
Can I use a different size pan?
Yes, but it will change the thickness of your layers. A 9×13 pan will make a thinner dessert, so you might want to adjust baking and chilling times slightly. You’ll also get more servings. An 8×8 pan will make thicker, taller squares. Just be sure your custard layer is cooked through if it’s thicker.
My custard is lumpy! Can I fix it?
Don’t panic! If you have small lumps, the best fix is to strain the hot custard through a fine-mesh sieve as you pour it over the crust. This will catch any bits. If it’s very lumpy, you can try blending it with an immersion blender before pouring. To prevent lumps next time, make sure your cornstarch is fully dissolved in the egg mixture.
Can I make this recipe without eggs?
For a true custard, eggs are essential for texture and richness. However, you can make a “pudding” version using more cornstarch. Use about ⅓ cup total of cornstarch. Follow the same steps, but know the flavor and color will be slightly different. It will still be delicious and creamy, just not a classic egg custard.
Why did my crust turn out soggy?
A soggy crust usually happens for two reasons. First, the crust wasn’t pressed firmly enough into the pan. Press it down very hard. Second, the custard was poured on while it was still hot, or the crust wasn’t completely cooled. Make sure your crust is at room temperature before adding the warm custard.
How far in advance can I make this?
You can assemble the crust and custard layers up to 24 hours in advance. Keep it covered in the fridge. I highly recommend adding the whipped cream topping the day you plan to serve it, ideally within a few hours. This keeps the whipped cream fresh, fluffy, and looking its best.
Can I use low-fat milk to make it healthier?
You can, but the custard will be less rich and creamy. The fat in whole milk and heavy cream gives the dessert its luxurious mouthfeel. Using low-fat milk might also affect how well the custard sets. For the best texture and flavor, I recommend sticking with the whole milk and cream.
What can I do with the leftover egg whites?
Don’t waste them! You can make a fluffy omelet or scrambled egg whites for breakfast. They’re great in healthy breakfast muffins. You can also make angel food cake, meringue cookies, or macarons if you’re feeling ambitious. Store them in an airtight container in the fridge for 2-3 days.
My whipped cream is runny. What did I do wrong?
Runny whipped cream often means your cream, bowl, or beaters weren’t cold enough. Fat needs to be cold to whip properly. It could also mean you didn’t beat it long enough. Make sure everything is chilled and beat on medium-high speed until truly stiff peaks form. Adding a little extra powdered sugar can help stabilize it.
Is there a way to make a no-bake crust?
Absolutely! For a no-bake version, simply mix the crumb mixture and press it firmly into the pan. Refrigerate it for at least 30 minutes to let the butter firm up and set the crust. This works perfectly and saves you from turning on the oven. The flavor will be slightly different, but still yummy.
Can I turn this into bars for a bake sale?
These are perfect for bake sales! Just make sure they are kept cold. I recommend transporting the whole pan in a cooler or on ice. Cut them into squares right in the pan. You can place each square in a paper cupcake liner for easy, mess-free pickup. They hold up very well and are always a crowd-pleaser.
Ready to Create Something Wonderful?
I hope you feel inspired to make these Vanilla Custard Cream Squares. They really are a special treat. They bring people together with every creamy, dreamy bite. Remember, cooking is about love and sharing. Don’t stress over perfection. A slightly lopsided square made with joy tastes even better than a perfect one. So turn on some music, gather your ingredients, and have fun in the kitchen. I can’t wait for you to try this recipe. Enjoy every sweet moment!
Garlic Ramen Delight
Ingredients
Equipment
Method
- Preheat oven to 350°F (175°C) and line a 9x9 inch baking dish with parchment paper.
- In a medium bowl, mix graham cracker crumbs, melted butter, and sugar until it resembles wet sand. Press mixture firmly into the prepared pan and bake for 10 minutes. Let cool on a rack.
- In a medium saucepan, heat milk and heavy cream over medium heat until small bubbles form. Do not boil.
- In a separate bowl, whisk together sugar, egg yolks, vanilla, and cornstarch until smooth and pale yellow.
- Temper the eggs by slowly adding a ladle of the hot milk mixture while whisking. Gradually add the remaining milk while continuing to whisk.
- Return mixture to saucepan and cook over medium heat, stirring constantly, until thickened (about 5-7 minutes). It should bubble with slow, thick pops. Cook for one more minute then remove from heat.
- Pour the hot custard over the cooled crust and spread evenly. Refrigerate for at least 2 hours, preferably 4.
- Prepare whipped cream by beating heavy cream, powdered sugar, and vanilla in a cold bowl until stiff peaks form.
- Once custard is set, spread whipped cream evenly on top. Cut into squares using a warm knife for clean slices.
- Decorate with an extra dollop of whipped cream, grated white chocolate, or a sprinkle of cinnamon before serving.