The Coziest, Spiciest Comfort Food: Beef & Jalapeño Cheddar Biscuits
You know those days when you crave something hearty, cheesy, and with just a little kick? The kind of dish that makes everyone gather in the kitchen, noses twitching at the smell? That’s exactly how I felt last Sunday. I wanted to make something special for game night, but nothing fussy. So I whipped up these Beef & Jalapeño Cheddar Biscuits, and let me tell you, they disappeared faster than a summer popsicle. It’s like the love child of a cheesy biscuit and a juicy sloppy joe, and it’s absolutely magical.
From Cornbread to Comfort: A Little Biscuit History
This recipe is my own happy mash-up of Southern and Tex-Mex flavors. Biscuits are, of course, a Southern staple, fluffy and perfect for sopping up gravy. Adding spicy jalapeños and sharp cheddar is a natural twist many home cooks have embraced. I took it one step further by tucking a savory, seasoned beef filling right inside the biscuit dough. It’s not a traditional, centuries-old dish, but it’s a modern, hand-held masterpiece born from a love of BIG flavor and simple, satisfying cooking. Sometimes the best recipes are the ones you invent to use what you love!
Why You’ll Absolutely Adore This Recipe
First, it’s a complete meal in one delicious, portable package. No need for a fork! Second, the contrast is incredible: the flaky, cheesy, slightly spicy biscuit against the rich, savory beef filling is a textural dream. It’s also incredibly forgiving. A little more cheese? Perfect. A little less jalapeño? No problem. This recipe loves to be adapted. Finally, it makes you look like a kitchen rock star with minimal effort. The wow factor is huge.
Perfect Occasions for Your Biscuit Masterpiece
These biscuits are the ultimate crowd-pleaser. Think tailgating parties, family movie nights, or a hearty weekend brunch. They’re perfect for potlucks because they travel so well. I’ve even packed them for a picnic! Anytime you need fun, filling finger food that both kids and adults will fight over, this is your go-to recipe.
Gathering Your Ingredients
Let’s get everything together. This list is simple and most items are pantry staples.
- 2 cups all-purpose flour
- 1 tbsp baking powder
- 1 tsp salt
- 1/2 cup cold unsalted butter, cubed
- 3/4 cup cold buttermilk
- 1 cup shredded sharp cheddar cheese
- 2-3 fresh jalapeños, finely diced (seeds removed for less heat)
- 1 lb ground beef (85/15 is ideal)
- 1 small onion, finely diced
- 2 cloves garlic, minced
- 1 tbsp tomato paste
- 1 tsp chili powder
- 1/2 tsp cumin
- Salt and black pepper to taste
Easy Swaps: Make It Your Own
Don’t have an ingredient? No worries! Here are my favorite swaps:
- Buttermilk: Make a quick version by adding 1 tbsp lemon juice or vinegar to 3/4 cup regular milk. Let it sit for 5 minutes.
- Ground Beef: Ground turkey, chicken, or a plant-based crumble work great.
- Jalapeños: Use 1/4 cup of pickled jalapeños for a tangier kick, or a can of mild green chiles for flavor without the heat.
- Cheddar Cheese: Pepper Jack is a fantastic spicy alternative, or use Colby for a milder taste.
Let’s Get Cooking: The Fun Part!
Ready to make a mess and create something amazing? Let’s do this step-by-step.
Step 1: Make the Savory Beef Filling
Start by browning your ground beef in a large skillet over medium heat. Use a wooden spoon to break it up into small crumbles. As it sizzles, add your diced onion and minced garlic. The kitchen will start smelling incredible. Once the beef is no longer pink and the onions are soft, stir in the tomato paste, chili powder, and cumin. The rich red color of the tomato paste will coat the beef beautifully. Season well with salt and pepper, then take it off the heat to cool completely. Pro tip: A cool filling is crucial! If it’s too hot, it will melt the butter in your biscuit dough and make it greasy.
Step 2: Create the Biscuit Dough
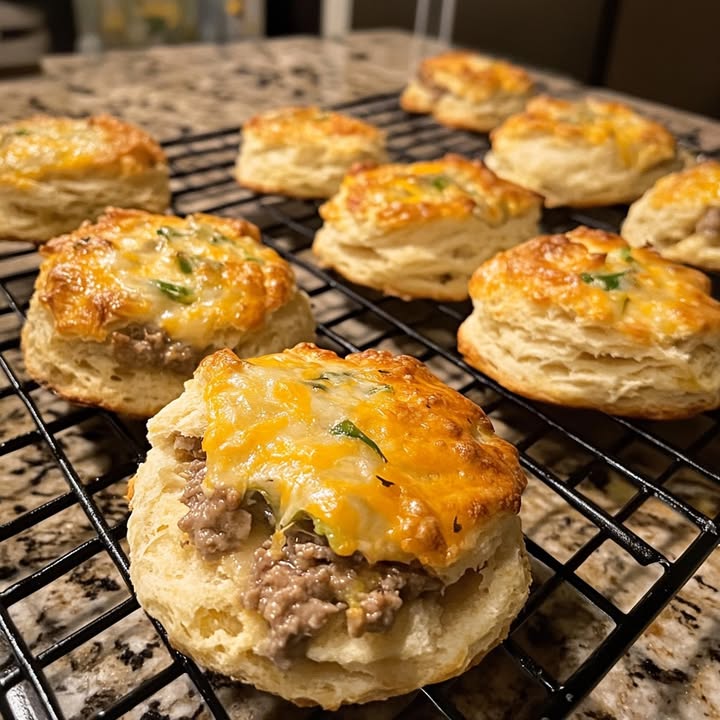
In a large mixing bowl, whisk together the flour, baking powder, and salt. Now, take your cold, cubed butter. Using a pastry cutter or your fingertips, work the butter into the flour mix. You want pea-sized pieces of butter throughout. This is what creates those lovely, flaky layers. Pour in the cold buttermilk and gently stir until just combined. It will look shaggy and uneven—that’s perfect! Now, fold in the shredded cheddar cheese and diced jalapeños. The dough will become studded with bright green and orange specks.
Step 3: Assemble the Biscuits
Turn your dough out onto a lightly floured surface. Gently pat it into a rough rectangle, about 1/2 inch thick. Now, take your cooled beef filling and spread it evenly over one half of the dough rectangle. Carefully fold the other half of the dough over the filling, like you’re closing a book. Press the edges gently to seal. Use a sharp knife or a bench scraper to cut the large packet into 8-12 squares. Don’t worry if some filling peeks out; it adds character!
Step 4: Bake to Golden Perfection
Place your biscuit squares on a parchment-lined baking sheet. Give them some room to breathe—they will expand! Pop them into a preheated 425°F (220°C) oven. Bake for 18-22 minutes. You’ll know they’re done when they are puffed up, golden brown on top, and you can see the cheesy bits bubbling around the edges. Your whole house will smell like a dream. Let them cool on the pan for at least 10 minutes. I know it’s hard, but this lets them set so they don’t fall apart when you pick them up.
Chef’s Tip
For the flakiest layers, handle the dough as little as possible. Overworking it develops gluten, which leads to tough biscuits. A light, confident touch is your best tool.
Your Kitchen Timeline
Here’s a quick breakdown so you can plan your cooking adventure:
- Prep Time: 25 minutes (including filling cook & cool time)
- Cook Time: 20 minutes
- Resting Time: 10 minutes
- Total Time: About 55 minutes
A Secret for Extra Flaky Goodness
My secret weapon? I freeze my butter, then grate it on a box grater right into the flour. This distributes the cold butter perfectly with minimal handling, guaranteeing incredible, tender layers every single time.
A Fun Jalapeño Fact
Did you know that the heat of a jalapeño is measured in Scoville Heat Units? The heat isn’t in the seeds themselves, but in the white pith (the placenta) the seeds are attached to. So, for less spice, scrape out that white ribbing! For more heat, leave it in.
What You’ll Need in Your Kitchen Arsenal
You don’t need fancy gadgets for this!
- Large mixing bowl
- Pastry cutter or your clean hands
- Large skillet
- Wooden spoon
- Baking sheet
- Parchment paper (a lifesaver for clean-up!)
- Sharp knife or bench scraper
Storing Your Leftovers (If You Have Any!)
Let the biscuits cool completely. Store them in an airtight container in the fridge for up to 4 days. They are fantastic cold, but I love them reheated.
To reheat, wrap them loosely in foil and warm in a 350°F oven for about 10 minutes. This keeps the biscuit from getting soggy. You can also microwave them for 20-30 seconds, but the oven method is best for texture.
For longer storage, you can freeze them! Wrap each biscuit individually in plastic wrap, then place them all in a freezer bag. They’ll keep for 2-3 months. Thaw in the fridge overnight and reheat as above.
My Best Tips for Biscuit Success
- Cold is key: Cold butter, cold buttermilk, cold bowl. This prevents the butter from melting before baking, which creates steam and lift.
- Don’t twist your cutter! If you use a round biscuit cutter instead of squares, press straight down. Twisting seals the edges and inhibits rising.
- Feel free to get creative with the filling! Add a tablespoon of BBQ sauce to the beef, or mix in some black beans and corn for a Southwest twist.
Making Them Look as Good as They Taste
Presentation is part of the fun! Serve these on a rustic wooden board for a casual feel. Add a small bowl of cool sour cream or a creamy avocado lime sauce for dipping. Sprinkle a few extra diced jalapeños and a little chopped cilantro on top for a fresh, colorful pop. It makes all the difference!
Try These Tasty Variations Next Time
Once you master the basic recipe, the world is your oyster! Here are six fun twists:
- Pizza Lover’s: Use Italian sausage, add diced pepperoni and a spoonful of pizza sauce to the beef. Top with mozzarella cheese.
- Breakfast Biscuits: Swap the beef for cooked breakfast sausage, and add a handful of frozen hash browns to the filling.
- BBQ Bacon: Mix shredded cooked chicken with your favorite BBQ sauce. Add crumbled cooked bacon to the biscuit dough.
- Vegetarian Fiesta: Skip the meat. Use a mix of black beans, corn, bell peppers, and taco seasoning for the filling.
- Philly Cheesesteak: Sauté thin slices of ribeye steak with onions and green peppers. Use provolone cheese instead of cheddar.
- Buffalo Chicken: Shred a rotisserie chicken and toss it in buffalo sauce. Use blue cheese crumbles in the biscuit dough.
Common Mistakes to Avoid
Let’s steer clear of a few simple pitfalls to ensure biscuit bliss.
Warm Filling, Sad Biscuits
This is the number one mistake! If your beef filling is still warm when you fold it into the dough, it will melt the butter. Melted butter means no steam, which means dense, flat biscuits instead of light, flaky ones. Always, always let your filling cool to room temperature. You can even spread it on a plate and pop it in the fridge for 15 minutes to speed things up.
Overworking the Dough
Biscuit dough is not bread dough. You don’t need to knead it until it’s smooth. The more you mix and handle it, the more gluten develops. Gluten equals chewiness, which we don’t want. Mix just until the ingredients come together. It’s okay if it looks a bit ragged and uneven. Those ragged bits become beautiful, tender layers in the oven.
Using Warm Butter or Buttermilk
I know I sound like a broken record, but temperature matters. Your butter and buttermilk must be cold straight from the fridge. Some bakers even freeze their butter and grate it in. Warm ingredients start the baking process too early and your biscuits will spread instead of rise. Treat your dough to a chill session.
Not Preheating the Oven Fully
Patience is a virtue here. A hot, fully preheated oven (425°F) gives the biscuits an immediate burst of heat. This creates a quick rise and sets the structure. If the oven is too low, the butter will melt out before the biscuits set, leaving you with a greasy, squat result. Wait for that oven beep!
Your Questions, Answered
Can I make the dough ahead of time?
Absolutely! You can prepare the biscuit dough (without the filling mixed in) up to a day ahead. Wrap it tightly in plastic wrap and keep it in the fridge. When you’re ready, let it sit out for 15 minutes, then roll, fill, and bake as directed. The filling can also be made a day ahead and stored covered in the fridge. This makes assembly super quick for a party or busy weeknight.
My biscuits didn’t rise much. What went wrong?
This usually points to one of three things: old baking powder, overworked dough, or an oven that wasn’t hot enough. Baking powder loses its potency over time. Make sure yours is fresh (less than 6 months old). Remember my light-touch rule for dough. And double-check your oven temperature with a separate thermometer to ensure it’s hitting that 425°F mark accurately.
How spicy are these with the jalapeños?
You have full control! The heat in jalapeños lives mostly in the white ribs and seeds. For a very mild flavor, remove all the seeds and the white pith inside. For medium heat, remove just the seeds. For a real kick, dice up the whole pepper, seeds and all. You can also taste a tiny piece of your pepper before adding it to gauge its heat level.
Can I use pre-shredded cheese from a bag?
You can, but I don’t recommend it for the best results. Pre-shredded cheese is coated with anti-caking agents like potato starch or cellulose. This coating can prevent the cheese from melting as smoothly and can sometimes make the texture of the dough a bit grainy. For the ooiest, gooiest melt, take two minutes to shred a block of cheese yourself.
What’s the best way to reheat these so they’re not soggy?
The oven or toaster oven is your best friend here! Reheat at 350°F for about 10 minutes. This will re-crisp the exterior and warm the filling through without making the biscuit soggy. The microwave is quick but will steam them, leading to a softer texture. If you must microwave, do it for only 15-20 seconds and then let it sit for a minute.
Can I freeze these biscuits before or after baking?
Both ways work great! To freeze before baking, assemble the biscuits and place the unbaked squares on a parchment-lined sheet. Freeze solid, then transfer to a freezer bag. Bake straight from frozen, adding 3-5 minutes to the baking time. To freeze after baking, let them cool completely, wrap individually, and freeze. Thaw in the fridge overnight and reheat in the oven.
What should I serve with these?
They are a full meal on their own! But if you want to round out the table, a simple green salad with a bright vinaigrette cuts the richness perfectly. For a real comfort food feast, creamy coleslaw or a bowl of tomato soup for dipping are fantastic companions.
My filling is a bit watery. How can I fix that?
Too much liquid in the filling can make the biscuit dough soggy. After browning your beef and adding the seasonings, let it simmer uncovered for a few extra minutes. This will allow any extra liquid from the tomatoes or onions to evaporate. You can also sprinkle in a teaspoon of flour or cornstarch and cook for another minute to help thicken it up.
Can I make these gluten-free?
Yes! Use a good-quality 1-to-1 gluten-free all-purpose flour blend that contains xanthan gum. Brands like Bob’s Red Mill or King Arthur Measure for Measure work well. The texture will be slightly more crumbly, but still delicious. Be sure your other ingredients (like baking powder) are labeled gluten-free if that’s a concern.
What if I don’t have buttermilk?
No buttermilk, no problem! My favorite quick substitute is to mix 1 tablespoon of lemon juice or white vinegar into a measuring cup. Then fill it up with regular milk until you reach the 3/4 cup line. Stir and let it sit for 5-10 minutes until it looks curdled and slightly thickened. This “soured” milk works just like buttermilk in the recipe.
Go Forth and Bake with Joy!
And there you have it! My ultimate, crowd-pleasing, secretly-easy recipe for Beef & Jalapeño Cheddar Biscuits. This dish is all about joyful cooking and sharing fantastic food with people you love. Don’t be afraid to get messy, to tweak the spices to your taste, and to enjoy that incredible smell wafting from your oven. I promise, once you pull that golden, cheesy, spicy pan out of the oven, you’ll feel like a total kitchen superstar. Now, go grab your apron and get baking—your new favorite comfort food awaits!
Italian Cream Cake
Ingredients
Equipment
Method
- Brown ground beef in a large skillet over medium heat, breaking it into small crumbles.
- Add diced onion and minced garlic to the skillet and cook until the beef is no longer pink and onions are soft.
- Stir in the tomato paste, chili powder, cumin, salt, and pepper, and then remove from heat to cool completely.
- In a large mixing bowl, whisk together flour, baking powder, and salt.
- Cut cold cubed butter into the flour mixture until pea-sized pieces form.
- Pour in cold buttermilk and mix until just combined; then fold in cheddar cheese and jalapeños.
- Turn dough onto a floured surface and pat into a rough rectangle, about 1/2 inch thick.
- Spread cooled beef filling over one half of the dough, then fold the other half over and press edges to seal.
- Cut the packet into 8-12 squares with a sharp knife or bench scraper.
- Place squares on a parchment-lined baking sheet and bake in a preheated 425°F oven for 18-22 minutes, until golden brown.
- Let cool on the pan for at least 10 minutes before serving.