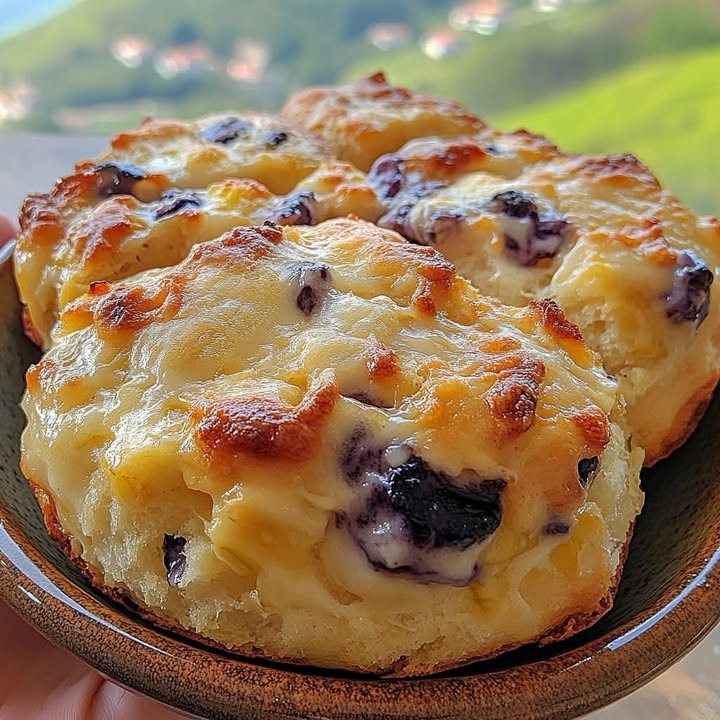
A Taste of Sunshine: Sweet Blueberry Biscuits
There’s nothing quite like the smell of fresh biscuits baking. Now, imagine that warm, buttery smell mixed with the sweet burst of blueberries. That’s the magic we’re making today! These Sweet Blueberry Biscuits are my go-to for turning an ordinary morning into something special. They are my little secret for making everyone feel loved before they’ve even had their coffee.
The Story Behind the Berry Bliss
I grew up eating classic, fluffy biscuits. They were a weekend staple. One summer, I had a huge bowl of blueberries on the counter and a craving for something sweet. I decided to marry the two ideas. My first batch was… well, let’s just say the blueberries sank and the biscuits were purple! After a few tries (and a very patient family), I figured out the trick: frozen butter and a gentle hand. This recipe is my modern take on a Southern classic, perfect for busy bakers who want incredible flavor without a fuss.
Why You’ll Fall in Love With This Recipe
You will love this recipe because it’s wonderfully simple. The dough comes together quickly. You get tender, flaky layers in every single bite. The juicy blueberries pop with sweetness. Then, a simple vanilla-lemon glaze adds the perfect finish. It feels fancy but is totally doable on a sleepy Saturday. Plus, your kitchen will smell like a dream!
When to Whip Up These Blueberry Treats
These biscuits are perfect for so many moments! Serve them warm at a weekend brunch with friends. Pack them for a lovely picnic in the park. They make a sweet addition to a holiday breakfast spread. I also love making a batch to welcome a new neighbor. Honestly, any day that needs a little extra joy is the right day for blueberry biscuits.
What You’ll Need: The Ingredients List
Gather these simple ingredients. Having them cold is the key to success!
For the Biscuits:
- 2 cups all-purpose flour
- 1 cup cold milk (whole milk is best!)
- 1/2 cup granulated sugar
- 5 tablespoons cold or frozen butter
- 4 teaspoons baking powder
- A generous pinch of salt
- 3 ounces fresh or dried blueberries
For the Glaze:
- 1 cup powdered sugar
- 2-3 tablespoons water
- 1 teaspoon pure vanilla extract
- 1 teaspoon fresh lemon juice
No Blueberries? No Problem! Easy Swaps
Don’t worry if you’re out of something! Here are my favorite swaps:
- Blueberries: Use frozen blueberries straight from the freezer. Don’t thaw them! You can also use dried cranberries or chopped raspberries.
- Milk: Buttermilk makes incredibly tender biscuits. Plain yogurt thinned with a little water also works great.
- Lemon Juice: You can use orange juice in the glaze for a different citrus twist.
Let’s Get Baking: Your Step-by-Step Guide
Put on your apron and get ready for some fun, messy hands. That’s how you know it’s good!
Step 1: Get Your Oven Ready
Start by preheating your oven to 450°F (232°C). This high heat is crucial. It creates a quick burst of steam from the cold butter. That steam is what makes our biscuits rise tall and get those beautiful flaky layers. Let the oven heat fully while you work on the dough. A hot oven is your best friend here.
Pro tip: Place your baking sheet in the oven as it preheats. A hot pan helps the biscuits start baking immediately for a better bottom crust.
Step 2: Mix the Dry Goods
Take a large mixing bowl. Add your flour, sugar, baking powder, and that important pinch of salt. Whisk it all together really well. You want to see the ingredients become one uniform, pale mixture. This ensures the baking powder is evenly distributed. No one wants a bite with too much baking powder! The sugar will glitter like tiny crystals in the flour.
Step 3: Add the Cold Milk
Pour your cold milk right into the bowl of dry ingredients. Use a fork or a dough whisk to stir it. You just want to mix until a shaggy, sticky dough forms. It will look rough and lumpy, and that’s perfect! Stop mixing as soon as no dry flour patches remain. Overmixing at this stage is the enemy of tender biscuits.
Step 4: Work in the Frozen Butter
This is the secret step! Take your stick of butter that’s been in the freezer for an hour. Don’t grate it. Just break it into small, pea-sized chunks with your hands. Scatter these cold butter pieces all over the top of your dough. The goal is to have solid bits of butter nestled in the dough, not blended in.
Step 5: Fold and Knead Gently
Lightly flour your hands. Gently fold the dough over itself a few times. You’re pressing the butter chunks into the dough, not melting them. You should see streaks of butter. Knead it just 4-5 times until it barely holds together. Imagine you are giving the dough a very gentle hug, not a workout.
Pro tip: If the dough gets too warm or sticky, pop the whole bowl into the freezer for 5 minutes. Cold dough equals flaky biscuits!
Step 6: Add Berries and Cut the Biscuits
Now, sprinkle your blueberries over the dough. Gently press and fold to distribute them. On a floured surface, pat or roll the dough out to about ¾-inch thick. Use a biscuit cutter or a floured glass to cut straight down—don’t twist! Twisting seals the edges and prevents a good rise. You should get about six beautiful, berry-studded rounds.
Step 7: Bake to Golden Perfection
Place your biscuits on a parchment-lined baking sheet. Make sure they are touching each other. This helps them rise up, not out. Bake for 7-12 minutes. Watch for gorgeous, golden-brown tops. The smell will be absolutely intoxicating. Pull them out when they look puffed and perfect.
Step 8: The Finishing Touches: Butter and Glaze
As soon as the biscuits come out of the oven, melt a tablespoon of butter. Brush it lightly over the hot tops. This adds flavor and gives the glaze something to stick to. In a small bowl, whisk the powdered sugar, water, vanilla, and lemon juice. Drizzle this sweet, glossy glaze all over the warm biscuits. Watch it shimmer and soak in slightly.
Chef’s tip: For an extra burst of flavor, add a teaspoon of grated lemon zest to the glaze. It makes the blueberries taste even brighter!
Your Baking Timeline
Here’s how your time will break down for these sweet treats:
- Prep Time: 15 minutes
- Cook Time: 10 minutes
- Chill Time (for butter): 1 hour
- Total Time: 1 hour 25 minutes
A Little Extra Secret From My Kitchen
My biggest secret is to always use a metal biscuit cutter that’s been dipped in flour. Plastic cutters can drag and stick. A sharp, floured metal cutter slices cleanly through the dough. This preserves those delicate layers we worked so hard to create. It’s a tiny thing that makes a huge difference!
A Berry Fun Fact
Did you know blueberries are one of the only natural foods that is truly blue? That gorgeous color comes from powerful antioxidants called anthocyanins. So not only are these biscuits delicious, but they’re giving you a little health boost, too. Nature’s candy is pretty amazing.
Tools You’ll Need
You don’t need fancy equipment! Here’s the short list:
- Large mixing bowl
- Whisk or fork
- Measuring cups and spoons
- Rolling pin (or just your hands!)
- 2-3 inch round biscuit cutter or a glass
- Parchment paper
- Baking sheet
- Pastry brush (for the butter)
- Small bowl for glaze
How to Keep Your Biscuits Fresh
These biscuits are truly best eaten the day they are made, preferably warm. The glaze will be at its glossy best.
If you have leftovers, let them cool completely first. Store them in an airtight container at room temperature for up to 2 days. They will lose some crispness but will still taste wonderful.
For longer storage, you can freeze the unglazed biscuits before baking. Place the cut biscuits on a tray, freeze solid, then transfer to a freezer bag. Bake from frozen, adding a few extra minutes to the baking time. Make the fresh glaze after they come out of the oven.
My Best Tips for Success
- Keep everything cold: milk, butter, even your bowl if your kitchen is warm.
- Handle the dough as little as possible. More handling makes tough biscuits.
- If using frozen blueberries, do not thaw them. Toss them in a little flour before adding to the dough to prevent bleeding.
- Want taller biscuits? Pat the dough thicker, closer to 1-inch, before cutting.
Make Them Look Extra Special
Presentation is part of the fun! Try these ideas:
- Serve them on a pretty, rustic wooden board with fresh blueberry sprigs.
- Dust a little extra powdered sugar over the glaze for a snowy effect.
- Place them in a basket lined with a checkered napkin for a homey feel.
- For a party, make mini biscuits using a smaller cutter.
Healthier Twists on the Classic
Want to lighten things up? Here are six tasty variations:
- Whole Wheat Blueberry Biscuits: Swap half the all-purpose flour for whole wheat flour. You’ll get a nuttier flavor and more fiber.
- Vegan Blueberry Biscuits: Use a plant-based milk and cold coconut oil or vegan butter. The method stays exactly the same.
- Lower Sugar Biscuits: Reduce the sugar in the biscuit dough to ¼ cup. You can also make a lighter glaze with just a touch of maple syrup.
- Gluten-Free Blueberry Biscuits: Use a 1-to-1 gluten-free all-purpose flour blend. The texture will be slightly more delicate.
- Lemon Poppy Seed Blueberry Biscuits: Add 2 tablespoons of poppy seeds and the zest of one lemon to the dry ingredients for a bright, textured twist.
- Savory Herb & Blueberry Biscuits: Reduce sugar to 1 tablespoon. Add 1 tablespoon of fresh chopped thyme or rosemary. The sweet and savory combo is surprising and delicious.
Common Mistakes to Avoid
Let’s dodge a few common pitfalls to make sure your biscuits are perfect.
Mistake 1: Using Warm Butter or Overworking the Dough
This is the biggest mistake. If your butter melts before baking, you lose the steam that creates flaky layers. You also make tough biscuits by kneading too much. Handle the dough gently and keep everything cold. Your finished biscuits will be tender and rise beautifully.
Mistake 2: Twisting the Biscuit Cutter
When you cut your biscuits, press straight down and lift straight up. Twisting the cutter seals the edges of the dough. This prevents the biscuits from rising high in the oven. Think of it like using a cookie cutter—clean cuts are key.
Mistake 3: Overbaking or Underbaking
Baking at 450°F is fast. Set a timer! Overbaking dries them out. Underbaking leaves them doughy inside. Look for that perfect golden-brown top. A good trick is to peek at the bottom—it should also be lightly golden.
Mistake 4: Adding Wet Blueberries
If you wash fresh blueberries, dry them thoroughly with a paper towel. Wet berries will bleed color and make the dough soggy. For frozen berries, use them straight from the freezer. A light toss in flour helps too.
Your Blueberry Biscuit Questions, Answered
Can I use frozen blueberries instead of fresh?
Absolutely! Frozen blueberries work wonderfully in this recipe. The key is to use them straight from the freezer. Do not thaw them before adding to the dough. If they thaw, they will release too much juice and turn your dough a soggy purple color. Tossing the frozen berries in a tablespoon of the measured flour can help prevent bleeding. Your baking time might be just a minute or two longer.
Why are my biscuits not rising tall and fluffy?
There are a few common reasons for flat biscuits. Your baking powder might be old and lost its power. Check the expiration date. You might have overmixed the dough, which develops gluten and makes it tough. Also, make sure your oven is fully preheated to the high temperature of 450°F. A cold oven won’t create the initial steam burst needed for a good rise.
Can I make the dough ahead of time?
Yes, you can prepare the dough ahead. After you cut out the biscuits, place them on a baking sheet. Cover them tightly with plastic wrap and refrigerate for up to 12 hours. You can also freeze them at this point for up to 3 months. When ready to bake, just put them directly into the preheated oven from the fridge or freezer, adding a few extra minutes for frozen ones.
What can I use if I don’t have a biscuit cutter?
No problem! A simple drinking glass with a sharp edge works perfectly. Just dip the rim in flour before each cut. You can also use a sharp knife to cut the dough into squares or triangles. This method is actually great because there are no scraps to re-roll, which can make biscuits tougher.
My glaze is too thin/thick. How do I fix it?
Glaze consistency is easy to adjust. If it’s too thin and runny, simply whisk in a little more powdered sugar, one tablespoon at a time. If it’s too thick and won’t drizzle, add more liquid. Use a few drops of water, milk, or lemon juice until it reaches a smooth, pourable consistency. It should coat the back of a spoon.
Can I omit the glaze for a less sweet biscuit?
Of course! The biscuits are delicious all on their own. Without the glaze, they are more of a classic sweet breakfast biscuit. You could also just brush them with the melted butter and a light sprinkle of coarse sugar before baking for a sparkly, crisp top. They are very versatile.
How do I store leftovers and how long do they last?
Store completely cooled biscuits in an airtight container at room temperature for 1-2 days. For longer storage, keep them in the refrigerator for up to 4 days. They will lose their flaky texture but can be gently warmed in the oven or toaster oven to refresh them. I do not recommend storing glazed biscuits stacked, as they will stick together.
Can I make these biscuits vegan?
You sure can! Use a plant-based milk like almond or oat milk. Substitute the butter with a high-quality, very cold vegan butter stick or even solid coconut oil. Just make sure all your vegan substitutes are cold, just like the original recipe calls for. The method remains exactly the same.
What’s the best way to reheat a biscuit?
The best way to bring back that fresh-baked magic is to use your oven or toaster oven. Preheat to 350°F and warm the biscuits for 5-8 minutes until heated through. You can also use a microwave for about 10 seconds, but it will make them soft, not crisp. The oven method is best for texture.
Can I add other fruits or mix-ins?
Get creative! Dried cranberries or cherries are a fantastic swap. Fresh raspberries or blackberries work but are more fragile. For a different twist, try adding white chocolate chips or chopped nuts like pecans. Just keep the total volume of add-ins about the same as the blueberries so the dough can still hold together.
The Final, Delicious Bite
I hope you feel excited to try these Sweet Blueberry Biscuits. They hold so many happy memories for me. From my messy first try to the perfect batch I now share with you. There’s something so satisfying about baking something from scratch that fills your home with love and good smells. So go on, get that butter in the freezer. Your future self will thank you for the delicious, warm, berry-filled bite of joy. Happy baking, friends!
No-Bake Pumpkin Delight
Ingredients
Equipment
Method
- Preheat your oven to 450°F (232°C).
- Mix the flour, sugar, baking powder, and salt in a large bowl until combined.
- Pour in the cold milk and mix with a fork until a rough dough forms.
- Break the cold butter into small pieces and scatter over the dough.
- Gently fold the dough a few times, incorporating the butter without melting it.
- Gently fold in the blueberries and roll or pat the dough to about ¾-inch thick.
- Cut out biscuits with a biscuit cutter and place them on a baking sheet.
- Bake for 7-12 minutes or until golden brown.
- Brush melted butter over the tops and drizzle with the glaze made from powdered sugar, water, vanilla, and lemon juice.