Succumb to This Delicious Apple Tart, a Joy in Every Bite!
There’s something magical about the smell of apples, cinnamon, and butter baking together. It fills your whole house with warmth and promises something wonderful. Every time I slide my simple apple tart into the oven, I know I’m about to make some happy memories. My family starts hovering in the kitchen, plates already in hand! This recipe is my little piece of homemade happiness, and I’m so excited to share it with you.
A Slice of Simple Tradition
This tarte aux pommes is a humble classic. It’s the kind of dessert you’d find in a French farmhouse kitchen, not a fussy pastry shop. While tarts can be complex, this version is all about letting the flavor of the apples shine. In my family, it’s become our go-to “anytime” treat. I perfected this recipe one chilly autumn afternoon, using up a basket of juicy apples from a friend’s tree. Now, it’s my symbol of cozy comfort and sharing.
Why You’ll Fall in Love With This Apple Tart
You will adore this recipe because it’s deceptively simple. It looks impressive with its spiral of apple slices, but it comes together with just a handful of ingredients. The result? A perfect balance: a crisp, buttery crust, tender sweet-and-tart apples, and a hint of warm cinnamon. It’s the ultimate dessert that feels special but won’t keep you in the kitchen all day.
The Perfect Moments for This Tart
This tart is incredibly versatile! Serve it warm with a scoop of vanilla ice cream for a fabulous weeknight dessert. Bring it to a potluck or book club – it always disappears fast. It’s also lovely for a casual weekend brunch with coffee. Honestly, any moment that calls for a touch of sweet, homemade goodness is the right moment for this tart.
What You’ll Need: Apple Tart Ingredients
- 1 store-bought or homemade shortcrust pastry (pâte brisée)
- 4 juicy apples (like Granny Smith or Honeycrisp)
- 50g (about 3 1/2 tbsp) of butter
- 100g (about 1/2 cup) of sugar
- 1 egg
- Cinnamon powder, to taste
Easy Swaps and Substitutions
No worries if you’re missing something! Here are some easy fixes:
- Pastry: A pre-made pie crust works perfectly. For a nuttier flavor, try a pâte sablée (sweet shortcrust).
- Apples: Use any firm baking apple you love. A mix of tart and sweet varieties creates great depth.
- Butter: For a dairy-free version, a high-quality plant-based butter works well.
- Sugar: Brown sugar can replace white sugar for a richer, caramel-like note.
- Cinnamon: Feel free to use a pinch of nutmeg or cardamom instead, or skip it entirely.
Creating Your Masterpiece: Step-by-Step Instructions
Step 1: Get Your Oven Ready
First things first, preheat your oven to 180°C (350°F). This is a crucial step for even cooking. A properly heated oven ensures your crust gets crisp and your topping sets beautifully. While it warms up, take your pastry out of the fridge to let it soften slightly – this will make it easier to roll out without cracking.
Step 2: Prepare the Tart Base
Lightly flour your work surface and rolling pin. Gently roll out your pastry into a circle slightly larger than your tart pan. Carefully transfer it to the pan, pressing it into the edges. Don’t stretch it, just let it settle. Use a fork to prick little holes all over the base. This “docking” stops the pastry from puffing up too much while baking.
Step 3: Prepare and Arrange the Apples
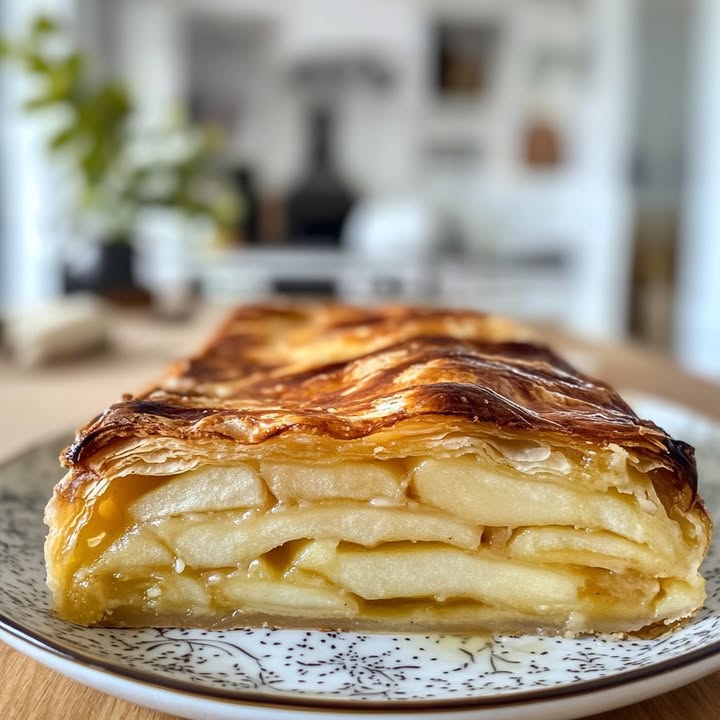
Peel your juicy apples and slice them into thin, even pieces. The key to that gorgeous spiral look is to start from the outside edge of the tart shell and work your way in, overlapping each slice slightly. Watching the concentric circles form is so satisfying! Pro tip: A mandoline slicer can give you super even slices, but a sharp knife works just fine.
Step 4: Make the Sweet Cinnamon Glaze
In a small bowl, crack your egg and give it a good whisk. Add the sugar and a generous sprinkle of fragrant cinnamon. Whisk until the mixture is smooth, pale, and slightly thickened. This simple glaze is what will bind everything together and create that lovely golden, glossy finish. Pour it slowly and evenly over the arranged apple slices.
Step 5: Add the Final Buttery Touch
Cut your cold butter into small pea-sized pieces. Scatter these little nuggets of butter all over the top of the tart. As it bakes, the butter will melt into the apples and sugar, creating an irresistible caramel-like richness. It’s the secret to that deep, luxurious flavor!
Step 6: Bake to Golden Perfection
Slide your assembled tart into the middle of your preheated oven. Bake for 30-35 minutes. You’re looking for a deep, golden-brown crust and a bubbling, caramelized top. The smell will be absolutely heavenly. Chef’s tip: If the crust is browning too quickly, you can loosely tent a piece of aluminum foil over the top for the last 10 minutes.
Your Apple Tart Timeline
Good things don’t have to take forever! This tart is wonderfully quick.
- Prep Time: 25 minutes (mostly for slicing apples!)
- Cook Time: 30-35 minutes
- Total Time: About 1 hour
- Resting Time: Let it cool for at least 15 minutes before slicing. This helps the filling set.
A Chef’s Little Secret
For an extra layer of flavor and to prevent a soggy bottom, try this: before adding the apples, sprinkle a thin layer of ground almonds or breadcrumbs mixed with a teaspoon of sugar over the unbaked pastry. This creates a barrier that soaks up any excess juice and adds a delightful crunch.
Apple Fun Fact
Did you know there are over 7,500 different varieties of apples grown around the world? Each one has its own unique balance of sweet, tart, crisp, and soft textures. Baking with apples is a delicious way to explore these differences!
Helpful Tools for Your Tart
You don’t need fancy equipment. A 9-inch tart pan with a removable bottom is ideal, but a pie dish works too. Otherwise, you’ll just need:
- A rolling pin
- A sharp knife or mandoline
- A mixing bowl and whisk
- A baking sheet (to catch any drips!)
Storing Your Delicious Apple Tart
Short-term storage: Once completely cooled, you can cover the tart loosely with foil or place it under a cake dome. It will keep perfectly at room temperature for up to 2 days. The crust may soften a bit, but the flavor will still be wonderful.
Refrigerating: For longer storage, wrap the tart tightly in plastic wrap or place it in an airtight container and refrigerate for up to 4 days. The chilled texture is different but still delicious. You can enjoy it cold or gently reheat slices.
Freezing: This tart freezes beautifully! Wrap the whole tart or individual slices tightly in plastic wrap and then in foil. Freeze for up to 2 months. Thaw in the refrigerator overnight and reheat in a warm oven to refresh the crust.
Tips & Tricks for Apple Tart Success
- Pre-baking (blind baking) the crust for 10 minutes before adding the filling gives an extra-crispy result.
- Brush the finished, cooled tart with a little apricot jelly for a professional, glossy finish.
- Serve with a dollop of crème fraîche or whipped cream to cut the sweetness.
- Experiment with apple varieties! A mix gives more complex flavor.
Beautiful Ways to Serve Your Tart
- Dust with powdered sugar just before serving for a snowy, elegant look.
- Add a small scoop of vanilla bean ice cream right on the warm slice.
- Garnish with a few fresh mint leaves or edible flowers for a pop of color.
- Serve on a beautiful cake stand for a simple yet stunning centerpiece.
Exploring Healthier Apple Tart Twists
This recipe is wonderfully adaptable. Here are six delicious variations:
- Whole Wheat Crust Tart: Swap the pastry for one made with whole wheat flour. It adds a nutty flavor and extra fiber.
- Reduced Sugar Delight: Cut the sugar in half and let the natural sweetness of the apples shine. A sprinkle on top before baking is enough.
- Nutty Crunch Topping: Skip the pastry! Mix chopped nuts (like almonds or walnuts) with a bit of butter and oats for a crumble topping over the apples.
- Dairy-Free Version: Use plant-based butter and a flax egg (1 tbsp ground flax + 3 tbsp water) instead of regular butter and egg.
- Fruit Mix Medley: Add other fruits! Try adding a handful of fresh cranberries or thinly sliced pears among the apple slices.
- Spice It Up: Go beyond cinnamon. Add a pinch of ginger, allspice, or even a tiny bit of black pepper for a unique twist.
Common Mistakes to Avoid With Your Apple Tart
Mistake 1: Soggy Tart Bottom
A soggy crust happens when the apple juices soak into the pastry before it has a chance to set. This often occurs if the apples are very wet or the filling is too liquidy. To avoid it, make sure to prick the pastry base well with a fork before adding filling. You can also pre-bake the crust for 10 minutes to create a seal. Sprinking a thin layer of ground nuts or breadcrumbs also helps.
Mistake 2: Slicing the Apples Too Thick
If your apple slices are too thick, they won’t cook through evenly. You’ll end up with some pieces that are still crisp while others are mushy. Aim for slices no thicker than 1/4 inch. Consistent thickness is more important than perfect shape. A sharp knife or a mandoline slicer is your best friend for this task.
Mistake 3: Skipping the Egg Wash Glaze
The mixture of egg and sugar isn’t just for sweetness. It acts as a binding agent and creates that beautiful, glossy, golden top. If you skip it, your tart might look a bit pale and the topping won’t hold together as well. Don’t worry if it seems runny when you pour it on; it will set perfectly in the oven’s heat.
Mistake 4: Not Using Cold Butter Pieces
Using softened or melted butter for the topping won’t give you the same result. Those little cold, solid pieces of butter melt slowly in the oven. As they melt, they create tiny pockets of rich flavor and help with caramelization. Scattering cold butter ensures it distributes evenly and does its job properly.
Apple Tart FAQs: Your Questions Answered
Can I use pre-made pie crust for this recipe?
Absolutely! A store-bought refrigerated pie crust works wonderfully and saves a lot of time. Just unroll it, fit it into your tart pan, trim the edges, and you’re ready to go. The flavor and texture will still be fantastic, making this an even easier dessert option for busy days.
What are the best apples to use for baking a tart?
The best apples for baking are firm varieties that hold their shape and offer a balance of sweet and tart. Granny Smith is a classic for its tangy flavor. Honeycrisp adds wonderful sweetness and crispness. Braeburn and Jonagold are also excellent choices. Using two different types can create a more complex and delicious flavor profile in your tart.
How do I know when my apple tart is done baking?
Your tart is done when the pastry crust is a deep golden brown and the apple filling is bubbling gently around the edges. The top should have a caramelized, glossy look. If you insert a thin knife into an apple slice near the center, it should meet just a little resistance but pierce easily – the apples should be tender, not crunchy.
Can I make this apple tart ahead of time?
Yes, you can prepare it ahead in a couple of ways. You can assemble the entire tart, cover it tightly, and refrigerate it for up to 8 hours before baking. Just add a few extra minutes to the baking time since it will be cold. Alternatively, you can bake it fully up to a day in advance. Store it covered at room temperature and reheat gently before serving.
Why did my pastry shrink in the pan while baking?
Pastry shrinkage usually happens if the dough was stretched when fitting it into the pan or if it wasn’t allowed to rest. Always let your pastry relax in the fridge for at least 15-30 minutes after rolling it out and placing it in the pan. Also, gently press it into the corners instead of pulling and stretching it to fit.
My tart is very juicy. Is that normal?
Some juiciness is normal, especially with very ripe, sweet apples. If it seems excessively wet, you might try pre-cooking your apple slices for a few minutes to release some juice before arranging them. Also, ensure your oven is fully preheated so the pastry sets quickly. A little juice is part of the charm!
Can I freeze a baked apple tart?
Freezing a baked apple tart works very well. Let it cool completely first. Wrap it tightly in plastic wrap, then in aluminum foil to prevent freezer burn. It will keep for up to 2 months. Thaw it overnight in the refrigerator and reheat it in a warm oven to crisp up the pastry again before serving.
Do I need to peel the apples for the tart?
Peeling is recommended for the best texture. Apple skins can become tough and separate from the soft flesh during baking, which can be unpleasant to eat. Peeling ensures every bite is perfectly tender. However, if you prefer more fiber and a rustic look, you can leave the skins on – just scrub the apples well first.
What can I use instead of cinnamon?
If you’re not a fan of cinnamon or just want to try something new, you have many options. A little freshly grated nutmeg or allspice would be lovely. Cardamom offers a unique, floral note. You could also use vanilla extract or even a small amount of almond extract in the egg-sugar mixture for a different kind of warmth.
How should I store leftovers?
Store any leftover tart covered at room temperature for 1-2 days. For longer storage, keep it in the refrigerator for up to 4 days. The crust will soften in the fridge, so reheating slices in a toaster oven or regular oven is the best way to bring back that delightful crispness. Avoid microwaving, as it can make the pastry soggy.
A Final Sweet Thought
I hope this recipe brings as much joy to your kitchen as it does to mine. There’s no greater pleasure than sharing a homemade dessert made with love. So, tie on your apron, put on some music, and let the wonderful smell of baking apples fill your home. Don’t forget to share your creation online with #tartegourmande! Happy baking!
Savory Beef Noodles
Ingredients
Equipment
Method
- Preheat your oven to 180°C (350°F).
- Lightly flour your work surface and rolling pin, then roll out the pastry into a circle slightly larger than the tart pan.
- Transfer the pastry to the pan, pressing it into the edges and pricking holes all over the base to dock it.
- Peel and slice the apples into thin, even pieces and arrange them in a spiral in the tart shell, overlapping each slice.
- In a small bowl, whisk the egg, sugar, and cinnamon until smooth, then pour it evenly over the apple slices.
- Cut the cold butter into small pieces and scatter them over the tart.
- Bake in the preheated oven for 30-35 minutes until the crust is golden brown and the apples are bubbling.