Your New Favorite Summer Showstopper: A No-Bake Mango Cheesecake
Let’s be honest. Sometimes you want a dessert that feels fancy, tastes incredible, but doesn’t require you to turn on a hot oven. That’s exactly why I fell in love with this Festive No-Bake Cheesecake. Picture this: a sunny afternoon, my kitchen filled with the sweet-tropical scent of mango, and the happy silence of friends devouring every last crumb. This mango cake isn’t just a dessert; it’s a vacation on a plate, and I’m so excited to share it with you.
A Slice of Sunshine: The Story Behind Mango Desserts
My own story with this cake started at a potluck. A friend brought a stunning, glossy mango dessert that disappeared in minutes. I begged for the recipe! While this specific version is my kitchen-tested twist, the love for mango in sweets is ancient. In many tropical cultures, mango is the “king of fruits,” celebrated in everything from chutneys to simple slices with sticky rice. This no-bake mango cheesecake is a modern, crowd-pleasing take on that tradition. It combines the creamy comfort of a classic New York cheesecake with the vibrant, sunny flavor of ripe mango. It’s a beautiful blend of traditions, all held together in one cool, refreshing slice.
Why This Festive No-Bake Cheesecake Will Steal Your Heart
You’ll adore this recipe because it’s a friend to the busy cook. It eliminates the stress of water baths and cracked tops common with baked cheesecakes. The flavor is pure, unadulterated mango bliss—not artificial at all. The texture is magical: a buttery, crunchy cookie base, an impossibly smooth and creamy mango filling, and that shimmering mango mirror on top. It’s light yet indulgent, and the gorgeous golden color makes it look like you spent all day in a professional bakery. Best of all? You can make it ahead of time, so you’re free to enjoy your own party.
Perfect Occasions for Your Mango Masterpiece
This cake is a celebration in itself! It’s perfect for summer barbecues, birthday parties, or Mother’s Day brunch. I love bringing it to potlucks because it always sparks conversation. It’s a fantastic ending to a spicy meal, as the cool mango cream is so refreshing. Honestly, any time you need a “wow” factor without the sweat, this refreshing mango dessert is your secret weapon. It turns an ordinary Tuesday into a tiny tropical getaway.
Gathering Your Ingredients for Success
Here is everything you’ll need to create this sunshine-filled treat. Using quality, simple ingredients is the key.
For the Crust:
- 200 g oatmeal cookies (or Graham crackers)
- 100 g unsalted butter, melted
For the Mango Cream Filling:
- 600 g full-fat cream cheese, at room temperature
- 500 g mango puree (fresh or high-quality frozen)
- 1 packet (approx. 250-300 ml) of heavy whipping cream, cold
- 80 g granulated sugar
- Zest and juice of 1 organic lemon
- 7 sheets of gelatin (or equivalent powdered gelatin)
For the Mango Mirror Glaze (Decoration):
- 500 g mango puree
- 60 g granulated sugar
- 3 sheets of gelatin
No Stress Substitutions
Don’t have an ingredient? No problem! Cooking is about improvising.
- Oatmeal Cookies: Graham crackers, digestive biscuits, or even vanilla wafers work perfectly for the crust.
- Mango Puree: You can buy it pre-made or simply blend fresh, ripe mango chunks until completely smooth. Frozen mango chunks, thawed, are a great year-round option.
- Gelatin Sheets: You can use powdered gelatin. One sheet of gelatin is generally equivalent to about 1 teaspoon (3 grams) of powdered gelatin. Remember to “bloom” powdered gelatin in cold water too!
- Organic Lemon: If you only have a regular lemon, that’s fine! Just give it a good scrub before zesting. Lime zest and juice can also add a fun, tropical twist.
Let’s Make This Festive No-Bake Cheesecake!
Here is the fun part! Follow these steps, and you’ll have a stunning dessert ready for the fridge.
Step 1: Creating the Buttery Crust
First, let’s build our foundation. Place your oatmeal cookies in a sturdy zip-top bag and crush them with a rolling pin until you have fine crumbs. You can also pulse them in a food processor. The sound is so satisfying! In a bowl, mix these golden crumbs with the melted, warm butter. The mixture should look like wet sand and hold together when you pinch it. Press this firmly and evenly into the bottom of a 22cm (or 9-inch) springform pan. I use the bottom of a glass to get it really compact. Pop this in the fridge to chill and set while you work on the creamy filling.
Step 2: Blooming the Gelatin and Prepping the Cream
Now, for the magic that sets our cake. Place your 7 sheets of gelatin in a large bowl of very cold water. They will soften and turn wobbly in about 5-10 minutes. Meanwhile, pour your cold heavy cream into a large mixing bowl and whip it to soft peaks. It should be billowy and hold its shape. Set this aside. In another large bowl, combine the soft cream cheese, 500g of mango puree, sugar, and the bright lemon zest and juice. Use a hand mixer on low to blend this until it’s completely smooth, creamy, and a beautiful sunny yellow color. No lumps allowed!
Pro tip: Ensure your cream cheese is truly at room temperature. Cold cream cheese will leave little lumps in your filling.
Step 3: Incorporating the Gelatin into the Filling
Here’s the crucial step for a perfect set. Squeeze the excess water out of your softened gelatin sheets. Melt them gently in a small saucepan over very low heat; they should become clear and liquid, not boil. Take the pot off the heat. To prevent the gelatin from forming strings, first stir about 3 tablespoons of your whipped cream into the melted gelatin. This tempers it. Now, pour this gelatin-cream mixture back into the large bowl with the remaining whipped cream. Fold it in gently until fully combined. Finally, fold this whipped cream mixture into your mango-cream cheese base. Use a spatula and fold gently until you have one homogenous, airy, and dreamy mango cream.
Step 4: Assembling and Setting the Cake
Retrieve your chilled crust from the fridge. Pour your magnificent mango cream filling over the top. Use your spatula to smooth the top into an even, beautiful layer. Give the pan a gentle tap on the counter to release any air bubbles. Now, place the whole pan carefully back in the refrigerator. Let it chill for at least 1-2 hours, until the surface is firm to the touch. This initial set is important before we add the shiny glaze on top.
Step 5: Crafting the Shiny Mango Mirror Glaze
While the cake chills, make the gorgeous topping. Bloom the 3 sheets of gelatin in cold water just like before. In a small saucepan, combine the remaining 500g of mango puree with the 60g of sugar. Warm this mixture over medium heat, stirring until the sugar dissolves. You don’t need to boil it, just get it warm. Squeeze out your softened gelatin and whisk it into the warm mango mixture until it’s completely dissolved. Let this glaze cool down until it’s just slightly warm or at room temperature—if it’s too hot, it will melt the filling below.
Step 6: The Grand Finale: Adding the Glaze
Once your cake’s filling is set and the glaze is cool, it’s time for the grand finish. Take the cake from the fridge. Pour the mango glaze slowly and carefully over the center of the cake. Tilt the pan gently to help the glaze flow evenly over the entire surface, creating a flawless, glossy “mirror.” The color is just stunning! Once covered, place the cake back in the refrigerator. Let it set completely for at least 4 hours, but preferably overnight. This patience is the secret to perfect, clean slices.
Chef’s tip: For the cleanest slices, dip your sharp knife in hot water and wipe it dry between each cut. This glides through the creamy layers like butter.
Timing Your Tropical Treat
Good things take a little time, but most of it is hands-off chilling!
- Prep Time: 30 minutes
- Chilling Time (Minimum): 4 hours
- Best Chilling Time: Overnight (8+ hours)
- Total Time (with Overnight Chill): About 8 hours 30 minutes
A Secret for the Smoothest Texture
My secret trick? After blending the cream cheese and mango puree, I pass the mixture through a fine-mesh sieve. This catches any tiny, stubborn bits of mango fiber or the last hint of cream cheese lump. It takes an extra minute but guarantees a filling so silky-smooth it will make you swoon. It’s the difference between “good” and “professional bakery amazing.”
A Fun Fact About Your Main Ingredient
Did you know there are over a thousand varieties of mango in the world? They can taste like peach, pineapple, even coconut! For this recipe, look for Alphonso, Ataulfo (Honey), or Kent mangoes if using fresh—they are super sweet and have that deep orange, creamy flesh that makes the puree so vibrant. Using a great-tasting mango puree is the single biggest factor in the flavor of this easy no-bake cake.
Equipment You’ll Need
You likely have most of this in your kitchen already:
- 9-inch (22cm) springform pan
- Food processor or zip-top bag & rolling pin (for crust)
- Mixing bowls (various sizes)
- Hand mixer or stand mixer
- Rubber spatula
- Small saucepan
- Fine-mesh sieve (optional, but recommended for my secret tip!)
Storing Your Mango Masterpiece
This cake is a fantastic make-ahead dessert. Once fully set, you can keep it covered in the refrigerator for up to 4-5 days. The flavors actually meld and get even better after a day. The crust may soften slightly after day 3, but it will still be delicious.
For longer storage, this no-bake mango cheesecake freezes beautifully. Freeze the whole cake or individual slices on a tray until solid, then wrap tightly in plastic wrap and foil. Store for up to 2 months. Thaw overnight in the refrigerator before serving.
Always store it in the springform pan or on a flat plate covered with a cake dome or loosely with plastic wrap. Avoid sealing it with tight plastic wrap directly on the glaze, as it might stick and ruin that beautiful glossy surface.
My Best Tips and Advice for You
- Room Temp is Key: Let your cream cheese sit out for a good hour. This is non-negotiable for a lump-free filling.
- Chill Your Bowl: For faster whipping, chill your mixing bowl and whisk attachment in the freezer for 10 minutes before whipping the cream.
- Taste Your Puree: Before adding sugar to the filling, taste your mango puree. If it’s very sweet, you can reduce the sugar by a tablespoon or two.
- Patience with the Glaze: Let the glaze cool enough so it thickens slightly. This helps it set quickly and neatly on the cake.
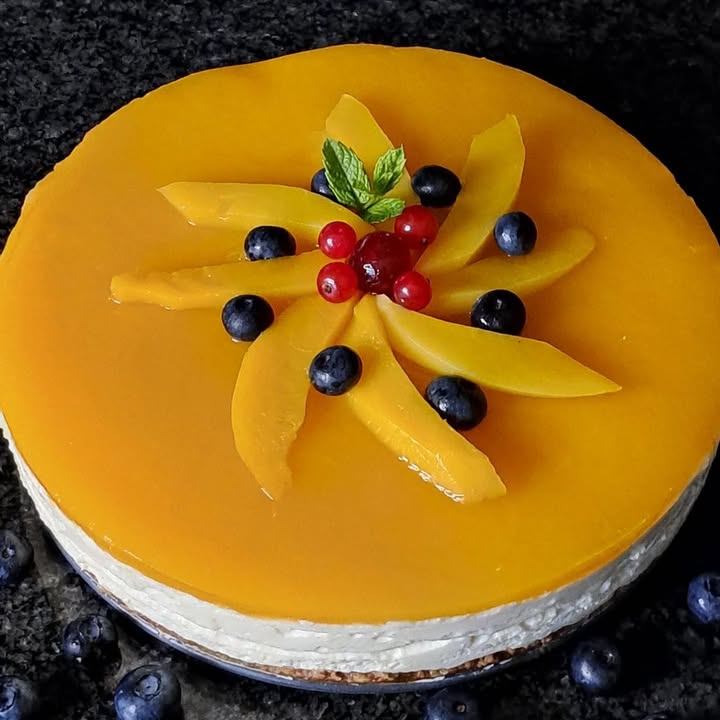
Presentation Ideas to Wow Your Guests
This cake is gorgeous on its own, but a little extra flair is always fun!
- Top with fresh mango slices, edible flowers, or a sprinkle of lime zest.
- Add a moat of fresh berries like raspberries or blueberries around the base on the serving plate.
- Serve with a dollop of lightly sweetened coconut whipped cream on the side.
- For a dinner party, garnish each slice with a thin, vertical slice of fresh mango and a mint leaf.
Healthier & Fun Recipe Variations
Love the idea but want to mix it up? Try one of these six delicious twists:
- Vegan Mango “Cheesecake”: Use soaked cashews and coconut cream instead of cream cheese and dairy cream. Agar-agar replaces gelatin for setting.
- Lower-Sugar Version: Use a sugar substitute approved for baking in both the filling and glaze. Opt for a nut-based crust with dates instead of butter and cookies.
- Mango-Passion Fruit Swirl: Swirl some tangy passion fruit puree into the mango filling before chilling for a dramatic flavor burst.
- Individual Mini Cheesecakes: Make these in a muffin tin with liners for perfect personal-portioned desserts. Great for parties!
- Chocolate-Crusted Mango Cake: Use chocolate wafer cookies for the crust. The combination of dark chocolate and bright mango is unbelievable.
- Tropical Trio Glaze: Blend mango with a little pineapple and passion fruit for the mirror glaze. Wow!
Common Mistakes to Avoid
Avoid these simple pitfalls for cheesecake perfection every time.
Mistake 1: Using Cold Cream Cheese
This is the #1 reason for a lumpy filling. Cold cream cheese doesn’t blend smoothly. It creates little white specks throughout your beautiful mango cream. To avoid this, plan ahead. Take the cream cheese out of the fridge at least one hour before you start. It should feel soft and spreadable. If you’re in a pinch, you can unwrap the blocks and microwave them on a plate for 10-15 seconds, but room temperature is always best.
Mistake 2: Adding Hot Gelatin Directly to the Filling
Pouring melted gelatin straight into your cool cream cheese mixture is a disaster. The gelatin can clump up into unpleasant rubbery strands. Always temper it first. Mixing a few spoonfuls of your whipped cream or some of the mango mixture into the melted gelatin equalizes the temperature. This creates a smooth slurry that blends perfectly into the rest of the filling without any strings.
Mistake 3: Not Letting the Cake Set Long Enough
Impatience leads to a soupy, messy slice. The filling needs time for the gelatin to do its job. Four hours is the minimum. An overnight chill is the gold standard. This ensures every layer—crust, filling, and glaze—is firm and set. A properly set cake will give you those clean, picture-perfect slices. If you try to cut it too early, the layers will run together. Trust me, waiting is the hardest but most important part!
Mistake 4: Over-Whipping the Cream
You want soft, billowy peaks, not stiff, grainy butter! Over-whipped cream loses its smooth texture and can make the final filling feel grainy instead of creamy. Whip the cream just until it holds its shape when you lift the whisk. It should look soft and luscious. If you accidentally go too far, you can stir in a new tablespoon or two of liquid cream to try to smooth it out a bit.
Frequently Asked Questions
Can I make this mango cake without gelatin?
For a fully set, sliceable no-bake cheesecake, gelatin is necessary as it’s the primary setting agent. For a vegetarian alternative, you can try agar-agar powder, but the conversion and method differ. Agar needs to be boiled to activate. Use about 1 tablespoon of agar powder for the filling and 1 teaspoon for the glaze, dissolved in a small amount of liquid and brought to a simmer before mixing in. The texture will be slightly firmer and less creamy than with gelatin. I recommend looking for a specific agar-agar cheesecake recipe for best results.
My glaze didn’t set shiny and firm. What went wrong?
A soft glaze usually means the gelatin wasn’t fully dissolved or the ratio was off. Ensure your gelatin sheets are properly softened (bloomed) and then completely melted into the warm mango-sugar mixture—no tiny granules should remain. Also, make sure you’re using the correct amount. If using powdered gelatin, measure accurately. Letting the glaze cool until it’s syrupy but not set before pouring is key. If it’s too thin and hot, it will just soak in.
Can I use frozen mango to make the puree?
Absolutely! Frozen mango is a fantastic, consistent option. Thaw it completely, then drain any excess liquid in a sieve before blending. Extra water in the puree can throw off the setting power of the gelatin and make the filling too soft. Using frozen mango is often more convenient and can be even sweeter than fresh, depending on the season.
How do I prevent my crust from getting soggy?
Two things help: a good chill and a proper barrier. First, press the crumb crust firmly and chill it well before adding the filling—this helps it compact. Second, make sure your filling is thick and cool (not warm) when you pour it over. The initial set of the filling in the fridge before adding the glaze also helps protect the crust. Even with all this, the bottom may soften slightly after a few days, but it will still taste wonderful.
Can I double this recipe for a larger crowd?
Yes, you can scale it up! Double all ingredients and use a larger springform pan, like a 10-inch or even a 9×13 rectangular pan for easier serving. Be aware that the chilling time may need to be increased, as a thicker cake takes longer to set fully in the center. The overnight chill becomes even more important for a doubled recipe.
What can I use instead of a springform pan?
A springform pan is ideal because the removable sides make serving easy. If you don’t have one, you can use a regular cake pan or pie dish. You’ll need to serve it directly from the pan. For an even easier option, consider making it in a pre-made Graham cracker pie crust for a quicker version, though the crust will be thinner.
Is it okay to use bottled mango juice instead of puree?
I don’t recommend it. Mango juice is too thin and watery. It won’t provide the thick, creamy body and intense mango flavor that puree does. The filling likely won’t set properly, and the taste will be weak. Stick to mango puree, which is essentially just blended mango flesh. It’s the heart of the recipe.
My filling seems too runny after mixing. Should I add more gelatin?
Don’t add more gelatin after the fact, as it won’t incorporate evenly. First, ensure you whipped the cream properly—it adds volume and structure. Second, make sure you followed the gelatin steps correctly. If it’s just slightly soft, the long chilling time will firm it up significantly. Always give it the full overnight chill before deciding if it’s too soft. The mixture will be pourable but not liquid when you first assemble it.
Can I add other fruits to the filling?
You can experiment, but be cautious. Adding very watery fruits like berries can affect setting. For a mixed berry swirl, you could reduce some berries into a thick compote and swirl it in. For a tropical version, a little well-drained crushed pineapple could work. The best bet is to keep the main filling as mango and add other flavors through the glaze or as toppings to ensure your cake sets perfectly.
How far in advance can I make this cake?
This is the best part! You can make it 1-2 days in advance. In fact, I strongly recommend making it the day before you need it. The flavors develop, and the texture becomes perfect. Just keep it covered in the fridge. You can even add fresh fruit garnish just a few hours before serving to keep it looking its best.
And there you have it! Your guide to creating a stunning, delicious, and surprisingly simple Festive No-Bake Cheesecake that’s bursting with mango flavor. Remember, the secret ingredient is always the joy you put into making it. So grab those mangoes, put on some fun music, and get ready for the compliments to roll in. This cake has never failed to bring a smile to my table, and I know it will do the same for yours. Happy no-baking!
Festive No-Bake Cheesecake
Ingredients
Equipment
Method
- Crush the oatmeal cookies and mix with melted butter to form the crust. Press into a springform pan and chill.
- Bloom the gelatin in cold water and whip the cream to soft peaks.
- Mix cream cheese, mango puree, sugar, lemon zest, and juice until smooth.
- Melt the bloomed gelatin and incorporate it with the whipped cream, then fold into the mango-cream cheese mixture.
- Pour the filling over the chilled crust and smooth the top. Chill until set.
- Prepare the mango glaze by blooming gelatin again, warming mango puree with sugar, and mixing in the melted gelatin.
- Once the cake filling is set, pour the glaze over it and chill until firm.