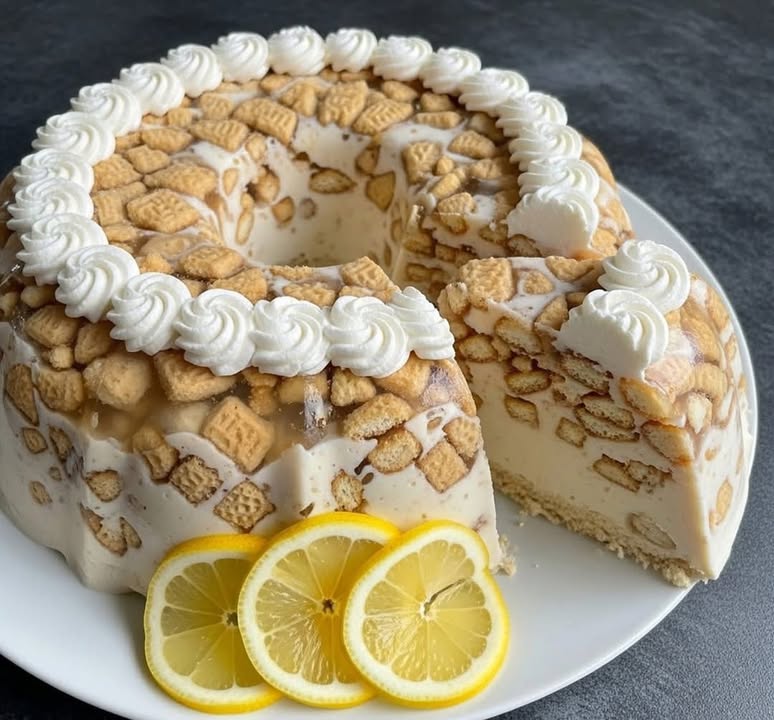
The Lemon Mosaic Jelly: A Burst of Sunshine in Every Bite!
Have you ever craved a dessert that’s as fun to make as it is to eat? I was looking through my grandma’s old recipe box last summer, hoping for a cool treat to beat the heat. I stumbled upon her faded note for a “lemon layered delight,” but I didn’t have all her fancy pans. So, my kids and I got creative with what we had in the pantry: lemon jelly, my favorite Marías cookies, and a block of cream cheese. What we invented is this stunning Lemon Mosaic Jelly. It’s a total showstopper that looks like stained glass and tastes like a pure, zesty lemon dream!
From Grandma’s Kitchen to My Fridge: A Sweet Story
This recipe feels like a beautiful blend of old and new. The use of Marías cookies, a staple in so many Mexican households, gives a lovely, nostalgic crunch. I used to dunk them in milk as a kid! The idea of making a mosaic came from a modern cooking show, but instead of complicated techniques, we use simple gelatin layers cut into wobbly, joyful cubes. It’s my family’s new tradition. We make it for birthdays, potlucks, or just because it’s Tuesday. It proves that the best recipes often come from a little improvisation and a lot of love.
Why You’ll Adore This Lemon Marvel
Let me count the ways! First, it’s ridiculously easy. No baking, just mixing and chilling. Second, the contrast is incredible: creamy, tangy, crunchy, and wobbly all in one spoonful. It’s surprisingly light yet feels indulgent. And the best part? Kids love helping to stir, pour, and (impatiently!) watch it set in the fridge. It’s a dessert that brings smiles long before the first taste.
Perfect Occasions for This Sunshine Dessert
This Lemon Mosaic Jelly is your secret weapon for so many events!
- Summer BBQs: A cool, refreshing finish to a grilled feast.
- Baby or Bridal Showers: It looks elegant and fancy with minimal effort.
- Weekend Family Dinners: Turns an ordinary meal into a celebration.
- Potluck Parties: Everyone will ask you for the recipe, guaranteed!
Gathering Your Sunshine Ingredients
Here’s what you’ll need to create this bright masterpiece:
- 2 packets (about 6 oz total) of lemon jelly powder
- 1 cup of boiling water (for the jelly)
- 1 cup of cold water (for the jelly)
- 1/4 cup of fresh natural lemon juice
- 15-20 Marías Cookies, roughly broken
- 1 can (14 oz) of condensed milk 🥛
- 1 packet of unflavored gelatin
- 1 cup of hot milk
- 1 package (8 oz) of cream cheese, softened 🧀
- Optional but irresistible: Chantilly cream for decoration
- Fresh lemon slices for garnish
No Problem! Handy Substitution Options
Out of something? Don’t worry! Here are some easy swaps:
- Marías Cookies: Graham crackers or Digestive biscuits work great.
- Lemon Jelly: Use lime or orange jelly for a different citrus twist.
- Cream Cheese: Full-fat Greek yogurt can be used for a tangier, lighter feel.
- Chantilly Cream: A dollop of cool whip or a sprinkle of powdered sugar is just fine.
- Condensed Milk: For a dairy-free version, use a canned coconut condensed milk.
Let’s Build Our Lemon Mosaic Masterpiece!
Alright, put on your favorite apron and let’s get our hands busy. This is the fun part!
Step 1: The Zesty Jelly Base
Start by emptying both packets of lemon jelly powder into a medium bowl. The bright yellow powder smells like sunshine already! Pour in the one cup of boiling water and whisk until all the colorful crystals have completely dissolved. This only takes a minute. Next, stir in the one cup of cold water and the quarter cup of fresh lemon juice. This fresh juice is our secret weapon—it adds a real, tangy punch that boxed jelly alone can’t deliver. Your kitchen will smell amazing.
Pro tip: If you want a super-clear jelly, you can strain this mixture through a fine sieve to catch any undissolved bits. Pour this lovely liquid into a square 8×8 inch dish. Gently slide it into the fridge. Now we wait for magic to happen. It needs about 2 hours to become completely firm and wobbly.
Step 2: The Creamy Cloud Layer
While the lemon layer sets, let’s make the creamy filling. In a small bowl, sprinkle the packet of unflavored gelatin over the cup of hot milk. Whisk it vigorously until it’s completely smooth and free of lumps. In a separate, larger bowl, beat the softened cream cheese until it’s perfectly smooth and creamy. This might take a couple of minutes. Now, slowly pour in the can of sweet, thick condensed milk while you keep beating. Finally, stream in the warm milk-gelatin mixture. Keep mixing until everything is one velvety, pale, and dreamy cream. Set this aside at room temperature for now.
Step 3: Creating the “Mosaic” Cubes
Check on your lemon jelly. It should be firm to the touch and not stick to your finger. Time for the best part! Take a sharp knife and carefully cut the entire sheet of jelly into small, bite-sized cubes, about 1/2 to 1 inch big. Think of it like cutting a pan of brownies. You’ll see the gorgeous, translucent yellow cubes jiggle on your cutting board. Now, grab a beautiful serving mold or a loaf pan. Start layering! First, scatter half of your broken Marías cookies on the bottom. Then, gently spoon in all of your lemon jelly cubes. They’ll look like little gems! Top them with the remaining broken cookies.
Step 4: The Final Pour and Set
Take your creamy cheese mixture from the counter. Give it one last stir to make sure it’s still fluid. Slowly and carefully, pour this creamy river over the top of your mosaic of jelly cubes and cookies. Try to pour it evenly so it seeps into all the little nooks and crannies. You might need to gently tap the mold on the counter to help it settle and remove any air bubbles. Place the whole creation back in the fridge. This is the final stretch! Let it chill for at least 4 hours, but overnight is even better for a perfect, clean slice.
Step 5: The Grand (and Delicious) Reveal
It’s time! To unmold, run a thin knife around the edges of your pan. Dip the bottom of the mold in a bowl of warm water for about 10-15 seconds. Place your serving plate on top, flip it over with confidence, and give it a gentle shake. It should slide right out, revealing your stunning layered mosaic. Now, for the crowning glory, pipe or dollop on some fluffy Chantilly cream. Add a few thin slices of fresh lemon for a pop of color. Slice, serve, and get ready for the “oohs” and “aahs”!
Chef’s tip: For the cleanest slices, use a knife dipped in hot water and wiped dry between each cut.
Your Time Investment for a Stunning Result
Good things come to those who wait, but this recipe is mostly hands-off!
- Prep Time: 30 minutes
- Setting Time (First Layer): 2 hours
- Final Setting Time: 4 hours (or overnight)
- Total Time: About 6 hours 30 minutes
A Little Secret from My Kitchen to Yours
Here’s my magic trick: add a tiny pinch of salt to the creamy cheese mixture. It sounds strange, but it enhances all the sweet and tangy flavors, making the lemon pop and the cream taste richer. It’s the difference between “good” and “wow, what is in this?!”
Fun Fact: The Cookie That Traveled the World
Did you know the Marías cookie was created in London in 1874 and named after a Russian princess, Maria Alexandrovna? It traveled to Mexico and became a beloved staple in pantries everywhere. Its simple, slightly sweet, and perfectly crunchy texture makes it ideal for no-bake desserts like ours. It soaks up flavors without getting soggy too fast!
What You’ll Need to Make It
No fancy equipment needed, promise!
- Two mixing bowls (one medium, one large)
- Whisk and electric mixer (a strong fork works too!)
- 8×8 inch square baking dish
- A 9×5 inch loaf pan or a decorative mold for serving
- Measuring cups and spoons
- Rubber spatula
- Sharp knife
Keeping Your Lemon Mosaic Happy
This dessert is best friends with the refrigerator. Once set, keep it covered with plastic wrap or in an airtight container. It will stay fresh and delicious for up to 4 days. The cookies will soften a bit over time, which is actually lovely—they become cake-like.
Can you freeze it? I don’t recommend freezing the assembled mosaic. The gelatin can become watery and lose its perfect texture when thawed. It’s truly a make-and-serve-within-a-few-days kind of treat.
If you have leftovers (lucky you!), just make sure your cover is tight. The lemon flavor might even intensify a little by the next day!
My Best Tips for Guaranteed Success
- Softening Cream Cheese: Take the cream cheese out of the fridge at least an hour before. Room-temperature cheese blends smoothly without lumps.
- Jelly Cube Size: Cut your lemon jelly cubes evenly. Smaller cubes create a finer mosaic, larger ones give a bolder look.
- No Rush: Patience is key! Don’t try to speed up the setting by putting it in the freezer. It can make the layers icy and uneven.
- Get Creative: Try different cookie flavors or sprinkle some zest between layers for extra lemon power!
Making It Look as Good as It Tastes
Presentation is half the fun!
- Serve on a plain white plate to let the colors shine.
- Garnish with mint sprigs alongside the lemon slices.
- For individual portions, layer everything in clear glass cups or mason jars.
- Drizzle a little lemon curd on the plate before placing the slice.
Feel Like Mixing It Up? Try These Variations!
Once you master the mosaic, a world of flavors opens up!
- Cranberry Orange Bliss: Use orange jelly and add a layer of whole-berry cranberry sauce. It’s perfect for the holidays!
- Tropical Dream: Mango jelly with crushed ginger snaps. Top with toasted coconut.
- Berry Cheesecake: Use strawberry jelly and mix fresh diced strawberries into the creamy layer.
- Coffee Toffee Crunch: Use a mild vanilla or coffee jelly and use crushed chocolate-covered toffee bars instead of cookies.
- Piña Colada: Coconut jelly, crushed pineapple, and use coconut milk in the creamy layer.
- Kids’ Rainbow: Make several small batches of different colored jellies (like strawberry, lime, orange) and mix the cubes for a rainbow effect!
Common Mistakes to Avoid
Let’s make sure your first try is a sparkling success.
Mistake 1: Using Cold Cream Cheese
This is the number one culprit for a lumpy, grainy cream layer. Cold cream cheese doesn’t blend smoothly with the other ingredients. You’ll end up with little white bits throughout your beautiful dessert. Always plan ahead. Take the cream cheese out of the fridge at least an hour before you start. If you forget, you can microwave it on a very low power setting for just 10-15 seconds at a time until it’s soft but not melted.
Mistake 2: Not Letting the First Layer Set Fully
Impatience can ruin the mosaic! If you pour the creamy mixture over the lemon jelly before it’s completely firm, the cubes will melt and bleed into the white layer. You’ll lose that stunning stained-glass effect. How do you know it’s ready? Gently press the surface with a clean finger. It should feel firm and your finger should come away clean. No stickiness! When in doubt, give it an extra 30 minutes.
Mistake 3: Adding Hot Mixture to Cold Ingredients
When you mix the hot milk and gelatin into the cream cheese, the cheese needs to be soft but not ice-cold. If the cheese is too cold, the sudden heat can cause it to seize or separate. Similarly, if the milk-gelatin mixture is boiling hot, it can cook the eggs in the cream cheese (if you add any) or just make everything weird. Let the hot milk mixture cool for just a minute or two off the heat before streaming it into your creamy base.
Your Lemon Mosaic Questions, Answered!
Can I use sugar-free jelly or condensed milk?
Absolutely, you can! Using sugar-free lemon jelly will work just fine for the first layer. The texture will set the same way. For the condensed milk, you can find a “sweetened condensed milk” alternative made with artificial sweeteners in some stores. Be aware that the final flavor and sweetness level might be slightly different. I suggest you do a small taste test of the creamy mixture before pouring it to see if you need to adjust anything. The recipe is quite forgiving.
My jelly didn’t set properly. What went wrong?
This usually happens for one of two reasons. First, you might have added too much liquid. Always measure your water carefully. Second, you might not have dissolved the jelly powder completely in the boiling water. Make sure you whisk until you can’t see any granules at all before adding the cold water. Also, ensure your fridge is cold enough. If it’s packed full, the air might not circulate well to set the gelatin. Try moving it to a less crowded shelf.
Can I make this recipe ahead of time?
Yes, and I highly recommend it! This dessert is perfect for making ahead. You can prepare the entire thing up to 24 hours before you need to serve it. In fact, letting it set overnight gives it the firmest, cleanest texture for slicing. Just keep it covered well in the refrigerator. Add the fresh chantilly cream and lemon slice garnish right before you bring it to the table so they look their best.
What can I use instead of Marías cookies?
No problem! The goal is a slightly sweet, crunchy cookie that holds up. Graham crackers are the most common and easy-to-find substitute. Digestive biscuits (like McVitie’s) also work beautifully. For a different twist, you could try vanilla wafers or even crushed-up plain shortbread cookies. Avoid cookies that are too soft or too sweet, like chocolate chip cookies, as they can make the dessert overly sweet or mushy.
Is there a way to make this without gelatin?
For the creamy layer, the unflavored gelatin is essential to get that firm, sliceable cheesecake texture. For the lemon layer, you could experiment with agar-agar, a plant-based setting agent. The substitution is not 1-to-1, so you’d need to follow a specific agar-agar recipe for a “jelly.” Without any setting agent, the lemon layer would just be a sauce, which could still be tasty but you’d lose the mosaic cube effect completely.
Can I use bottled lemon juice instead of fresh?
You can, but I really encourage you to use fresh lemons if possible. Fresh lemon juice has a bright, vibrant flavor that bottled juice just can’t match. Bottled juice often has a more muted, sometimes slightly bitter taste. That fresh zip is what makes this dessert taste special and not just like the boxed jelly. If you must use bottled, choose one that is 100% juice without any added preservatives or flavors.
My creamy layer is too runny. Can I fix it?
If it hasn’t been poured yet, you might be able to save it! First, make sure you used the correct amount of unflavored gelatin. If you did, the mixture might just need more time to cool and start setting at room temperature. Let it sit on the counter for 15-20 minutes, stirring occasionally. It should begin to thicken slightly. If it’s already poured over the cubes and isn’t setting after many hours, unfortunately, you can’t fix it after the fact. It will still taste delicious, just serve it with a spoon!
How do I get it out of the mold without breaking it?
The warm water bath is your best friend! Run a thin knife along every edge of the mold to loosen it first. Then, fill a bowl or your sink with an inch or two of warm (not boiling) water. Dip just the bottom of the mold into the water for about 10-15 seconds. This slightly melts the outer gelatin, creating a release. Place your serving plate on top, hold them together firmly, and flip with confidence. If it doesn’t slide out immediately, give it a gentle shake or tap the plate on the counter. Patience is key.
Can I double this recipe for a crowd?
You sure can! Simply double all the ingredients. Instead of using one 8×8 dish for the lemon jelly, you’ll need two, or one much larger rectangular pan. For the final assembly, use a large bundt pan, a deep 9×13 dish, or even a trifle bowl. Just remember that a larger, deeper mold will take longer to set completely. Add at least an extra 2 hours to the final chilling time, or just plan to make it the day before your event.
My family doesn’t like lemon. What other flavors work?
The exciting part about this recipe is its versatility! For a Cranberry Orange Bliss version, use orange jelly and mix a handful of dried cranberries into the cookie layer. For a berry twist, strawberry or raspberry jelly is fantastic. My kids love a “tropical” version with mango or pineapple jelly and coconut cookies. The method stays exactly the same, just swap out the main jelly flavor and pair it with a complementary cookie. Have fun experimenting!
A Dessert That’s Pure Joy
So there you have it! My family’s favorite Lemon Mosaic Jelly with Marías Cookies isn’t just a recipe; it’s a little project filled with love. It brings a splash of sunshine to your table and a whole lot of happiness to whoever tastes it. The mix of creamy, tangy, and crunchy is simply magic. I hope you give it a try and make some sweet memories of your own. Don’t forget to snap a picture of your gorgeous creation before it disappears! Happy cooking!
Cranberry Orange Bliss
Ingredients
Equipment
Method
- Mix lemon jelly powder with boiling water until dissolved.
- Stir in cold water and lemon juice, then pour into an 8x8 inch dish and refrigerate for about 2 hours.
- In a small bowl, mix unflavored gelatin with hot milk until smooth.
- Beat softened cream cheese in a large bowl, then add condensed milk and the milk-gelatin mixture, blending until smooth.
- Cut the set lemon jelly into small cubes and layer half of the broken Marías cookies in a serving mold.
- Add the lemon jelly cubes over the cookies, then top with the remaining broken cookies.
- Pour the creamy mixture evenly over the layers and refrigerate for at least 4 hours (or overnight).
- To serve, run a knife around the edges of the mold, warm the bottom briefly in warm water, invert onto a plate, and garnish with Chantilly cream and lemon slices.