Can you smell that? It’s the crisp air, the rustle of leaves, and the undeniable scent of pumpkin spice. When that feeling hits, I don’t want to spend hours baking. I want a hug in dessert form, and I want it now. That’s exactly why this No-Bake Pumpkin Lush is my ultimate fall lifesaver. Last Thanksgiving, my oven decided to take a vacation, and this creamy, dreamy dessert was the hero that saved the day. Let me show you how to make it!
The Cozy Story Behind the Pumpkin Lush Dessert
The term “lush” for desserts is pure American ingenuity. It speaks to layers of indulgence that feel luxurious. This particular version is a modern twist on classic no-bake “icebox” cakes that our grandmothers made. They were masters of turning simple ingredients into magic. While traditional recipes might have used just pudding, we’ve layered in creamy cheesecake and the warm hug of pumpkin spice. It’s a beautiful blend of old-fashioned comfort and the flavors we crave every autumn. Making this, I always think of those resourceful home cooks and give a little nod to their brilliance.
Why You’ll Love This No-Bake Pumpkin Dessert
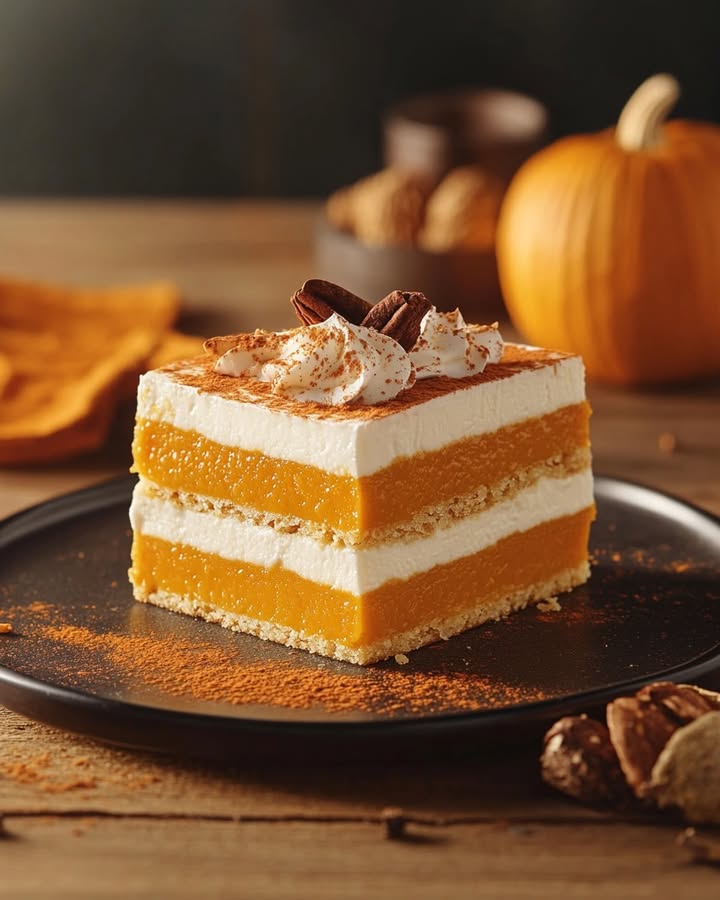
First, there’s no oven needed! That’s a win on busy days. Second, the layers are just stunning. You get a buttery crust, a tangy cream cheese cloud, a spiced pumpkin mousse, and fluffy whipped topping. Each spoonful is a perfect bite of textures and flavors. Best of all, it makes a big 9×13 pan, so it’s perfect for feeding a crowd without any stress. It’s the dessert that looks like you fussed for hours, but your secret is safe with me!
Perfect Occasions for Your Pumpkin Lush
This dessert is your secret weapon for so many events! It’s a star at Thanksgiving, a hit at Halloween parties, and a wonderful treat for casual weekend gatherings. I love bringing it to potlucks because it travels so well. It also makes a fantastic “just because” dessert for a cozy family movie night. Honestly, any time you need a bit of creamy, pumpkin-y joy, this is your recipe.
Ingredients for Creamy No-Bake Pumpkin Lush
Gather these simple ingredients for layers of flavor. I promise, most are pantry staples!
For the Crust:
- 1 package (14.3 oz) graham crackers, crushed finely
- ⅔ cup unsalted butter, melted
For the Cream Cheese Layer:
- 8 oz cream cheese, softened
- 1 cup powdered sugar
- 1 ½ cups whipped topping (like Cool Whip), thawed
For the Pumpkin Layer:
- 1 can (15 oz) pure pumpkin puree (not pumpkin pie filling)
- 1 package (3.4 oz) instant vanilla pudding mix
- 2 cups cold whole milk
- 1 teaspoon pumpkin pie spice
For Topping & Garnish:
- Additional whipped topping for the top layer
- Crushed pecans or caramel sauce (optional, but delicious!)
Easy Ingredient Substitutions
Don’t worry if you’re missing something! Here are my favorite swaps:
- Graham Crackers: Use gingersnap cookies for a spicier crust.
- Butter: Salted butter works fine, just skip any added salt.
- Whipped Topping: You can use an equal amount of freshly whipped heavy cream sweetened with a little sugar.
- Pumpkin Pie Spice: Make your own with ½ tsp cinnamon, ¼ tsp ginger, ⅛ tsp nutmeg, and ⅛ tsp cloves.
- Pecans: Try toasted walnuts or skip nuts entirely for allergies.
How to Make No-Bake Pumpkin Lush: A Step-by-Step Guide
Step 1: Create the Buttery Graham Cracker Base
First, let’s make the foundation. Crush your graham crackers until they resemble fine sand. I use a food processor, but a bag and a rolling pin work just as well! In a bowl, pour the melted butter over the crumbs. Mix it until every single crumb is coated and looks like wet sand. Press this mixture firmly and evenly into the bottom of your 9×13 inch dish. The key is a solid, compact base. Pro tip: Use the bottom of a measuring cup to press it down for a perfectly smooth surface.
Step 2: Whip Up the Dreamy Cream Cheese Layer
Next, the creamy middle. In a large bowl, beat the softened cream cheese until it’s completely smooth. No lumps allowed! Gradually add the powdered sugar and beat again until it’s fluffy and light. Now, gently fold in the whipped topping. Use a spatula and fold in a slow, sweeping motion to keep the mixture airy. Spread this cloud-like layer carefully over your crust. Try to get it as even as possible for beautiful slices later.
Step 3: Mix the Spiced Pumpkin Pudding Magic
This is where the fall flavor really sings! In a clean bowl, whisk the cold milk and the instant vanilla pudding mix together for about 2 minutes. It will start to thicken beautifully. Add the pumpkin puree and pumpkin pie spice. Keep whisking until the color is a uniform, vibrant orange and the texture is luxuriously thick and creamy. The smell is absolutely heavenly. Spread this pumpkin layer gently over the cream cheese layer.
Step 4: Top, Chill, and Get Ready for Bliss
We’re on the home stretch! Now, spread one final, smooth layer of whipped topping over the pumpkin layer. This seals in all the moisture and makes it look gorgeous. Cover the dish and tuck it into the fridge. Patience is key here. Let it chill for at least 4 hours, or even overnight. This waiting time lets the layers set and the flavors become best friends. Chef’s tip: For super clean slices, run your knife under hot water and wipe it dry between each cut.
Your Pumpkin Lush Timeline
- Prep Time: A quick and easy 20 minutes.
- Chilling Time: A crucial 4 hours (perfect to make ahead!).
- Total Time: 4 hours and 20 minutes from start to ready-to-eat.
My One Secret for the Best Texture
Use cold milk for the pudding layer. I cannot stress this enough. Room temperature milk will prevent the instant pudding from setting up properly. Your pumpkin layer will be runny and won’t hold its beautiful shape. I always put my milk in the freezer for 10 minutes before I start. That little trick guarantees a firm, scoopable, perfect layer every single time.
A Fun Pumpkin Fact
Did you know the pumpkins we use for puree are not the same as jack-o’-lantern pumpkins? They’re a special variety called sugar pumpkins or pie pumpkins. They’re smaller, sweeter, and have a denser, less stringy flesh. That’s why canned puree gives us such a smooth, consistent texture without any extra work!
What You’ll Need to Make It
- 9×13 inch baking dish (glass is best for pretty presentation)
- Mixing bowls (I use three medium ones)
- Electric hand mixer or stand mixer
- Whisk and spatula
- Measuring cups and spoons
Storing Your Leftover Pumpkin Dessert
Keep any leftovers covered tightly with plastic wrap or in an airtight container in the refrigerator. The dessert will stay fresh and delicious for 3 to 4 days. The crust may soften slightly after a day or two, but it will still taste amazing.
I do not recommend freezing the fully assembled dessert. Freezing can cause the whipped topping layers to become watery and separate when thawed. The texture just won’t be the same.
If you want to get a head start, you can make the graham cracker crust a day ahead. Just cover it and leave it at room temperature. Assemble the rest of the layers the day you plan to serve it for the best texture.
Tips and Advice for Perfect Results
- Make sure your cream cheese is truly softened. Leave it on the counter for an hour before you start. This prevents lumps in your creamy layer.
- Gently fold, don’t stir, the whipped topping into the cream cheese. This keeps it light and fluffy.
- For a stronger spice flavor, add an extra ½ teaspoon of pumpkin pie spice to the pumpkin layer.
- Label your can! Double-check you have 100% pumpkin puree, not “pumpkin pie filling” which already has sugar and spices added.
Presentation Ideas to Wow Your Guests
- Serve in clear glass trifle bowls or dessert cups to show off the gorgeous layers.
- Garnish each slice with a tiny sprinkle of pumpkin pie spice or cinnamon just before serving.
- Drizzle each plate with caramel sauce and a few whole pecans for a restaurant-style look.
- For a fun twist, set up a garnish bar with crushed cookies, chocolate shavings, and different sauces.
6 Tasty Recipe Variations to Try
Love this concept? Try these other delicious lush dessert ideas!
- Chocolate Pumpkin Lush: Use chocolate graham crackers for the crust. Add a tablespoon of cocoa powder to the cream cheese layer.
- Gingersnap Pumpkin Lush: Swap graham crackers for crushed gingersnaps. The spicy crust pairs perfectly with the pumpkin.
- Dairy-Free Pumpkin Lush: Use dairy-free cream cheese, whipped topping, and a milk alternative like almond or oat milk.
- Cheesecake Pumpkin Lush: Double the cream cheese layer ingredients for an even richer, tangier center.
- Maple Pecan Pumpkin Lush: Add a teaspoon of maple extract to the pumpkin layer and top with toasted pecans and a maple syrup drizzle.
- Mini Pumpkin Lush Parfaits: Layer the components in individual jars or glasses for adorable single-serving desserts.
Common Mistakes to Avoid with Pumpkin Lush
Mistake 1: Using Warm or Room Temperature Milk
This is the number one reason for a soupy pumpkin layer. Instant pudding needs the shock of cold liquid to activate its thickening agents properly. If your milk isn’t cold, the pudding won’t set. Your layers will run together. Always use milk straight from the fridge, or chill it even more before starting.
Mistake 2: Not Letting the Cream Cheese Soften
Starting with cold, hard cream cheese leads to a lumpy, difficult-to-mix cream cheese layer. You’ll overwork it trying to get it smooth. Take the cream cheese out of the fridge at least an hour before you begin. When you press it, your finger should leave a deep indent. This ensures a silky, lump-free mixture.
Mistake 3: Skipping the Long Chill Time
I know it’s tempting to dig in early. But if you don’t chill the dessert for the full 4 hours, the layers won’t be set. You’ll get a delicious but messy spoonful instead of a beautiful, clean slice. The chilling time is not optional. It’s when the magic happens, so plan ahead!
Mistake 4: Stirring Instead of Folding the Whipped Topping
When you add the whipped topping to the cream cheese, be gentle! Stirring too vigorously deflates the air in the whipped topping. This makes your middle layer dense instead of light and fluffy. Use a spatula to “fold” by cutting down through the middle and turning the mixture over itself until just combined.
Frequently Asked Questions
Can I make this pumpkin lush dessert ahead of time?
Absolutely! This dessert is perfect for making ahead. In fact, I think it tastes even better the next day. You can assemble it completely up to 24 hours before you plan to serve it. Just keep it covered tightly in the refrigerator. This makes it a fantastic stress-free option for holiday dinners or parties where you have lots of other dishes to prepare.
What’s the difference between pumpkin puree and pumpkin pie filling?
This is very important. Pumpkin puree is just cooked, mashed pumpkin. Pumpkin pie filling is pre-sweetened and already has spices like cinnamon and nutmeg added. For this recipe, you must use 100% pure pumpkin puree. Using pie filling will make your dessert far too sweet and could throw off the texture since it often contains thickeners.
Can I use homemade whipped cream instead of Cool Whip?
Yes, you can. For the cream cheese layer, whip 1 ½ cups of heavy cream with 2 tablespoons of powdered sugar until you get stiff peaks. Then fold it into the cream cheese mixture. You can also use fresh whipped cream for the top layer. Just note that fresh whipped cream doesn’t hold its shape as long as stabilized toppings, so it’s best for serving the same day.
Why is my pumpkin layer not thickening up?
The most common cause is not using cold enough milk. Instant pudding needs the cold to set. Another reason could be not whisking for the full 2 minutes. Give it time to thicken. Finally, make sure you are using instant pudding mix, not “cook and serve” pudding, which requires cooking on the stove and won’t work in this no-bake recipe.
How long will leftovers last in the fridge?
Your pumpkin lush dessert will stay fresh and tasty in the refrigerator for 3 to 4 days when covered well. The crust will gradually get softer, but the flavors will still be wonderful. I do not recommend freezing it, as the texture of the whipped layers can become grainy and separate when thawed.
Can I make this in a different size pan?
You can, but the layer thickness will change. A 9×9 inch square pan will give you much thicker, richer layers and will serve fewer people. You might even have a little extra filling. For a thinner dessert that serves more, stick with the standard 9×13 inch rectangle dish. It’s the perfect size for the given ingredient amounts.
Is there a way to make this recipe healthier?
You can make some lighter swaps. Use reduced-fat or Neufchâtel cream cheese. Choose a sugar-free instant pudding mix and a light whipped topping. You can also use a lower-fat milk. The flavor will still be great, though the texture might be slightly less rich. For the crust, you could try mixing graham crumbs with a little less butter or using a nut-based crust.
My crust is crumbling and not holding together. What did I do wrong?
This usually means you didn’t use enough butter, or you didn’t mix it in thoroughly. Every single crumb should be moistened. It should feel like wet sand that holds together when you squeeze it in your hand. If it’s still too dry, add just a little more melted butter, one tablespoon at a time, until the texture is right.
Can I add real pumpkin pie spice to the cream cheese layer too?
You sure can! Adding a half teaspoon of pumpkin pie spice to the cream cheese mixture is a fantastic idea. It weaves the warm spice flavor throughout the entire dessert, not just the pumpkin layer. It creates a more cohesive and deep spiced flavor that many people love. Go ahead and give it a try!
What can I use if I don’t have pumpkin pie spice?
No problem! You can easily make your own blend. Mix together ½ teaspoon ground cinnamon, ¼ teaspoon ground ginger, ⅛ teaspoon ground nutmeg, and a tiny pinch of ground cloves or allspice. This combo will give you that classic warm flavor. You can adjust the amounts to your own taste if you prefer more cinnamon or less ginger.
Your New Go-To Fall Dessert Awaits
There you have it! A dessert that’s as easy to make as it is impressive to serve. This No-Bake Pumpkin Lush has saved my holidays and brought smiles to so many faces. I love how it fills the kitchen with the scent of autumn without any oven heat. So grab your bowl and whisk, and get ready to make a dessert that will have everyone asking for the recipe. Happy no-baking, friends!
Bagel Breakfast Sliders
Ingredients
Equipment
Method
- Crush graham crackers until they resemble fine sand and mix with melted butter until coated.
- Press the mixture firmly into the bottom of a 9x13 inch dish to create a solid crust.
- Beat softened cream cheese until smooth, then gradually mix in powdered sugar and fold in whipped topping.
- Spread the cream cheese layer evenly over the crust.
- Whisk cold milk and instant vanilla pudding mix together until thick, then mix in pumpkin puree and pumpkin pie spice.
- Spread the pumpkin layer gently over the cream cheese layer.
- Top with a final layer of whipped topping and refrigerate for at least 4 hours or overnight.