The Ultimate No-Bake Treat: Meet Your New Favorite Snack
Do you ever have one of those days where you need a treat, but turning on the oven feels like a marathon? I hear you! That’s exactly why I’m obsessed with these Chocolate Chip Bombs. My kids started calling them “bombs” because they explode with flavor, and the name just stuck. Picture this: a chewy, peanut buttery base, a satisfying crunch, and a sweet chocolate drizzle. It’s pure magic in just a few minutes, and I can’t wait for you to try them.
From Lunchbox Treat to Family Legend
This recipe has a special place in my heart. It’s a twist on the classic “Scotcheroo” or peanut butter rice crispy treat, which has been a Midwest potluck staple for decades. My grandma used to make something similar, but she always used butterscotch chips. One day, I was out of butterscotch but had a giant bag of chocolate chips staring at me. I made the switch, added a little extra honey for chewiness, and my family declared it a massive upgrade. Now, these Chocolate Chip Bombs are the first thing gone at any family gathering or school bake sale. They’re a beautiful blend of nostalgic and new.
Why You’ll Fall in Love With These Chocolate Chip Bombs
Let me count the ways! First, there’s zero baking required. This is a huge win on hot days or when you’re short on time. Second, they’re incredibly forgiving. Forget to measure exactly? It’s okay! The recipe is flexible. Third, the flavor combination is unbeatable. Salty peanut butter, sweet honey, crisp cereal, and rich chocolate create a perfect balance. They’re also fantastic for making with kids—my little ones love stirring the mixture and pressing it into the pan. It’s a fun, messy, and delicious project.
Perfect Occasions for Your Bomb Batch
These bars are the ultimate crowd-pleaser for so many events. I always make a double batch for:
- School Events: They’re nut-free if you skip the topping (check your cereal), travel well, and kids adore them.
- Potlucks & Picnics: No need to keep them hot or cold, and they’re easy to eat with your hands.
- Weekend Meal Prep: I cut them into bars, wrap them individually, and grab one for a quick afternoon pick-me-up all week.
- Last-Minute Guests: You can whip these up in 15 minutes flat before friends arrive.
- Holiday Cookie Platters: They add a delicious, different texture alongside all the traditional cookies.
Gathering Your Chocolate Chip Bomb Ingredients
Here’s what you’ll need to make one glorious 9×9-inch pan. The beauty is in the simplicity!
- 1 cup creamy peanut butter
- 1/2 cup honey
- 3 cups crispy rice cereal
- 1/2 cup chocolate chips
- 1/4 cup chopped peanuts (optional, but highly recommended for extra crunch!)
Easy Swaps and Substitutions
Don’t have something? No problem! This recipe is wonderfully adaptable.
- Peanut Butter: Any nut or seed butter works. Try almond butter or sunflower seed butter for a nut-free version.
- Honey: Maple syrup or light corn syrup can be used. Maple syrup will give a slightly different, but delicious, flavor.
- Cereal: Any plain, crispy cereal will do. I’ve used corn flakes and even bran flakes in a pinch.
- Chocolate Chips: Swap for butterscotch, white chocolate, or dark chocolate chips. Use what you love!
- Topping: Instead of peanuts, use sprinkles, a pinch of sea salt, or even mini M&Ms for a colorful finish.
Crafting Your Chocolate Chip Bombs: A Step-by-Step Guide
Let’s get our hands a little sticky and make some magic happen. This process is as fun as it is easy.
Step 1: Melting the Sweet Base
Grab a medium saucepan. Combine the creamy peanut butter and golden honey. Turn the heat to medium-low. Watch as they slowly melt together, creating a smooth, fragrant, and glossy mixture. Stir it constantly with a wooden spoon. You’ll smell the rich, roasted peanut aroma blooming. Pro tip: Don’t let it boil! You just want it warm enough to blend seamlessly. Once it’s completely smooth and runny, take it off the heat immediately.
Step 2: The Big Crunch Incorporation
Now, pour in all three cups of crispy rice cereal. It will make a wonderful sound as it hits the warm mixture. Use a sturdy spoon or spatula to fold and stir. You want every single piece of cereal to get lovingly coated in that shiny peanut butter glue. The texture changes from separate ingredients to one cohesive, lumpy, and glorious mass. It should look uniformly tan and feel slightly stiff to stir.
Step 3: Pressing for Perfection
Lightly grease your 9×9-inch baking pan with butter or a quick spray of oil. Transfer the cereal mixture into the pan. Now, here’s a trick: use the bottom of a flat cup or a piece of parchment paper to press the mixture down. Press it firmly and evenly into all the corners. This ensures your bars hold together and don’t crumble later. You should have a nice, compact, and level surface ready for its chocolate blanket.
Step 4: The Chocolate Drizzle Finale
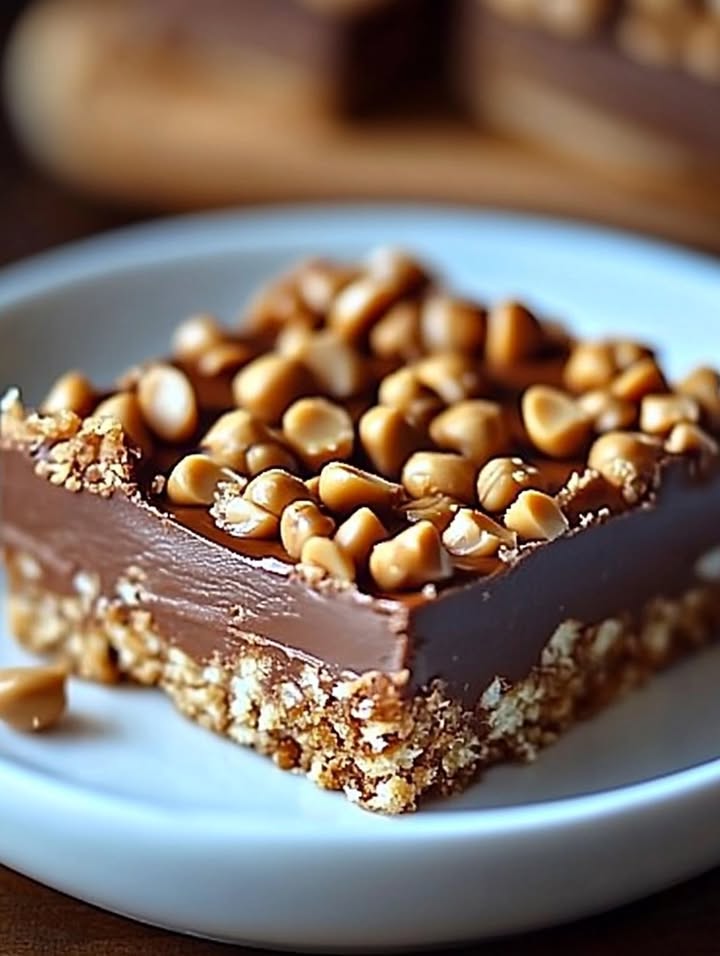
Place your chocolate chips in a microwave-safe bowl. Heat them in 20-second bursts, stirring well between each, until they are just melted and silky. Don’t overheat them! Using a spoon, drizzle the liquid chocolate back and forth across the pressed bars in a zig-zag or artistic pattern. Watching the dark chocolate ribbon over the lighter base is so satisfying. This is where your Chocolate Chip Bombs really start to look special.
Step 5: Adding the Optional (But Awesome) Topping
If you’re using chopped peanuts, now is the time! Sprinkle them evenly over the wet chocolate drizzle. The peanuts will stick to the chocolate as it sets, giving every bite an incredible extra crunch and a beautiful, professional-looking finish. This step is totally optional, but I highly recommend it for texture lovers.
Step 6: The Patient Chill
This is the hardest part! Carefully place the whole pan in the refrigerator. Let the bars chill for at least 2 hours, or until the chocolate is completely set and the base is firm. This waiting time allows all the flavors to marry and the structure to solidify. I sometimes pop them in the freezer for about 45 minutes if I’m in a real hurry.
Step 7: Slice, Serve, and Savor!
Run a knife around the edge of the pan. Use a sharp knife to cut your slab into squares or rectangles. Wiping the knife with a warm, damp cloth between cuts gives you super clean edges. Then, just enjoy! The first bite gives you the cool, set chocolate, then the chewy middle, and finally that fantastic crispy crunch. Chef’s tip: For truly clean cuts, score the chocolate gently after drizzling but before chilling, then finish cutting after they’re set.
Your Chocolate Chip Bomb Timeline
Here’s a quick breakdown of how much time you need to dedicate to this recipe.
- Prep Time: 10 minutes
- Cook Time: 5 minutes (melting time)
- Chill Time: 2 hours
- Total Time: 2 hours 15 minutes
- Yield: 12-16 bars, depending on how you cut them
My Secret for the Chewiest Bars
My absolute secret weapon is to use fresh, runny honey. If your honey has crystallized, warm it gently before measuring. The liquid honey binds with the peanut butter to create that perfect, soft-chewy texture that makes these bombs so addictive. Thick or old honey can make the bars a bit too hard.
A Little Food for Thought
Did you know the combination of peanut butter and chocolate was popularized in America by Harry Burnett Reese? He invented Reese’s Peanut Butter Cups in 1928 during the Great Depression. Our Chocolate Chip Bombs are a wonderful homemade nod to that iconic American flavor pairing, with a delightful crunchy twist thanks to the cereal!
What You’ll Need to Make Them
You likely have these tools in your kitchen already:
- Medium saucepan
- Wooden spoon or silicone spatula
- 9×9-inch baking pan
- Measuring cups and spoons
- Microwave-safe bowl (for chocolate)
- Knife for cutting
Keeping Your Chocolate Chip Bombs Fresh
These bars store beautifully, making them a perfect make-ahead treat. Once they are fully set and cut, you have a few great storage options.
For short-term storage, place them in an airtight container. Layer them between sheets of parchment paper so they don’t stick together. They will keep perfectly at room temperature for about 3 days, or in the refrigerator for up to a week. I find the fridge keeps them a bit chewier.
Yes, you can freeze Chocolate Chip Bombs! Individually wrap each bar in plastic wrap, then place them all in a freezer-safe bag or container. They will keep for up to 2 months. Thaw them at room temperature for about 30 minutes before enjoying. This is my favorite way to always have a sweet treat on hand.
Tips and Advice for Bomb-Proof Success
- For super neat cuts, line your pan with parchment paper, letting it hang over the edges. Once chilled, you can lift the whole slab out before cutting.
- If your mixture seems too dry or crumbly after adding the cereal, add another tablespoon of warm peanut butter and stir.
- For a swirled look, spread half the melted chocolate over the bars, let it set slightly, then drizzle the rest.
- Get the kids involved! They can measure cereal, stir (with help on the stove part), and press the mixture into the pan.
Presenting Your Masterpiece
Make your bars look extra special for guests or gifts.
- Stack them on a cute cake stand with a dusting of powdered sugar.
- Place mini bars in colorful paper cupcake liners for a party.
- Drizzle with both white and dark chocolate for a fancy two-tone effect.
- Package them in a clear cellophane bag tied with a ribbon for a lovely homemade gift.
Healthier and Fun Variations to Try
Love the idea but want to mix it up? Here are six fantastic twists on the original Chocolate Chip Bomb.
- Protein Power Bombs: Use natural peanut butter, add a scoop of vanilla protein powder to the warm mix, and use sugar-free chocolate chips.
- Trail Mix Bombs: Replace 1 cup of cereal with a mix of rolled oats, sunflower seeds, and dried cranberries before pressing.
- Double Chocolate Bombs: Stir 2 tablespoons of cocoa powder into the melted peanut butter and honey mixture for an intense chocolate base.
- Cookie Dough Bombs: Use cookie butter instead of peanut butter, and fold in mini chocolate chips along with the cereal.
- Salty-Sweet Bombs: Use a coarse sea salt on top of the chocolate drizzle instead of peanuts for a gourmet touch.
- Fruity Pebbles Bombs: Use Fruity Pebbles cereal instead of rice cereal for a vibrant, fruity, and colorful version kids go crazy for.
Common Mistakes to Avoid
Even easy recipes have pitfalls. Avoid these to ensure your Chocolate Chip Bombs are perfect every time.
Mistake 1: Overheating the Peanut Butter Mixture
It’s tempting to crank up the heat to speed things up. But overheating causes the oils to separate from the peanut butter. This creates a greasy, oily bar that won’t hold together well. The honey can also become too hard when cooled. Always use medium-low heat and stir constantly until just smooth and combined.
Mistake 2: Not Pressing the Mixture Firmly Enough
A gentle pat into the pan isn’t enough. If the cereal mixture isn’t compacted, your bars will fall apart when you cut and eat them. Use real pressure! I use a glass with a flat bottom or my hands protected by a piece of parchment paper. Press down hard, especially in the corners, to create a dense, solid base.
Mistake 3: Skipping the Chill Time
I know, waiting is hard. But cutting into these bars before they are fully set is a recipe for a crumbly mess. The chocolate won’t be firm, and the bars won’t have their final chewy-crisp texture. The refrigerator time is not optional; it’s essential for the structure. Set a timer and walk away!
Mistake 4: Using the Wrong Cereal
Not all cereals are created equal here. You need a light, crispy rice cereal like Rice Krispies. Using a dense cereal like granola or a flake cereal that gets soggy (like corn flakes) without adjusting the recipe will change the texture completely. Stick with the classic for the right “bomb” experience.
Your Chocolate Chip Bomb Questions, Answered
Can I make these gluten-free?
Absolutely! The recipe is naturally gluten-free as long as you use a certified gluten-free crispy rice cereal. Many brands, like Malt-O-Meal’s Crispy Rice or specific labeling from name brands, are gluten-free. Always check the package to be sure, as some cereals may contain malt flavoring derived from barley.
My mixture seems too dry and crumbly. What did I do wrong?
This usually happens if the peanut butter and honey weren’t warm enough to properly coat the cereal, or if you packed your measuring cup too tightly. Don’t worry, it’s an easy fix! Gently reheat the whole mixture in the saucepan over very low heat, adding a teaspoon more of peanut butter or honey until it becomes stirrable and sticky again. Then press it into the pan immediately.
Can I use natural, drippy peanut butter?
You can, but it may change the texture. Commercial creamy peanut butter has stabilizers that help the bars set firmer. Natural peanut butter can sometimes make a softer, oilier bar. If you use it, make sure it’s very well stirred, and consider chilling the bars for an extra hour or even placing them in the freezer to help them firm up properly.
Why do mine taste too sweet?
The sweetness level depends heavily on your peanut butter and honey. If you used a sweetened peanut butter and a very strong honey, it can be overpowering. Next time, try using a “natural” creamy peanut butter with no added sugar and a milder honey like clover. You can also reduce the honey by a tablespoon, but be aware it may affect how well the bars hold together.
How do I get a clean cut without squishing the bars?
A sharp knife is your best friend. Run it under very hot water, wipe it dry, and make your cut. The heat helps slice through the chocolate cleanly. Wipe the blade and reheat it between each cut. For the absolute cleanest cuts, score the chocolate drizzle lightly with a knife right after you add it, before chilling. Then just follow those lines when you cut fully later.
Can I double this recipe?
Yes, you can easily double it! Use a large saucepan to melt the doubled peanut butter and honey. You’ll need to press the mixture into a 9×13-inch pan instead of the 9×9-inch. The chill time will remain about the same. This is a fantastic idea for parties or gifting.
What can I use instead of honey?
Maple syrup is the best direct substitute. It will give a distinct maple flavor that pairs wonderfully with peanut butter and chocolate. Light corn syrup will also work and will give you a chewier, slightly glossier bar. Agave nectar can be used, but it may result in a softer texture.
My chocolate seized up when I tried to melt it. Help!
Chocolate seizes (becomes clumpy) when even a tiny drop of water gets in. Always ensure your bowl and spoon are completely dry. Melt slowly using short bursts in the microwave, stirring between each. If it does seize, don’t panic! Stir in a tiny amount of vegetable oil or shortening (about 1/2 teaspoon at a time) until it becomes smooth again.
Are these okay for school if there are nut allergies?
The main recipe as written is not safe for nut allergies due to the peanut butter. However, you can make a great nut-free version! Use a seed butter like sunflower seed butter (often called “SunButter”) and omit the peanut topping. Always check your cereal label for allergen warnings too.
Can I add other mix-ins?
Of course! Get creative. After coating the cereal, you could gently fold in 1/4 cup of mini M&Ms, crushed pretzel pieces, or even toasted coconut flakes. Just be careful not to add too many extra dry ingredients, or the binding mixture might not hold everything together.
Ready, Set, Bomb!
And there you have it—everything you need to know to make the easiest, most delicious no-bake treat in your kitchen. These Chocolate Chip Bombs have saved my day more times than I can count. They bring smiles, satisfy cravings, and create the best kind of messy memories with loved ones. I hope you give them a try this week. Grab your saucepan, call over a helper (big or small), and get ready for your new favorite snack to explode onto the scene. Happy cooking!
Chocolate Chip Bombs
Ingredients
Equipment
Method
- Combine creamy peanut butter and honey in a medium saucepan over medium-low heat.
- Stir constantly until melted and smooth, then take off the heat.
- Pour in the crispy rice cereal and mix until well coated.
- Lightly grease a 9x9-inch baking pan and press the mixture firmly into the pan.
- Melt chocolate chips in a microwave-safe bowl in 20-second bursts, stirring until smooth.
- Drizzle the melted chocolate over the pressed mixture in a zig-zag pattern.
- Add optional chopped peanuts on top of the chocolate drizzle.
- Refrigerate for at least 2 hours until set, then slice and serve.