Witch’s Cauldron Brownie Bites: Your New Halloween Party Hero
You know that moment at a Halloween party? Everyone is chatting in costumes, and the food table is a sea of orange and black cupcakes. Then you arrive with a platter of these little bubbling cauldrons. The crowd goes quiet. Fingers point. Someone whispers, “What IS that magic?” That’s the power of these Witch’s Cauldron Brownie Bites. They’re the show-stopping, spellbinding treat that makes you the undisputed kitchen wizard of the season. I tested this recipe three times last October, and let me tell you, the third batch vanished before I could even take a picture for my mom!
A Cauldron Full of Fun: The Story of This Sweet Spell
While brownies have a rich history dating back to the late 1800s, the fun of turning them into tiny themed treats is a modern twist. I love taking classic, fudgy brownies and giving them a playful Halloween personality. The idea for the “cauldron” came from my daughter’s obsession with a cartoon witch. She asked if we could make food that bubbled like a potion. We started with regular brownies in a muffin tin, but the well in the center was the real game-changer. It’s the perfect vessel for our mystical, colorful frosting “potion.” It’s a tradition now—no Halloween is complete without whipping up a batch of these bewitching bites.
Why You’ll Absolutely Love This Halloween Recipe
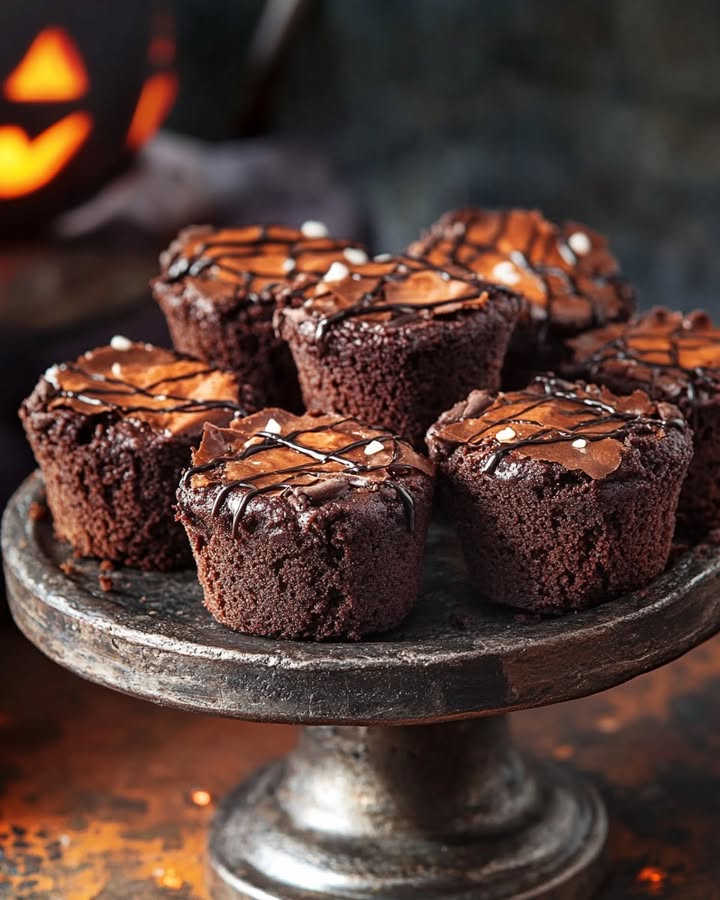
First, they are incredibly cute. The bright green and purple frosting against the dark brownie is just so festive. Second, they are the perfect two-bite dessert. No plates or forks needed! They’re also surprisingly simple. The brownie base is a straightforward, one-bowl situation. The decorating is where you and the kids can get wildly creative. Plus, that cream cheese frosting is tangy and not too sweet, which balances the rich chocolate perfectly. It’s a win on all fronts: taste, texture, and terrific Halloween spirit.
Perfect Occasions for These Bewitching Bites
Obviously, these are born for Halloween. But their charm works for more than just October 31st!
- Halloween Party: The ultimate centerpiece for your spooky spread.
- School Bake Sale: They’ll be the first treat to disappear from the table.
- Movie Night: Make a double batch for family film night with “Hocus Pocus.”
- Pumpkin Carving Gathering: A sweet reward after all that scooping and carving.
- Just-Because Baking: Sometimes you need a little magic on a rainy Tuesday.
Gathering Your Magical Ingredients
Here’s everything you’ll need to cast this delicious spell:
For the Brownie Bites:
- 12 Tablespoons (170g) unsalted butter, cut into pieces
- 3/4 cup (150g) semisweet chocolate chips
- 1/2 cup (50g) natural cocoa powder
- 1/2 teaspoon instant coffee grounds (optional, but great for depth!)
- 1 cup (200g) packed light or dark brown sugar
- 1/2 cup (100g) granulated sugar
- 2 large eggs + 1 extra egg yolk
- 1 teaspoon vanilla extract
- 1 cup + 2 Tablespoons (140g) all-purpose flour
- 1/2 teaspoon baking powder
- 1/2 teaspoon salt
For the Wizard’s Frosting:
- 1/2 cup (113g) salted butter, softened
- 8 oz (226g) brick-style cream cheese, softened
- 1 teaspoon vanilla extract
- 4 cups (500g) powdered sugar
- Gel food coloring (I used mint green and regal purple)
For Decorating:
- Colored sprinkles
- Candy eyeballs
Smart Swaps: Ingredient Substitution Options
Don’t panic if you’re missing something! Magic is adaptable.
- Butter: You can use salted butter. Just omit the extra 1/2 tsp salt in the brownie batter.
- Chocolate Chips: A chopped dark chocolate bar works beautifully.
- Cocoa Powder: Dutch-process cocoa can be used, but your brownies will be milder and darker.
- Cream Cheese Frosting: Not a fan? Use a simple vanilla buttercream instead.
- Food Coloring: Liquid food coloring works but use less. Gel colors are more vibrant.
- Gluten-Free: Use a trusted 1:1 gluten-free flour blend.
Brewing Your Brownie Cauldrons: Step-by-Step
Step 1: Prepare Your Mini Cauldron Molds
Preheat your oven to 350°F (175°C). Now, this is crucial: generously spray a 24-count mini muffin tin with baking spray. This isn’t regular cooking spray. Baking spray has flour in it, which creates a non-stick barrier that your brownies will slide right out of. If you don’t have it, grease and lightly flour each well, tapping out the excess. Trust me, this step saves so much frustration later!
Step 2: Melt the Chocolate and Butter
Combine the butter pieces and chocolate chips in a big microwave-safe bowl. Microwave for 30 seconds, then stir. It will look messy. Microwave for another 15 seconds and stir again. Keep doing this in short bursts until the mixture is completely smooth and glossy. The smell is heavenly—like a rich, chocolatey hug. Pro tip: Stirring well between heats prevents the chocolate from burning.
Step 3: Build the Brownie Batter Base
Stir the cocoa powder and instant coffee (if using) into the warm chocolate mixture. The coffee won’t make it taste like coffee. It just makes the chocolate flavor deeper and more complex. Next, add both sugars. The batter will look grainy and thick, which is perfect. Add the eggs and extra yolk one at a time, stirring vigorously after each. Finally, mix in the vanilla. Your arm might get a workout, but the shiny, thick batter is worth it.
Step 4: Bring It All Together
In a separate bowl, whisk together the flour, baking powder, and salt. This aerates the flour and ensures the leavening is evenly distributed. Add these dry ingredients to your wet chocolate mixture. Gently fold everything together until just combined and no dry streaks remain. Overmixing can make the brownies tough, so stop when it’s unified. The batter will be thick and luxurious.
Step 5: Bake and Create the Cauldron Shape
Using a cookie scoop or a tablespoon, drop batter into each prepared mini muffin well. Bake for about 18 minutes. A toothpick inserted should come out with a few moist crumbs, not wet batter. As soon as they come out of the oven, take a rounded teaspoon or the back of a small melon baller. Immediately press gently into the center of each hot brownie bite to make a well. This forms your cauldron! Let them cool completely in the pan.
Step 6: Concoct the Colorful Potion Frosting
While the brownies cool, make the frosting. Beat the softened butter and cream cheese together until creamy and lump-free. Mix in the vanilla. Gradually add the powdered sugar with the mixer on low, then beat on medium until fluffy. Now for the fun! Divide the frosting if using two colors. Add gel colorings a tiny drop at a time. Stir thoroughly to avoid streaks. Chef’s tip: A tiny drop of lemon yellow in the mint green makes it look extra neon and witchy!
Step 7: Decorate and Cast Your Spell!
Once brownies are totally cool, spoon or pipe your vibrant frosting into each well. It should look like a bubbling potion! Immediately add sprinkles and candy eyeballs so they stick. Let your imagination run wild—some cauldrons can have purple potion, some green, some a mix! The final look is spooky, adorable, and utterly irresistible.
Your Witch’s Kitchen Timetable
Planning is part of the magic. Here’s how your time will be spent:
- Prep Time: 25 minutes
- Cook Time: 18 minutes
- Cooling & Decorating Time: 1 hour
- Total Time: About 1 hour 45 minutes
The Chef’s Secret for the Fudgiest Bites
That extra egg yolk is my not-so-secret weapon. The fat and emulsifiers in the yolk create an incredibly tender, fudgy crumb that holds its shape perfectly in the mini muffin tin. It’s the difference between a good brownie and a magical, melt-in-your-mouth one.
A Pinch of Kitchen Lore
Did you know natural cocoa powder is acidic? That’s why we use baking powder, which is a complete leavener. It reacts with the cocoa and the moisture in the batter to give our brownie bites a perfect little lift and a crackly top. It’s edible chemistry at its most delicious!
Necessary Equipment for Your Potion Lab
- 24-count mini muffin tin
- Baking spray or butter & flour for greasing
- Large microwave-safe mixing bowl
- Medium mixing bowl
- Whisk and rubber spatula
- Electric hand mixer or stand mixer
- Cookie dough scoop or tablespoon
- Piping bag or ziplock bag (optional, for frosting)
Storing Your Enchanted Creations
These brownie bites are best enjoyed the day they are made, when the frosting is fresh and the brownie is soft. If you need to store them, place them in a single layer in an airtight container. They can sit at room temperature for a few hours if your kitchen isn’t too warm.
For longer storage, you must refrigerate them because of the cream cheese frosting. Keep them in an airtight container in the fridge for up to 3 days. The brownie itself may firm up a bit when cold, but it will still be delicious.
I do not recommend freezing the fully assembled bites, as the frosting and decorations can get messy. You can, however, freeze the un-frosted brownie bites for up to a month. Thaw at room temperature and frost fresh.
Tips and Advice for Spellbinding Success
- Use brick-style cream cheese, not the spreadable kind in a tub. It has less water and makes a sturdier frosting.
- Let your brownies cool completely before frosting. Warm brownies will melt your beautiful potion.
- Get the kids involved with the decorating. It’s the most fun part and doesn’t require precision.
- If your brownies stick, run a small knife around the edges while they are still slightly warm to help release them.
Presentation Tips for Maximum Wow Factor
- Arrange them on a black platter or a slate board for dramatic contrast.
- Scatter a few extra candy eyeballs and sprinkles around the plate.
- Add labels like “Eye of Newt Potion” or “Witch’s Brew” on small tags.
- Place the platter on a bed of dry ice (carefully!) for a real bubbling cauldron effect.
Healthier Alternative Recipes & Fun Twists
Want to mix up the magic? Here are six inspired variations.
- Black Bean Brownie Bites: For a gluten-free, protein-packed version, blend a can of black beans into the wet ingredients. They become incredibly fudgy and no one will guess the secret ingredient!
- Vegan Witch’s Cauldrons: Use flax eggs, vegan butter, and dairy-free chocolate. Top with a coconut cream-based frosting colored with plant-based food dyes.
- Peanut Butter Swirl Cauldrons: Before baking, drop a small spoonful of peanut butter into each brownie-filled well and swirl with a toothpick. Frost as usual for a chocolate-PB potion.
- Orange Creamsicle Version: Flavor the frosting with orange extract instead of vanilla and color it bright orange. It’s a non-traditional but delicious Halloween color.
- Zombie Brains Variation: Skip the cauldron well. Frost the top of the brownie bite with pink frosting and pipe a “brain” pattern on top with a darker pink or red icing.
- Spider Web Bites: Frost the bites with white frosting. Use a toothpick to drag lines of chocolate sauce from the center outwards to create a simple web design. Add a black sprinkles spider.
Common Mistakes to Avoid
Mistake 1: Using the Wrong Pan Spray
This is the biggest pitfall. Using regular cooking spray often leads to torn brownies that stick in the pan. The flour in baking spray is essential for easy release. If you don’t have it, take the extra minute to grease and flour each well. Shake out the excess flour so your brownies don’t get a dusty coating.
Mistake 2: Overbaking the Mini Brownies
It’s easy to do because they are small. Overbaked brownie bites become dry and cakey, losing that essential fudgy texture. Start checking at 16 minutes. The toothpick test is your friend—look for moist crumbs, not a clean pick. Remember, they continue to cook a bit in the hot pan.
Mistake 3: Adding Frosting to Warm Brownies
Impatience is a recipe for a melted mess! If the brownie bites are even slightly warm, the cream cheese frosting will soften, slide off, and lose its shape. It can also make the brownie soggy. Let them cool in the pan, then transfer to a rack to cool completely. Use this time to make your colorful frosting.
Mistake 4: Using Spreadable Cream Cheese
The cream cheese that comes in a tub is formulated to be soft and spreadable right from the fridge. It has more water and stabilizers. For a thick, pipeable frosting that holds its shape, you must use the brick-style, full-fat cream cheese. Let it soften at room temperature for easy mixing.
Frequently Asked Questions
Can I make these Witch’s Cauldron Brownie Bites ahead of time?
Yes, you can prepare in stages for less stress. The un-frosted brownie bites can be baked, cooled, and stored in an airtight container at room temperature for one day, or frozen for a month. Make the frosting up to two days ahead and keep it covered in the fridge. Let it come to room temperature and re-whip before using. Assemble and decorate the day you plan to serve them for the freshest look and texture.
What can I use if I don’t have a mini muffin tin?
You have a couple of options! A regular muffin tin will work, but your baking time will increase to about 22-25 minutes. Your “cauldrons” will just be bigger. You can also bake the batter in an 8×8 square pan and cut it into small squares. You won’t get the cup shape, but you can still frost the tops decoratively. For the true well shape without the special pan, it’s trickier, but a mini muffin tin is a great investment for cute treats.
My frosting turned out too runny. How can I fix it?
A runny frosting usually means the cream cheese or butter was too soft, or you added a liquid-based food coloring. To save it, try chilling the whole bowl of frosting in the refrigerator for 20-30 minutes, then re-beating it. You can also add a little more powdered sugar, a quarter cup at a time, until it thickens up. Always use gel food coloring for the most vibrant color without adding extra liquid.
Can I make these brownie bites nut-free?
Absolutely! This recipe as written does not contain any nuts. However, always double-check your ingredient labels, especially on chocolate chips and cocoa powder, to ensure they are processed in a facility that is safe for your needs. All major brands typically have this information on the packaging.
How do I get the candy eyeballs to stick to the frosting?
The key is timing. Add the sprinkles and candy eyeballs immediately after piping or spooning the frosting onto the brownie bite. The surface of the frosting is still slightly moist and sticky at this point, which acts like glue. If you wait too long, the frosting can form a slight crust, and the decorations might not adhere as well and could fall off.
Is the instant coffee necessary?
No, it’s completely optional. I include it because it enhances the chocolate flavor without adding a coffee taste. It makes the chocolate taste richer and deeper. If you don’t have it or don’t like coffee, just leave it out. Your brownies will still be wonderfully chocolatey and delicious. Don’t let that one ingredient stop you from making this fun recipe.
Can I use milk chocolate instead of semisweet?
You can, but be aware it will change the final result. Milk chocolate is sweeter and has a milder cocoa flavor. Your brownie bites will be much sweeter overall. For the best balanced, rich chocolate flavor that’s not overly sweet, I highly recommend sticking with semisweet or dark chocolate chips. They pair perfectly with the sweet frosting.
How many brownie bites does this recipe make?
This recipe is designed for a standard 24-count mini muffin tin, and you should get exactly 24 brownie bites. Using a cookie scoop helps ensure they are all the same size and bake evenly. If you have leftover batter, just wait for the first batch to bake and cool slightly, then re-spray the tin and bake a second, smaller batch. Do not overfill the wells.
My brownies sank in the middle after I made the well. Did I do something wrong?
Not at all! That slight sink is exactly what you want. You are intentionally creating a dip or well to hold the frosting “potion.” It’s not a mistake—it’s the design. Just make sure you press the well in while the brownies are hot and fresh from the oven. If you wait until they cool, they will be too firm to shape.
What’s the best way to transport these to a party?
Transporting these little guys requires a little care. Use a sturdy, flat container with a lid. Place them in a single layer. If you need a second layer, place a sheet of parchment paper over the first layer, then carefully arrange the second batch on top. Avoid stacking them directly on top of each other, as they will smash the decorations. Keep the container level in your car and avoid very warm areas.
Go Ahead, Cast a Delicious Spell!
There you have it, friends—everything you need to create these unforgettable Witch’s Cauldron Brownie Bites. They are more than just a dessert; they’re a conversation starter, a memory maker, and a giant dose of Halloween joy packed into a two-bite treat. Don’t be intimidated. The steps are simple, and the payoff is huge. So tie on your apron, pretend it’s a wizard’s cloak, and get baking. Your spellbound guests (and your taste buds) will thank you. Happy haunting, and happier baking!
Beef Jalapeño Biscuits
Ingredients
Equipment
Method
- Preheat your oven to 350°F (175°C) and generously spray a 24-count mini muffin tin with baking spray.
- Combine butter and chocolate chips in a microwave-safe bowl, microwaving in 30-second intervals until smooth.
- Stir in cocoa powder and optional coffee into the warm chocolate mixture, then add both sugars and mix.
- Beat in the eggs and extra yolk one at a time, followed by the vanilla.
- In another bowl, whisk flour, baking powder, and salt, then fold into the chocolate mixture until just combined.
- Scoop batter into the prepared tin and bake for about 18 minutes until a toothpick comes out with moist crumbs; create a well in the center of each.
- Cool completely in the pan.
- Beat together the softened butter and cream cheese for frosting until creamy; gradually add powdered sugar, mixing until fluffy.
- Color the frosting as desired with gel food coloring.
- Spoon or pipe frosting into the well of each brownie and decorate with sprinkles and candy eyeballs.