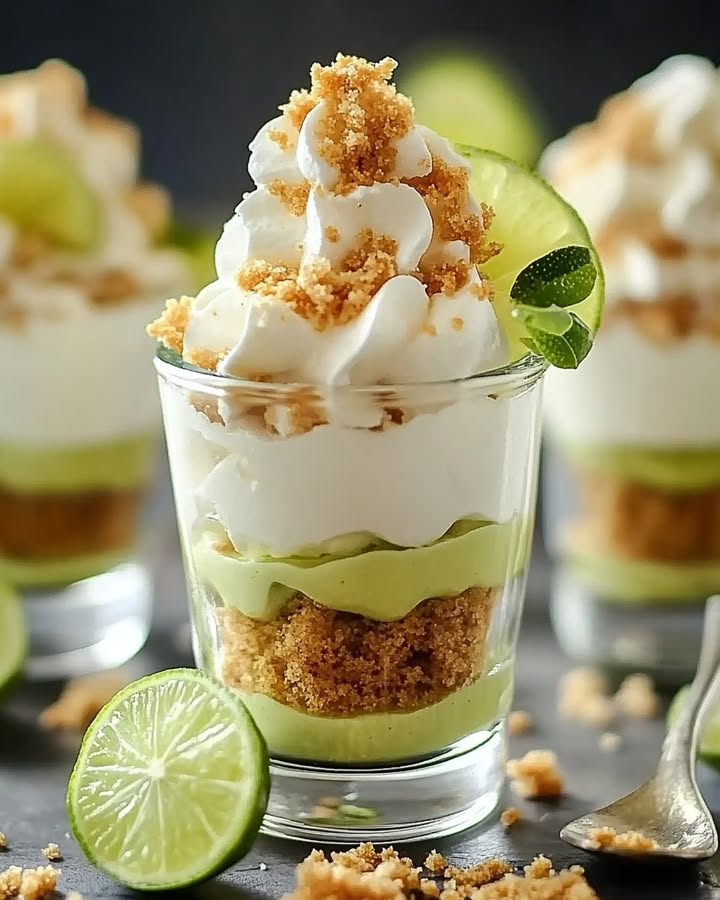
The Sunshine in a Glass: Key Lime Cheesecake Parfaits
You know that feeling when you need a little slice of sunshine, but it’s pouring rain outside? Or when you want a fancy dessert but the thought of turning on the oven makes you sweat? That’s exactly when I first dreamed up these Key Lime Cheesecake Parfaits. They’re my no-bake, happy-dance-in-your-mouth answer to chasing away the blahs. Imagine the tangy zip of a key lime pie married to the creamy dreaminess of cheesecake, all layered in a pretty glass. It’s pure magic, and I can’t wait for you to make it.
A Slice of Floridian History in a Glass
Key lime pie is Florida’s official state pie, a beloved legend born from simple, shelf-stable ingredients. Sailors and sponge fishermen out on the boats likely whipped up the first versions—no fresh milk or eggs needed, just sweetened condensed milk and those tiny, potent key limes. My parfait version takes that classic, carefree spirit and makes it even more fun and shareable. It’s the modern, no-fuss cousin to the pie, perfect for our busy lives. Think of it as key lime pie’s stylish, portable best friend who’s always ready for a party.
Why You’ll Adore These Zesty Parfaits
Let me count the ways! First, there’s zero baking required. Your oven gets to take a nap. Second, they come together in about 20 minutes of active fun. Third, the flavor is an incredible balance: the rich, buttery crust, the tangy-sweet, velvety filling, and the fluffy cloud of whipped cream on top. Each spoonful is a perfect bite. They look gorgeous and impress guests, but they’re honestly so simple that my teenager can assemble them. It’s a win-win dessert that feels special without the stress.
Perfect Occasions for Your Parfait Party
These parfaits are your secret weapon for so many moments. I love them for summer barbecues—they’re a cool, refreshing finale. They’re fabulous for girls’ nights, baby showers, or Mother’s Day brunch. I even make individual ones for birthdays when a whole cake is too much. They’re ideal for picnics (just secure the lids!) and are always the star of my potluck spread. Honestly, any day that ends with ‘y’ is a good day for a key lime parfait.
Gathering Your Sunshine Ingredients
Here’s your simple shopping list for pure joy:
- 1 cup graham cracker crumbs
- 2 tablespoons granulated sugar
- 4 tablespoons unsalted butter, melted
- 8 oz cream cheese, softened
- 1/2 cup sweetened condensed milk
- 1/4 cup key lime juice (freshly squeezed or bottled)
- 1 teaspoon key lime zest
- 1 cup whipped cream (store-bought or homemade)
- Key lime slices and extra lime zest for garnish (optional)
No Limes? No Problem! Handy Substitutions
Don’t fret if you can’t find every single item. Cooking is about joy, not stress!
- Key Lime Juice: Regular Persian lime juice works perfectly. The flavor is slightly different but still deliciously tart.
- Graham Cracker Crumbs: Try crushed digestive biscuits, vanilla wafers, or even shortbread cookies for the crust.
- Whipped Cream: A tub of whipped topping like Cool Whip will work in a pinch, though fresh always tastes lighter.
- For a Lighter Touch: Use Neufchâtel cheese (the lighter cream cheese) and light whipped cream. The texture will be slightly softer but still yummy.
Crafting Your Creamy Dream in a Glass
Alright, let’s get our hands busy and make some sunshine! Clear some counter space, put on some fun music, and let’s go.
Step 1: Create the Buttery Crumb Base
Grab a medium bowl and pour in your graham cracker crumbs. They smell like honey and childhood, don’t they? Add the granulated sugar and give it a stir. Now, pour in that golden, melted butter. Listen to that satisfying sizzle as you mix. Keep stirring until every single crumb is glistening and coated. It should feel like wet sand at the beach. Pro tip: If you’re using store-bought crumbs, you can melt the butter right in the microwave in a glass measuring cup to save a dish.
Step 2: Build Your Foundation Layer
Get your serving glasses ready. I use pretty parfait glasses, but even clear mason jars or fancy tumblers work great. Divide the buttery crumb mixture evenly among them. Now, take the back of a spoon and press the crumbs firmly into the bottom. You’re creating a solid crust that won’t get soggy too fast. This layer gives that essential crunch against the creamy filling. Set these little crust vessels aside.
Step 3: Whip Up the Zesty Filling
In a large mixing bowl, plop in your softened cream cheese. It should be at room temperature so it blends smoothly without lumps. Beat it with a hand mixer or stand mixer until it’s perfectly smooth and creamy, like a pale, spreadable cloud. Now, slowly drizzle in the sweetened condensed milk—that super-sweet, thick nectar. Follow it with the vibrant green key lime juice and that fragrant zest. The color will lighten instantly. Mix until everything is homogenous, smooth, and irresistibly tangy.
Step 4: Lighten and Fluff the Mixture
Here’s the secret to an airy texture. Take half of your whipped cream and gently fold it into the cream cheese mixture. Use a rubber spatula and a soft, lifting motion—think of it as giving the filling a gentle hug. You’re not stirring hard; you’re folding to incorporate air and lighten the whole mixture. This step makes the parfait filling creamy yet fluffy, not dense. You’ll see it transform before your eyes.
Step 5: Layer the Creamy Dream
Now for the fun assembly! Spoon or pipe the luscious cheesecake filling over the crusts in your glasses. Fill them about three-quarters of the way up. You want to leave room for that glorious whipped cream crown. As you spoon it in, admire the beautiful pale green color against the golden crust. It already looks like a professional dessert.
Step 6: Crown and Garnish Your Masterpiece
Top each parfait with a generous, playful dollop of the remaining whipped cream. Go for a rustic swoosh or pipe it on fancy—it’s your call. For the final touch, add a thin key lime slice on the rim or a little sprinkle of bright green lime zest right on top. The zest adds a fantastic burst of aroma and makes it look so fresh. Chef’s tip: For the prettiest garnish, use a microplane to get fine, fluffy zest just before serving.
Step 7: The Very Important Patience Step
I know, I know—you want to dig in right now! But trust me, this step is non-negotiable. Gently place your parfaits in the refrigerator. Let them chill and set for at least 2 hours. This waiting time allows the flavors to get to know each other and mingle beautifully. The crust firms up slightly, and the filling becomes perfectly sliceable with a spoon. It’s worth the wait, I promise.
Your Key Lime Parfait Timeline
| Prep Time: | 20 minutes |
| Chill Time: | 2 hours |
| Total Time: | 2 hours 20 minutes |
| Kcal per serving: | ~280 kcal (for 4 parfaits) |
My Secret for the Ultimate Zest
My number one chef’s secret is in the zest. Always zest your limes before you juice them. It’s infinitely easier! The fragrant oils in the zest pack the most powerful lime flavor punch. That little teaspoon elevates the entire dessert from “good” to “wow, what is that amazing flavor?!”. Don’t skip it!
A Fun Lime Fact
Those tiny key limes are actually yellow when fully ripe! The green ones we often see are typically picked slightly early. True, ripe key limes have a stronger, more complex aroma than the common Persian lime. This is why bottled key lime juice can be such a great, consistent option for capturing that authentic taste.
Tools You’ll Need
You don’t need fancy equipment. Here’s my list:
- Medium mixing bowl (for crust)
- Large mixing bowl (for filling)
- Electric hand mixer or stand mixer
- Rubber spatula
- Measuring cups and spoons
- 4 serving glasses or jars
- Zester or microplane
- Juicer (if using fresh limes)
Keeping Your Sunshine Fresh: Storage Tips
These parfaits store beautifully, making them a fantastic make-ahead dessert. Once assembled, simply cover the tops of the glasses tightly with plastic wrap. You can do this right after adding the whipped cream topping. This prevents any funky refrigerator smells from getting in and also stops the whipped cream from drying out.
They will keep happily in the fridge for up to 2 days. The crust will slowly soften the longer they sit, but it will still be delicious. I don’t recommend freezing them, as the creamy filling can separate and become watery when thawed, and the texture of the whipped cream will suffer.
If you want to prep components ahead, you can make the crust mixture and the filling separately. Store the crust in a bag at room temp and the filling in a sealed container in the fridge. Assemble them no more than a few hours before serving for the best textured crust.
My Best Tips for Parfait Perfection
- Soft Cream Cheese is Key: Let it sit out for a good hour. This prevents a lumpy filling.
- Taste as You Go: Love extra tang? Add an extra squeeze of lime juice to the filling.
- Chill Your Bowls: For homemade whipped cream, chill your mixing bowl and beaters first. It whips up faster and higher.
- Layer Thick: For clear glasses, use a spoon to gently press the filling against the side for a clean, professional look.
Presentation Ideas to Wow Your Guests
- Serve on a platter lined with crushed graham crackers to look like sand.
- Add a tiny paper umbrella or a sprig of fresh mint on top.
- For a dinner party, line them up down the center of the table as a edible centerpiece.
- Use different sized glasses for a fun, varied look on a dessert table.
Mix It Up! 6 Delicious Variations
Love this recipe? Try these fun twists!
- Berry Bliss: Add a layer of fresh raspberries or strawberries between the crust and filling.
- Tropical Twist: Fold 1/4 cup of toasted coconut into the crust and garnish with toasted coconut flakes.
- Chocolate Dipped: Dip the rims of the glasses in melted white chocolate and crushed graham crackers before filling.
- Mango Lime: Blend 1/2 cup of ripe mango puree into the cream cheese filling for a tropical duo.
- Boozy Adult Version: Add a tablespoon of coconut rum or citrus vodka to the filling for a grown-up treat.
- Vegan Sunshine: Use vegan cream cheese, coconut whipped cream, and vegan butter. Swap sweetened condensed milk for a vegan alternative.
Common Mistakes to Avoid
Mistake 1: Using Cold, Hard Cream Cheese
This is the biggest culprit for a lumpy, grainy parfait filling. When cream cheese is cold, it doesn’t blend smoothly with the other ingredients. No matter how long you mix, you’ll end up with tiny bits of cream cheese throughout. Always plan ahead and let your cream cheese sit on the counter for at least 60 minutes. It should feel soft to the touch but not melted. This simple step ensures a velvety, dreamy texture.
Mistake 2: Over-mixing the Whipped Cream Into the Filling
When you fold in the whipped cream, be gentle! Vigorous stirring or using the mixer will deflate the whipped cream. You’ll lose all that lovely air you worked hard to incorporate. The result is a dense, heavy filling instead of a light and fluffy one. Use a rubber spatula and a slow, gentle folding motion from the bottom of the bowl up. Stop as soon as no white streaks remain.
Mistake 3: Skipping the Chilling Time
It’s so tempting to eat them right away, but patience is key. The parfaits need that minimum 2-hour chill to set properly. Without it, the filling will be too soft and soup-like, and the layers might bleed together. The chilling time allows the flavors to deepen and meld. For the absolute best texture and taste, I often make them the night before. They are worth the wait.
Mistake 4: Using All Whipped Topping in the Filling
While you can use whipped topping (like Cool Whip), using the entire amount in the filling can make it taste overly artificial and have a strange, stable texture. The recipe is designed to use half whipped cream for lightness and half for topping. If using homemade whipped cream, you get a fresher, less sweet flavor. If you must use all whipped topping, reduce the amount folded in slightly so the filling isn’t too fluffy and bland.
Your Key Lime Parfait Questions, Answered
Can I make one big parfait instead of individual ones?
Absolutely! You can layer all the ingredients in a pretty 8×8 dish or a trifle bowl to make a spectacular Key Lime Cheesecake Trifle. Just press the crust into the bottom, spread the filling over it, and top with whipped cream. It’s perfect for feeding a crowd and looks stunning. The serving and storage instructions are the same, just use a large spoon to scoop out portions.
How far in advance can I prepare these?
You can assemble the complete parfaits up to 24 hours in advance. Any longer and the crust will start to get quite soft from the moisture of the filling. For the very best texture, I recommend making the components (the crust mix in one container, the filling in another) 1 day ahead. Then, assemble them about 2-4 hours before you plan to serve. This gives the crust a little time to set but prevents it from getting soggy.
I can’t find key limes. What can I use instead?
Don’t worry at all! Regular Persian limes (the common green limes at the grocery store) work perfectly well. The flavor will be slightly different—key limes are more aromatic and tart, while Persian limes are a bit more straightforwardly sour. You’ll still get a delicious, tangy lime cheesecake flavor. Just be sure to use fresh lime juice if possible, as bottled Persian lime juice can have a metallic taste.
Is bottled key lime juice okay to use?
Yes, a good-quality bottled key lime juice is a fantastic shortcut and often provides a very authentic, consistent flavor. Since key limes are tiny and a pain to juice, many bakers in Florida swear by certain bottled brands. Just make sure it’s pure key lime juice and not a “key lime flavor” blend. It will save you a ton of time and effort.
My filling seems too runny. What did I do wrong?
A runny filling usually points to two issues. First, the cream cheese may not have been soft enough, causing you to over-mix and incorporate too much air that later deflates. Second, not chilling long enough. The filling firms up significantly in the fridge. If it’s still runny after chilling, it could be that the whipped cream used was not stiff enough or the condensed milk was a bit off. Next time, ensure your whipped cream forms stiff peaks before folding it in.
Can I use low-fat or fat-free cream cheese?
You can, but the texture and flavor will not be as rich and creamy. Full-fat cream cheese gives the parfait its signature decadent mouthfeel and helps it set properly. Low-fat versions have more water and stabilizers, which can lead to a softer, sometimes almost gummy, texture. For the best result, I highly recommend using the regular, full-fat block cream cheese.
What’s the best way to zest a lime without a zester?
If you don’t have a microplane or zester, use the fine side of a box grater very carefully. Hold the lime steady and rub it gently over the grater, avoiding the bitter white pith underneath. You can also use a sharp vegetable peeler to peel off thin strips of just the green zest, then mince it very finely with a knife. The goal is to get those fragrant oily bits, not big chunks.
Can I freeze these parfaits?
I don’t recommend freezing the assembled parfaits. The creamy filling can separate and become grainy when thawed, and the whipped cream layer will not hold up well. The texture will be compromised. This dessert is best enjoyed fresh from the fridge. If you must freeze, freeze just the filling in a sealed container, then thaw in the fridge overnight and re-assemble.
How do I get nice, clean layers in the glass?
For picture-perfect layers, use a piping bag for the cheesecake filling. Pipe it in a spiral on top of the crust to create a smooth, even layer. You can also use a small spoon to gently spread the filling against the side of the glass. When adding the final whipped cream dollop, place it centrally so the green filling peeks out around the edges beautifully.
What else can I use for the crust?
Get creative! Ginger snap cookies make a wonderfully spicy crust. Vanilla wafers or shortbread cookies are deliciously buttery. For a nutty twist, try finely ground pecans or almonds mixed with a little butter and sugar. You can even skip the crust for a lower-carb option and just enjoy the creamy filling and whipped cream.
Go Make Some Sunshine!
And there you have it—my absolute favorite way to capture a ray of sunshine in a glass. These Key Lime Cheesecake Parfaits are more than just a dessert; they’re a little moment of joy, a guaranteed smile-maker. They’ve saved the day for me more times than I can count, from last-minute guests to “I need a treat” Tuesday. I hope you love making them (and eating them!) as much as my family does. Now, go whip up some happiness!
Cajun Seafood Alfredo
Ingredients
Equipment
Method
- In a medium bowl, mix graham cracker crumbs and sugar; stir in melted butter until coated.
- Divide the crumb mixture into serving glasses and press firmly to form the crust.
- In a large mixing bowl, beat softened cream cheese until smooth; mix in sweetened condensed milk, key lime juice, and key lime zest until well combined.
- Gently fold half of the whipped cream into the cream cheese mixture until airy.
- Layer the cheesecake filling into the crusts in the glasses, leaving room for whipped cream.
- Top each parfait with a dollop of remaining whipped cream and garnish with key lime slices or zest.
- Refrigerate the parfaits for at least 2 hours to set before serving.