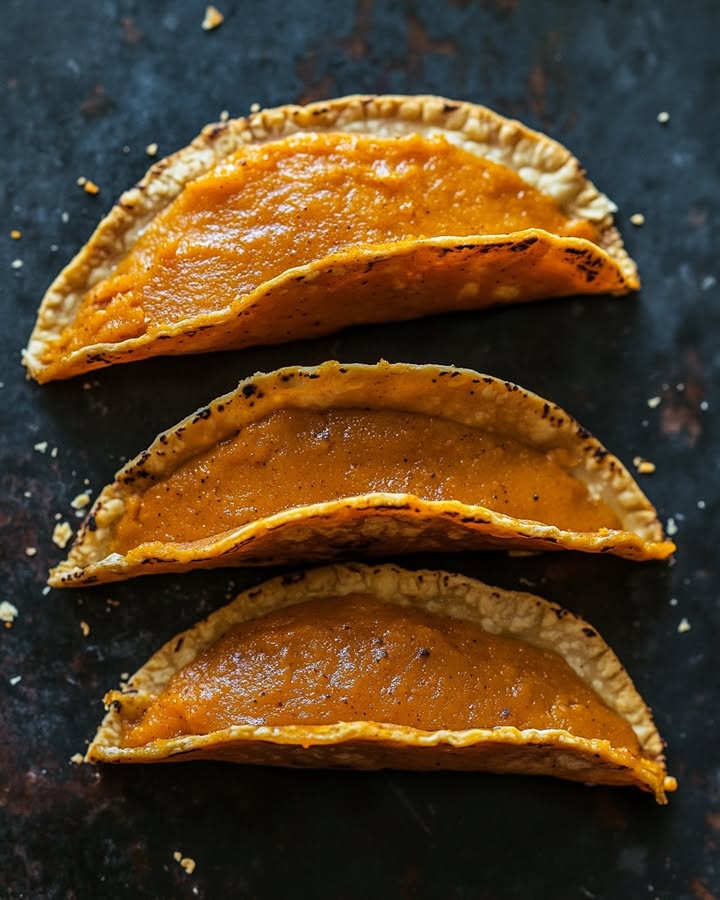
Is there anything better than the smell of pumpkin pie spice in the fall? It’s like a cozy hug in a jar. But I’ll let you in on a secret: I’ve always wished my pumpkin pie had a little more crunch. One day, while staring at a stack of tortillas and my favorite pumpkin pie filling, I had a wild idea. What if we turned pie into a taco? The result was pure magic. These Pumpkin Pie Tacos combine the creamy, spiced filling we all love with a crispy, cinnamon-sugar shell you can hold in your hand. It’s the dessert mash-up you never knew you needed!
A Sweet Twist on Two Classics
This recipe is a beautiful blend of tradition and playfulness. Pumpkin pie itself has deep roots in American history, famously served at the early harvest celebrations that inspired Thanksgiving. On the other hand, the taco is a versatile vessel loved worldwide. When my grandkids were visiting, I wanted to create a fun dessert that was less messy than regular pie slices. That’s how these “tacos” were born in my kitchen! They are a modern, interactive take on a classic, perfect for a new generation of food lovers. It keeps the soul of the traditional pie but wraps it up in a fun, shareable package.
Why You’ll Fall in Love with These Taco Shells
First, they are ridiculously fun to make and eat. Who doesn’t love a dessert you can hold? Second, the texture contrast is everything. The shell bakes into a sweet, shatteringly crisp cookie-like cradle for the luscious, cool filling. And third, they’re incredibly versatile. You can make them fancy for a dinner party or a quick, whimsical treat for a weeknight. They bring smiles to the table every single time.
Perfect Occasions to Whip Up a Batch
- Thanksgiving Dessert Table: They’re a stunning and conversation-starting addition next to the traditional pie.
- Fall Birthday Parties or Halloween Gatherings: A huge hit with both kids and adults.
- Football Game Day: Serve these as the ultimate sweet halftime treat.
- Just Because it’s Tuesday: Sometimes, you need a little pumpkin joy on a regular day.
Ingredients for Pumpkin Pie Tacos
Here’s everything you’ll need to create this sweet sensation. Gather these simple ingredients, and let’s get started!
For the Cinnamon Sugar Taco Shells:
- 6 tortillas (8-inch), cut into rounds
- 1/2 cup granulated sugar
- 1 teaspoon ground cinnamon
- 1/3 cup melted butter
For the Pumpkin Pie Filling:
- 4 ounces softened cream cheese
- 1/4 cup powdered sugar
- 3/4 cup canned pumpkin puree (not pie filling)
- 1/2 teaspoon pure vanilla extract
- 1 1/2 teaspoons pumpkin pie spice
For the Toppings:
- 1/2 cup heavy whipping cream
- 2 tablespoons powdered sugar
- 1/2 teaspoon vanilla extract
- Chopped pecans for garnish (optional)
Easy Ingredient Swaps and Substitutions
Don’t have exactly what’s listed? No problem! Here are some easy swaps:
- Tortillas: Use gluten-free tortillas to make this recipe celiac-friendly. Corn tortillas will give a different, earthier flavor and crisp up nicely.
- Sugar: You can use coconut sugar or a monk fruit sweetener blend in the cinnamon sugar mix for a lower-glycemic option.
- Dairy-Free: Use vegan butter and a plant-based cream cheese. For the whipped cream, chill a can of full-fat coconut milk overnight and whip the solid cream with a little powdered sugar.
- Pumpkin Pie Spice: Make your own by mixing 3/4 tsp cinnamon, 1/4 tsp ginger, 1/8 tsp nutmeg, and 1/8 tsp allspice or cloves.
- Nut-Free: Skip the pecans or garnish with pumpkin seeds or a sprinkle of cinnamon.
Let’s Make Some Pumpkin Pie Tacos!
Ready to create these adorable treats? Follow these simple steps for perfect results every time.
Step 1: Shape Your Shells
First, preheat your oven to a toasty 400°F. Grab your tortillas and a 4 to 4.5-inch round cookie cutter. Press down firmly to cut out as many circles as you can from each tortilla. You should get about 20 perfect little discs. Don’t toss the scraps! You can brush them with butter and cinnamon sugar and bake them as crispy chips for snacking.
Step 2: Create the Cinnamon Sugar Coating
On a small plate or shallow bowl, whisk together the granulated sugar and ground cinnamon. The rich, rusty-brown color of the cinnamon swirling into the white sugar is just beautiful. Now, take a fork and gently poke each tortilla round a few times. This is a pro tip to prevent giant air bubbles from forming in the oven, which can ruin your perfect taco shell shape.
Step 3: Coat and Mold
You’ll need your melted butter and cinnamon sugar mix ready. Using a pastry brush, lightly coat one side of a tortilla round with butter. Immediately dip it, butter-side-down, into the cinnamon sugar. Flip it over, brush the other side, and dip again. You want a nice, even coat—this is what creates that magical caramelized, crunchy shell! Now, here’s the fun part: flip a standard muffin tin upside down. Carefully drape each coated round over the space between two muffin cups. It will naturally fold into that perfect taco shell shape as it bakes.
Step 4: Bake to Golden Perfection
Slide your muffin tin into the preheated oven. Bake for about 8-11 minutes. Keep an eye on them! You’re looking for a gorgeous golden-brown color and crisp edges. The warm, sugary smell will fill your kitchen. Once done, remove the pan and let the shells cool completely right on the tin. They will crisp up even more as they cool. Chef’s tip: For extra-crunchy shells, you can bake them a day ahead and store them in an airtight container at room temperature.
Step 5: Whip the Cream
While the shells cool, make your fresh whipped cream. Pour the cold heavy whipping cream, 2 tbsp of powdered sugar, and the vanilla extract into a chilled bowl. Using a hand mixer or a whisk, beat it until soft, then stiff peaks form. This means when you lift the beaters, the cream stands up in firm points. Don’t over-whip, or it will become grainy. Set this fluffy cloud aside in the fridge.
Step 6: Make the Pumpkin Pie Filling
In another bowl, beat the softened cream cheese with the remaining 1/4 cup of powdered sugar until it’s completely smooth and lump-free. Scrape down the sides of the bowl. Now, add the glorious orange pumpkin puree, the vanilla, and the pumpkin pie spice. Beat it all together until it’s creamy, dreamy, and perfectly spiced. The color is a warm, inviting autumnal orange.
Step 7: Assemble Your Masterpiece
The moment of truth has arrived! Ensure your taco shells are completely cool—if they’re warm, the filling will melt. You can spoon the pumpkin filling into each shell, or for a fancier look, pipe it in using a piping bag or a zip-top bag with the corner snipped off. Top each one with a generous dollop of your homemade whipped cream. Finish with a sprinkle of chopped pecans for that final touch of texture and flavor.
Timing is Everything
Let’s break down the clock so you can plan your baking adventure.
- Prep Time: 20 minutes (cutting, coating, whipping, mixing)
- Cook Time: 10 minutes
- Cooling Time: 15 minutes (crucial for crispy shells!)
- Total Time: About 45 minutes
- Servings: Makes about 18 adorable pumpkin pie tacos
My Secret for the Filling
The chef’s secret to a no-fail, silky-smooth filling is in the cream cheese. You must let it soften completely at room temperature for at least an hour. Trying to beat cold cream cheese will leave you with stubborn lumps. When it’s soft, it blends seamlessly with the pumpkin, creating a mousse-like texture that’s simply divine.
A Little Pumpkin Spice Story
Did you know the “pumpkin pie spice” blend we love wasn’t commercially sold until the 1950s? Before that, home cooks mixed their own cinnamon, ginger, nutmeg, and cloves. This recipe uses that same DIY spirit. Making these tacos feels like connecting with a long line of home bakers who loved the warm, comforting flavors of fall.
Essential Kitchen Tools
- 8-inch round cookie cutter (or a large glass)
- Pastry brush
- Standard 12-cup muffin tin
- Mixing bowls (medium and small)
- Hand mixer or stand mixer (a whisk and strong arm will work, too!)
- Measuring cups and spoons
How to Store Your Leftover Pumpkin Pie Tacos
For the Shells: The baked and cooled taco shells store beautifully on their own. Keep them in an airtight container at room temperature for up to 3 days. If they lose a little crispness, you can pop them in a 300°F oven for 3-4 minutes to refresh them.
For Assembled Tacos: Once filled, they are best eaten within a few hours. The moisture from the filling will soften the shell over time. If you must store them, place them in a single layer in an airtight container in the fridge for up to a day. Expect a softer shell.
For Components: Store the pumpkin filling and whipped cream separately in airtight containers in the fridge for up to 3 days. Assemble fresh tacos when you’re ready to serve!
Tips for Taco Success
- Use pure pumpkin puree, not pumpkin pie filling. The filling is already sweetened and spiced, which would throw off our recipe.
- When coating the tortillas, work quickly so the butter doesn’t soak in too much before you apply the sugar.
- Don’t skip poking the tortillas with a fork! It seems small, but it makes a huge difference in getting an even shell shape.
- Let the shells cool fully on the muffin tin. They will continue to crisp up as they cool.
Make Them Look Picture-Perfect
- Serve them on a large wooden board or platter lined with fall leaves or a cute napkin.
- Dust the platter with a little extra cinnamon or pumpkin pie spice for a professional touch.
- Offer a small bowl of extra chopped pecans, caramel sauce, or chocolate shavings so guests can customize their own taco.
- For a party, set up a “Pumpkin Pie Taco Bar” with bowls of the filling, whipped cream, and toppings so everyone can build their own.
Six Delicious Recipe Variations
Love the idea? Here are more ways to play with it!
- Chocolate Drizzle Delight: Add a tablespoon of cocoa powder to the pumpkin filling. Drizzle assembled tacos with melted chocolate.
- Maple Pecan Crunch: Substitute maple syrup for half the powdered sugar in the filling. Top with candied pecans.
- Ginger Snap Style: Add 1/4 tsp of ground ginger to the cinnamon sugar for the shell. It gives a wonderful spicy kick.
- Mini Taco Bites: Use a 2-inch round cutter for tiny, one-bite tacos. Perfect for large crowds or cocktail parties!
- Cheesecake Fusion: Double the cream cheese filling portion and add a tablespoon of lemon juice. Tastes just like mini pumpkin cheesecake tacos.
- Apple Pie Twist: Replace the pumpkin filling with a thick, cooked apple pie filling. Top with a sharp cheddar cheese whipped cream for a true fall experience.
Common Mistakes to Avoid
Mistake 1: Using Cold Cream Cheese
This is the number one reason for lumpy filling. Cold cream cheese doesn’t blend well. It stays chunky and creates an uneven texture. Always plan ahead and let your cream cheese sit on the counter until it’s soft and spreadable. If you forget, you can microwave it on a low-power setting for 10-second bursts, but watch it closely.
Mistake 2: Skipping the Fork Pokes
It’s tempting to skip this tiny step, but don’t! When the moist tortillas hit the hot oven, steam builds up inside. Without those little vent holes from the fork, the steam gets trapped. This causes large, uneven bubbles that distort your beautiful taco shell shape. A few quick pokes ensures a smooth, curved shell.
Mistake 3: Overfilling the Tacos
We get it, the filling is delicious! But an overstuffed taco shell is a messy, broken taco shell. The weight of too much filling can cause the crisp shell to crack right down the middle. Use a moderate spoonful or pipe a neat line down the center. You can always add a little extra whipped cream on top.
Mistake 4: Assembling While Shells are Warm
That warm, fragrant shell is so hard to resist. However, if you add the cool pumpkin and cream filling to a warm shell, two bad things happen. First, the shell will soften and lose its signature crunch. Second, the filling can start to weep and separate. Patience is key. Let them cool completely on the pan.
Your Pumpkin Pie Taco Questions, Answered
Can I make these gluten-free?
Absolutely! The easiest way is to use your favorite brand of gluten-free flour tortillas. Make sure they are the 8-inch size for cutting. All the other ingredients in the recipe (like the pumpkin puree and spices) are naturally gluten-free. Just double-check your labels to be safe, especially on things like vanilla extract or powdered sugar, which rarely but sometimes contain additives.
Can I prepare the shells ahead of time?
Yes, and I highly recommend it for easy entertaining! The baked cinnamon sugar shells keep wonderfully in an airtight container at room temperature for 2-3 days. In fact, making them a day ahead often makes them even crispier. You can also make the pumpkin pie filling 2 days in advance and store it covered in the fridge. Simply assemble with fresh whipped cream right before serving.
My pumpkin filling seems too runny. What went wrong?
This usually happens for one of two reasons. First, you might have accidentally used “pumpkin pie filling” instead of 100% pure pumpkin puree. The pie filling has added liquid and is much softer. Second, your cream cheese may not have been soft enough, leading to under-mixing. To fix a runny filling, you can beat it a bit more or chill it for 30 minutes to firm up. For next time, just be sure to buy plain “pure pumpkin” and use very soft cream cheese.
I don’t have a muffin tin. How else can I shape the shells?
No worries! You have a few options. You can drape the coated tortilla rounds over the bars of your oven rack (place a baking sheet on the rack below to catch drips). You can also hang them over the edge of a loaf pan or a baking dish. The goal is to find something that creates a “U” shape so the sides curl up as they bake into a taco form.
What’s the best way to cut the tortilla rounds?
A round cookie cutter between 4 and 4.5 inches is perfect. If you don’t have one, use a large, sturdy glass as a guide. Simply press it down onto the tortilla and use a sharp knife to trace around the edge. A small bowl can also work. You want a size that’s big enough to hold filling but small enough to create a cute, handheld treat.
Can I use homemade pumpkin puree?
You can, but you need to be careful about moisture. Homemade pumpkin puree often has much more water than the canned kind. If you use it, you must strain it very well first. Place it in a fine-mesh sieve or cheesecloth over a bowl for several hours to let the excess liquid drain out. Otherwise, your filling will be too loose.
Is there a dairy-free version of this recipe?
Yes, it’s very easy to adapt! Use a plant-based butter (like those made from avocado oil or coconut oil) to brush the shells. For the filling, use a dairy-free cream cheese alternative. For the whipped cream, you can buy a canned coconut whipped topping or make your own by whipping the solid cream from a chilled can of full-fat coconut milk with a little powdered sugar.
How do I keep my whipped cream from getting runny?
The secret is keeping everything cold. Chill your mixing bowl and beaters in the freezer for 10 minutes before you start. Use heavy whipping cream that is very cold straight from the fridge. Stop beating as soon as you see stiff peaks—over-beating can turn it to butter! If you’re making it far in advance, you can add a tiny bit of cornstarch (about 1/4 tsp) to help stabilize it.
Can I freeze pumpkin pie tacos?
I don’t recommend freezing the fully assembled tacos, as the texture of the shell and filling will suffer. However, you can freeze the baked, unfilled shells. Let them cool completely, then store them in a single layer in a freezer-safe bag for up to 1 month. Thaw at room temperature and crisp them up in a warm oven if needed. The pumpkin filling can also be frozen separately for up to 2 months.
What other toppings could I use?
Get creative! While whipped cream and pecans are classic, you can try so many things. A sprinkle of toffee bits adds a buttery crunch. A drizzle of salted caramel or hot fudge sauce takes it over the top. For a festive touch, use colorful sprinkles. A little sprinkle of sea salt on top cuts the sweetness beautifully. Let your favorite fall flavors guide you.
Time to Celebrate with a Taco!
There you have it! Your guide to making the most fun, flavorful, and festive fall dessert. These Pumpkin Pie Tacos are more than just a recipe; they’re a little piece of edible joy. They take the cozy, familiar flavor of pumpkin pie and turn it into a playful, shareable moment. I hope they bring as much laughter and happiness to your table as they have to mine. Now, go preheat that oven, grab your cinnamon sugar, and get ready to make some delicious memories. Happy baking!
Cheesy Garlic Linguine
Ingredients
Equipment
Method
- Preheat your oven to 400°F and cut tortillas into rounds using a cookie cutter.
- Mix granulated sugar and ground cinnamon on a plate.
- Poke each tortilla round a few times with a fork to prevent air bubbles.
- Brush one side of a tortilla round with melted butter, dip it into cinnamon sugar, then flip and coat the other side.
- Drape coated tortilla rounds over an upside-down muffin tin to form taco shells.
- Bake for about 8-11 minutes until golden brown and crisp.
- While the shells cool, whip the heavy cream with powdered sugar and vanilla extract until stiff peaks form.
- In another bowl, beat softened cream cheese with powdered sugar until smooth, then add pumpkin puree, vanilla, and pumpkin pie spice, mixing until creamy.
- Spoon or pipe the pumpkin filling into cooled taco shells, top with whipped cream, and garnish with chopped pecans.