The Magical Fluffy Japanese Soufflé Pancakes: A Taste of a Cloud
Have you ever stared at a picture of food and thought, “That can’t be real”? That was me the first time I saw Japanese soufflé pancakes. They looked like edible clouds plopped right onto a plate, too whimsical to be true. I just had to make them. After a few hilarious (and slightly flat) attempts, I finally cracked the code. Now, I’m sharing that magic with you. These aren’t your regular weekend pancakes. They’re a jiggly, fluffy, melt-in-your-mouth experience that will turn any breakfast into a special occasion.
From Japan to Your Kitchen: A Story of Fluffy Dreams
The story of these pancakes starts in the bustling cafés of Japan. Chefs there took a classic western idea and made it uniquely their own. They applied the science of a soufflé—using whipped egg whites for an insane rise—to the humble pancake. The result? A dessert-like breakfast that’s as much fun to watch being made as it is to eat. While traditional versions are simpler, the modern ones, topped with whipped cream and fruit, are like little pieces of cake you can justify having in the morning. My version brings that café-quality wonder right into your home kitchen, no fancy tools required!
Why You’ll Fall in Love With These Soufflé Pancakes
You’ll love this recipe because it works. I tested it over and over until it was foolproof. The joy comes from watching your batter triple in size in the pan. It’s also incredibly versatile. They are subtly sweet on their own, making them the perfect canvas for all your favorite toppings. Plus, the process is a delightful little kitchen experiment. It feels less like flipping pancakes and more like creating edible art. The smiles you get from serving these are worth every minute.
Perfect Occasions for These Pillowy Pancakes
Think beyond Sunday brunch! These pancakes are your secret weapon for making moments memorable. Whip them up for a birthday breakfast in bed—they feel like a celebration. They are a surefire hit at a girls’ brunch or a romantic weekend treat. Having a rough week? Making these is a fun, rewarding therapy session. They turn an ordinary Saturday into something Instagram-worthy (and more importantly, delicious). Any day you want to add a dash of joy is the perfect day for soufflé pancakes.
What You’ll Need: The Ingredients List
Gather these simple ingredients. The magic is in the method, not a long list!
- 2 large eggs: Cold eggs separate more cleanly.
- 2 tablespoons milk: Whole milk adds richness, but any works.
- 1 teaspoon vanilla extract: For that wonderful, warm aroma.
- 1 teaspoon lemon zest (optional): A bright, fresh twist.
- 1/4 cup all-purpose flour: Fluffed, spooned, and leveled for accuracy.
- 1 teaspoon baking powder: Our little rising helper.
- 1/2 teaspoon white vinegar or lemon juice: Stabilizes the meringue.
- 2 tablespoons granulated sugar: Just enough sweetness.
- Oil for cooking: A neutral oil like canola or vegetable.
No Problem! Handy Substitutions
Out of something? Don’t worry! Here are easy swaps:
- Milk: Any milk you have—dairy, almond, oat, or soy—works just fine.
- Lemon Zest: Skip it, or use a drop of lemon extract or orange zest.
- All-purpose flour: For a gluten-free version, use a 1:1 gluten-free flour blend.
- Vinegar: Cream of tartar is a perfect substitute here.
- Toppings: Use any fresh fruit, yogurt, chocolate chips, or even a dollop of lemon curd.
Let’s Make Some Magic: Step-by-Step Instructions
Step 1: Separate Your Eggs Like a Pro
Start with two clean, dry bowls. Crack your first egg and gently pass the yolk back and forth between the shell halves, letting the white fall into one bowl. Place the yolk in the second bowl. Do the same with the second egg. Be careful! Even a tiny bit of yolk in the whites can prevent them from whipping up properly. It’s like they’re fussy little divas that need their own space. Pro tip: Crack each egg over a small cup first. That way, if a yolk breaks, you don’t ruin the whole bowl of whites.
Step 2: Create the Luxurious Yolk Batter
Now, take your bowl of sunny yellow yolks. Add the milk, vanilla, and that bright lemon zest if using. Whisk it all together until it’s smooth and slightly frothy. Next, sift your flour and baking powder right over the mixture. Sifting is not busywork here; it adds air and prevents lumps. Gently whisk it all until you have a smooth, thick, and pale yellow paste. It will be quite thick—that’s perfect! Set this aside while you work on the clouds.
Step 3: Whip Up the Fluffy Meringue Clouds
This is the star of the show! Add the vinegar (or lemon juice) to your egg whites. Start beating them on medium speed. After about 30 seconds, when they look foamy and white like sea foam, start adding the sugar. Sprinkle it in a tablespoon at a time while the mixer runs. Now, crank up the speed to medium-high. Keep beating until you get stiff, glossy peaks. This means when you lift the beaters, the peak stands straight up and doesn’t flop over. The meringue should look like shiny, white marshmallow fluff. Don’t rush this!
Step 4: Gently Fold Everything Together
Time for a gentle hug. Take about one-third of your fluffy white meringue and plop it into the yolk batter. Using a rubber spatula, fold it in gently. Scoop from the bottom and fold over the top, turning the bowl as you go. You just want to lighten the thick batter. Now, pour this lighter mixture back into the bowl with the remaining meringue. Again, fold with care. You want to combine them until no big white streaks remain, but be patient. Overmixing will deflate all those precious air bubbles you just created.
Step 5: Cook Low and Slow for Maximum Fluff
Place a good non-stick pan or griddle over low heat. Let it warm up for a full minute, then add just a tiny bit of oil and wipe it around. Spoon or pipe your batter into the pan, making tall, high piles. Seriously, don’t be shy—pile it up! Immediately cover the pan with a lid. This creates a mini-oven, allowing the pancakes to cook through without burning the bottom. Let them cook undisturbed for 7-8 minutes. You’ll see them puff up beautifully, peeking under the lid is so tempting but try to resist!
Step 6: The Great Flip and Final Cook
This is the moment of truth. Take a thin, flexible spatula and gently, confidently slide it under a pancake. In one smooth motion, flip it over. It should be a lovely golden brown. Don’t worry if they deflate a tiny bit—it’s normal. Cover the pan again immediately and cook for another 5-6 minutes on the second side. This slower cooking ensures the insides are fully set and custardy, not raw. Chef’s tip: Add a few drops of water to the pan away from the pancakes before covering for the second side. The steam helps them cook through perfectly.
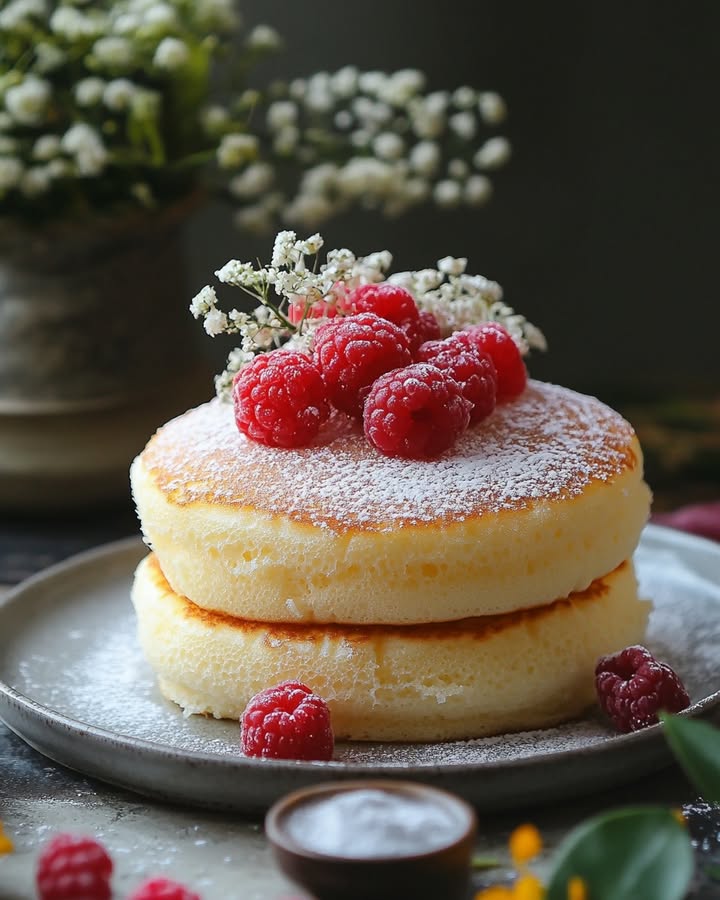
Step 7: Plate, Top, and Devour Immediately!
Slide those gorgeous, jiggly pancakes onto a plate. They are best eaten right away, while they’re still warm and ethereal. Top them with a dollop of sweetened whipped cream, a pile of fresh, tart berries, a dusting of snowy powdered sugar, or a waterfall of maple syrup. Maybe all of the above! The contrast of the warm, soft pancake with cold cream and juicy fruit is absolute heaven. Gather everyone quickly—these clouds wait for no one!
Timing is Everything
Here’s a quick breakdown of your time commitment:
- Prep Time: 10 minutes (getting everything ready)
- Cooking Time: 15 minutes (mostly hands-off)
- Total Time: About 25 minutes to cloud-like bliss
- Servings: Makes 2 generous stacks (about 4-6 pancakes total)
The One Big Secret for Soufflé Pancake Success
Patience is your most important ingredient. The biggest mistake is turning the heat up to cook them faster. High heat will give you a dark, crusty outside and a raw, runny inside. Trust the low heat. Let the covered pan do its steamy magic. Slow and steady wins the fluffy race every single time.
A Fun Fact About Your Fluffy Pancakes
That vinegar or lemon juice you add to the egg whites isn’t just for flavor. It’s a science hack! The acid helps stabilize the egg white foam. It makes the proteins in the whites unfold and link together into a stronger, more elastic network. This means your meringue is less likely to collapse or weep, giving you those stable, lofty peaks that turn into jiggly pancakes. Who knew a little acid could be so helpful?
Tools You’ll Need for Fluffy Success
You don’t need much! Here’s your toolkit:
- Two mixing bowls (one for yolks, one for whites)
- A whisk and a rubber spatula for folding
- Electric hand mixer or stand mixer (beating whites by hand is a workout!)
- A good non-stick skillet or griddle with a tight-fitting lid
- A thin, flexible spatula for the delicate flip
- Sifter or fine mesh strainer for the flour
Storing Your Soufflé Pancakes (If You Have Any Left!)
Let’s be honest, these are best eaten straight from the pan. Their heavenly texture is at its peak for about 10 minutes after cooking. The steam inside starts to escape, and they will naturally deflate a bit as they sit, becoming more dense.
If you must store them, let the pancakes cool completely on a wire rack first. Place them in a single layer in an airtight container. You can separate layers with parchment paper. They will keep in the fridge for up to one day.
To reheat, avoid the microwave if you can, as it will make them rubbery. Instead, warm them gently in a toaster oven or a regular oven at 300°F for about 5-8 minutes. This will help revive some of their texture.
My Best Tips for Pancake Perfection
- Cold eggs separate better, but room temperature whites whip up higher. Separate them cold, then let the whites sit out for 10-15 minutes.
- Make sure your mixing bowl for the whites is completely clean and grease-free. Any residual fat is the enemy of meringue.
- Don’t open the lid frequently while cooking! Every peek releases precious steam and heat.
- For extra-tall, uniform pancakes, use metal ring molds or clean tuna cans with both ends removed. Grease them well and place them in the pan before adding batter.
Make Them Pretty: Presentation Ideas
We eat with our eyes first! Make your stack beautiful:
- Dust with powdered sugar through a small sieve for a snowy effect.
- Create a color contrast with bright red strawberries, blue blueberries, and green mint leaves.
- Drizzle sauces artistically—try maple syrup, chocolate sauce, and a berry coulis in swirls.
- Serve on a simple, solid-colored plate to let the pancakes be the star.
- Add a quenelle (a fancy oval scoop) of whipped cream on top for a café touch.
Feeling Creative? Try These Tasty Variations!
Once you master the basic fluffy pancake, the sky’s the limit!
- Matcha Green Tea: Sift 1-2 teaspoons of high-quality matcha powder with the flour for a beautiful green color and elegant flavor.
- Chocolate Lovers: Add 2 tablespoons of sifted cocoa powder to the flour. Fold in mini chocolate chips for a gooey surprise.
- Cheesy Potato Puffs Inspiration (Savory Twist): For a fun, savory idea inspired by Cheesy Potato Puffs, omit the sugar and vanilla. Fold in 1/2 cup of finely shredded cheddar cheese and 1/4 cup of cooled, mashed potato into the yolk base. Top with chives and sour cream.
- Funfetti Birthday Cake: Add a splash of almond extract and fold in a handful of rainbow sprinkles with the last fold. Top with vanilla glaze.
- Lemon Blueberry: Increase the lemon zest to 1 tablespoon. Gently fold a handful of fresh blueberries into the final batter. The berries burst with juicy flavor.
- Tiramisu Style: Add 1 teaspoon of instant espresso powder to the yolk batter. Layer cooked pancakes with a mascarpone whipped cream and dust with cocoa.
Common Mistakes to Avoid for Fluffy Pancakes
Mistake 1: Skipping the Sifting Step
It’s easy to think sifting flour is an old-fashioned step you can skip. But with delicate recipes like this, lumps are the enemy. Lumps of flour or baking powder won’t incorporate smoothly into the thin yolk mixture. You end up over-mixing to try to break them down, which can lead to tough pancakes. Always take the 30 seconds to sift your dry ingredients together. It makes for a perfectly smooth batter and an even rise.
Mistake 2: Rushing the Meringue
Undersoft peaks are a recipe for flat pancakes. If your egg whites are still soft and droopy when you stop beating, they don’t have enough structure. They’ll collapse when folded and again in the pan. Be patient. Beat until the peaks are stiff and glossy. A good test: Turn the bowl upside down over your head (carefully!). If the meringue doesn’t move, it’s ready. If it falls out, keep beating!
Mistake 3: Overmixing the Final Batter
When you combine the meringue and yolk batter, you must be gentle. Vigorous stirring or beating deflates all the precious air you just whipped into the egg whites. Use a folding motion: cut through the center, scrape along the bottom, and fold over the top. It’s okay if there are a few tiny streaks of white. A few streaks are better than a completely deflated, runny batter.
Mistake 4: Cooking on Too High Heat
This is the most common error. We’re used to cooking pancakes on medium heat. Soufflé pancakes are different. High heat will quickly brown and even burn the outside, while the inside stays liquidy and raw. The center needs time to cook through steam. Keep your burner on the lowest setting. Let the lid and the slow, gentle heat work their magic. It takes longer, but the fluffy payoff is worth it.
Your Fluffy Pancake Questions, Answered!
Can I make the batter ahead of time?
Unfortunately, no. The batter is at its absolute peak right after you finish folding in the meringue. The air bubbles start to deflate the longer it sits. For the best, tallest pancakes, cook them immediately after mixing. Prepare all your toppings and get your pan hot first, so you’re ready to go as soon as the batter is done.
Why did my pancakes deflate after cooking?
A little deflation is normal and happens as the steam inside escapes. Significant deflation usually means the inside wasn’t fully cooked. The structure wasn’t set. This often happens if the heat was too high (outside cooks fast, inside stays raw) or if they weren’t cooked long enough. Next time, ensure you’re using low heat and don’t skimp on the covered cooking time. A toothpick inserted in the center should come out clean.
My meringue won’t form stiff peaks. What went wrong?
There are a few common culprits. First, check for any trace of egg yolk in your whites. Even a little fat can prevent whipping. Second, make sure your bowl and beaters are spotlessly clean and dry. Any grease is a problem. Third, you might not have beaten them long enough. It can take 5-8 minutes of beating with an electric mixer. Be patient and keep going until they are glossy and hold a firm peak.
Can I use a pancake mix instead of flour?
I don’t recommend it. Pancake mix already contains leaveners and sometimes other ingredients in specific proportions. Our recipe relies on the precise balance of just baking powder and the meringue for its unique rise. Using a pre-mix can throw off that balance and you likely won’t get the same cloud-like texture. Stick with simple, measured ingredients for the best results.
Do I really need to cover the pan with a lid?
Yes, absolutely! The lid is non-negotiable for true Japanese soufflé pancakes. It traps the steam generated by the wet batter. This steam cooks the top and center of the pancake without you having to flip it too early. Without the lid, you’d have a raw top and would need to cook it much longer on the first side, risking a burnt bottom. The lid creates the perfect mini-oven environment.
Can I bake these in the oven instead?
You can try a hybrid method for extra thickness. Use metal ring molds in an oven-safe pan. Cook on the stovetop for 2-3 minutes, then transfer the entire pan to a preheated 325°F oven for about 10 minutes. This can help ensure the very center cooks through if you’re making super tall pancakes. But for the standard recipe, the stovetop with a lid is perfect.
What’s the best way to flip them without breaking them?
Use a thin, flexible, non-stick spatula. Slide it fully under the pancake, getting as much support as possible. Move quickly but with confidence. Don’t hesitate halfway through the flip. A decisive motion is better than a slow, shaky one. If you’re nervous, practice with the first pancake—it’s often the sacrificial one! It also helps if the bottom has formed a nice golden crust.
Are these pancakes very sweet?
Not on their own, which is what makes them so great. The batter itself has only a little sugar. Their flavor is delicate, eggy, and vanilla-like. This makes them the perfect base for both sweet and savory toppings. You can control the sweetness level entirely by what you add on top, from a light drizzle of honey to a full dessert-style setup with chocolate and cream.
Can I make them without a mixer?
You can, but be prepared for a serious arm workout! Whipping egg whites to stiff peaks by hand with a whisk takes significant time and elbow grease. It is possible and was how it was done for centuries. Use a large, rounded balloon whisk and a copper or glass bowl if you have one. It will take at least 10-15 minutes of vigorous whisking. An electric mixer is a huge time and energy saver for this recipe.
What’s the purpose of the vinegar or lemon juice?
The acid (vinegar or lemon juice) is a stabilizer. It helps denature the proteins in the egg whites, making them unfold and form a stronger, more elastic network as you whip them. This results in a meringue that is less likely to collapse or “weep” liquid. It gives you a sturdier foam that can hold up to being folded and cooked, leading to a taller, more stable pancake.
Ready to Bring a Taste of Japan Home?
There you have it—the secrets to creating your own plate of edible clouds. Don’t be intimidated by the steps. Once you try it, you’ll see it’s just a simple process with a breathtaking result. The look of wonder on your family’s or friends’ faces when you bring these jiggly, fluffy Japanese soufflé pancakes to the table is priceless. It’s more than breakfast; it’s a little moment of magic. So grab your whisk, take a deep breath, and get ready to flip for joy. Happy cooking!
Cheesy Potato Puffs
Ingredients
Equipment
Method
- Separate the egg whites from the yolks, placing them in two clean bowls.
- In the bowl with the yolks, add milk, vanilla, and lemon zest. Whisk until smooth.
- Sift flour and baking powder into the yolk mixture and whisk until combined.
- In the bowl with the egg whites, add vinegar (or lemon juice) and beat until foamy.
- Gradually add sugar while beating until stiff peaks form.
- Gently fold one-third of the meringue into the yolk batter, then fold the remaining meringue until no streaks remain.
- Heat a non-stick pan over low heat, add oil, then spoon the batter into high piles.
- Cover the pan and cook for 7-8 minutes, then flip and cook for another 5-6 minutes.
- Serve immediately with toppings like whipped cream, fruit, and syrup.