Discover the Magic of Chicken Cacciatore Delight
Picture this: a cozy Sunday afternoon, the smell of garlic and tomatoes wafting through the air, and the sound of laughter as friends gather around the table. That’s exactly how my love affair with Chicken Cacciatore Delight began. This Italian classic is more than just a dish—it’s comfort food at its finest. Tender chicken, savory vegetables, and a rich tomato sauce come together in a symphony of flavors that will have everyone asking for seconds.
The Story Behind Chicken Cacciatore
Let’s take a little trip to Italy, shall we? The name “Cacciatore” means “hunter” in Italian, and this dish was originally created by hunters who needed hearty, flavorful meals after a long day outdoors. Traditionally made with rabbit or wild game, modern versions often use chicken, making it accessible and easy to prepare. I first tried this dish during a family trip to Tuscany, where a local trattoria served it with crusty bread and a glass of Chianti. Back home, I’ve tweaked the recipe to suit my taste, and now it’s a staple at my dinner parties.
Why You’ll Fall in Love with This Recipe
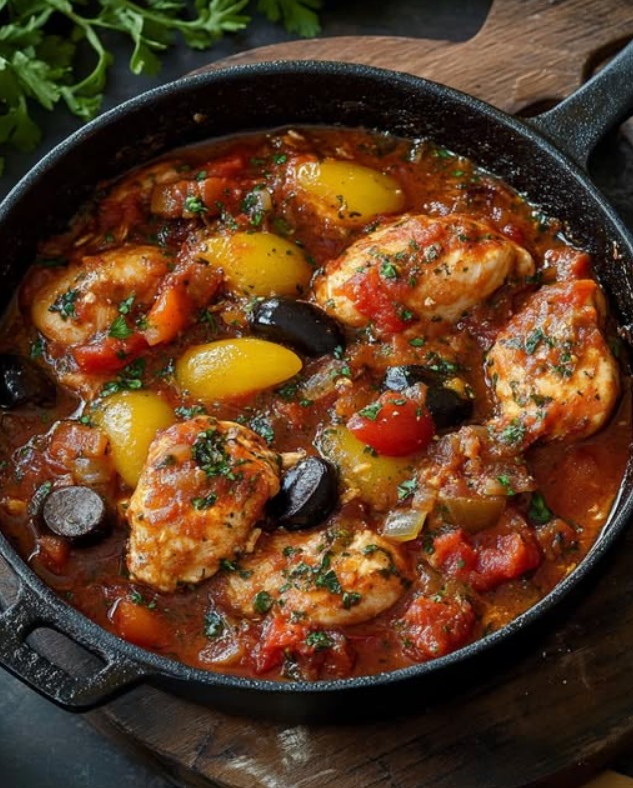
What makes Chicken Cacciatore Delight so irresistible? For starters, it’s packed with bold flavors—think juicy chicken, sweet bell peppers, earthy mushrooms, and tangy olives all simmered in a luscious tomato sauce. Plus, it’s surprisingly simple to make! Even if you’re not a seasoned cook, this recipe is forgiving and rewarding. The aroma alone will transport you straight to an Italian countryside kitchen.
Perfect Occasions for Chicken Cacciatore Delight
This dish is perfect for casual weeknight dinners, potlucks, or even date night. Serve it alongside a crisp salad and some garlic bread, and you’ve got yourself a meal that feels fancy but doesn’t require hours in the kitchen. It’s also a great way to impress guests without breaking a sweat!
Ingredients for Your Culinary Adventure
- For the chicken:
- 6 boneless, skinless chicken thighs
- 3 tablespoons olive oil (divided)
- Salt and pepper, to taste
- For the sauce:
- 1 medium onion, diced
- 2 cloves garlic, minced
- 1 yellow bell pepper, diced
- 1 red bell pepper, diced
- 1 carrot, peeled and sliced
- 280g mushrooms, sliced
- 150g pitted black olives
- 8 sprigs fresh thyme
- 2 tablespoons fresh parsley, chopped (plus extra for garnish)
- 2 tablespoons fresh basil, chopped
- 1 teaspoon dried oregano
- 800g canned crushed tomatoes
- 2 tablespoons tomato paste
- 200g Roma tomatoes, halved
- ½ teaspoon red chili flakes (optional)
Substitution Options
Not a fan of mushrooms? Swap them out for zucchini or eggplant. If you don’t have fresh herbs on hand, dried ones work too—just use half the amount called for. For a lighter version, replace the chicken thighs with breasts, though thighs are juicier and more flavorful. And if you’re vegetarian, try using chickpeas or tofu instead of chicken.
Step 1: Preparing the Chicken
Start by seasoning your chicken thighs generously with salt and pepper. Heat two tablespoons of olive oil in a large skillet over medium-high heat. Once the oil shimmers, add the chicken and let it sear until golden brown on both sides—about 3-4 minutes per side. Remove the chicken and set it aside. The sizzle and aroma at this stage are pure magic, setting the tone for what’s to come.
Pro tip: Pat the chicken dry with paper towels before seasoning. This helps achieve that beautiful golden crust.
Step 2: Sautéing the Vegetables
In the same skillet, add the remaining tablespoon of olive oil. Toss in the diced onion and sauté until translucent, about 3-4 minutes. Add the garlic and cook for another 30 seconds, releasing its fragrant aroma. Now, throw in the bell peppers, carrot, mushrooms, thym, parsley, basil, and oregano. Cook for 5 minutes until the veggies soften slightly. The vibrant colors and earthy scents will make your kitchen feel like a rustic Italian villa.
Step 3: Adding the Tomatoes
Pour in the crushed tomatoes, tomato paste, halved Roma tomatoes, and red chili flakes (if using). Stir everything together and bring the mixture to a gentle boil. Watch as the sauce transforms into a thick, glossy delight. This step is where the magic happens—the flavors deepen and meld beautifully.
Step 4: Simmering to Perfection
Nestle the seared chicken back into the skillet, submerging it in the sauce. Lower the heat, cover, and let it simmer for 40 minutes, stirring occasionally. As the chicken cooks, it absorbs the rich flavors of the sauce, becoming unbelievably tender. Imagine the anticipation building as the aroma fills your home.
Step 5: Incorporating the Olives
Ten minutes before serving, stir in the black olives. Their briny flavor adds a delightful contrast to the sweetness of the tomatoes and the earthiness of the herbs. Let the dish simmer uncovered for these final moments, allowing the flavors to intensify.
Step 6: Finishing Touches
Taste and adjust the seasoning if needed. Sprinkle freshly chopped parsley over the top for a pop of color and freshness. Serve hot, and watch as your loved ones dig in with gusto.
Chef’s tip: A splash of red wine during the simmering process can elevate the dish to restaurant-quality levels.
Timing Breakdown
- Prep time: 20 minutes
- Cooking time: 50 minutes
- Total time: 1 hour 10 minutes
Chef’s Secret
Here’s a little secret: deglaze the pan with a splash of broth or wine after browning the chicken. This not only cleans up any stuck bits but also adds depth to the sauce.
Fun Fact About Chicken Cacciatore
Did you know that Cacciatore-style dishes vary across Italy? In some regions, they include white wine, while others stick strictly to red. It’s a testament to the versatility of this beloved recipe!
Necessary Equipment
- Large skillet or Dutch oven
- Wooden spoon or spatula
- Sharp knife and cutting board
- Measuring spoons and cups
Storage Tips
Short-term storage: Let the dish cool completely before transferring it to an airtight container. It keeps well in the fridge for up to 3 days. Reheat gently on the stovetop or in the microwave.
Freezing: Portion the cacciatore into freezer-safe containers and freeze for up to 3 months. Thaw overnight in the fridge before reheating.
Reviving leftovers: Add a splash of water or broth when reheating to restore moisture and enhance the flavors.
Tips and Advice
- Use high-quality canned tomatoes for the best results.
- Don’t overcrowd the pan when browning the chicken; it prevents steaming.
- Fresh herbs make a noticeable difference in flavor compared to dried ones.
Presentation Ideas
- Serve in individual ramekins for a charming touch.
- Garnish with a drizzle of olive oil and extra parsley.
- Pair with a loaf of warm, crusty bread for dipping.
Healthier Alternatives
1. Low-carb version: Skip the carrots and serve with cauliflower rice.
2. Dairy-free option: Ensure no cheese toppings are used.
3. Gluten-free twist: Use gluten-free pasta or polenta as a side.
4. Vegan delight: Substitute chicken with chickpeas or lentils.
5. Spicy kick: Increase the chili flakes or add diced jalapeños.
6. Herbaceous upgrade: Experiment with rosemary or sage for unique flavors.
Common Mistakes to Avoid
Mistake 1: Overcrowding the Pan
When browning the chicken, resist the urge to cram all the pieces into the pan at once. Doing so lowers the temperature and causes the chicken to steam rather than sear. Instead, cook in batches to ensure each piece gets that gorgeous golden crust.
Mistake 2: Skipping the Deglazing Step
After browning the chicken, those caramelized bits stuck to the bottom of the pan are flavor gold! Don’t skip deglazing with broth or wine—it enhances the sauce immensely.
Mistake 3: Rushing the Simmer
Patience is key here. Allowing the dish to simmer slowly lets the flavors develop fully. Turning up the heat to speed things along will result in tough chicken and underdeveloped sauce.
FAQs
Can I use chicken breasts instead of thighs?
Absolutely! While thighs are juicier, breasts work fine. Just be mindful not to overcook them, as they can dry out quickly.
Is this dish spicy?
Only if you want it to be! The red chili flakes are optional, so feel free to omit them or adjust the quantity to suit your taste.
Can I make this ahead of time?
Yes, and it tastes even better the next day! The flavors continue to meld, making it ideal for meal prep.
What sides pair well with Chicken Cacciatore?
Garlic bread, mashed potatoes, or a simple green salad complement the dish beautifully.
How do I store leftovers?
Transfer cooled leftovers to an airtight container and refrigerate for up to 3 days or freeze for longer storage.
Can I use dried herbs instead of fresh?
Of course! Use one-third the amount of dried herbs since they’re more concentrated.
What type of tomatoes should I use?
San Marzano tomatoes are highly recommended for their sweetness and low acidity.
Do I need a special pan?
No, but a heavy-bottomed skillet or Dutch oven works best for even heat distribution.
Can I add other vegetables?
Definitely! Zucchini, spinach, or artichokes would be delicious additions.
Is this dish kid-friendly?
Yes! Kids love the mild, comforting flavors. You can always leave out the olives if they’re picky.
There you have it—a complete guide to mastering Chicken Cacciatore Delight. Whether you’re cooking for one or hosting a crowd, this dish promises to deliver warmth, flavor, and joy. So grab your apron, fire up the stove, and let the adventure begin!
Chicken Cacciatore Delight
Ingredients
Equipment
Method
- Season chicken thighs with salt and pepper.
- Heat 2 tablespoons olive oil in a large skillet over medium-high heat.
- Sear the chicken for 3-4 minutes per side until golden brown, then set aside.
- In the same skillet, add the remaining tablespoon of olive oil; sauté diced onion until translucent (3-4 minutes).
- Add minced garlic and cook for another 30 seconds.
- Toss in bell peppers, carrot, mushrooms, thyme, parsley, basil, and oregano; cook for 5 minutes.
- Pour in crushed tomatoes, tomato paste, halved Roma tomatoes, and optional red chili flakes; bring to a gentle boil.
- Nestle the chicken back into the skillet, cover, and simmer for 40 minutes.
- Stir in black olives 10 minutes before serving; simmer uncovered.
- Taste and adjust seasoning; garnish with fresh parsley before serving hot.