Why Crispy Garlic Chicken Is a Game-Changer
Picture this: it’s a busy Tuesday evening, and I’m staring into my fridge, wondering what to whip up for dinner. That’s when I remembered my go-to recipe—Crispy Garlic Chicken with Parmesan. It’s one of those dishes that feels fancy enough for a dinner party but is simple enough for a weeknight. The golden crust, the savory garlic aroma, and that cheesy parmesan kick? Pure magic. This dish has become a family favorite, and I can’t wait to share it with you.
A Little Background on Crispy Garlic Chicken
I first stumbled upon this recipe while scrolling through a food blog. At the time, I was looking for something new to try with chicken breasts, which, let’s be honest, can get boring if you don’t jazz them up. This recipe caught my eye because it reminded me of Italian-inspired flavors—garlic, parmesan, and herbs—but with a crispy twist. Over time, I’ve tweaked it to make it even easier and more flavorful. Trust me, once you try it, you’ll see why it’s such a crowd-pleaser.
Why You’ll Love This Recipe
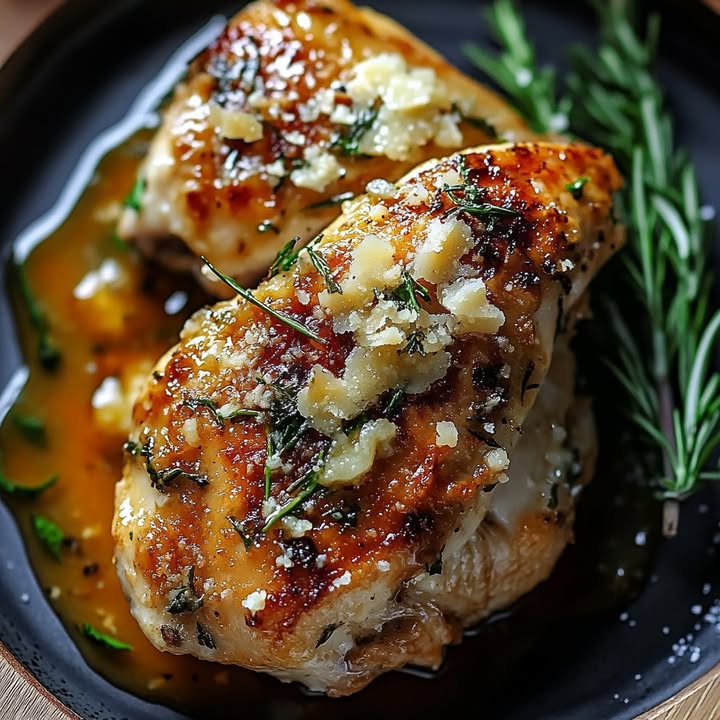
This Crispy Garlic Chicken recipe is all about simplicity and flavor. The panko breadcrumbs give it an irresistible crunch, while the parmesan adds a rich, nutty depth. Plus, it’s ready in under an hour! Whether you’re cooking for your family or hosting friends, this dish is sure to impress. And the best part? It pairs beautifully with almost any side—salads, roasted veggies, or even mashed potatoes.
Perfect Occasions to Make Crispy Garlic Chicken
This dish is versatile enough for any occasion. Serve it at a casual family dinner, bring it to a potluck, or even plate it up for date night. I’ve made it for everything from Sunday lunches to birthday dinners, and it never disappoints. Its golden-brown appearance and mouthwatering aroma make it feel special, no matter the setting.
Ingredients
- 4 boneless, skinless chicken breasts
- 1/2 cup melted butter
- 4 cloves garlic, minced
- 1 cup panko breadcrumbs
- 1 cup grated parmesan cheese
- 2 tablespoons fresh parsley, chopped
- 1 teaspoon paprika
- 1/2 teaspoon black pepper
- 1/2 teaspoon salt
- 1 tablespoon olive oil
Substitution Options
If you’re missing an ingredient or want to switch things up, here are some easy swaps:
- Chicken: Use chicken thighs instead of breasts for juicier results.
- Parmesan: Substitute with pecorino romano for a sharper flavor.
- Panko: Regular breadcrumbs work too, though they won’t be as crispy.
- Fresh parsley: Dried parsley is fine in a pinch—use 1 teaspoon.
Preparation
Step 1: Preheat and Prep
Start by preheating your oven to 375°F (190°C). Line a baking sheet with parchment paper or a silicone mat to prevent sticking. This step is crucial for achieving that perfect crisp without any soggy spots. While the oven heats up, grab two bowls—one for the garlic butter mixture and another for the breadcrumb coating.
Step 2: Mix the Garlic Butter
In one bowl, combine the melted butter and minced garlic. The aroma alone will make your kitchen smell like heaven. Stir well to ensure the garlic is evenly distributed throughout the butter. This mixture not only adds flavor but also helps the breadcrumb coating stick to the chicken.
Step 3: Prepare the Coating
In the second bowl, mix the panko breadcrumbs, grated parmesan, chopped parsley, paprika, salt, and pepper. This blend is where the magic happens. The panko gives the chicken its crunch, while the parmesan adds a cheesy punch. Pro tip: Toast the panko lightly in a dry skillet before using it for extra crispiness.
Step 4: Coat the Chicken
Dip each chicken breast into the garlic butter, ensuring it’s fully coated. Then, press it firmly into the breadcrumb mixture, making sure every inch is covered. Place the coated chicken on the prepared baking sheet. Drizzle a little olive oil over the top for an extra golden finish.
Step 5: Bake to Perfection
Bake the chicken for 25–30 minutes, or until the internal temperature reaches 165°F (74°C). You’ll know it’s done when the coating is golden brown and the chicken is juicy inside. Let it rest for a few minutes before serving—it’s worth the wait!
Chef’s Secret
Here’s a little trick I learned: Pat the chicken dry with paper towels before coating it. Removing excess moisture ensures a crispier crust. It’s a small step, but it makes a big difference!
Timing
- Prep Time: 15 minutes
- Cooking Time: 30 minutes
- Total Time: 45 minutes
Extra Info
Did you know that panko breadcrumbs originated in Japan? They’re lighter and flakier than traditional breadcrumbs, which is why they’re perfect for creating that ultra-crispy texture we all love.
Necessary Equipment
- Baking sheet
- Parchment paper or silicone mat
- Mixing bowls
- Meat thermometer
Storage
To store leftovers, place the cooled chicken in an airtight container and refrigerate for up to 3 days. Reheat in the oven at 350°F (175°C) for 10–15 minutes to maintain the crispiness. Avoid microwaving, as it can make the coating soggy.
If you want to freeze the chicken, wrap each piece individually in plastic wrap and place them in a freezer-safe bag. They’ll keep for up to 3 months. Thaw overnight in the fridge before reheating.
For meal prep, you can assemble the chicken ahead of time and store it in the fridge for up to 24 hours before baking. This saves time on busy days!
Tips and Advice
- Use freshly grated parmesan for the best flavor—it melts better than pre-shredded varieties.
- Double the breadcrumb mixture if you prefer a thicker coating.
- Serve with lemon wedges for a bright, zesty touch.
Presentation Tips
- Garnish with extra parsley for a pop of color.
- Arrange the chicken on a platter with roasted vegetables for a stunning centerpiece.
- Drizzle a bit of balsamic glaze around the plate for an elegant touch.
Healthier Alternative Recipes
Looking to lighten up this dish? Here are six variations:
- Air Fryer Version: Cook the chicken in an air fryer at 375°F (190°C) for 12–15 minutes. It’s just as crispy with less oil.
- Gluten-Free Option: Swap panko for gluten-free breadcrumbs and use cornstarch in the garlic butter.
- Low-Carb Twist: Replace breadcrumbs with crushed pork rinds for a keto-friendly alternative.
- Herb-Infused: Add dried oregano or thyme to the breadcrumb mixture for extra flavor.
- Spicy Kick: Mix in red pepper flakes or cayenne powder for heat lovers.
- Veggie Swap: Use cauliflower steaks instead of chicken for a vegetarian option.
Common Mistakes to Avoid
Mistake 1: Skipping the Pat-Dry Step
Not drying the chicken properly can lead to a soggy crust. Always pat it dry with paper towels before coating. Pro tip: Let the chicken sit uncovered in the fridge for 30 minutes to dry further.
Mistake 2: Overcrowding the Baking Sheet
If the chicken pieces are too close together, they won’t cook evenly. Leave space between each piece for proper airflow.
Mistake 3: Underseasoning
Don’t skimp on the seasoning! Taste the breadcrumb mixture before coating to ensure it’s flavorful enough.
FAQ
Can I use chicken thighs instead of breasts?
Absolutely! Chicken thighs are juicier and work wonderfully in this recipe. Just adjust the cooking time slightly if needed.
What sides pair well with this dish?
Try serving it with a fresh arugula salad, roasted broccoli, or creamy mashed potatoes. These sides complement the crispy texture and bold flavors perfectly.
Can I make this recipe gluten-free?
Yes, simply swap the panko breadcrumbs for a gluten-free alternative. Cornstarch in the garlic butter also helps achieve a crispy finish.
How do I reheat leftovers without losing crispiness?
Reheat the chicken in the oven at 350°F (175°C) for 10–15 minutes. Avoid the microwave, as it can make the coating soggy.
Can I prepare this dish ahead of time?
Definitely! Assemble the chicken up to 24 hours in advance and store it in the fridge until you’re ready to bake.
Is this recipe kid-friendly?
Kids love the crispy texture and cheesy flavor of this dish. Feel free to reduce the garlic amount if they’re not fans of strong flavors.
What can I substitute for fresh parsley?
Dried parsley works fine—use 1 teaspoon instead of 2 tablespoons of fresh parsley.
Can I freeze this dish?
Yes, wrap each piece individually and freeze for up to 3 months. Thaw in the fridge before reheating.
How do I know when the chicken is fully cooked?
Use a meat thermometer to check the internal temperature. It should read 165°F (74°C) for safe consumption.
What’s the best way to crush panko for a finer texture?
Place the panko in a zip-top bag and crush it with a rolling pin or the bottom of a glass.
Final Thoughts
Crispy Garlic Chicken with Parmesan is a dish that brings people together. Its crunchy exterior, cheesy goodness, and garlicky aroma make it unforgettable. Whether you’re cooking for yourself or sharing it with loved ones, this recipe is sure to become a staple in your kitchen. So grab your ingredients, turn on some music, and enjoy the process—it’s half the fun!
Crispy Garlic Chicken
Ingredients
Equipment
Method
- Preheat your oven to 375°F (190°C) and line a baking sheet with parchment paper or a silicone mat.
- In a bowl, combine the melted butter and minced garlic, stirring well.
- In another bowl, mix the panko breadcrumbs, grated parmesan, chopped parsley, paprika, salt, and pepper.
- Dip each chicken breast into the garlic butter, then press it firmly into the breadcrumb mixture.
- Place the coated chicken on the prepared baking sheet and drizzle with olive oil.
- Bake for 25–30 minutes until the internal temperature reaches 165°F (74°C) and the coating is golden brown. Let rest for a few minutes before serving.