Why This Crispy Garlic Chicken Recipe Will Win Your Heart
Let me tell you a little story. A few months ago, I was hosting a dinner party for some close friends. I wanted to impress them but didn’t want to spend hours in the kitchen. That’s when I stumbled upon this Crispy Garlic Chicken with Parmesan recipe. It was love at first bite! The crispy golden crust paired with the rich garlic aroma and nutty Parmesan made everyone ask for seconds. And guess what? You can whip it up in under an hour. Trust me, this dish is about to become your new go-to.
The Story Behind Crispy Garlic Chicken
This dish has roots in classic European cooking, where garlic and Parmesan are often celebrated as flavor powerhouses. Over time, home cooks added their own twists, like breading techniques or seasoning blends, to make it more indulgent. My version leans on simplicity while still delivering that wow factor. When I tested it for the first time, I couldn’t believe how easy it was to create something so restaurant-worthy. It’s proof that sometimes, less really is more.
Why You’ll Love This Recipe
First off, this Crispy Garlic Chicken is packed with bold flavors. The garlic adds a punch, while the Parmesan brings a savory depth. Plus, the crispy coating gives it that satisfying crunch we all crave. Another bonus? It’s beginner-friendly. Even if you’re not a seasoned cook, you’ll nail this recipe on your first try. And did I mention how quick it is? Perfect for busy weeknights or last-minute gatherings.
Perfect Occasions to Make This Dish
Whether you’re hosting a casual family dinner or throwing a chic brunch, this recipe fits the bill. It’s also a hit at potlucks because it’s easy to transport and always gets compliments. I’ve served it during holiday meals too—it pairs beautifully with roasted veggies or a fresh salad. Honestly, any occasion is a good excuse to make this dish!
Ingredients for Crispy Garlic Chicken
- 4 boneless, skinless chicken breasts
- 1 cup all-purpose flour
- 2 teaspoons garlic powder
- 1 teaspoon paprika
- Salt and pepper to taste
- 2 large eggs, beaten
- 1 cup breadcrumbs
- 1/2 cup grated Parmesan cheese
- 3 tablespoons olive oil
- 4 cloves garlic, minced
- Fresh parsley for garnish (optional)
Substitution Options
- Swap chicken breasts for thighs if you prefer darker meat.
- Use gluten-free flour and breadcrumbs for a gluten-free version.
- Replace Parmesan with Pecorino Romano for a sharper flavor.
- Olive oil can be substituted with melted butter for extra richness.
Step 1: Preparing the Chicken
Start by patting the chicken breasts dry with paper towels. This step is crucial because moisture prevents the breading from sticking properly. Season both sides generously with salt, pepper, and a sprinkle of garlic powder. Pro tip: Let the chicken sit for 10 minutes to absorb the flavors. While it rests, set up your breading station—a plate with flour, a bowl with beaten eggs, and another plate with a mix of breadcrumbs, Parmesan, and paprika. The vibrant yellow of the eggs and the golden crumbs will make your mouth water!
Step 2: Breading the Chicken
Dip each piece of chicken into the flour, shaking off any excess. Next, dunk it into the egg mixture, ensuring it’s fully coated. Finally, press it into the breadcrumb-Parmesan blend, making sure every inch is covered. The texture should feel rough and sandy, promising that irresistible crunch later. Place the breaded chicken on a clean plate while you heat the oil. Chef’s tip: Use one hand for wet ingredients and the other for dry to keep things tidy.
Step 3: Cooking the Chicken
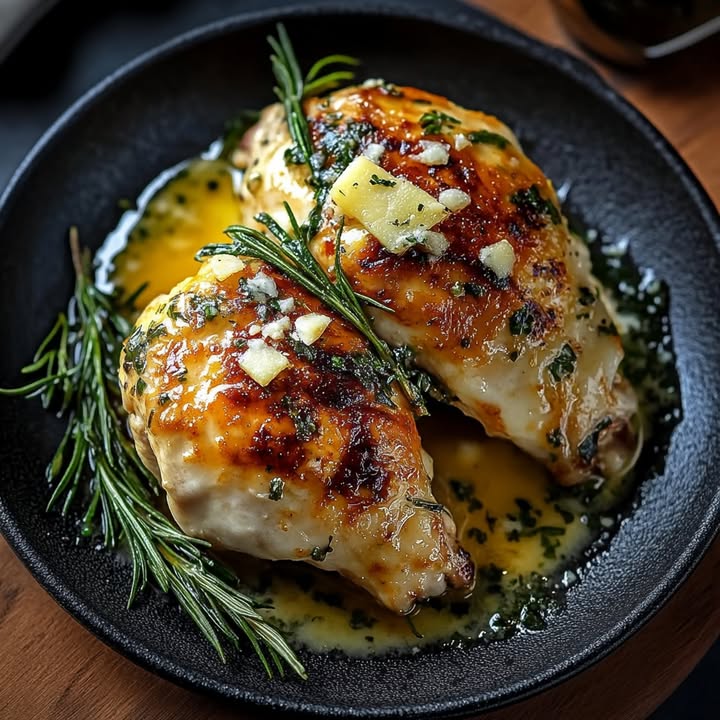
Heat olive oil in a large skillet over medium heat. Once shimmering, add the chicken pieces carefully—don’t overcrowd the pan. Cook for about 5-6 minutes per side until golden brown and cooked through. You’ll know it’s ready when the crust turns a deep golden hue and smells heavenly. Resist the urge to flip too early; patience ensures maximum crispiness. Garnish with minced garlic during the last minute of cooking for an extra burst of flavor.
Timing Breakdown
- Prep Time: 15 minutes
- Cooking Time: 20 minutes
- Total Time: 35 minutes
Chef’s Secret
To achieve an even crispier coating, toast the breadcrumbs in a dry skillet for 2-3 minutes before mixing them with Parmesan. This simple trick enhances their texture and flavor, taking your dish to the next level.
Fun Fact About Garlic
Did you know garlic was once considered a currency in ancient Egypt? People valued it so much they used it to pay workers building the pyramids. Imagine trading a clove of garlic for a day’s labor today!
Necessary Equipment
- Large skillet
- Paper towels
- Three shallow bowls or plates
- Tongs or spatula
Storage Tips
If you have leftovers (which is rare), store them in an airtight container in the fridge for up to three days. Reheat in the oven at 350°F for 10 minutes to retain the crispiness. Avoid microwaving, as it makes the coating soggy. For longer storage, freeze the cooked chicken in a freezer-safe bag for up to two months. Thaw overnight in the fridge before reheating.
When freezing uncooked breaded chicken, place the pieces on a baking sheet lined with parchment paper and freeze until solid. Transfer to a zip-top bag once frozen. This method prevents clumping and keeps the coating intact.
Finally, always label your containers with the date to track freshness. Proper storage ensures you can enjoy this dish anytime without compromising quality.
Tips and Advice
- Double-coat the chicken for an ultra-crispy layer.
- Use fresh Parmesan instead of pre-grated for better flavor.
- Don’t skip resting the chicken after seasoning—it boosts juiciness.
Presentation Ideas
- Serve on a wooden board with lemon wedges for a rustic touch.
- Garnish with chopped parsley for a pop of color.
- Pair with a side of creamy mashed potatoes or steamed broccoli.
Healthier Alternatives
Looking to lighten up this dish? Here are six variations:
- Baked Version: Skip frying and bake at 400°F for 25 minutes.
- Air Fryer Method: Cook at 375°F for 12-15 minutes for guilt-free crispiness.
- Low-Carb Option: Replace breadcrumbs with crushed pork rinds.
- Vegan Twist: Use plant-based chicken and nutritional yeast instead of Parmesan.
- Spicy Kick: Add red pepper flakes to the breadcrumb mixture.
- Herbaceous Blend: Mix dried herbs like thyme or rosemary into the coating.
Mistake 1: Overcrowding the Pan
One common error is cramming too many chicken pieces into the skillet. This lowers the temperature and causes steaming instead of frying, ruining the crispiness. To avoid this, cook in batches and give each piece enough space. Pro tip: Use a thermometer to ensure the oil stays around 350°F.
Mistake 2: Skipping the Resting Step
Some folks rush the process and skip letting the chicken rest after seasoning. Without this pause, the flavors won’t penetrate the meat. Take those extra 10 minutes—it makes a world of difference.
Mistake 3: Using Stale Breadcrumbs
Stale breadcrumbs lack the crunch needed for this recipe. Always check the expiration date or opt for homemade ones. Fresh breadcrumbs guarantee a superior texture.
Mistake 4: Flipping Too Soon
Impatience leads to disaster here. Flipping the chicken prematurely tears the delicate coating. Wait until the edges turn golden and lift easily with tongs. Patience pays off!
FAQs
Can I use chicken tenders instead of breasts?
Absolutely! Tenders cook faster and are perfect for smaller appetites. Adjust cooking time accordingly, usually reducing it by 2-3 minutes per side.
What sides pair well with this dish?
Roasted vegetables, Caesar salad, or garlic butter pasta complement the flavors beautifully. Choose based on your mood or dietary preferences.
Is this recipe kid-friendly?
Yes! Kids adore the cheesy, garlicky goodness. Feel free to adjust the seasoning levels to suit their taste buds.
Can I prep this ahead of time?
Definitely. Bread the chicken and refrigerate for up to 24 hours before cooking. This saves time and ensures a stress-free meal prep.
How do I prevent sogginess?
Ensure the chicken is completely dry before breading. Also, avoid covering the cooked chicken with foil, as trapped steam softens the crust.
What if I don’t have fresh garlic?
No worries! Use 1 teaspoon of garlic powder instead. While fresh is ideal, powdered works just fine in a pinch.
Can I make this gluten-free?
Of course. Swap regular flour and breadcrumbs for certified gluten-free alternatives. The results will still be deliciously crispy.
Why does my coating fall off?
This happens when the chicken isn’t properly dried or the breading layers aren’t adhered correctly. Follow the steps closely for best results.
How do I know when the chicken is done?
Check the internal temperature with a meat thermometer—it should read 165°F. Alternatively, cut into the thickest part to ensure no pink remains.
Can I freeze leftovers?
Yes! Store in a freezer-safe container for up to two months. Reheat in the oven for best results.
This Crispy Garlic Chicken with Parmesan is more than just a recipe—it’s a celebration of flavors and textures. Whether you’re feeding your family or impressing guests, it never disappoints. So grab your skillet and get cooking. Bon appétit!
Crispy Garlic Chicken
Ingredients
Equipment
Method
- Pat the chicken breasts dry with paper towels and season both sides with salt, pepper, and garlic powder. Let sit for 10 minutes.
- Set up a breading station with a plate of flour, a bowl of beaten eggs, and a plate with breadcrumbs mixed with Parmesan and paprika.
- Dip each chicken piece into the flour, then the egg, and finally press into the breadcrumb-Parmesan blend. Place on a clean plate.
- Heat olive oil in a large skillet over medium heat and add chicken pieces, cooking for 5-6 minutes per side until golden brown and cooked through.
- Garnish with minced garlic during the last minute of cooking for extra flavor.