The Ultimate German Roll Cake Experience
Is there anything more joyful than unrolling a slice of the most decadent cherry roll cake? It’s like opening a delicious, chocolaty present. I remember making a version of this for my daughter’s “un-birthday” party (you know, the ones we make up just to have cake). The look on her face when I sliced into that swirl of cream and cherries was pure magic. It wasn’t just cake; it was an event. Today, I’m sharing that magic with you.
A Slice of Forest Fantasy
The Black Forest Roll Cake takes its inspiration from the granddaddy of German desserts: the Black Forest Gateau. That famous cake hails from the Black Forest region, known for its sour cherries and Kirschwasser (a cherry brandy). Our rolled version is its fun, modern, and frankly, less intimidating cousin. It packs all the classic flavors—deep chocolate, lush cherries, and billowy cream—into a beautiful spiraled log. It’s perfect for bakers who love impressive results but want a smoother, simpler journey from bowl to table.
Why This Decadent Cherry Roll Steals Hearts
You will absolutely adore this recipe. First, the flavor combination is simply unbeatable. The rich cocoa sponge, the sweet-tart cherries, and the smooth vanilla cream are a match made in heaven. Second, it’s surprisingly forgiving. The rolling trick with a towel makes it much easier than you’d think! Finally, it’s a total showstopper. Bringing this stunning dessert to any gathering will make you feel like a professional pastry chef who just stepped out of a cozy kitchen.
Perfect Occasions for Your Cherry Chocolate Roll
This isn’t just an “any Tuesday” kind of cake (though I support cake any day!). Its elegance makes it perfect for special moments. Think holiday dinners, birthdays where a layer cake feels like too much, potlucks where you want your dish to stand out, or even a fancy weekend treat. I love serving it during the winter holidays; the dark chocolate and red cherries just feel so festive. It’s a guaranteed conversation starter and a sweet ending to any meal.
Gathering Your Ingredients for Success
Great cakes start with great ingredients. Having everything measured and ready (we call this mise en place) makes the process smooth and fun. Here’s what you’ll need:
For the Chocolate Cake:
- 4 large eggs
- ¾ cup of granulated sugar
- ½ cup all-purpose flour
- ¼ cup unsweetened cocoa powder (Dutch-processed is great for a deeper color)
- 1 teaspoon baking powder
- A pinch of salt
- 1 teaspoon pure vanilla extract
For the Cherry Cream Filling:
- 1 ½ cups of heavy whipping cream, very cold
- ⅓ cup powdered sugar (confectioners’ sugar)
- 1 teaspoon vanilla extract
- 1 cup canned pitted cherries in syrup or water, well-drained and patted dry
For the Decoration:
- 1 cup whipped cream (for piping, optional)
- Chocolate Ganache: ½ cup semi-sweet chocolate chips + ¼ cup heavy cream
- Maraschino cherries (for that classic look!)
- Shaved chocolate or chocolate curls (optional but gorgeous)
Quick & Easy Substitution Options
No need to panic if you’re missing something! Baking is about adaptability.
- Cherries: No canned cherries? Use a high-quality cherry jam or compote, or even frozen cherries that have been thawed and well-drained.
- Heavy Cream: For a stable filling, heavy cream is best. For a lighter option, you could use stabilized whipped cream made with mascarpone.
- Cocoa Powder: Any unsweetened cocoa works. Natural cocoa gives a more intense chocolate flavor, while Dutch-processed is milder and darker.
- Gluten-Free: Use a reliable 1-to-1 gluten-free flour blend in place of the all-purpose flour.
Crafting Your Decadent Cherry Roll Masterpiece
Follow these steps, take your time, and enjoy the process. The aroma of baking chocolate cake is therapy in itself!
Step 1: Preheat and Prepare
Start by heating your oven to 350°F (175°C). This ensures it’s perfectly hot when your batter is ready. Take a 10×15 inch jelly roll pan (a baking sheet with sides) and line it with parchment paper. Let the paper hang over the sides a little. This “handle” will be a lifesaver later. Lightly grease the paper with a bit of butter or baking spray. This step is your ticket to a cake that releases perfectly.
Step 2: Make the Chocolate Sponge
In a large bowl, beat the eggs and granulated sugar together. Use a hand mixer or stand mixer on high speed. You want the mixture to become very pale, thick, and fluffy. This should take about 5-7 minutes. This air is what gives the cake its light, rollable texture. Sift the flour, cocoa powder, baking powder, and salt right into the bowl. Gently fold everything together with a spatula just until no dry streaks remain. Finally, fold in the vanilla extract. The batter will be thin and silky. Pour it onto your prepared pan and spread it into an even layer with an offset spatula.
Step 3: Bake and Roll While Hot
Slide the pan into your preheated oven. Bake for 10 to 12 minutes. The cake is done when the top springs back lightly to the touch. Here comes the important part! As soon as the cake comes out of the oven, carefully lift it using the parchment paper handles and place it on a heat-safe surface. Dust the top lightly with powdered sugar. Place a clean, lint-free kitchen towel over the cake. Quickly but gently, flip the whole thing over so the cake is on the towel. Peel off the parchment paper. Now, starting from a short end, use the towel to roll the warm cake up tightly. Let it cool completely rolled up like this. This “trains” the cake to hold its spiral shape later.
Pro tip: Don’t let the cake cool flat! Rolling it warm is the key to preventing cracks.
Step 4: Whip Up the Cherry Cream Filling
While the cake cools, make your luscious filling. Ensure your bowl and beaters are cold for best results. Pour the very cold heavy cream into the bowl. Add the powdered sugar and vanilla. Beat on medium-high speed until you see firm, beautiful peaks form. Be careful not to overbeat, or you’ll get grainy butter! Gently fold in the well-drained cherries with your spatula. The vibrant red cherries peeking through the white cream is a lovely sight. Pop the bowl into the fridge to keep it firm.
Step 5: Assemble the Roll
Once the cake roll is completely cool, it’s assembly time! Find the seam of your rolled cake and carefully unroll it on a flat surface. It will relax into a flat rectangle. Spread the cherry cream filling evenly over the entire surface, leaving a small border at the edges. Now, roll the cake back up, this time without the towel inside. Use the towel to help guide you for a tight roll. Place the finished roll seam-side down on your serving plate. Admire your beautiful spiral!
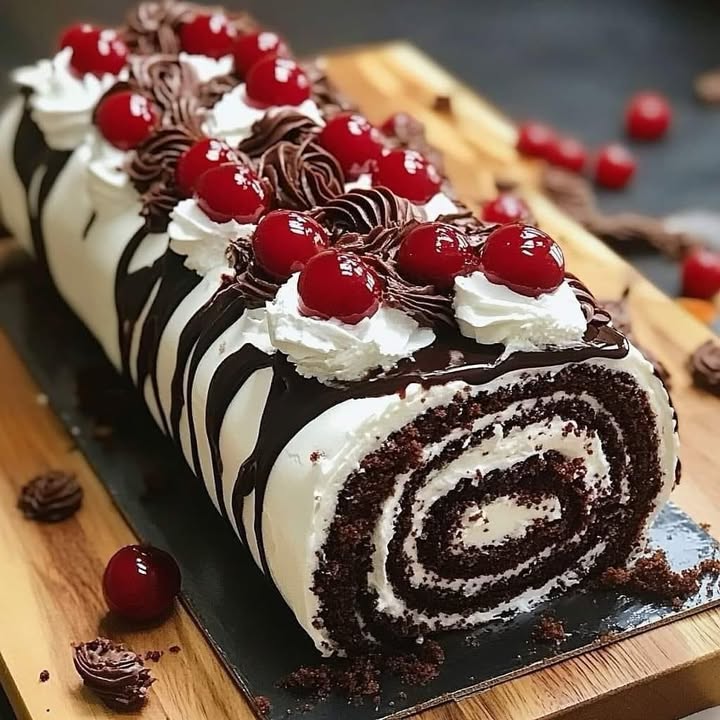
Step 6: Decorate to Impress
Let’s make it spectacular! For the ganache, heat the ¼ cup heavy cream until just simmering. Pour it over the chocolate chips in a small bowl. Let it sit for a minute, then stir until smooth and glossy. Drizzle this luxurious chocolate ganache over the top of your roll. You can go for elegant drips or full coverage. Pipe swirls of extra whipped cream along the top if you like. Finally, crown it with maraschino cherries and a shower of chocolate shavings. It’s a masterpiece!
Chef’s tip: For the cleanest slices, refrigerate the decorated cake for at least an hour before serving. This sets the filling and makes cutting a breeze.
Your Recipe Timetable
| Prep Time: | 25 minutes |
| Cook Time: | 12 minutes |
| Cooling Time: | 1 hour |
| Chilling Time: | 1 hour (recommended) |
| Total Time: | About 2 hours 40 minutes |
A Baker’s Secret for the Perfect Roll
My absolute best trick is using a thin, damp kitchen towel for the initial roll. I dampen it under the tap and wring it out very well. The slight moisture creates steam against the hot cake, making the surface even more flexible and less likely to stick or crack. Just make sure the towel isn’t dripping wet—just lightly damp. It’s a game-changer for a flawless, crack-free roll every single time.
A Fun Fact About Cherries
Did you know the famous Black Forest region in Germany isn’t just known for cake? It’s also the birthplace of the cuckoo clock! The traditional cake uses sour Morello cherries, which are abundant there. While our recipe uses simpler canned cherries, seeking out a jar of Morello cherries can add an authentic, wonderfully tart depth to your decadent cherry roll. It’s a lovely nod to the dessert’s heritage.
Necessary Kitchen Equipment
You don’t need fancy gear, just a few basics:
- 10×15 inch Jelly Roll Pan (a rimmed baking sheet)
- Parchment Paper
- Stand Mixer or Hand Mixer
- Large Mixing Bowls
- Spatula (both a flexible rubber one and an offset metal one are helpful)
- Clean Kitchen Towel (lint-free)
- Sifter or Fine Mesh Sieve
- Cooling Rack
Storing Your Cherry Chocolate Roll
Because of the whipped cream filling, this cake must be stored in the refrigerator. Cover it loosely with plastic wrap or place it in a large cake carrier. It will keep beautifully for up to 2-3 days. The flavors actually meld and become even more delicious after a night in the fridge.
For longer storage, you can freeze the undecorated cake roll. Wrap the assembled roll (without ganache or whipped cream toppings) tightly in plastic wrap, then in foil. Freeze for up to 1 month. Thaw overnight in the refrigerator before adding your final decorations and serving.
If you have leftovers, store slices in an airtight container in the fridge. The ganache may lose a little shine, but the taste will still be wonderful.
Tips and Advice for Baking Bliss
- Chill Your Tools: For the fastest, fluffiest whipped cream, chill your mixing bowl and beaters in the freezer for 15 minutes before you start.
- Don’t Overmix: When combining the dry ingredients into the eggs, fold gently. Overmixing deflates the precious air you whipped in.
- Drain Those Cherries Well: Extra juice from the cherries can make your filling runny. Pat them dry with a paper towel after draining.
- Sharp Knife: Use a sharp, thin-bladed knife to cut your slices. Wipe it clean with a damp cloth between cuts for perfect, clean layers.
Presentation Ideas to Wow Your Guests
Presentation is the final flourish! Here are some ideas:
- Dust the plate with a little cocoa powder or powdered sugar before placing the slice.
- Serve with a small extra dollop of whipped cream and a fresh cherry on the side.
- For a festive look, use seasonal decorations like edible gold leaf for New Year’s or red and green sprinkles for Christmas.
- Slice the cake on a slight diagonal for a more dynamic look on the plate.
- Place the whole roll on a long, rustic wooden board for a stunning centerpiece.
Healthier and Fun Recipe Variations
This recipe is wonderfully versatile. Try one of these twists:
- Black Forest Roll Cups: Bake the cake in a sheet pan, cut it into squares, and press them into muffin tins to form cups. Fill with the cherry cream for individual desserts.
- Chocolate Orange Roll: Swap the cherry filling for a cream flavored with orange zest and a tablespoon of orange liqueur. Decorate with candied orange peel.
- Mocha Roll: Add a teaspoon of instant espresso powder to the cake batter for a coffee-chocolate flavor. Fill with mocha-flavored whipped cream.
- Summer Berry Roll: Use a mix of fresh, finely chopped strawberries, raspberries, and blueberries in place of the cherries for a bright, summery version.
- Nutella Swirl Roll: Spread a thin layer of Nutella over the cake before adding the whipped cream filling. It creates a wonderful hazelnut-chocolate ribbon inside.
- Dairy-Free Roll: Use a plant-based heavy cream alternative for the filling and a dairy-free chocolate for the ganache. Check that your other ingredients are dairy-free certified.
Common Mistakes to Avoid
Avoid these simple pitfalls for a perfect roll every time.
Mistake 1: Overbaking the Cake
This is the number one cause of a cracked roll. An overbaked cake becomes dry and brittle, so it cracks when you try to bend it. The cake should be just set and springy to the touch. Start checking at the 10-minute mark. It’s better to have a slightly underbaked, moist cake than an overbaked one. A good test is to lightly press the center; if it springs back, it’s done.
Mistake 2: Not Rolling the Cake While Warm
It feels counterintuitive to handle a hot cake, but it’s essential. The warm cake is flexible and pliable. Rolling it at this stage “trains” its memory to stay in a spiral. If you let it cool flat, it will set in that flat shape and resist rolling later, leading to cracks. Have your towel and powdered sugar ready the moment the cake comes out of the oven.
Mistake 3: Using Warm Cream or Tools for the Filling
Whipped cream is finicky. If your bowl, beaters, or cream aren’t cold, the cream won’t whip up properly. It might become grainy or, worse, turn into butter. Always chill your equipment in the freezer for 10-15 minutes before whipping. Your heavy cream should come straight from the fridge. This ensures light, stiff peaks that hold the filling together.
Mistake 4: Overfilling or Under-Draining the Cherries
Too much filling can cause the cake to burst when you roll it. A thin, even layer is perfect. Also, if your cherries are wet, that liquid will seep into the cream and cake, making everything soggy and the roll unstable. After draining the canned cherries, spread them on a paper towel and pat them thoroughly dry. This step is quick but makes a huge difference.
Mistake 5: Skipping the Chill Before Slicing
You’ve worked so hard and you want to see that perfect swirl right away! But slicing a freshly made roll is messy. The filling hasn’t set, so it will squish out. Letting the decorated roll chill in the fridge for at least an hour firms up the cream and ganache. This gives you those gorgeous, clean, Instagram-worthy slices that hold their shape perfectly on the plate.
Frequently Asked Questions
Can I make this cake roll a day ahead?
Absolutely, and I often do! It’s actually better the next day. Assemble the roll completely, including the ganache drizzle. Cover it loosely and refrigerate overnight. The flavors have more time to blend beautifully. Just add any fresh whipped cream rosettes or cherry decorations right before you serve it. This makes party day so much less stressful.
My cake cracked when I rolled it. What did I do wrong?
Don’t worry, this happens to everyone! The most common reasons are overbaking the cake or letting it cool flat before rolling. A few small cracks are okay and can be hidden with ganache or whipped cream. Next time, be extra quick to roll it warm and ensure you don’t bake it a minute too long. Even if it cracks, it will still taste incredible.
What can I use instead of canned cherries?
You have great options. Frozen dark sweet cherries, thawed and well-drained, work well. You can also use a high-quality cherry pie filling or compote, but spread it in a very thin layer so it’s not too wet. For a different twist, try other fruits like chopped strawberries or raspberries.
Do I have to use a jelly roll pan?
For this specific size and thickness, yes, that pan is important. A regular baking sheet might be too large or have no rim, causing batter to spill. A 10×15 pan gives you the perfect thin sponge needed for rolling. If you only have a 9×13 pan, your cake will be thicker and may need a slightly longer bake time, but it can still work.
Can I add alcohol, like Kirsch, to this recipe?
You sure can, for an authentic touch! Brush 1-2 tablespoons of Kirsch (cherry brandy) or Amaretto over the unrolled cake before adding the filling. This adds wonderful flavor and moisture. Just make sure your audience is okay with it. You could also add a splash to the whipped cream for a boozy filling.
How do I prevent the towel from sticking to the cake?
The light dusting of powdered sugar on the hot cake before placing the towel acts as a barrier to prevent sticking. Make sure you’re using a clean, lint-free cotton or flour sack towel. The damp towel trick I mentioned earlier also helps prevent sticking.
My whipped cream turned out grainy. Can I fix it?
Grainy cream usually means it was over-whipped and started to separate into butter. Unfortunately, you can’t truly fix it once it happens. It’s best to start over with new cold cream and chilled tools. To avoid this, whip on medium-high speed and watch closely. Stop as soon as you see firm peaks that hold their shape.
Is it okay to freeze this cherry chocolate roll?
Yes, but plan ahead. Freeze the undecorated assembled roll (no ganache or whipped cream on top). Wrap it very tightly in plastic wrap, then foil. Thaw it overnight in the refrigerator. Then, make fresh ganache and whipped cream to decorate it before serving. This keeps the textures perfect.
Can I make this recipe gluten-free?
Definitely! Use a good quality 1-to-1 gluten-free flour blend that contains xanthan gum. I’ve had great success with brands like Cup4Cup or Bob’s Red Mill 1-to-1. Follow the recipe exactly as written, just swapping the flours. The texture might be slightly more delicate, so handle with care when rolling.
How do I get those pretty chocolate shavings for decoration?
Take a room-temperature bar of chocolate. Using a vegetable peeler, gently “peel” along the edge of the bar. The curls will naturally form. For finer shavings, you can use a microplane zester. If the chocolate is too cold, it will flake; if too warm, it will melt. Room temp is just right.
Your Baking Adventure Awaits!
There you have it—the complete guide to creating a stunning, delicious Decadent Cherry Roll that will earn you endless compliments. Remember, baking is an adventure, not a test. Even if your first roll has a crack (and mine certainly did!), it’s filled with love, chocolate, and cherries, which makes it perfect. So put on your apron, preheat that oven, and get ready to roll up something spectacular. Happy baking!
Decadent Cherry Roll
Ingredients
Equipment
Method
- Preheat your oven to 350°F (175°C) and prepare a 10x15 inch jelly roll pan with parchment paper.
- In a large bowl, beat eggs and granulated sugar until pale and fluffy (5-7 minutes).
- Sift in flour, cocoa powder, baking powder, and salt into the egg mix; gently fold in with a spatula.
- Add vanilla extract and mix until smooth, then pour batter into the prepared pan and spread evenly.
- Bake for 10-12 minutes until the top springs back when lightly touched.
- Dust the top with powdered sugar, place a kitchen towel over it, flip onto the towel, and remove the parchment paper.
- Roll the warm cake up tightly using the towel and let it cool completely.
- In a cold bowl, whip the heavy cream, powdered sugar, and vanilla until stiff peaks form and fold in the cherries.
- Once the cake is cool, unroll it, spread the cherry cream filling evenly, and re-roll without the towel.
- Prepare the ganache by heating cream until simmering, pouring it over chocolate chips, and stirring until smooth.
- Decorate the rolled cake with ganache, pipe whipped cream, and garnish with maraschino cherries and chocolate shavings.