The Ultimate Comfort Mashup: Biscuits and Sausage Gravy Breakfast Pizza
Ever have one of those mornings where you can’t decide between a fluffy biscuit or a slice of leftover pizza? I’ve been there more times than I care to admit, usually on a lazy Sunday with a house full of hungry people. That’s why I created this monster of deliciousness: Biscuits and Sausage Gravy Breakfast Pizza. It’s a hug on a pan, pure comfort food that turns your favorite breakfast into a shareable, gooey, pizza-shaped masterpiece. Trust me, it disappears faster than you can say “more coffee, please!”
A Slice of Breakfast History, Remixed
Biscuits and gravy is a classic Southern staple, born from humble beginnings as a hearty, economical way to feed a family. Pizza, of course, needs no introduction. But somewhere along the line, a brilliant mind (possibly fueled by a serious brunch craving) decided to marry the two. This recipe is my homage to that fusion spirit. It takes the familiar, creamy peppery sausage gravy and the soft, buttery biscuit and reimagines them in a fun, communal format. It’s not traditional, and that’s exactly what I love about it. It’s a modern twist that honors the soul of the original dishes.
Why You’ll Fall in Love With This Breakfast Pizza
First, it’s incredibly satisfying. You get layers of flavor and texture in every bite. Second, it’s surprisingly simple. We’re using canned biscuit dough as a clever shortcut for the crust. No yeast, no waiting for dough to rise. Third, it feeds a crowd with minimal fuss. One pan, a few simple steps, and you have a breakfast or brunch centerpiece that earns you major host points. It’s the kind of recipe that makes everyone ask, “When are you making this again?”
Perfect Occasions for This Savory Pie
This pizza is a superstar for weekend brunches, holiday mornings like Christmas or New Year’s Day, or even a fun “breakfast for dinner” night. It’s perfect for feeding houseguests or for a casual gathering with friends. I’ve even brought it to potlucks, and it’s always the first platter to be emptied. Any time you want to serve something special without spending all day in the kitchen, this is your recipe.
Gathering Your Ingredients
Here’s everything you need to create this masterpiece. I recommend getting everything measured and ready before you start cooking. It makes the process so smooth!
- 1 (16 oz) can refrigerated biscuit dough
- 1 lb breakfast sausage (pork or turkey)
- 1/4 cup all-purpose flour
- 2 1/2 cups whole milk
- 1/2 teaspoon salt
- 1/2 teaspoon black pepper
- 1/2 teaspoon garlic powder
- 1/2 teaspoon onion powder
- 2 cups shredded mozzarella cheese
- 1 cup shredded cheddar cheese
- 4 large eggs
- 2 tablespoons butter
- Fresh parsley, chopped (optional, for garnish)
Easy Swaps and Substitutions
No whole milk? Use 2% or even a milk-alternative, but the gravy might be slightly less rich. For a spicy kick, use hot breakfast sausage. Don’t have mozzarella? All cheddar works great, or try a Monterey Jack blend. You can also add toppings like sautéed bell peppers, onions, or mushrooms after the gravy layer for extra veggies.
Let’s Make Some Breakfast Magic!
Follow these steps, and you’ll have a golden, bubbly breakfast pizza ready to devour. The smells alone will have everyone gathered in the kitchen.
Step 1: Preparing the Biscuit Canvas
Start by preheating your oven to 375°F (190°C). Take a 12-inch pizza pan or a large baking sheet and give it a good coat of non-stick spray or a slick of butter. Open that can of biscuits—that satisfying *pop* is the sound of fun beginning! Arrange the biscuits in the pan, pressing and stretching them together to form one even layer. You’re creating the base of your pizza, so try to seal any gaps. Bake this for just 8 to 10 minutes. You want it lightly golden, but not fully cooked through. It will finish baking later with all the toppings.
Pro tip: A little flour on your fingers can help prevent the dough from sticking as you press it out.
Step 2: Crafting the Hearty Gravy
While the crust par-bakes, grab a large skillet. Crumble in the breakfast sausage and cook it over medium heat. You want it nicely browned and no longer pink. The aroma of cooking sausage is pure comfort. Once cooked, don’t drain all the fat—that’s flavor! Sprinkle the flour directly over the sausage. Stir it constantly for about a minute to cook out the raw flour taste. Now, slowly pour in the milk while whisking. Watch as the magic happens! The mixture will thicken into a creamy, luscious gravy in about 5 to 7 minutes. Stir in the salt, pepper, garlic powder, and onion powder. Give it a taste—this is the soul of your pizza.
Step 3: Whisking Up Soft Clouds of Egg
In a separate small skillet, melt the butter over medium heat. Crack your eggs into a bowl, whisk them until uniform, and pour them into the melted butter. Gently push the eggs around with a spatula as they cook. Stop just when they are softly set and still look a bit wet. They will cook more in the oven, so we don’t want them dry now. Think fluffy, yellow clouds.
Step 4: The Grand Assembly
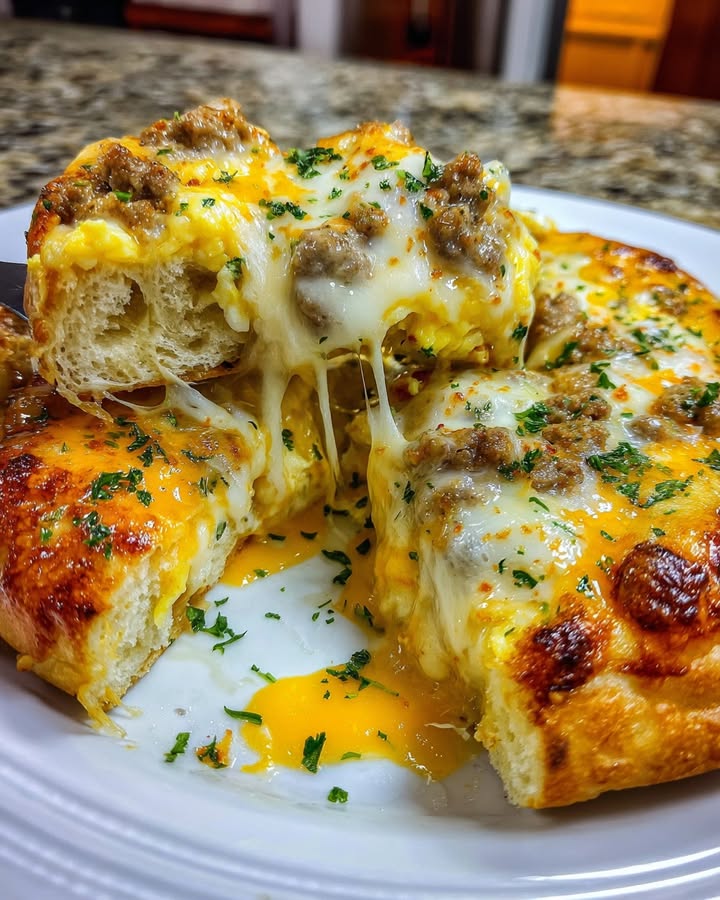
Your kitchen should smell amazing by now! Pull the partially baked biscuit crust from the oven. Carefully spread the warm sausage gravy evenly over the top, going all the way to the edges. Next, scatter the softly scrambled eggs across the gravy sea. Finally, shower everything with the glorious mix of mozzarella and cheddar cheese. This cheesy blanket will melt into gooey perfection.
Step 5: The Final Bake to Bubbly Bliss
Carefully return your loaded pizza pan to the hot oven. Bake for another 10 to 12 minutes. You’re waiting for that beautiful moment when the cheese is completely melted, bubbly, and has those irresistible golden-brown spots. The crust edges should be a deep, golden brown.
Step 6: The Best Part – Serving!
Remove your masterpiece from the oven. Let it cool for just 3-4 minutes—this helps the cheese set a bit so it doesn’t slide right off when you cut it. Sprinkle with some fresh chopped parsley for a pop of color and freshness if you like. Use a pizza cutter or a sharp knife to slice it into wedges. Serve it warm and watch the happy silence descend.
Chef’s tip: For an extra flavor boost, brush the par-baked biscuit crust with a little melted butter and a sprinkle of garlic powder before adding the gravy. It adds a fantastic savory note!
Your Game Plan: Timing It Right
Here’s a quick timeline to help you plan:
Prep Time: 15 minutes
Cooking Time: 25 minutes
Total Time: About 40 minutes
Servings: 6-8 hungry people
A Secret for the Best Gravy
My secret is in the seasoning. After you add the spices, always taste your gravy off the heat. Think it needs more pepper? Add it! The gravy is the star, so make sure it’s seasoned to your liking. A tiny pinch of cayenne can also add a wonderful, subtle warmth.
A Fun Fact About Fusion Food
Combining two beloved dishes into one isn’t just a modern trend. Think of turducken (chicken in a duck in a turkey) or the croissant-donut hybrid, the cronut. Our Biscuits and Gravy Pizza follows in this proud, delicious tradition of culinary mash-ups, proving that some of the best recipes come from playful experimentation in the kitchen.
What You’ll Need in Your Kitchen
You don’t need any fancy gear for this recipe, just the basics:
- 12-inch pizza pan or large rimmed baking sheet
- Large skillet
- Small skillet
- Whisk
- Spatula
- Mixing bowls
- Measuring cups and spoons
- Pizza cutter or sharp knife
Keeping the Leftovers (If You Have Any!)
Store any leftover slices in an airtight container in the refrigerator for up to 3 days. To reheat, the microwave works in a pinch, but for the best texture, use a toaster oven or regular oven at 350°F until warmed through. This helps the crust stay a bit crisp and prevents it from getting soggy.
I do not recommend freezing the fully assembled and baked pizza. The biscuit crust and scrambled eggs can become watery and rubbery when thawed and reheated. However, you can freeze the cooked sausage gravy by itself for up to 2 months! Thaw it in the fridge overnight and reheat it gently on the stove when you’re ready to make a fresh pizza.
For the freshest experience, this dish is truly best enjoyed the day it’s made. But hey, cold breakfast pizza straight from the fridge has its own quirky charm, too!
My Top Tips for Success
Use whole milk for the richest, creamiest gravy. Don’t rush the gravy thickening step—let the milk heat gradually and stir often. For a crispier bottom crust, place your pizza pan on the lowest oven rack for the final bake. Always let the pizza rest for a few minutes after baking. It makes slicing cleaner and saves your mouth from a cheese burn!
Presentation Ideas to Wow Your Guests
Place the whole pizza on a large wooden cutting board for a rustic look. Garnish with not just parsley, but a sprinkle of green onion or a light dash of smoked paprika for color. Serve with small bowls of extra toppings like hot sauce, crispy fried onions, or even a side of fresh fruit salad to balance the richness. For individual servings, you can use a muffin tin to make mini breakfast pizza cups with the same ingredients!
Mix It Up! Healthier & Fun Variations
Want to change things up? Here are six delicious twists on the classic:
- Vegetarian Delight: Swap the sausage for a meatless crumble or sautéed mushrooms and spinach for a veggie-packed version.
- “Everything Bagel” Pizza: Sprinkle the cheese layer with everything bagel seasoning before baking for a savory, oniony crunch.
- Southwestern Style: Use spicy chorizo sausage, add a layer of black beans with the gravy, and top with pepper jack cheese and avocado after baking.
- Loaded Baked Potato Pizza: Top the gravy with diced, par-cooked potatoes and crispy bacon bits before adding the cheese. Finish with a drizzle of sour cream and chives after baking.
- Lower-Carb Version: Use a base of cauliflower crust or flattened sausage patties instead of the biscuit dough for a keto-friendly option.
- Sunny-Side Up: Skip the scrambled eggs. After the pizza is baked, create small wells in the cheese and crack fresh eggs into them. Broil for 2-3 minutes for perfect runny-yolk eggs.
Common Mistakes to Avoid
Mistake 1: Fully Baking the Biscuit Crust First
This is the big one. If you bake the biscuit dough completely before adding toppings, it will likely burn on the bottom during the second bake. You want a par-baked, pale golden crust that finishes cooking under the weight of the gravy and cheese. It soaks up flavor and stays tender inside while getting crisp on the edges.
Mistake 2: Making a Lumpy Gravy
A lumpy gravy happens when you add the milk too fast or don’t whisk constantly. The key is a slow, steady stream of milk while you whisk the sausage and flour mixture vigorously. If you do get a few lumps, don’t panic! Just keep cooking and whisking; they often smooth out. A silicone whisk is great for getting into the corners of the pan.
Mistake 3: Overcooking the Scrambled Eggs
Remember, the eggs will cook again in the oven. If you scramble them until they are completely dry and firm in the skillet, they will become tough and rubbery on the finished pizza. Take them off the heat while they still look a bit soft and wet. They will set up perfectly during the final bake.
Mistake 4: Skipping the Seasoning Taste Test
The amounts for salt, pepper, and spices are a guide. Sausages can vary in saltiness. Always taste your gravy after it thickens and before you put it on the crust. This is your chance to adjust and make it perfect for your palate. A bland gravy means a bland pizza.
Frequently Asked Questions
Can I make this breakfast pizza ahead of time?
You can partially prepare it! Cook the sausage gravy and scramble the eggs ahead of time. Store them separately in the fridge for up to a day. When ready to bake, let the gravy warm up a bit at room temp (it will be very thick), then assemble and bake as directed. You may need to add a few minutes to the final bake time since you’re starting with cold toppings.
What kind of biscuit dough works best?
I find the classic “grands” style flaky biscuits work perfectly. They are large enough to easily press into a crust. Avoid the tiny “bite-size” biscuits, as they are harder to merge into a seamless base. The dough should be cold when you press it out for easier handling.
My gravy is too thin. How can I fix it?
If your gravy hasn’t thickened after several minutes, you can make a “slurry.” Mix one tablespoon of flour with two tablespoons of cold milk in a small bowl until smooth. Whisk this mixture into the simmering gravy and cook for another 2-3 minutes. This should thicken it right up without lumps.
Can I use frozen biscuits or homemade dough?
Absolutely! For frozen biscuits, thaw them first according to package directions, then press them together. For homemade biscuit dough, prepare your favorite recipe but press it into the pan instead of cutting out individual biscuits. You may need to adjust the initial par-bake time slightly.
Is it okay to use pre-shredded cheese?
Yes, for convenience, pre-shredded cheese is fine. For the absolute best melt and flavor, shredding your own cheese from a block is superior because it doesn’t have anti-caking agents. But let’s be real—on a busy morning, the bagged stuff works just great and saves a step.
How do I know when the pizza is done baking?
Look for three signs: the cheese should be completely melted with some bubbly, golden spots. The edges of the biscuit crust should be a deep, golden brown. If you gently lift a corner with a spatula, the bottom should be firm and browned. If the top is browning too fast but the crust seems soft, you can loosely tent it with foil.
Can I add other meats like bacon or ham?
Please do! Diced ham or cooked, crumbled bacon are fantastic additions. I’d recommend adding them with the scrambled egg layer so they don’t burn. Just be mindful of the salt content, as these meats are already salty.
What’s a good side dish to serve with this rich pizza?
Since the pizza is hearty, a light, fresh side is ideal. A simple fruit salad, a crisp green salad with a vinaigrette, or some roasted tomatoes balance the meal perfectly. A cup of fresh berries or melon is also a refreshing choice.
My family doesn’t like spicy food. Will this be too peppery?
Not at all! The black pepper in the recipe provides flavor, not intense heat. You can easily reduce it to 1/4 teaspoon or even omit it. The flavor will mostly come from the sausage and the garlic/onion powders. You are in full control of the seasoning.
Can I make this in a cast iron skillet?
Yes, a large (12-inch) cast iron skillet is an excellent choice! Press the biscuit dough directly into the greased, cold skillet. Par-bake, then add toppings and finish baking. The cast iron gives you a wonderfully crispy, golden-brown crust. Just remember the handle will be extremely hot—use a handle cover!
Go Forth and Create Breakfast Legend
And there you have it—your guide to creating the most talked-about breakfast in the neighborhood. This Biscuits and Sausage Gravy Breakfast Pizza is more than just a meal; it’s an experience. It’s messy, indulgent, and packed with love. It’s the recipe you’ll pull out when you want to make an ordinary morning extraordinary. So preheat that oven, get that sausage sizzling, and prepare for the compliments to roll in. Happy cooking, and enjoy every gooey, delicious slice!
Gourmet Ice Creams Delight
Ingredients
Equipment
Method
- Preheat your oven to 375°F (190°C).
- Coat a 12-inch pizza pan or large baking sheet with non-stick spray or butter.
- Arrange the biscuits in the pan, pressing them together to form an even layer, and bake for 8 to 10 minutes until lightly golden.
- In a large skillet, cook the crumbled breakfast sausage over medium heat until browned.
- Sprinkle flour over the cooked sausage and stir constantly for about a minute.
- Gradually pour in the milk while whisking, and cook for 5 to 7 minutes until the mixture thickens into gravy.
- Stir in salt, pepper, garlic powder, and onion powder, and taste for seasoning.
- In a separate small skillet, melt butter over medium heat and scramble the eggs until softly set.
- Spread the sausage gravy evenly over the par-baked biscuit crust.
- Add the scrambled eggs on top of the gravy, then sprinkle with mozzarella and cheddar cheese.
- Bake in the oven for another 10 to 12 minutes until the cheese is melted and bubbly.
- Allow the pizza to cool for 3-4 minutes, sprinkle with parsley if desired, and slice into wedges to serve.