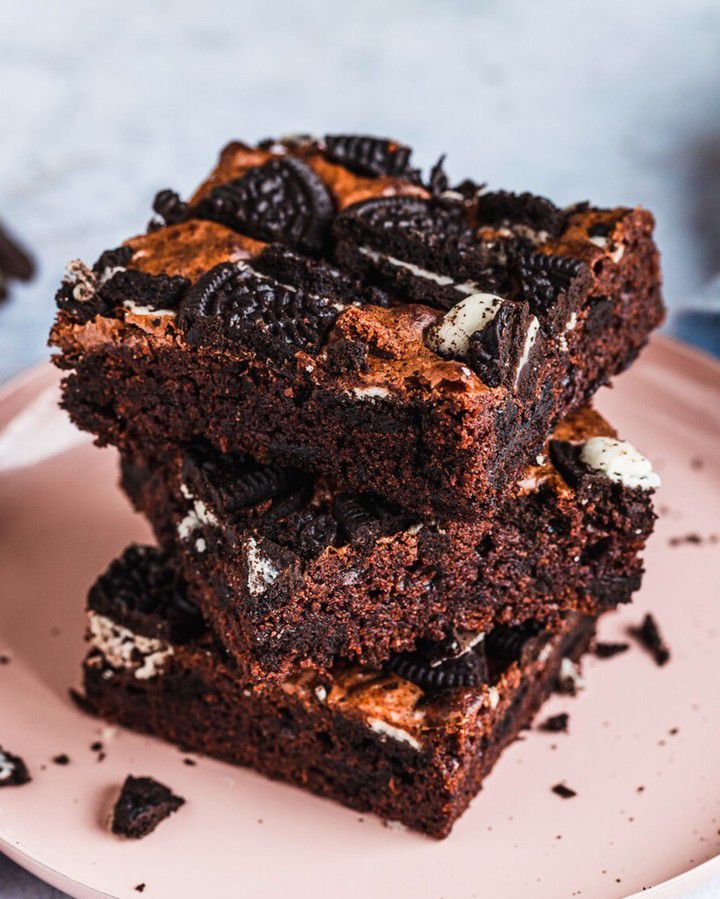
My Quest for the Ultimate Oreo Brownie Bliss
Have you ever stared into your pantry, spotted a sleeve of Oreos, and thought, “These need to be more than just cookies”? That was me last Tuesday. I wanted fudgy, decadent brownies but with that iconic cookie-crunch surprise. My family now calls these magical squares “Oreo Brownie Bliss,” and after one bite, you’ll understand why. It’s the kind of treat that disappears before the coffee is even poured.
From Cookie Jar to Brownie Pan: A Sweet Evolution
Brownies have been a beloved American dessert for over a century. The classic debate? Fudgy vs. cakey. I’m firmly on team fudgy. Adding Oreos, however, is a modern twist we can all thank creative home bakers for. It takes a timeless treat and injects it with playful texture and a hit of vanilla cream. This recipe isn’t just baking; it’s a fun fusion of two legendary sweets into one unforgettable experience.
Why You’ll Fall in Love With This Oreo Brownie Recipe
This recipe is a winner for so many reasons! First, it’s incredibly simple—no fancy equipment or techniques needed. The result is a rich, chocolaty brownie packed with chunks of Oreo that stay slightly crisp. It’s the perfect balance of soft, gooey, and crunchy. Best of all, it brings pure joy to anyone who tries it. Watching my kids’ eyes light up when they see the cookie chunks is my favorite part.
Perfect Occasions for Your Oreo Brownie Bliss
These brownies are the ultimate crowd-pleaser. I bake them for birthday parties, potlucks, and school bake sales—they’re always the first to go. They’re also a fantastic “just because” treat for movie nights or a cozy weekend at home. If you need a quick dessert that looks and tastes like you spent hours, this is your secret weapon.
Gathering Your Ingredients for Oreo Brownie Bliss
You likely have most of this in your kitchen already! Here’s what you need:
- 110 ml neutral cooking oil (like sunflower oil)
- 180g brown sugar
- 2 medium eggs (size M)
- 2 tbsp baking cocoa
- 70g flour
- 1 pinch of salt
- 20 Oreo cookies
- Some butter for the tray
Easy Substitutions for Your Pantry
No brown sugar? Use white sugar, but expect a slightly less fudgy texture. Out of sunflower oil? Any mild oil like canola or even melted coconut oil works. For a gluten-free version, use a 1:1 gluten-free flour blend and gluten-free sandwich cookies. You can even swap the cocoa for melted dark chocolate for an extra intense flavor.
Crafting Your Oreo Brownie Bliss: Step-by-Step
Step 1: Mix Your Base
Start by preheating your oven to 180°C (160°C for fan ovens). Grease your 28×23 cm brownie pan well with butter. In a large bowl, whisk together the oil, rich brown sugar, and eggs until the mixture is smooth and slightly shiny. In a separate bowl, mix the dark baking cocoa, flour, and that important pinch of salt. The salt makes the chocolate flavor pop! Gently stir the dry ingredients into the wet mixture. Don’t overmix—just combine until no flour streaks remain.
Step 2: Fold, Pour, and Bake
Now for the fun part! Roughly chop 14 of your Oreo cookies. You want big chunks and small crumbs for varied texture. Fold them gently into your thick, chocolaty batter. Pour this glorious mix into your prepared pan and smooth the top. Chop the remaining 6 cookies and scatter them evenly over the surface. They will create a beautiful, crunchy topping. Bake for 25-30 minutes. You’ll know it’s done when the top is set but a toothpick inserted has a few moist crumbs. Pro tip: Better slightly underdone than overbaked for that perfect fudgy center!
Chef’s tip: Let the brownies cool completely in the pan before cutting. I know it’s hard to wait, but this patience gives you clean, sharp slices and allows the texture to set perfectly.
Your Oreo Brownie Bliss Timeline
- Prep Time: 15 minutes
- Cook Time: 30 minutes
- Cooling Time: 1 hour (the hardest part!)
- Total Time: 1 hour 45 minutes
My Chef’s Secret for Ultimate Bliss
For an extra flavor kick, add a teaspoon of instant espresso powder to your dry ingredients. You won’t taste coffee, but it deepens the chocolate flavor incredibly, making your Oreo Brownie Bliss even more decadent.
A Fun Cookie Fact
Did you know the Oreo cookie was introduced in 1912? It’s officially the best-selling cookie brand in the world. Using them in brownies is a delicious tribute to over a century of snack happiness.
Necessary Equipment
You only need simple tools: a large mixing bowl, a whisk, a spatula, a chopping board, a knife, and a 28×23 cm brownie pan (or similar size). No mixer required!
Storing Your Oreo Brownie Bliss
Once completely cool, store the brownies in an airtight container at room temperature. They will stay fresh and fudgy for up to 4 days. Place a piece of parchment paper between layers if you stack them.
For longer storage, you can freeze them. Wrap individual squares tightly in plastic wrap and then place them in a freezer bag. They will keep for up to 3 months.
To thaw, simply let them sit at room temperature for an hour or pop them in the microwave for a few seconds. They’ll taste just-baked!
Tips and Advice for Brownie Perfection
- Use a kitchen scale for measuring flour and sugar. It’s more accurate than cups.
- Don’t overbake! The brownies will continue to cook a bit as they cool.
- For extra gooey brownies, reduce the bake time by 3-5 minutes.
- Experiment with different Oreo flavors like mint or peanut butter for a fun twist.
Presentation Ideas to Impress
- Dust with powdered sugar just before serving for a pretty finish.
- Serve warm with a scoop of vanilla ice cream and drizzle of chocolate sauce.
- Cut into small squares for a party-friendly finger food.
- Plate with a few fresh raspberries for a pop of color and a tart contrast.
Healthier & Fun Recipe Variations
Love the idea but want to mix it up? Try these!
- Gluten-Free Bliss: Use your favorite gluten-free flour blend and gluten-free sandwich cookies.
- Protein-Packed Brownies: Swap half the flour for vanilla protein powder. It adds a nutritional boost!
- Vegan Oreo Brownies: Use flax eggs and vegan Oreos. The result is just as delicious.
- Mint Chocolate Twist: Add ½ tsp peppermint extract to the batter and use mint Oreos.
- Peanut Butter Lover’s: Swirl ¼ cup of melted peanut butter into the batter before baking.
- Rocky Road: Fold in mini marshmallows and chopped nuts with the Oreo chunks.
Common Mistakes to Avoid for Oreo Brownie Bliss
Mistake 1: Overmixing the Batter
Stirring the batter too much after adding the flour develops gluten. This makes your brownies tough and cakey, not fudgy. Once you add the dry ingredients, mix just until you no longer see streaks of flour. A few lumps are perfectly fine. A gentle hand is the secret to the best texture.
Mistake 2: Overbaking the Brownies
Brownies continue to cook as they cool. If you wait for a clean toothpick, they’ll be dry. Bake until the top is set and a toothpick inserted has a few moist crumbs attached. It should look a little underdone in the center when it comes out. This guarantees that dreamy, fudgy center we all crave.
Mistake 3: Cutting While Warm
I know the aroma is irresistible. But cutting into warm brownies makes a messy, crumbly disaster. They need time to set and firm up. Let them cool completely in the pan on a wire rack. Your patience will be rewarded with neat, beautiful squares.
Mistake 4: Using Cold Eggs
Cold eggs don’t blend as well with oil and sugar. This can result in a denser, greasier brownie. Simply take your eggs out of the fridge about 30 minutes before you start. Room temperature eggs mix smoothly for a better batter and a better rise.
Your Oreo Brownie Bliss FAQs Answered
Can I use a different type of oil?
Absolutely. Any neutral-flavored oil like canola, vegetable, or light olive oil will work just fine. I don’t recommend strong oils like extra virgin olive oil as the flavor can overpower the chocolate. Melted butter is also a fantastic substitute for a richer, more classic brownie taste. It will change the texture slightly, making it a bit more cakelike.
My brownies are too cakey, not fudgy. What went wrong?
This usually happens from overmixing or overbaking. Too much mixing develops the gluten in the flour. Overbaking simply dries them out. Next time, mix the batter less vigorously and check your oven temperature with a thermometer. Also, take them out of the oven a few minutes earlier, even if the center looks a little soft. They will set as they cool.
Can I add other mix-ins besides Oreos?
Of course! This recipe is a great base. Chopped nuts like walnuts or pecans add a nice crunch. Chocolate chips or chunks make it extra indulgent. You can even try chopped pretzels for a sweet-and-salty kick. Just keep the total volume of add-ins to about 1 to 1.5 cups so the batter can still hold everything together.
How do I know when the brownies are perfectly baked?
Look for a few key signs. The edges should be pulling away from the pan slightly. The top will have a shiny, crackly crust. The most reliable test is the toothpick test. Insert it into the center—it should come out with a few moist crumbs, not raw batter. If it’s completely clean, they are likely overdone.
Can I make these brownies gluten-free?
Yes, it’s very easy. Simply use a 1:1 all-purpose gluten-free flour blend in place of the regular flour. Be sure to also use gluten-free sandwich cookies. The baking time and method remain exactly the same. I’ve done this for friends with celiac disease, and they were thrilled with the result.
Why is there a pinch of salt in a sweet recipe?
Salt is a flavor enhancer, not just for savory food. A small pinch in your baked goods makes the chocolate taste richer and deeper. It balances the sweetness and prevents the brownies from tasting one-dimensional or overly cloying. Don’t skip it!
What’s the best way to cut brownies cleanly?
Use a sharp chef’s knife. For the cleanest cuts, some bakers even lightly grease the knife first. You can also use a plastic knife—it sounds strange, but it works wonderfully on sticky treats. Wipe the blade clean between each cut for neat, photogenic squares.
Can I double this recipe?
You sure can. Simply double all the ingredients exactly. You’ll need to use a larger baking pan, like a 9×13 inch sheet pan. Keep a close eye on the baking time, as it may need a few extra minutes. Check with the toothpick test to be sure.
How long do these brownies stay fresh?
Stored correctly in an airtight container at room temperature, they are at their best for 3-4 days. After that, they start to dry out. For longer storage, freeze them. They freeze exceptionally well and can be thawed quickly for an instant treat.
Can I use a different size pan?
Yes, but the baking time will change. A larger pan will result in thinner brownies that bake faster. A smaller, deeper pan will need more time. Regardless of the pan, always perform the toothpick test. Adjust your expectations for texture based on the pan depth.
Go Bake Some Bliss!
This Oreo Brownie Bliss recipe is my go-to for smiles. It’s simple, forgiving, and always a hit. The look on my friends’ faces when they bite into a crunchy Oreo chunk is priceless. I hope this recipe becomes your secret weapon for sweet moments too. Grab those Oreos, preheat your oven, and get ready for some serious bliss. Happy baking!
Oreo Brownie Bliss
Ingredients
Equipment
Method
- Preheat your oven to 180°C (160°C for fan ovens) and grease your 28x23 cm brownie pan well with butter.
- In a large bowl, whisk together the oil, brown sugar, and eggs until smooth and shiny.
- In a separate bowl, mix the cocoa, flour, and salt.
- Gently stir the dry ingredients into the wet mixture until no flour streaks remain.
- Roughly chop 14 Oreos and fold them into the batter.
- Pour the batter into the prepared pan and smooth the top.
- Chop the remaining 6 Oreos and scatter them over the surface.
- Bake for 25-30 minutes; a toothpick inserted should have a few moist crumbs.
- Let the brownies cool completely in the pan before cutting.