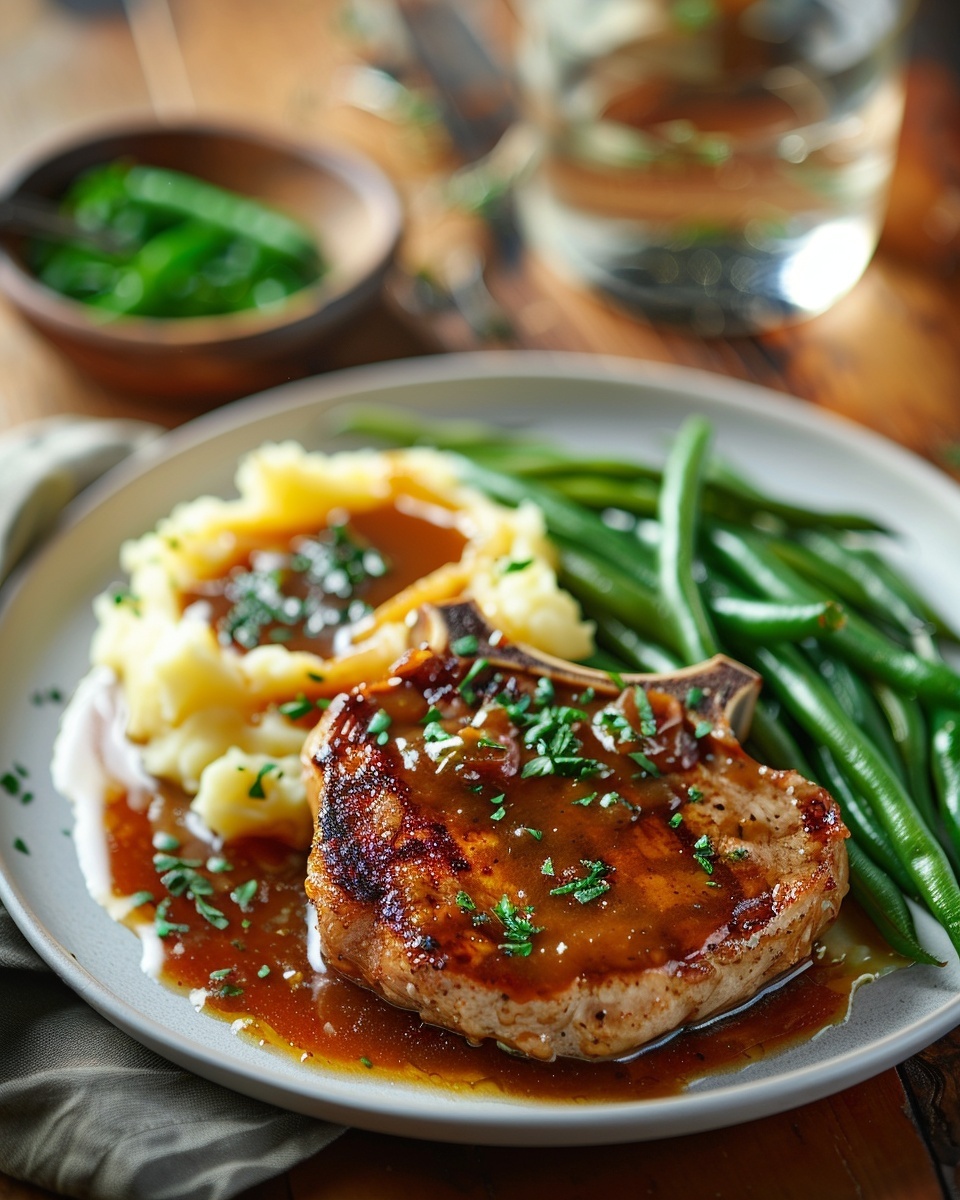
I still remember the first time my grandmother made pork chops with gravy on a chilly Sunday evening. The smell of sizzling pork filled the kitchen, and that rich, savory gravy she poured over everything made my mouth water. That meal turned into a family favorite we still make today. There’s something magical about tender pork chops swimming in silky gravy that just feels like home.
Pork chops with gravy isn’t fancy restaurant food. It’s the kind of dinner that brings everyone to the table without complaint. Whether you grew up eating smothered pork chops or you’re just discovering this comfort food classic, you’re in for a treat. This dish combines juicy pork with flavorful gravy to create a meal that satisfies every time.
In this article, I’ll walk you through everything you need to know about making perfect pork chops with gravy. We’ll cover the basics of choosing the right cut, explore different gravy options, and learn how to prepare pork chops that turn out tender and delicious. You’ll discover tips for selecting quality meat, essential tools you’ll need, and the best methods to get restaurant-quality results at home.
This beloved dish has earned its place on dinner tables across the country for good reason. It’s affordable, feeds a crowd, and uses simple ingredients most of us already have. Plus, you can customize it with different gravies and seasonings to match your family’s taste. Whether you prefer braised pork chops with gravy, fried pork chops gravy, or baked pork chops, the foundation stays the same.
Understanding the Basics of Pork Chops with Gravy
Let’s start with the basics. Pork chops with gravy is a simple concept: you cook seasoned pork chops and serve them with a flavorful sauce made from pan drippings, broth, and other ingredients. The gravy can be thin and light or thick and creamy, depending on your preference. The pork stays moist and tender because the gravy adds moisture while everything cooks together.
The beauty of this dish is its flexibility. You can make smothered pork chops and gravy on the stovetop, bake them in the oven, or even use a slow cooker. Each method creates slightly different results, but all deliver that comforting combination of meat and sauce.
When it comes to pork chops, you have options. Boneless pork chops cook faster and are easier to eat, making them great for weeknight dinners. They work perfectly for smothered boneless pork chops because they absorb flavors quickly. Bone-in pork chops take a bit longer to cook but often stay juicier and have more flavor. The bone helps conduct heat and adds richness to your gravy.
Most recipes call for center-cut chops, which come from the middle of the loin. These chops have a nice balance of meat and fat. You might also see rib chops, which have more marbling and stay extra moist during cooking. Shoulder chops cost less but contain more connective tissue, so they need longer cooking times to get tender.
Gravy options can transform your dish completely. Here are the most popular types:
- Pan gravy: Made from the drippings left in your skillet after cooking the pork. This creates the most flavorful option because it captures all those browned bits.
- Mushroom gravy: Perfect for pork chops and mushroom gravy lovers. Fresh or canned mushrooms add earthy richness.
- Cream of mushroom soup gravy: The quickest method. Smothered pork chops with cream of mushroom soup requires minimal effort but delivers maximum comfort.
- Brown gravy: A classic choice that pairs beautifully with pork’s mild flavor. Does brown gravy go on pork chops? Absolutely!
- Onion gravy: Caramelized onions create a sweet and savory sauce that’s hard to resist.
Choosing the right cut depends on your cooking method and time available. What cut of pork chop is best for gravy? For braising or slow cooking, go with thicker bone-in chops (about 1 to 1.5 inches thick). They won’t dry out during long cooking times. For pan-frying and quick stovetop methods, thinner boneless chops (around 3/4 inch) work better because they cook through before the outside gets tough.
If you plan to bake pork chops with gravy, medium-thick chops (about 1 inch) give you the best results. They cook evenly in the oven and stay tender when surrounded by sauce. The smothered pork chops pioneer woman style typically uses bone-in chops for maximum flavor.
Preparing the Perfect Pork Chops
Great pork chops with gravy start at the grocery store or butcher shop. Look for chops with a light pink color, not pale or gray. Fresh pork should smell clean, never sour or off. Check for good marbling – those thin white lines of fat running through the meat. This fat melts during cooking and keeps everything moist and flavorful.
The meat should feel firm to the touch, not mushy. If you’re buying packaged chops, check the sell-by date and avoid any packages with excess liquid. That liquid can mean the meat has been sitting too long or was previously frozen.
Thickness matters more than most people realize. Thin chops (under 1/2 inch) cook so fast they often turn out dry and tough. Super thick chops (over 1.5 inches) can brown nicely on the outside but stay raw in the middle. Aim for that sweet spot between 3/4 inch and 1.5 inches, depending on your cooking method.
Here’s what you’ll need to have ready before you start cooking:
- A heavy skillet or cast-iron pan (for stovetop methods)
- A baking dish (for oven methods)
- Tongs for flipping
- A meat thermometer (the best tool for perfect results every time)
- Measuring cups and spoons
- A whisk for making smooth gravy
For ingredients, keep these basics on hand:
- Salt and black pepper (the foundation of good seasoning)
- All-purpose flour (for dredging and thickening gravy)
- Oil or butter for cooking
- Broth (chicken or beef both work well)
- Garlic powder, onion powder, or fresh versions
- Optional: paprika, thyme, sage, or your favorite herbs
Preparing your pork chops properly makes a huge difference. Start by patting them dry with paper towels. Wet meat won’t brown properly, and good browning means better flavor in your pan gravy. If your chops have a thick layer of fat around the edge, trim it down to about 1/4 inch. Too much fat can make the gravy greasy, but a little fat adds flavor.
Season both sides generously with salt and pepper. I like to do this at least 15 minutes before cooking, which gives the salt time to penetrate the meat. Some people worry about salting too early, but for pork chops, this brief rest improves the texture and taste.
If you want extra flavor, dredge your chops in seasoned flour before cooking. Mix flour with salt, pepper, garlic powder, and paprika. Coat each chop lightly and shake off the excess. This creates a golden crust and helps thicken your gravy later when you make pork chops with pan gravy.
Marinating isn’t required for pork chops with gravy, but it can add another flavor dimension. A simple marinade of oil, soy sauce, garlic, and herbs works great. Even 30 minutes makes a difference, though overnight is better if you have time. Just remember to pat the chops dry before cooking so they brown instead of steam.
One trick I learned from my mom: let your pork chops sit at room temperature for about 20 minutes before cooking. Cold meat straight from the fridge cooks unevenly. The outside overcooks while the inside stays underdone. Room temperature chops cook more evenly and stay juicier.
How to make gravy for pork chops starts with how you cook the meat. Don’t crowd your pan – leave space between each chop. Crowding creates steam instead of that beautiful brown crust you want. That crust isn’t just for looks. Those browned bits stuck to the pan become the foundation of incredible gravy.


Cooking Methods for Pork Chops with Gravy
Now that your chops are prepped and ready, it’s time to choose your cooking method. Each technique delivers different textures and flavors, so I’ll walk you through the best approaches I’ve tested over the years.
Oven-Baked Pork Chops with Gravy
Baking is honestly my favorite method when I’m cooking for the family midweek. The oven does most of the work while I help with homework or throw together a salad. How to cook pork chops in the oven with gravy is surprisingly straightforward once you get the hang of it.
First, preheat your oven to 375°F. While it heats up, brown your seasoned pork chops in an oven-safe skillet with a bit of oil over medium-high heat. Give them about 3 minutes per side—you’re not cooking them through yet, just creating that golden crust. Remove the chops and set them aside on a plate.
In the same skillet (don’t wash it, those browned bits are liquid gold), add a tablespoon of butter. Toss in diced onions and cook until they soften, maybe 4 minutes. Sprinkle in 2 tablespoons of flour and stir constantly for about a minute. This creates what’s called a roux, which thickens your gravy beautifully. Slowly pour in 1.5 cups of chicken or beef broth while whisking. The mixture will bubble and thicken right before your eyes.
Nestle your browned chops back into the gravy, spooning some over the tops. Slide the whole skillet into the oven uncovered. How long does it take for pork chops to get tender in gravy? Generally speaking, bone-in chops need about 25-30 minutes, while boneless cuts finish in 20-25 minutes. Your meat thermometer should read 145°F when you pull them out.
Here’s something I learned the hard way: don’t skip the resting time after baking. Let those chops sit for 5 minutes before serving. The juices redistribute throughout the meat instead of running all over your cutting board. The gravy thickens up a bit more during this time too.
For extra flavor, I sometimes add fresh thyme sprigs or a splash of white wine to the gravy before baking. My neighbor swears by adding a teaspoon of Dijon mustard, which adds a subtle tang that cuts through the richness. If you’re wondering whether your preparation technique matches the precision needed for other proteins, you might find similarities in preparing tender filet mignon with sauce, where timing matters just as much.
Braised Pork Chops with Gravy
Braising turns tougher, cheaper cuts into fork-tender masterpieces. This method uses both dry and wet heat, starting with a good sear then finishing with gentle simmering in liquid. Braised pork chops with gravy might take longer than other methods, but the results are absolutely worth the wait.
Start the same way as baking—brown your chops well on both sides in a heavy pot or Dutch oven. Remove them, then build your braising liquid. I like to sauté chopped carrots, celery, and onions until they get some color. Add garlic and cook until fragrant, maybe 30 seconds. Pour in about 2 cups of broth, a cup of white wine if you have it (or just use more broth), and add herbs like rosemary and bay leaves.
Bring this mixture to a simmer, then return your pork chops to the pot. The liquid should come about halfway up the sides of the chops, not cover them completely. Cover the pot with a tight-fitting lid and reduce the heat to low. Let everything bubble gently on the stovetop for 45 minutes to an hour for bone-in chops, or about 30-40 minutes for boneless.
The magic of braising happens during this slow cooking. The connective tissues in the meat break down, the flavors meld together, and you end up with incredibly tender pork swimming in rich gravy. By the way, this method works brilliantly for shoulder chops that might turn out tough with faster cooking methods.
When the chops are tender, remove them to a serving platter and keep them warm. Strain the braising liquid if you want a smooth gravy, or leave the vegetables in for a more rustic presentation. If the gravy seems thin, simmer it uncovered for a few minutes to concentrate the flavors. For a thicker consistency, whisk together a tablespoon of flour with two tablespoons of cold water, then stir it into the simmering liquid.
Fried Pork Chops with Gravy
Nothing beats the crispy, golden crust of pan-fried pork chops. This is Sunday dinner territory in my house. Fried pork chops gravy combines that satisfying crunch with velvety sauce for a contrast that keeps you coming back for more.
The key to success here is temperature control and not rushing things. Heat about a quarter inch of oil in a large skillet over medium heat—not medium-high, just medium. You want the oil hot enough to sizzle when you add the meat, around 325-350°F if you’re checking with a thermometer.
Dredge your pork chops in seasoned flour, making sure both sides are well coated. Shake off the excess, then carefully lay each chop in the hot oil. Don’t crowd the pan or the temperature drops and you’ll end up steaming instead of frying. Cook for about 4-5 minutes per side for thinner chops, 6-7 minutes for thicker ones. You’re looking for that beautiful mahogany brown color.
When they’re done, transfer the chops to a wire rack set over a baking sheet. This keeps the bottom from getting soggy while you make the gravy. Pour off most of the oil, leaving about 2 tablespoons plus all those crispy brown bits in the pan. Add 3 tablespoons of flour and whisk constantly over medium heat for about 2 minutes. The mixture should turn a light golden color.
Gradually whisk in 2 cups of milk or a combination of milk and broth. Keep whisking to prevent lumps. The gravy will thicken as it comes to a simmer. Season with salt, lots of black pepper, and maybe a pinch of cayenne if you like a little heat. Pork chops with pan gravy made this way captures all the flavor from frying, creating something truly special.
Funny enough, this technique shares similarities with making crispy chicken tenders, where maintaining oil temperature is equally crucial for that perfect crunch.
Smothered Pork Chops with Gravy
Smothering is a cooking technique I first encountered at a friend’s house in Louisiana. The basic idea involves covering the meat completely with gravy or sauce and cooking everything together until the flavors marry. Smothered pork chops and gravy creates a dish where you can’t tell where the meat ends and the sauce begins—in the best possible way.
For classic smothered chops, brown your seasoned meat in a skillet, then remove it. In the same pan, cook sliced onions until they’re deeply caramelized and almost melting, which takes a good 10-15 minutes. Don’t rush this part. Those sweet, golden onions form the flavor foundation of your gravy. Add minced garlic, then sprinkle flour over everything and stir for a minute.
Pour in your broth slowly while stirring, scraping up all the brown bits from the bottom. Return the pork chops to the pan and spoon gravy over them generously. Reduce the heat to low, cover the pan, and let everything simmer together for 20-30 minutes. The chops finish cooking while absorbing all those oniony, savory flavors.
If you want an even quicker version, try smothered pork chops with cream of mushroom soup. After browning your chops, remove them and add sliced mushrooms to the pan with some butter. Cook until the mushrooms release their liquid and start to brown. Stir in a can of cream of mushroom soup, a half cup of milk or broth, and seasonings. Return the chops to the pan, cover, and simmer for 20 minutes. It’s weeknight-friendly comfort food that tastes like you spent hours cooking.
The smothered pork chops pioneer woman style typically includes lots of onions, sometimes bell peppers, and a generous amount of gravy that practically becomes part of the meat. Ree Drummond’s approach emphasizes building flavor layers—browning the meat well, caramelizing the vegetables, and simmering everything long enough for the flavors to develop fully. The method reminds me a bit of how you’d approach tender baked chicken thighs, where patience during cooking pays off with incredible results.
For smothered boneless pork chops, reduce your cooking time slightly since boneless cuts cook faster than bone-in. Check them after 15-20 minutes of simmering to avoid overcooking. The beauty of smothering is that the constant contact with liquid keeps the meat from drying out, even if you accidentally cook it a few minutes too long.
You can customize your smothering liquid endlessly. Some people add a touch of honey for sweetness, others include hot sauce for heat, and I’ve even seen recipes with mustard or Worcestershire sauce for extra depth. The technique stays the same regardless of what flavors you add.


Making the Perfect Gravy for Your Pork Chops
Here’s the thing—pork chops are great, but it’s really the gravy that turns a good meal into something memorable. I’ve made countless batches over the years, and honestly, gravy-making is where you can let your personality shine. Some people like theirs thick enough to stand a spoon in, while others prefer a thinner, more delicate sauce. There’s no wrong answer, just different approaches.
Classic Pan Gravy
Pan gravy is where I always start when teaching someone to cook. It’s the foundation that, once mastered, opens up so many other possibilities. The beauty of pork chops with pan gravy is that you’re using what’s already in your pan, so nothing goes to waste and the flavor is unmatched.
After you’ve cooked your pork chops and removed them from the skillet, take a look at what’s left behind. Those brown, crusty bits stuck to the bottom? That’s called fond, and it’s pure flavor concentrate. Don’t you dare wash that pan yet.
Here’s what you’ll need for classic pan gravy:
- 2-3 tablespoons of fat (from cooking the pork, or add butter if needed)
- 3 tablespoons all-purpose flour
- 2 cups of liquid (chicken broth, beef broth, or even milk)
- Salt and black pepper to taste
- Optional: a splash of white wine, soy sauce, or Worcestershire sauce
Keep your skillet over medium heat and make sure you have enough fat in the pan—about 2-3 tablespoons. If your pork chops didn’t leave much behind, add a tablespoon or two of butter. Once it’s melted and bubbling, sprinkle in the flour. Use a whisk or wooden spoon to stir constantly, making sure you scrape up all those flavorful brown bits.
Cook this flour-fat mixture (the roux) for about 2 minutes, stirring the whole time. You’ll notice it starts to smell nutty and turns a light golden color. This step is crucial—it cooks out the raw flour taste that would otherwise make your gravy taste pasty. My aunt used to skip this step to save time, and we could always tell the difference.
Now comes the fun part. Slowly pour in your liquid while whisking continuously. Start with just a splash, whisk it smooth, then gradually add the rest. The mixture will bubble up dramatically when the cold liquid hits the hot roux. Keep whisking to prevent lumps from forming. As it comes to a simmer, you’ll see it thicken right before your eyes.
Let the gravy simmer gently for 3-5 minutes, which gives the flour time to fully hydrate and the flavors to meld. Taste it and season with salt and plenty of freshly ground black pepper. If it’s too thick, whisk in a bit more broth. Too thin? Let it simmer a few minutes longer, or whisk together a teaspoon of flour with two teaspoons of cold water and stir that slurry in.
One trick I picked up from a diner cook: if your gravy gets lumpy despite your best efforts, pour it through a fine-mesh strainer into a clean pan. Problem solved, and nobody needs to know it wasn’t perfect the first time.
For extra depth, I sometimes add a teaspoon of Dijon mustard or a tablespoon of heavy cream at the end. Fresh herbs like thyme or sage, finely chopped and stirred in just before serving, add a restaurant-quality touch. By the way, understanding how to balance flavors when you’re learning how to make gravy for pork chops helps with so many other dishes too—it’s a skill that keeps giving.
Mushroom Gravy
Mushroom gravy holds a special place in my heart because it was the first variation I successfully made on my own as a teenager. Pork chops and mushroom gravy is a combination that just works, with the earthy mushrooms complementing the mild pork beautifully.
Start by cooking your pork chops as usual, then set them aside. In the same pan, melt 2 tablespoons of butter over medium heat. Add 8 ounces of sliced mushrooms—I usually go with baby bellas because they have more flavor than white button mushrooms, but honestly, any variety works. Don’t stir them constantly; let them sit for a minute or two at a time so they can brown instead of just steaming.
Once the mushrooms have released their liquid and started to get golden edges (about 6-8 minutes), add a couple of minced garlic cloves and cook for another 30 seconds. The kitchen will smell absolutely amazing at this point. Sprinkle 3 tablespoons of flour over the mushrooms and stir everything together, coating the mushrooms completely.
Pour in 2 cups of beef broth gradually while stirring. The mushrooms will darken the gravy naturally, giving it a rich, deep color. Add a splash of dry sherry or white wine if you have it—it’s not required, but it does add a subtle complexity that makes people ask, “What’s in this?” in the best way possible.
Let the gravy simmer for about 5 minutes until it thickens. Stir in a quarter cup of heavy cream or sour cream for extra richness. The cream isn’t absolutely necessary, but it transforms the gravy from good to spectacular. Season with salt, pepper, and maybe a pinch of dried thyme.
Here are some variations I’ve tried that worked wonderfully:
- Mix in caramelized onions with the mushrooms for added sweetness
- Add a tablespoon of tomato paste for deeper umami flavor
- Use a combination of mushroom types—shiitake, oyster, and cremini together create incredible depth
- Stir in fresh parsley or chives right before serving for brightness
- A dash of truffle oil at the end makes it fancy enough for company
Funny enough, my pickiest kid who claims to hate mushrooms will eat this gravy without complaint. I think the mushrooms break down enough during cooking that the texture doesn’t bother him, and the flavor is just too good to resist.
The smothered pork chops with cream of mushroom soup approach I mentioned earlier is basically a shortcut to this same flavor profile, using condensed soup instead of making gravy from scratch. Both methods have their place—one for busy weeknights, one for when you have a few extra minutes to create something special.
Brown Gravy
Does brown gravy go on pork chops? Absolutely, and it’s actually one of the most traditional pairings. Brown gravy has a deep, savory quality that stands up to pork’s rich flavor without overwhelming it. This is the gravy my grandpa always requested, and I still make it his way.
You can make brown gravy from scratch using the same pan gravy technique, but with a darker roux. Instead of cooking the flour and fat mixture for just 2 minutes, you let it cook for 4-5 minutes, stirring constantly, until it turns a rich brown color similar to peanut butter. This extended cooking gives the gravy a deeper, more complex flavor with slightly nutty undertones.
Here’s my go-to brown gravy recipe:
In your skillet with the pork drippings, add 3 tablespoons of butter if needed to have enough fat. Whisk in 3 tablespoons of flour and cook over medium heat, stirring constantly, until the mixture turns golden brown—about 4-5 minutes. Watch it carefully during the last minute because it can go from perfect to burnt quickly.
Gradually whisk in 2 cups of beef broth. Beef broth creates a richer, darker gravy than chicken broth, which is what you want here. Add a tablespoon of soy sauce and a teaspoon of Worcestershire sauce for extra depth. These ingredients add umami and help darken the color naturally.
Bring the mixture to a simmer and let it cook for about 5 minutes, whisking occasionally. The gravy should coat the back of a spoon when it’s ready. Season with salt and lots of black pepper. Some folks add a tiny pinch of sugar to balance the savory flavors, which sounds weird but actually works.
For an even smoother, more refined brown gravy, try this restaurant trick: after the gravy thickens, remove it from heat and whisk in a tablespoon of cold butter. This technique, called mounting with butter, gives the sauce a glossy sheen and silky texture that looks professional.
One thing I’ve learned about brown gravy is that it pairs especially well with bone-in pork chops because the meat itself has more robust flavor. The combination creates a hearty, old-fashioned meal that reminds me of Sunday dinners at my grandmother’s house. When I’m looking for inspiration beyond pork, I often browse through other meat and poultry preparations that use similar gravy techniques.
If you’re watching what goes into your food, it’s worth noting that checking nutrient labeling on packaged broths and stocks can help you choose options lower in sodium, which gives you better control over your gravy’s final seasoning. I started doing this after realizing some broths are so salty that my gravy needed almost no additional salt, while others required quite a bit more.
You can make brown gravy ahead of time and reheat it gently, whisking in a splash of broth if it’s too thick after refrigeration. It keeps in the fridge for about 3-4 days, or you can freeze it for up to 3 months. Just thaw it overnight in the refrigerator and reheat slowly on the stovetop, whisking frequently.
The versatility of brown gravy extends beyond pork chops too. I use the same basic recipe for meatloaf, roast beef, mashed potatoes, and even biscuits. Once you’ve got this technique down, you’ll find yourself making it all the time because it transforms simple ingredients into something comforting and delicious.
Making any of these gravies might seem intimidating at first, but I promise it gets easier each time you do it. The first few batches might not turn out perfect—mine certainly didn’t. But even imperfect gravy usually tastes pretty good, and you learn something from each attempt. Before long, you’ll be adjusting seasonings by taste, thickening by eye, and creating variations based on what you have in the pantry. That’s when cooking shifts from following recipes to actually cooking, and it’s one of the most satisfying feelings in the kitchen.
Whether you stick with classic pan gravy, venture into mushroom territory, or embrace the heartiness of brown gravy, you’re now equipped to make pork chops with gravy that’ll have everyone asking for seconds. The techniques are simple, the ingredients are affordable, and the results are consistently delicious—exactly what weeknight cooking should be.
FAQ
How to cook pork chops in the oven with gravy?
Preheat your oven to 375°F and brown seasoned pork chops in an oven-safe skillet for about 3 minutes per side. Remove the chops, then make gravy in the same pan by creating a roux with butter and flour, then adding broth. Return the chops to the skillet, nestle them in the gravy, and bake uncovered for 20-30 minutes depending on thickness. The chops are done when they reach an internal temperature of 145°F. Let them rest for 5 minutes before serving to keep them juicy.
How long does it take for pork chops to get tender in gravy?
Boneless pork chops typically become tender in gravy after 20-25 minutes of cooking, while bone-in chops need about 25-35 minutes. If you’re braising on the stovetop at a gentle simmer, add another 10-15 minutes to these times. Thicker chops naturally take longer than thin ones. The gravy keeps everything moist, so you have a bit more wiggle room than with dry cooking methods. Always use a meat thermometer to check for 145°F internal temperature rather than relying solely on time.
Does brown gravy go on pork chops?
Yes, brown gravy is actually a classic pairing with pork chops that’s been popular for generations. The rich, savory flavor of brown gravy complements pork’s mild taste without overpowering it. You can make brown gravy from scratch using the drippings from your pork chops, or use a quality store-bought version in a pinch. It works especially well with bone-in chops because their more robust flavor stands up nicely to the deeper gravy. Many traditional American diners and home cooks consider brown gravy the standard choice for pork chops.
What cut of pork chop is best for gravy?
Center-cut bone-in pork chops between 1 and 1.5 inches thick are ideal for most gravy preparations because they stay moist during cooking and have excellent flavor. For quick stovetop methods, boneless chops around 3/4 inch thick work better since they cook through faster. If you’re braising or slow-cooking, shoulder chops are actually a great budget option despite being tougher, as the long cooking time in gravy breaks down their connective tissue. Rib chops with extra marbling are perfect when you want especially juicy results.
Can I use milk instead of broth in pork chop gravy?
Absolutely, milk creates a creamy, country-style gravy that many people prefer. It works especially well after frying pork chops, giving you that classic Southern-style gravy. Use whole milk for the richest result, though 2% works fine too. You can also do half milk and half broth for a middle ground that has both creaminess and savory depth. Just keep in mind that milk-based gravies are a bit more delicate and can separate if you boil them too hard, so keep the heat gentle once your gravy comes together.
How do I fix lumpy gravy?
If you catch lumps forming while you’re making gravy, whisk vigorously and the small ones will often break up. For stubborn lumps, pour the gravy through a fine-mesh strainer into a clean pan and continue cooking. Prevention is easier than fixing though—always add liquid gradually to your roux while whisking constantly, and make sure your roux is smooth before adding liquid. Using a whisk instead of a spoon makes a huge difference. If all else fails, an immersion blender can smooth out lumpy gravy in seconds.
Can I make pork chop gravy ahead of time?
Yes, gravy actually develops even better flavor after sitting for a few hours or overnight. Make your gravy, let it cool completely, then store it in an airtight container in the refrigerator for up to 4 days. It’ll thicken considerably when cold, so when reheating, add a splash of broth or milk and whisk frequently over medium-low heat. You can also freeze gravy for up to 3 months, though cream-based gravies sometimes separate a bit after freezing—just whisk them well while reheating and they’ll come back together.
What’s the best way to reheat pork chops with gravy?
The oven method preserves moisture best—place chops and gravy in a covered baking dish and reheat at 325°F for about 15-20 minutes until warmed through. You can also reheat on the stovetop in a covered skillet over medium-low heat, adding a splash of broth if the gravy seems too thick. The microwave works in a pinch; use 50% power and heat in 1-minute intervals, checking between each. Whichever method you choose, make sure there’s plenty of gravy covering the chops so they don’t dry out during reheating.
Why are my pork chops tough even with gravy?
The most common reason is overcooking—pork becomes tough and dry when cooked past 145°F internal temperature. Thin chops are especially prone to overcooking because they go from perfect to overdone in just a minute or two. Another issue might be not letting the chops rest after cooking; cutting into them immediately causes the juices to run out. Finally, if you’re using very lean chops without much marbling, they’ll naturally be less tender regardless of cooking method. Try thicker chops or ones with a bit more fat for better results.
Can I make this recipe in a slow cooker?
Definitely, slow cookers make wonderfully tender smothered pork chops with minimal effort. Brown your chops first in a skillet for better flavor and color, though you can skip this step if you’re short on time. Place them in the slow cooker with your gravy ingredients—I usually do sliced onions, broth, seasonings, and a can of cream of mushroom soup for easy weeknight meals. Cook on low for 4-6 hours or high for 2-3 hours. The extended cooking time makes even budget cuts incredibly tender, and you come home to dinner ready to serve.
With these techniques in your back pocket, you’re ready to create pork chops with gravy that’ll become a regular request at your dinner table. Don’t be afraid to experiment with different gravy styles and seasonings until you find your family’s favorite version—that’s how cooking traditions start, one delicious dinner at a time.
Pork Chops with Gravy
Ingredients
Equipment
Method
- Pat the pork chops dry with paper towels and season both sides with salt and pepper.
- Dredge the chops in seasoned flour and shake off the excess.
- Heat oil or butter in a heavy skillet over medium-high heat.
- Brown the pork chops for about 3 minutes on each side, creating a golden crust.
- Remove the chops and set aside on a plate.
- In the same skillet, add butter and diced onions, cooking until softened (about 4 minutes).
- Sprinkle in flour, stirring constantly for about 1 minute to form a roux.
- Gradually pour in the broth while whisking to combine, allowing the mixture to bubble and thicken.
- Return the pork chops to the skillet, spooning gravy over the tops.
- Transfer the skillet to a preheated oven at 375°F and bake uncovered for 20-30 minutes (depending on thickness).
- Let the chops rest for 5 minutes before serving to allow juices to redistribute.